To avoid these ads, REGISTER NOW!

Gambrel Shed - Truss support

kszach

Active member
Joined
Feb 11, 2006
Messages
40
Location
Richfield, WI
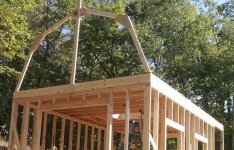
OK... I've been framing my 12x16 gambrel shed. I will have a loft area that hangs over the shed to form a porch. I framed up the loft floor with 2x8s spanning the 12' width. I put 5/8 floor sheathing down. I started to build the Gambrel trusses. Set the first (temporarily) to get a sense of acomplishment for the day.


I'm struggling with how to support those trusses at the end. Do I cut into the floor so that I can put a plywood gusset from the 2x8 to the truss (constructed of 2x4s)? Do I pop a hole 1 1/4" in the floor and put a simpson strong tie strap down to the 2x8? Do I just toenail the truss into the 5/8 flooring? Maybe some sort of strapping along the truss top to the outside of the wall? I had also thought of putting 2x4s in between the truss ends, nailing them down to the blocking in between the 2x8's.. not sure if I have a lot of room in there before I hit the top edge of the truss.
 

Attachments

  • IMG_20150914_155543903.jpg
    IMG_20150914_155543903.jpg
    155.7 KB · Views: 84
Last edited:
To avoid these ads, REGISTER NOW!

matt_i

Well-known member
Joined
Mar 14, 2008
Messages
10,727
Location
SE Michigan
Personally, I would not have finish-decked the top before finishing the truss ends. Couple loose sheets for walk-boards, great, but now you have to get back inside of there. Also, personally, I would want plywood gusset "plates" on both sides so a 2x4 is inline with a 2x8. Eventually if you want to finish it out you will have to notch the decking for every truss and probably put some blocking to capture the "tails" of the plywood.

Toenail I would consider a non-starter, its a collapse waiting to happen as soon as you load the roof with decking, shingles, and you.
 
OP
K

kszach

Active member
Joined
Feb 11, 2006
Messages
40
Location
Richfield, WI
Here is what I'm thinking now... OK 2 options

1. Snap a line on the decking at a level that will give me a good thickness for a plywood gusset (6-8"). Set saw depth to just over the decking thickness and cut that outside part off. The good thing is the decking is only screwed down, a few screws on the outside edge and I'm back in business. Trusses get gussets down to the ceiling joists, both sides PL and ring shank nails. The thing that I'm not crazy about here is this leaves a big gap in the attic area where stuff could fall down.

2. Cut notches (2-3" wide and 8" deep) in the decking around the truss tails that will give me room to sneak a plywood gusset down to the ceiling joist and allow me to put the truss directly on top of the ceiling joist. This will give me an enclosed attic but will be more work and I'll have to go down below the attic floor to secure the bottom of the gusset to the ceiling joist.
 

CNGsaves

Well-known member
Joined
Sep 26, 2012
Messages
13,233
Location
KS and OK
OP . . . .not sure what's up with your Google drive storage of the PIC. I could see it yesterday, but today it's . . . . . 502 Error
(see below).

Put your PIC's directly on GJ with:
. . . . Edit 1st post, Go Advanced, Manage Attachments, Browse, find your pics on harddrive and link up to 7 per post, Upload, Close This Window, Save Changes

From what I remember of pic, you have no overhang at all on outside edge. What do you mean by "truss tails" as I didn't see any ?? :dunno:
 

Attachments

  • Kszach_Google502error_no shed pic.JPG
    Kszach_Google502error_no shed pic.JPG
    22.2 KB · Views: 22

theoldwizard1

Well-known member
Joined
Feb 22, 2011
Messages
43,156
Location
SE MI
A bit trickier, but easier in the long run

Permalinks for Google Drive Images

You will also notice that image is HUGE ! I usually us Paint and shrink them 50-66%. You could ave cropped that picture down a lot.

uc


Cropped and resized to 33% of original
 

Attachments

  • IMG_20150914_155543903.jpg
    IMG_20150914_155543903.jpg
    102 KB · Views: 29
Last edited:

theoldwizard1

Well-known member
Joined
Feb 22, 2011
Messages
43,156
Location
SE MI
Now that you are in this situation, I would just use 3/4-1" longer nails/screws so that when you toe nail the frame it is going to bite into the top plate.

It won't help that much, but you could add a 3rd top plate over the decking, but precisely to the space between the frames and with the top outside corner knock off at the same angle as the frame. Toe nail back through this plate and the frame.

Why do you have that header running the full length of the side ?
 
To avoid these ads, REGISTER NOW!
OP
K

kszach

Active member
Joined
Feb 11, 2006
Messages
40
Location
Richfield, WI
No header running the full length (long dimension), I have blocking in between the ceiling joists... I think that is what you see?
The shorter dimension is 2x8 ceiling joists which is what the decking is screwed to.

Hmmm... you got me thinking. What if I nail a 3rd top plate then toenail the truss into it and use a simpson hurricane clip or do those require a double top plate?
 

matt_i

Well-known member
Joined
Mar 14, 2008
Messages
10,727
Location
SE Michigan
Again, if you think about the loads, the entire weight of everything on the roof wants to blow out the near-vertical sidewall right at the connection you are proposing to toenail. (!!!!)

In other words, its basically 2 of the most critical areas in a truss and you are proposing to use a toenail joint.

I'm being blunt but that's to make sure your structure doesn't collapse on itself, possibly with you on it hanging shingles on the roof deck.

Again my admonition is to use plywood gusset plates to make sure the frame members are properly connected. You can probably use a super sawzall and cut some slots for the 2x4 to pass, plus an additional slot for the plywood gussets. You should have clearance from underneath to drive nails or screws.
 
OP
K

kszach

Active member
Joined
Feb 11, 2006
Messages
40
Location
Richfield, WI
Thanks matt_i for bringing me back to my senses.

This is exactly what I'm thinking for option #2 which is the direction that I'm leaning. I had not thought of using the Sawzall but I may give it a try... I was figuring on setting the circular saw depth to just over the decking thickness.
 

Homerr

Well-known member
Joined
Mar 16, 2012
Messages
379
Location
Seattle, WA
Talk to an engineer.

Snow loading in your area?

Have plans before you start?

This design lacks the basics. Not trying to be harsh, but get the rest figured out before you continue. Don't make it worse by improvising.
 
OP
K

kszach

Active member
Joined
Feb 11, 2006
Messages
40
Location
Richfield, WI
Actually, this is directly from plans... they call for toenailing which I was not crazy about. I built a smaller version of this at a previous house and followed the plans to a tee including toenailing the truss to the top plate. It is still holding together but this one is bigger and will be used for much more.
 
To avoid these ads, REGISTER NOW!
Top Bottom