To avoid these ads, REGISTER NOW!

Garage attic storage done right...

someguy11

Well-known member
Joined
Apr 19, 2015
Messages
208
Hi.

I have a 22x31 garage. It has a 5:12 roof and 9' 2x4 24" OC walls.

Last fall, after much research, including reading many posts on this site, I built up the attic so that it could be used for storage. By "built up", I mean that I reinforced the existing structure so that the attic could handle a significant load without sagging or falling down. I did this without tearing down the existing roof.

For those that aren't aware, the typical 2x4 horizontal ceiling member (chord) on a prefabbed roof truss is not designed for significant loads. Its designed to be loaded in tension, to keep the walls from pushing apart and to attach some of the webs, but that is about it.

I wanted to store a significant amount of stuff in the attic of my garage. Not an engine, but a decent sized air compressor, the lawn mower in the winter, dirt bike parts, fluids, etc.

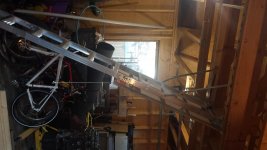
Long story short, I bought 11 22' 1 3/4" x 9.5" LVLs. I then taper (scarf) cut each end of the LVL so that it sat under the roof but on top of the top plate on the wall. We then screwed each LVL to the bottom cord of the roof truss. We then sheeted out the floor in the attic with 3/4" OSB, leaving all the truss webs in place.

It turned out way better than I expected. The roof trusses in my garage have a space about 6 feet wide between the webs in the middle, which creates a nice open space for moving things around. I ended up with nearly 5 feet of clear ceiling height at the center of the roof. Its less as you go toward the sides, of course, but its still pretty good. I've been in a lot worse garden sheds !

22 foot LVLs are not light. A friend and I put them in place by hand. It took about 3 days to put the LVLs in place, mostly because we had to move and work around the stuff in the garage, but also figure things out on the go and unwire the entire garage because all the wire was run on the trusses. One also had to work around the garage door openers. Not a small job, but a very satisfying one.

The key to putting the LVLs in place was to cut them to precisely the right length and with the right scarf prior to placing them. To place them, one guy stood on a high quality step ladder and the other guy lifted one end of the LVL up to him. He put it on his shoulder and then slide it on its side into the space between the top place and the underside of the roof. We then chained the LVL to the roof truss it was going to be placed against, so there was no chance of it falling.

The team then moved to the opposite wall and repeated the procedure. There was *just* enough room to get the other end past the wall and onto the top plate, which the LVL lying on its side. Once in place, we then stood it up and screwed it to the chord of the roof truss.

The screwing took the most time. We screwed everything on 24" spacing. Screws drive really hard into LVLs. Hint: use #8 3" deck screws, not #10. #8s drive way easier.

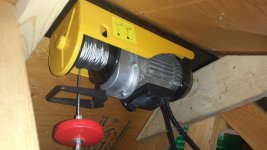
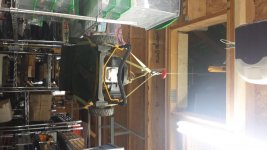
We also hung a really nice ladder and created a 36 x 36" hatch where I can winch things up into the attic.

The new floor is super stable. No flexing anywhere.

I spent a lot of time using online span calculators trying to find a structural wood beam to fit my purpose. The problem arose that I couldn't get structural wood in pieces longer than 16 feet for a reasonable cost. And I was strongly advised against making a joint in the beams.

I called my local LVL supplier and had their engineering guy run some numbers for me. An 1 3/4" x 9.5" LVL on 24" OC, same as my roof trusses is good for 25 PSF distributed dead load. They need to have at least 1.75" bearing on the top plate. My scarf end cuts were OK, but you need to check this on a case by case basis.

My attic storage area is 20 x 20 = 400 ft^2. 400ft^2 x 25 PSF = 10,000 pounds. I'm not sure if the walls and the headers over the garage doors are up to that much. I'll never store that much weight up there, but its nice to know my floor is up to holding it.

The LVLs cost about $3.80 per lineal foot. 11 x 22' x $3.80 = $1000. Plus screws, plus 3/4" OSB subfloor. Plus the ladder, plus the hoist. Not an inexpensive project, but boy did it free up space in my garage !

I have pictures if anyone needs to see them.
 
Last edited:
To avoid these ads, REGISTER NOW!
OP
S

someguy11

Well-known member
Joined
Apr 19, 2015
Messages
208
A couple more things... an engineered floor joist would have worked too, but a) they can't be scarf cut and b) they need to be deeper to hold the same load. LVLs are a bit more expensive, but they work for the application.

Many people have put loads up in their attic without reinforcing the bottom chords. They get away with it because the truss webs transfer the load to the roof members. Which is fine until a big snow comes along and loads the roof and then it fails.

I hope all this helps someone. It took me a long time to get this figured out. Most engineers I talked to didn't have any practical ideas and didn't want anything to do with the project.
 

920kip

Well-known member
Joined
Aug 11, 2011
Messages
168
Location
Titletown USA
Great write up. I have the same size garage. I keep some kid's toys and x-mas stuff up in my attic. But would consider doing what you have done with a dormer installed also. If I ever need more space.
Thanks for the info.
 
OP
S

someguy11

Well-known member
Joined
Apr 19, 2015
Messages
208
I'm glad you liked the write up. I've been meaning to write it up ever since I did it last fall. There are tons of threads on this topic, with very few solutions. I thought I would share mine.
 

xyster101

Well-known member
Joined
Jul 3, 2013
Messages
640
Location
Upstate NY
I want to see pictures. You will love the storage space! I did the same thing as you but with rafters. I used engineered joists that were 24' long and 14" tall, 1' on center ("I" beams). I can park my ATV and the old 1,000 lb zero turn mower up there along with anything else I need. My 24'x46' garage is recessed into a hill so this ramp reaches the second floor easy.


There is 6'6" head room to the collar ties, I'm 6'4".


bczygan

Well-known member
Joined
Nov 4, 2009
Messages
22,002
Location
DETROIT! Arsenal of Scrappers
A couple of notes.

You mention it was designed for a 30PSF Dead Load. Dead Load refers to the weight of the structure, not the stored items. The spec for the beams should include the live and dead loads. And LVL's come in different strengths. Also part of the specification is the deflection limit. All beams "sag", or more properly deflect. The design sets the limit for this to a fraction of the span, such as L/240, L/360 or L/480. This also defines how springy the floor system feels, which is important for longer spans. It also is set, to account for whether a finished drywall or plaster ceiling is to be installed. L240 is OK for an open ceiling or other than plaster or drywall.

Also important is the decking material, especially with larger than 16" spans.

Fastening the LVL's to the existing truss bottom chords helps them resist side loads and creates a composite structural member.

Even with a seeming large total load capability, attention should still be paid to point loads from heavy objects. Placing heavy loads away from the center of spans helps.

Do you know the live and dead loads, Fb of the LVL and actual weight of the structural elements?
 
Last edited:
To avoid these ads, REGISTER NOW!

theoldwizard1

Well-known member
Joined
Feb 22, 2011
Messages
43,114
Location
SE MI
Assuming the bottom chord rested on top of a double top plate (typical) ...

I wonder if you just ran a 2x6 under each bottom chord and attached it to the wall at each end with joist hangers, would you achieve a similar load rating. The bottom chord could be attached to this new "joist" with pocket screws or joing plates ?
 
OP
S

someguy11

Well-known member
Joined
Apr 19, 2015
Messages
208
A couple of notes.

You mention it was designed for a 30PSF Dead Load. Dead Load refers to the weight of the structure, not the stored items.

Dead load can be anything, including furniture that doesn't move and snow. The main determinant is that its static, not dynamic.

The spec for the beams should include the live and dead loads. And LVL's come in different strengths.
Yes they do. Which is why I didn't mention the brand name. Mine were 2.0E strength.

Also part of the specification is the deflection limit. All beams "sag", or more properly deflect. The design sets the limit for this to a fraction of the span, such as L/240, L/360 or L/480. This also defines how springy the floor system feels, which is important for longer spans. It also is set, to account for whether a finished drywall or plaster ceiling is to be installed. L240 is OK for an open ceiling or other than plaster or drywall.

Actually, the criteria that had to be passed on the design were

- Member reaction (how much weight gets put on the end of the beam, where it sits on the plate.)
- Shear
- Moment
- Live Load Deflection
- Dead Load Deflection

At 25 psf, my ceiling would have a deflection of L/263, which is 0.981" of sag.

The engineer actually messed up the calcs a bit. I told him the building was 22 x 31 and he used a clear span of 22'. Its actually closer to 21' 5".

I'd include the actual engineering report but it has the brand and the engineer and supplier on it and I don't want them to be liable for anything, because this stuff needs to be figured out on a case by case basis. The good part about all this is that you should be able to go to any LVL supplier and work with their engineer, probably free of charge, to figure out what you need.

Also important is the decking material, especially with larger than 16" spans.
Which is why I went with 3/4" OSB subfloor plywood. The engineer recommended 5/8".

And while we are at it, if you spec an TIJ engineered I beam, when they do the calcs they consider the flooring material as adding strength to the beam. (Increasing its moment capacity.) With LVLs, they aren't usually used under a floor, so the flooring factor isn't added it. Screwing 3/4" of OSB to the top of the LVL makes the system even stronger. As does screwing the bottom chord of the rafter to bottom side of the LVL. When done, this is a very strong system.

Fastening the LVL's to the existing truss bottom chords helps them resist side loads and creates a composite structural member.
Yes. It dramatically adds to the moment capacity, especially because its at the bottom, where the beam is in tension. However, according to building code you can't factor that strength in because its not a glued joint. I thought about gluing the cord to the LVL, but it takes special non creeping glue to do so, it was expensive and it was a pain.

Actually, I thought about building an entire floor joist by making a TIJ engineered truss, using the bottom roof truss chord as one of the flanges. It is possible to do it, but I couldn't find an engineer that would design and stamp it and I didn't want trouble with building inspectors down the road.

Like I said, I spent a lot of time working this setup out.

Do you know the live and dead loads, Fb of the LVL and actual weight of the structural elements?
My LVL calcs are for over and above the weight of the LVL itself. I'll leave you look up numbers for whatever elements you chose to use. FWIW, 3/4" OSB sub floor is about 2 psf, but screwing it to the top of the LVL adds more strength than what it weighs in the first place.
 
Last edited:
OP
S

someguy11

Well-known member
Joined
Apr 19, 2015
Messages
208
Here are some pictures.

I have a few more, but they are on another camera. Not sure how good they are either, because we had all the lighting disconnected when we did this project.

Note the blocking between the beams. The beams need to be blocked on each end and in the middle so that they don't fall over.
 

Attachments

  • 20141217_152107.jpg
    20141217_152107.jpg
    140.7 KB · Views: 252
  • 20141217_152118.jpg
    20141217_152118.jpg
    139.1 KB · Views: 215
  • 20141217_152124.jpg
    20141217_152124.jpg
    139.1 KB · Views: 220
  • IMG_20150327_111327.jpg
    IMG_20150327_111327.jpg
    142.8 KB · Views: 216
  • IMG_20150327_111400.jpg
    IMG_20150327_111400.jpg
    142.4 KB · Views: 211
OP
S

someguy11

Well-known member
Joined
Apr 19, 2015
Messages
208


There is 6'6" head room to the collar ties, I'm 6'4".


That is beautiful storage !

Mine isn't that nice because my garage uses plain roof trusses. My garage is governed by local building restrictions which limit the height to the eaves and the overall height of the roof. I wish I had a bigger garage (and yard for that matter), but the property is located inner city in a big city, so I can't complain. I've got just about the nicest setup of anyone in the neighborhood.

Nice touch to paint the space, btw. The underside of my roof has roofing nails sticking through. To avoid potential injury, we put 3/4" foam insulation sheet on the underside of the roof to cover the protruding nails.

I'll snap some pictures of the loft when I get the lights wired up there.

My garage is getting and is going to get a few more nice upgrades. I'll post details of the projects as I do them. I'm aiming to maximize every cubic inch of what I've got.
 
Last edited:

67carl

Well-known member
Joined
Dec 10, 2013
Messages
3,890
Location
California
Looke good. You'll really enjoy that extra storage. If you're going to put in a floor and close it up don't forget to wire up some lights. Good for you that you got help. Last summer I put in 11ft+ 2x8s across my garage to do the same thing you did, only I did it by myself. Stupid. When I was standing on the ladder hoisting up one of those beams above my head something in my right arm, just above the elbow joint, gave up. My entire arm went numb and the beam fell on my shoulder. Took about 5 minuntes before the tingly sensation went away. Now when I lift my arm above my head it hurts. Really need to see a doc as I think I tore something...
 

Chilliwack Murray

Well-known member
Joined
Dec 10, 2012
Messages
1,503
Location
Chilliwack BC
I have a hill, after seeing this I'll have to move my shop next to it... Nice work by the way.

I think you've done a good job in designing the upgrade and the proof will be loading it up. My 2 cents worth (being a practical person and not an engineer) would be to take a measurement, or cut a measuring stick an inch or two shorter than the ceiling at the most stressed point and you will be able to easily see how close you are to your calculated deflection. If you are at 100% deflection and 50% load you will know you should stop adding weight. Rather unscientific but it would give me piece of mind if I had any question.
 

xyster101

Well-known member
Joined
Jul 3, 2013
Messages
640
Location
Upstate NY
Some guy
Nice work. Don't listen to these guys. I too talked with the TIJ engineer for what size joists I needed. 11.5" worked on paper but he insisted on the 14" joists for my application.
Amazing how easy it is taking with an engineer to get a real answer over people's opinions here (just so much fact and fiction here).
Can't wait to see the top of your area. That is a LOT of hard work you did!
 

someguy123

Member
Joined
Feb 4, 2013
Messages
14
I finally got the winch mounted in the attic. Bolted it to a piece of 1/2 x 6" flat iron I had laying around. Then secured the flat iron between the roof trusses over the hatch we made in the loft.

It worked perfectly. It took all of 10 minutes to lower the lawn mower down from the loft and lift the snow blower into the loft.

The trap door is just a piece of 3/4" flooring OSB supported on all 4 edges by the LVLs that form the hatch perimeter.

When you get something hoisted into the loft, you slide the trap door under it and lower it onto the hatch. Then you disconnect the sling and store it into the loft.

When you want to lower something down from the loft, you position it on the trap door, attach the sling, lift it off the trap door about 4", test it for stability, then slide the trap door away and lower it to the floor below.

The only thing I would change is that the pendant control needs to be lengthened so that it can be used from the floor below. Its a pain when adjusting the sling to lift something to have to go up and down to take up the slack and test the load for stability. Its an easy wiring job to lengthen the pendant cable.

Its so nice to have the snowblower stored away in the attic for summer.

Now that the winch is working, I can start sorting and lifting some of the stuff I'm storing on the racks into the attic. The attic ladder works great for going up and down, but its not great for getting bulky stuff into and out of the attic.
 

Attachments

  • 20150531_101359.jpg
    20150531_101359.jpg
    136.1 KB · Views: 71
  • 20150531_102356.jpg
    20150531_102356.jpg
    140.8 KB · Views: 72
  • 20150531_103458.jpg
    20150531_103458.jpg
    143.9 KB · Views: 75
Last edited:
To avoid these ads, REGISTER NOW!
Top Bottom