To avoid these ads, REGISTER NOW!

Above 1200 Sq/FT Garage build in South West B.C

Wokspaces above 1200 squarefeet.
OP
D

dmittz

Well-known member
Joined
Dec 2, 2016
Messages
1,298
Just a little update. I borrowed my Dad's truck today and he also let me have a little bit of gravel he had left over.
20221105_123702.jpg
I used that gravel in the area in front of the north man door where the water had been pooling because it was low.
20221105_135412.jpg20221105_135422.jpg

I also got some more insulation before returning the truck.
 
To avoid these ads, REGISTER NOW!
OP
D

dmittz

Well-known member
Joined
Dec 2, 2016
Messages
1,298
My Dad came over this afternoon and helped me for a bit. We put all thr plywood I had up on the wall with the two large doors.
20221106_160422.jpg

We also put up as much insulation as I had.
20221106_160401.jpg
 

Zengineer

Well-known member
Joined
Apr 10, 2010
Messages
781
Location
British Columbia, Canada
I used that gravel in the area in front of the north man door where the water had been pooling because it was low.
20221105_135422.jpg

You wouldn't believe me that I'm jealous of your gravel and man door, lol. I've got about 1' deep of mud leading up to mine (seriously) and I'm all out of gravel. I guess the good news is that I'm still just waiting for concrete to cure and will be for a while, hovering around freezing is not going to get it done any faster.
 

jollygreengiant

Well-known member
Joined
Nov 10, 2013
Messages
2,359
Location
Ontario, Canada
I gotta say, I'm no Dodge fanboy but I had to stop for a minute and admire that clean 2500. Around here there's hardly any of that vintage left, and the ones that are look like swiss cheese from all the rot.

What are you doing for heat in your shop?
 
OP
D

dmittz

Well-known member
Joined
Dec 2, 2016
Messages
1,298
You wouldn't believe me that I'm jealous of your gravel and man door, lol. I've got about 1' deep of mud leading up to mine (seriously) and I'm all out of gravel. I guess the good news is that I'm still just waiting for concrete to cure and will be for a while, hovering around freezing is not going to get it done any faster.

Yes, gravel is very pricey! Between the driveway, 2 parkimg areas and under slab gravel i've brought in like 16 truck and trailers of road pack 3/4 minus gravel at about $900-$950 a time. So i'm really trying not to buy anymore but I still have to finish the walkway to the back door. Yes its been getting down around freezing at night here and up to 9C or 10C during the day so i'm sure my concrete is curing slowly also. But Knock on wood no cracks in my slab that I can see yet.
 
OP
D

dmittz

Well-known member
Joined
Dec 2, 2016
Messages
1,298
I gotta say, I'm no Dodge fanboy but I had to stop for a minute and admire that clean 2500. Around here there's hardly any of that vintage left, and the ones that are look like swiss cheese from all the rot.

What are you doing for heat in your shop?

Thanks, ya the 95' Dodge diesel is no show truck but its still in decent shape, we use it all the time. Has nearly 500,000km and keeps going.

Yes, heat in the shop is something i'm pondering. At the moment its jusy been my Milwaulker heated jacket, lol. But i'm pondering my options for once we get the insulation done. We always just used box heaters in my dad's barn/shop without issue but I might try to find a more 'perminent' heating solution.
 
OP
D

dmittz

Well-known member
Joined
Dec 2, 2016
Messages
1,298
My contractor and a couple of his guys came by an put up a bit more of the trim, but didn't quite finish it all. 20221107_143258.jpg

The electricians also came by today and figured out how to get the fresh air dampener to work.
20221107_131158.jpg
Its actually a pretty slick little system for a shop. When the ceiling exhaust fan is turned on by the humidistat (or manually) the fresh air inlet dampener opens to allow fresh air in, once the fan turns off the fresh air dampener closes again so that cold air isn't coming in all the time.

It should work nicely to control humidity in the shop if say the tractor is parked in there after snow plowing or if I wash a car inside. On manual control it'll should be good for dealing with paint or welding fumes too.

I built a little removable wood 'cover plate' for the whole setup, just need to add a louvered 8in duct cover.

20221107_140002.jpg
 
OP
D

dmittz

Well-known member
Joined
Dec 2, 2016
Messages
1,298
Well friends, I got thr quote back to do all of the oustanding electrical work and its like $15k. So... that is way out of the budget. The electricians I have used so far are excellent but a tad pricey.

Anyway as a result i'm going to be handling some portions myself but will have an electrian look everything over and I'll hire out anything i'm not comfortable doing. But, things like running wire, wiring recepticles, lights or regular switches i'm very comfortable with handling.

I picked up a ton of electrical materials and did the first set of recepticles 20amp plugs this box is on its own circuit. Piece of cake. I'll be doing a lot more of this soon.

20221109_151613.jpg
 
Last edited:

Cdubu52

Well-known member
Joined
Sep 4, 2014
Messages
631
Location
Pittsboro, NC
Well friends, I got thr quote back to do all of the oustanding electrical work and its like $15k.
That doesnt seem too far off. You have a lot more in your building than I do with the upstairs. My cost to wire my shop was very close to that number. I was a bit surprised, especially considering I got a "friend discount". But, it was exceptional work.
 
OP
D

dmittz

Well-known member
Joined
Dec 2, 2016
Messages
1,298
yes, I don't think 15k is a terrible price, pehaps on the higher end of average, but they always do very good work.

However to get, power out to the shop, pay the utility for the hookup and run power to the shed/wire it. I'm already like $11-12K in electrical just to get to where I am now. And to finish it with everything else I want is another $15k. Those figures don't include all the electrical work I did to the house or the backup generator.

Realistically not all of the electrical has to be done, and certainly not all of it has to be done right away. I like working in the shop wheather its on cars, tractors, woodworking or electrical so I'm happy to just pick away at what I can do and then hire out the few items I don't feel comfortable with (such as adding a sub panel for the future mezzanine).
 

Bruce 993 SEA

Well-known member
Joined
Oct 22, 2016
Messages
1,033
Location
La Conner, WA
I order from Westside Wholesale Electric and get the non-tamper resistant plugs. I also get the heavier duty plugs. This is where Home Depot is not a good deal on pricing.

Project is looking great!

Cheers!
 
Last edited:
OP
D

dmittz

Well-known member
Joined
Dec 2, 2016
Messages
1,298
I order from Westside Wholesale Electric and get the non-tamper resistant plugs. I also get the heavier duty plugs. This is where Home Depot is not a good deal on pricing.

Project is looking great!

Cheers!
Thank you kindly for the tip, for any plugs I haven't boughy yet I'll try sourcing from a wholesaler.
 

Bruce 993 SEA

Well-known member
Joined
Oct 22, 2016
Messages
1,033
Location
La Conner, WA
It has been a while sense I bought from a wholesaler. 4 years ago I got a screaming deal. Now, it seems like Home Depot is better priced and in stock. It pays to shop around.

I would definitely get industrial grade. Residential is not a very good plug. The industrial has the brass clamps on the sides and the outlet holds onto the plug with greater clamping force.
 
OP
D

dmittz

Well-known member
Joined
Dec 2, 2016
Messages
1,298
Sorry Guys not much has happened so I have very little updates my little guy brought a nasty flu home from pre-school and we've all been sick with it for somwtime which has meant that between caring for a sick child and being sick myself and the weather having been below freezing for over a week straight I haven't had much motivation to go out and get much done.

I have been working with my contractor and an engineer to get the beams for the mezzaine level spec'd and hired the contractor to install them (date yet to be determined). My garage door install has also been confirmed for just before christmas. That's about all for now.
 

charliev

Member
Joined
May 17, 2021
Messages
14
Location
Surrey, BC
Sorry Guys not much has happened so I have very little updates my little guy brought a nasty flu home from pre-school and we've all been sick with it for somwtime which has meant that between caring for a sick child and being sick myself and the weather having been below freezing for over a week straight I haven't had much motivation to go out and get much done.

I have been working with my contractor and an engineer to get the beams for the mezzaine level spec'd and hired the contractor to install them (date yet to be determined). My garage door install has also been confirmed for just before christmas. That's about all for now.
Get well soon
 
OP
D

dmittz

Well-known member
Joined
Dec 2, 2016
Messages
1,298
Thanks Guys, hopefully soon we will be well again and I can get some more done with the workshop.
 
OP
D

dmittz

Well-known member
Joined
Dec 2, 2016
Messages
1,298
Ok Friends, i'm not quite better yet but managed to get my **** off the couch and get a little done in the shop to get things moving again. haha.

I added another 'quad' recepticle box on its own 20amp curcuit. This south wall is where i'm planning to put my main work bench. So it now has 16 plugs on 4x 20amp circuits.
Still a bit more work to do on this wall as I want to wire in provisions for some sort of under cabinet lights like I have in the shop at my parents place.

20221111_171443.jpg

I also managed to get the east wall in the 'tall' area of the shop fully insulated and vapor barriered. Although I still need to add the sofit fresh air ducts.
20221116_101230.jpg
Before I can finish insulating the south wall I have to run a bunch of wires from the panel over there. Its going to be a bear of a job given the height and length of the wire runs. At least I can use the scaffold but realized I stacked about 50 sheets of plywood in the way so i'll have to move those all too, lol.
Anyway that will likely be the next job, unless I feel lazy and just work on the east wall sofit ducts.
 
Last edited:
To avoid these ads, REGISTER NOW!
OP
D

dmittz

Well-known member
Joined
Dec 2, 2016
Messages
1,298
Maybe not in your area then, but im also in BC and its pretty standard for wood frame buildings here. Anyways its used where the vapor barrier ends at the top/bottom plates and around window framing.
Interesting, I can't say i've ever seen it used around here. It might just help with air sealing, although wouldn't all the screws from attaching the interior cladding prevent an air tight seal anyway?

The way its always been explained to me the plywood/interior cladding sandwiches the vapor barrier to the studs making it fairly air tight as long as the barrier between the studs doesn't have holes in it. But perhaps for really high perfomance air sealing caulking would help?

I should mention I did of course seal the various pieces of vapor barrier together with 'tuck tape'.
 
Last edited:
OP
D

dmittz

Well-known member
Joined
Dec 2, 2016
Messages
1,298
Great progress. What's your plan for the east wall - why only one outlet on that wall?
Thank you! The tall area, east wall will just have the sacffolding left in front of it and will be used for storage of things like implements for my tractor and car parts up higher. The south east Corner where the plugs are will likely be my sand blaster/dust collector. So basically not much will be going in that area that needs power other than in the south east corner.
 
OP
D

dmittz

Well-known member
Joined
Dec 2, 2016
Messages
1,298
Well friends,

I got started pulling wires to the south side of the shop. So far i've pulled two 12-2 wires (20 amp circuits) Even with the scaffold it was a multi-hour ordeal, but I probbly saved a pretty penny not hiring it out. I would have hated to do this with a latter!!!
20221117_172255.jpg
20221117_172235.jpg
Kind of hard to see in the picture but the wires are up there.

So one circuit is for the 2 plug boxes on the south wall. The other is for an exterior plug beside the south man door.
20221117_172227.jpg
I got the plugs on the south wall wired up but haven't gotten to the exterior plug yet.

I also switched out the two metal 'quad boxes' I had installed and switched them to plastic boxes. They just seem nicer quality and I prefer the integrated foam seal on them to using 'add on' plastic vapor surrounds.

20221117_101403.jpg
 

jollygreengiant

Well-known member
Joined
Nov 10, 2013
Messages
2,359
Location
Ontario, Canada
Maybe not in your area then, but im also in BC and its pretty standard for wood frame buildings here. Anyways its used where the vapor barrier ends at the top/bottom plates and around window framing.

Interesting, I can't say i've ever seen it used around here. It might just help with air sealing, although wouldn't all the screws from attaching the interior cladding prevent an air tight seal anyway?

The way its always been explained to me the plywood/interior cladding sandwiches the vapor barrier to the studs making it fairly air tight as long as the barrier between the studs doesn't have holes in it. But perhaps for really high perfomance air sealing caulking would help?

I should mention I did of course seal the various pieces of vapor barrier together with 'tuck tape'.

I know it's code here for residential work, not sure about commercial. But yes, basically any place where there might be air intrusion that's not covered by insulation. So around wall openings and around your top/bottom plates, but also along the studs where you have multiple studs sandwiched together.

I think the interior cladding sandwiching the vapour barrier was the traditional practice, where as the acousti seal is the next advancement in that area. As for screws in the cladding, that only breaks your air seal if you remove them. Otherwise your material should seal around the fastener. At least that's my understanding.

You're making good progress with the electrical! That's one job that takes a long time.
 
OP
D

dmittz

Well-known member
Joined
Dec 2, 2016
Messages
1,298
I know it's code here for residential work, not sure about commercial. But yes, basically any place where there might be air intrusion that's not covered by insulation. So around wall openings and around your top/bottom plates, but also along the studs where you have multiple studs sandwiched together.

I think the interior cladding sandwiching the vapour barrier was the traditional practice, where as the acousti seal is the next advancement in that area. As for screws in the cladding, that only breaks your air seal if you remove them. Otherwise your material should seal around the fastener. At least that's my understanding.

You're making good progress with the electrical! That's one job that takes a long time.
Thanks for the explination on the Accustic seal. Perhaps because we have a so called 'mild climate' where I live in south west B.C there hasn't been the same push for air sealing as elsewhere. I know vancouver actually has a bit stricter insulation codes than langley, I don't think that aspect of building code has changed here in decades although I hear the coming 'step code' will be adding further requirements for insulation /air sealing.

Given the new info I may perhaps use some of this sealant (cost dependant) in the mezzinie area as it may one day be used as living quarters. In the rest of the shop i'm not going to bother though as its a shop and traditional R20 insulated walls will be just fine and actaully better than what's in my 1970's built house.

I have to say I may be going a bit slow on the electrical because i'm trying to be cautious and not screw it up, but even so I am realizing it is mighty time consuming work. I have a bit of a deadline with the doors arriving before christmas at least in the tall area of the shop so I have to push forward and get it done and the wall cladding up before that.
 
OP
D

dmittz

Well-known member
Joined
Dec 2, 2016
Messages
1,298
I had my electrician come by this morning and do a preliminary check of my work. He said it all looked decent so far, his only suggestion was related to the wires in the attic. He said although its not an 'accessible attic' (no perminent stairs or latter) He would prefer to see the wires either run very close to the edge for the attic or on top of a 2x4 to ensure that no one ever steps on them and breaks them.
However, the reason I did them this way is because I was going to put some 5/8 plywood in the center of the attic to make for easier walking if I ever do need to get up there and was going to add some more 2x4 on top of the trusses and the 5/8 would attach to those so the wires would actually be in a little 'service cavity' under the 5/8th but above the trusses, which should work too.
I'll then put some (easily removable) R38 batts ontop of the plywood in the center of the attic and blown insulation in rest of the attic.

20221118_104035.jpg

I also got the Exterior plug box in on the south wall, but made a bone head mistake and bought a regular plug, so I have to go back and get a GFCI for it before I can finish that box.
20221118_095040.jpg
 
Last edited:
OP
D

dmittz

Well-known member
Joined
Dec 2, 2016
Messages
1,298
More Electrical....

As you guys proabbly guessed I had planned to spend the day today working on electrical in the shop so here is the rest of what I accomplished this afternoon.

I switched out the two plug boxes the electricans had installed so all the plug boxes on this wall where the work bench is, will match.
20221118_142407.jpg

I ran the wire and got the plug box in place for the exterior GFCI on the north wall by the man door. Was a little bit of a pain because the siding guys put the sidding plug surround with a stud behind it... but I got it done.
20221118_133735.jpg

Next up the big reason I took today to do electrical was I knew it would be a bright sunny day and I wanted to wire some circuits into the panel and with the main breaker off I wanted to do that during the daytime to make is easier to see.

Sadly when I bought my breakers I stupidly forgot to get the wire clamps that you put through the knock-outs on the panel. I did luck-out and noticed the electricans had left 2 laying on the ground beside the panel. So 2 cicuits was what I wired in.
20221118_145741.jpgI wired in one 'quad box' of plugs on the north wall and also the plugs on the south wall. Tested them and everything is working 😊

20221118_145730.jpg
20221118_152735.jpg
Following that I ran a another 12-2 wire for plugs that will be on the west wall where that work bench will be. There isn't much space between studs so I had to use a couple 1 gang boxes/duplex plugs here.

20221118_175715.jpg20221118_175708.jpg
I didn't quite finish the last plug because my wife said dinner was ready and i'd rather eat than work, haha.

The only thing I noticed that i'm slightly nifted about is although I have a 200amp panel. The way it was installed I can only access the kock-outs at the top of it, Because the studs are tight on either side. So at this point once I wire in the additional 5 cicuits I'm currently roughing i'll be out of knock-outs on the top of the panel since the side knockouts aren't accessible. I'm thinking the whole panel will have to be pulled out and re-installed so the side kock-outs are acessible since I can't just cut-out the weight bearing studs on either side.
 

Attachments

  • 20221118_152735.jpg
    20221118_152735.jpg
    318.6 KB · Views: 28
  • 20221118_145730.jpg
    20221118_145730.jpg
    379.7 KB · Views: 8
OP
D

dmittz

Well-known member
Joined
Dec 2, 2016
Messages
1,298
I didn't have much time today. But I did get both the south and north exterior GFCI plugs wired up in the weather proof boxes and I then wired them and the one remaining 'quad box' into the panel (3 seperate 20amp circuits)20221119_161036.jpg
20221119_151809.jpg
I have to say the 'modern' weather proof boxes are kind of fuggly. But I guess research has shown these work better than the old school more slim design ones?

Anyway tested all the circuits and the GFCI's and everything works.

I have 3 more knockouts on the top of the panel ...Actually it might be just enough as I only have 3 more cicuits planned, but I have devised a way to pull the panel out without having to rewire it if I find I need more circuits than I have knock-outs on the top of the panel.
 
OP
D

dmittz

Well-known member
Joined
Dec 2, 2016
Messages
1,298
I Switched gears a little today and with some help from my dad we got the 1/2in plywood up on the east wall in the tall section.
20221120_141659.jpg
Even with the scaffold getting the plywood all the way up a 18ft wall was a tiring work.

Being in the cascadia earthquake zone it was in the back of my mind that those tall walls were at risk of sideways sheer motion, but with 1/2in sheathing on the outside and inside of the walls holding everything squarley together I feel a lot better about the structure now.
 
Last edited:
OP
D

dmittz

Well-known member
Joined
Dec 2, 2016
Messages
1,298
After recently tearing down a wood building (and spending a lot of time retrofitting commercial buildings for earthquakes) I now know why we stick build on the west coast. In an earthquake, wood is good.
For sure!
In addition to the plywood interior cladding I made sure the engineers on my building included the walls all being bolted to the foundation a bit more often than code plus earthquake straps, enlarged footers, and the rafters are all hurricane/earthquake strapped to the walls. Still i'm not sure it (or most structures) would withstand a high magnitude earthquake without damage but hopefully it makes the difference between some repairble damage and a collapsed structure. Hopefully, I don't experience a major subduction earthquake in my lifetime.
 

Zengineer

Well-known member
Joined
Apr 10, 2010
Messages
781
Location
British Columbia, Canada
Without damage is a lofty goal with the subduction quake in our future. But still standing, usable and safe for occupancy post-event is achievable, much more so than other methods used. The 2011 Christchurch, NZ subduction earthquake, which basically imparted loads on buildings similar to "picking them up 1.5M in the air and dropping them", which is quite the visual. Needless to say, masonry did not fare well in that situation.

You sound like you are in fine shape from a building perspective, and today's building code is pretty robust. Figuring out how to survive multiple weeks "off grid" is where most folks will be really challenged. If our recent storms are any indicator, after about 8 hours of power outage all hell starts breaking loose...
 

charliev

Member
Joined
May 17, 2021
Messages
14
Location
Surrey, BC
I Switched gears a little today and with some help from my dad we got the 1/2in plywood up on the east wall in the tall section.
20221120_141659.jpg
Even with the scaffold getting the plywood all the way up a 18ft wall was a tiring work.

Being in the cascadia earthquake zone it was in the back of my mind that those tall walls were at risk of sideways sheer motion, but with 1/2in sheathing on the outside and inside of the walls holding everything squarley together I feel a lot better about the structure now.
Did you use vapour barrier??
 
OP
D

dmittz

Well-known member
Joined
Dec 2, 2016
Messages
1,298
Without damage is a lofty goal with the subduction quake in our future. But still standing, usable and safe for occupancy post-event is achievable, much more so than other methods used. The 2011 Christchurch, NZ subduction earthquake, which basically imparted loads on buildings similar to "picking them up 1.5M in the air and dropping them", which is quite the visual. Needless to say, masonry did not fare well in that situation.

You sound like you are in fine shape from a building perspective, and today's building code is pretty robust. Figuring out how to survive multiple weeks "off grid" is where most folks will be really challenged. If our recent storms are any indicator, after about 8 hours of power outage all hell starts breaking loose...
Agreed my main goal would just be a repairable structure instead of a collapsed one.

The off grid thing after a earthquake would be tough. I don't want to go down the whole 'prepper' road but I have ensured that in my house we have a few places that are easily accessible with fire extinguishers, first aid kits and flash lights in case that earthquake ever comes. I'm on a Well and septic so as long as I can keep the backup generator running I have water and sewer also. By perhaps bad judgement my backup generator is on Natural gas (for covenience) i've thought about getting a 2000gal propane tank for it (= 4 weeks of non-stop running) But have trouble figuring out where to put that without it being an eye sore. Plan B is my small portable generator and the 36 gal of gas I keep for the cars in storage (rotated regularly).
 
OP
D

dmittz

Well-known member
Joined
Dec 2, 2016
Messages
1,298
A little more progress to report.

So I priced out insulating the attic to about R50 (20in of insulation) I also priced out just having the outside blown and on the middle 8ft doing R14 batts, then some 5/8 plywood and 2x4' then (for walking) then R38 batts on the plywood. which would make future alterations and repairs easy. However to my suprise it was going to cost a lot of extra money just to make and theoretical future alterations up there easier. At this point I don't think I want to spend that much money on making things hypotetically easier in the future so i'm just going to do R50 blown insulation like 90% of other new builds proabbly do.

As a result of that change my wires in the attic would no longer be in a ' protected service cavity' so I re-strung all my 12/2 wires up in the attic so they are all electrical stapled on top of 2×4's (rather than across them) as the electrican had recomended. Yes, I could have saved myself a lot of work by pricing things out first, lesson learned!

I'm now in the process of stringing some 10/3 wire for hoist its over kill as the hoist is only 20Amp 250V and only requires 2 hots and a ground but I figured if I ever replace it, having a larger wire in place and also one with a neutral will future proof it in-case a future new hoist require a little more power or has 120v auxillary features.

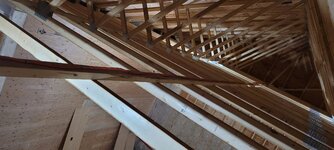
Here's the 10/3 wire in the attic where it meets up with the 12/2 wires on their way back to the panel from various locations. I tired to keep it all neat as I could.

20221122_212530.jpg
And the stringing of the three 12/2 wires on there way to the south west side/corner of the shop:20221122_210618.jpg
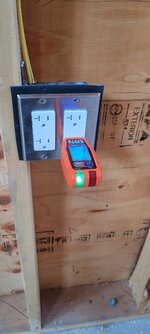
Also after some debate I decided that although i'm using a hand operated chain hoist for the 12ft talls doors to save money, I do want to future proof it, so I added a dedicated 20amp 120V circuit for 'future' power door openers about 3 feet back from the wall centered between the doors. Hopefully that is a workable spot as it would be hard to change now.

20221122_210933.jpg
I've also started the vapor barrier and 3/8 ceiling plywood (I don't see an advantage to thicker plywood on the ceiling). note the future door opener plug box. Additionally I extened the sofits ducts up to 30in of height above the bottom of the trusses as they are only 20in before (not tall enough) and stuffed 8in x 24in strips of Roxul my neighbors gave me on top of the walls but under the sofit ducts (had to be careful not to crush the ducts!) The Roxul strips will stop any blown insulation from falling into the sofits and should also stop and wind guests from messing up the blown insulation.

I need to get at least the first 8ft of the celing clad with plywood before my doors arrive but I couldn't go further than 4ft until I made a decision about lighting...

20221122_194225.jpg
20221122_194328.jpg
20221122_194334.jpg
Being that I have 18ft ceilings in the tall area I thought my shop is a decent cannidate for High bay lights. I got these two from Rona they produce 15,471 lumens each (about 31,000 combined)

I honestly don't know if that will be enough light but if it is it will turn out to be a very inexpensive lighting solution and also very simple since I can just use the two existing ceiling light electrical boxes. Additionally they hang down from the ceiling with a chain which perfect as my one electrical box is situatied between where the 2 12ft garage doors roll up so the light will still be visible even when the doors are open.

So basically i'm going to put up some plywood then the high bay lights and then judge if its enough light, if not i'll add some more boxes before completing closing up the ceiling.

I also added the blocking to hang the high bay light on my light box near the 12ft doors
20221122_205459.jpg
 

Attachments

  • 20221122_212752.jpg
    20221122_212752.jpg
    442.9 KB · Views: 5
  • 20221122_212748.jpg
    20221122_212748.jpg
    479.4 KB · Views: 5
Last edited:
To avoid these ads, REGISTER NOW!
Top Bottom