To avoid these ads, REGISTER NOW!

Garage Door Not Fitting Tightly in Frame...

KnightFire

Well-known member
Joined
Jul 24, 2007
Messages
1,786
Location
WV
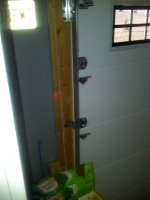
I've had my garage doors in for about two years, but have just recently noticed that both doors do not fit snugly in their frames. There is about a 1/4" of play in the doors when I push against them from the inside, while they are in their down position, until they rest against the frame. I can see a ton of daylight around both doors, and can't see any possible way to adjust them to take up the 1/4" slack.

Is there any way to adjust the doors so they sit flush to the frame?

The weather stripping is in good shape, they are Amarr triple insulated doors, the triple insulation right now is doing NO good, because of the gap between the doors and their frames! :mad:

I've called the installer, but was hoping to get some information from you guys regarding possible adjustments, as I 'm sure to not hear back from the installer for a couple of days.
 
To avoid these ads, REGISTER NOW!

moserjj

Well-known member
Joined
Oct 17, 2010
Messages
155
Location
WI, USA
You should be able to adjust the track and move it in some to take up the slack
 

Kevin54

MEMBER EMERITUS
Joined
Jan 12, 2005
Messages
29,341
Location
Urbana, Ohio
Adjust the track and joint rollers should be adjustable also. You don't want them "tight" against the jamb but close. The outer weatherstripping pieces should take care of any air infiltration.
 
OP
K

KnightFire

Well-known member
Joined
Jul 24, 2007
Messages
1,786
Location
WV
You should be able to adjust the track and move it in some to take up the slack

Great! How?

As far as I can tell, the track is not adjustable. At least the track mounting brackets aren't adjustable.
 
Last edited:

moserjj

Well-known member
Joined
Oct 17, 2010
Messages
155
Location
WI, USA
can you post some pictures of the track and its mounting? Usually the track is mounted to brackets that have slots in them and allow the track to be adjusted in/out from the door opening.
 
OP
K

KnightFire

Well-known member
Joined
Jul 24, 2007
Messages
1,786
Location
WV
can you post some pictures of the track and its mounting? Usually the track is mounted to brackets that have slots in them and allow the track to be adjusted in/out from the door opening.

Here you go!

These are shots of the track mount and rollers, as I can tell they are not adjustable, except for side to side track adjustment, which doesn't help me with an in/out adjustment. The brackets are riveted to the track.

In the 2nd photo you can see all the light coming through, I'm surprised it showed up...with the garage lights and cell phone flash turned on.

Hopefully these will make more sense to you, than they do for me. :)
 

Attachments

  • Garage Door Track Hardware (1).jpg
    Garage Door Track Hardware (1).jpg
    124.8 KB · Views: 379
  • Garage Door Track Hardware (2).jpg
    Garage Door Track Hardware (2).jpg
    146.2 KB · Views: 378
  • Garage Door Track Hardware (3).jpg
    Garage Door Track Hardware (3).jpg
    131.4 KB · Views: 399
  • Garage Door Track Hardware (4).jpg
    Garage Door Track Hardware (4).jpg
    129.5 KB · Views: 391
Last edited:

waterman1971

Active member
Joined
Dec 3, 2008
Messages
31
Location
My home
Drill out those rivets and replace them with traditional fasteners in the slotted portion of the angle brackets. This will allow you to move the door in or out to reduce the size of those gaps.
 

Kevin54

MEMBER EMERITUS
Joined
Jan 12, 2005
Messages
29,341
Location
Urbana, Ohio
I've never seen a door that you couldn't adjust. It looks to me like something has been left off.

If the track absolutely cannot be adjusted, and the rollers are non adjustable, then if you put shims behind the existing rollers it will push them tighter against the track, therefore pushing the door outwards towards the frame
 
Last edited:

rickairmedic

Well-known member
Joined
May 31, 2005
Messages
4,165
Location
louisville ,Ky
Well your right they are not adjustable. Only thing I can think of is to either shim the mounts on the door itself or probably easier . Pull the trim/weatherstrip on the outside and push it back against the door and reatatch it .


Rick
 
OP
K

KnightFire

Well-known member
Joined
Jul 24, 2007
Messages
1,786
Location
WV
Drill out those rivets and replace them with traditional fasteners in the slotted portion of the angle brackets. This will allow you to move the door in or out to reduce the size of those gaps.

I was afraid someone was going to say that...16 brackets...2 rivets each, then I'll have to purchase the hardware needed to use the slots, I was really hoping for an easy adjustment somewhere...:tantrum2:
 

waterman1971

Active member
Joined
Dec 3, 2008
Messages
31
Location
My home
You may not have to drill them all out. Just do the ones that are buggin you.

What type of weatherstripping is installed? Perhaps you could move that, it may be an easier fix.
 
OP
K

KnightFire

Well-known member
Joined
Jul 24, 2007
Messages
1,786
Location
WV
I've never seen a door that you couldn't adjust. It looks to me like something has been left off.

If the track absolutely cannot be adjusted, and the rollers are non adjustable, then if you put shims behind the existing rollers it will push them tighter against the track, therefore pushing the door outwards towards the frame

How would I shim the roller? If I put a shim on the roller plate, it would push the door further from the frame, not draw it in closer....:confused:

Or...do you mean I should insert something into the track to push the rollers forward as it closes...???

I'm confused.
 
OP
K

KnightFire

Well-known member
Joined
Jul 24, 2007
Messages
1,786
Location
WV
You may not have to drill them all out. Just do the ones that are buggin you.

What type of weatherstripping is installed? Perhaps you could move that, it may be an easier fix.

The weatherstripping is good, it covers nicely, once the door is pushed flush to the frame from the inside. The 1/4" in/out slack is what needs taken up so the weatherstripping can do it's job...I think.

*sigh* I think your right, the brackets need drilled so they can be made adjustable. That is the only way I can think of to take up that 1/4" in/out slack...unless I'm missing something obvious...which is kinda what I was hoping for...
 
Last edited:

waterman1971

Active member
Joined
Dec 3, 2008
Messages
31
Location
My home
Typically, the door is closed and then the weatherstripping is installed. As was mentioned earlier it is best not to place the door too tightly in the hole. Perhaps this was the consideration when they installed your door.
 
OP
K

KnightFire

Well-known member
Joined
Jul 24, 2007
Messages
1,786
Location
WV
Typically, the door is closed and then the weatherstripping is installed. As was mentioned earlier it is best not to place the door too tightly in the hole. Perhaps this was the consideration when they installed your door.

It was if I recall accurately. The stripping sits flush with the frame and covers the gap. Are you all suggesting I should offset the stripping from the frame to move it closer to door? I can see how this would help, but is it actually curing the problem or is it band-aiding it?

Should a garage door move back and forth 1/4" in the wind? It actually rattles back and forth inside the tracks on windy days, I couldn't see how moving the stripping back by offsetting it, would fix this...but I'm not sure which is why I'm here :)

Once the door is pushed out--from the inside--to take up the 1/4" slack, it fits perfectly flush with the weather stripping...
 
Last edited:

waterman1971

Active member
Joined
Dec 3, 2008
Messages
31
Location
My home
When wrapping a garage door casing with metal coil stock, it was rare to find one that had a uniform reveal.
 
OP
K

KnightFire

Well-known member
Joined
Jul 24, 2007
Messages
1,786
Location
WV
It's a consensus then...I'll move the stripping back towards the door more, hopefully that will fix the rattles in high wind and actually create a seal around the door.

Thanks everyone!
 

nehog

Well-known member
Joined
Jan 2, 2010
Messages
7,935
Location
Jaffrey, NH
Here you go!

These are shots of the track mount and rollers, as I can tell they are not adjustable, except for side to side track adjustment, which doesn't help me with an in/out adjustment. The brackets are riveted to the track.

In the 2nd photo you can see all the light coming through, I'm surprised it showed up...with the garage lights and cell phone flash turned on.

Hopefully these will make more sense to you, than they do for me. :)

Same doors as mine, the slots are in the C-section not the brackets. Don't 'drill out' anything, they are adjustable, I've adjusted mine a few times over the last year to fine tune 'em...

Unloosen at least three brackets (I do it with the door up so the track is free to move without the door forcing it the wrong way) and it will move with a small amount of pressure.
 
To avoid these ads, REGISTER NOW!
OP
K

KnightFire

Well-known member
Joined
Jul 24, 2007
Messages
1,786
Location
WV
Same doors as mine, the slots are in the C-section not the brackets. Don't 'drill out' anything, they are adjustable, I've adjusted mine a few times over the last year to fine tune 'em...

Unloosen at least three brackets (I do it with the door up so the track is free to move without the door forcing it the wrong way) and it will move with a small amount of pressure.

What is a C-section, is that the same as a track?

I don't see anything adjustable inside the track, the only things track-side of the brackets are rivets.
 

Kevin54

MEMBER EMERITUS
Joined
Jan 12, 2005
Messages
29,341
Location
Urbana, Ohio
How would I shim the roller? If I put a shim on the roller plate, it would push the door further from the frame, not draw it in closer....:confused:

Or...do you mean I should insert something into the track to push the rollers forward as it closes...???

I'm confused.

If you shim between the roller plate and the door, it will push the two (roller & door) further away from each other. Seeing that the track is stationary, the door will be pushed out

Same doors as mine, the slots are in the C-section not the brackets. Don't 'drill out' anything, they are adjustable, I've adjusted mine a few times over the last year to fine tune 'em...

Unloosen at least three brackets (I do it with the door up so the track is free to move without the door forcing it the wrong way) and it will move with a small amount of pressure.

Most doors have an adjustable plate at the very bottom, at the top corner ("C" section) and one in the middle. On his, if you could only adjust the "C" section, then it would only let the top of the door go out and not any of the rest of the door. IIRC, as in my door, I have adjustable rollers at the top and adjustable rails / track also.
 

Kevin54

MEMBER EMERITUS
Joined
Jan 12, 2005
Messages
29,341
Location
Urbana, Ohio
I looked at my door yesterday when I was in the garage and every bracket is adjustable. The pic you show with the slot and two rivets.....mine has a flat head bolt inside the rail and a nut on the outside through the slot. This is done on all three brackets on each side.
 
OP
K

KnightFire

Well-known member
Joined
Jul 24, 2007
Messages
1,786
Location
WV
In case anyone was curious, I went the easiest route and moved the weather stripping back, it now seals fairly tightly. Since the frames of the garage doors aren't true, I doubt I'll ever really get a good seal, but that isn't the fault of the garage door, or the installation, its due to poor framing of the portal itself. At some point I'll have to add some trim to square up the frame...when it's warmer, lol

For now, I'm happier, there isn't nearly as much light coming around the edges of the doors that there was. Time will tell if it helps to keep the garage warmer...
 

csp

Well-known member
Joined
Mar 23, 2010
Messages
5,719
Location
Franktown, CO
I looked at my door yesterday when I was in the garage and every bracket is adjustable......

Some are and some aren't. Mine are the type with the rivet. Could be age based as mine were installed in 2007. At my old house (built in 1996) they were adjustable. Could be brand based too though. Fact is not all are adjustable.

I'm planning on replacing my vinyl seals with brush seals.
 

CraigP

Well-known member
Joined
Dec 13, 2010
Messages
61
Just like Kevin54 said, you can put a 1/4" piece of plywood between the roller bracket and the door itself. This will push the track wheel against the track (into the garage) and push the door out (towards the weatherstripping you have moved). I have read this works several times here and may have to do the same with the top panel of my door soon as it doesn't want to sit tight against the weatherstripping naturally.
 

Zick

Well-known member
Joined
May 13, 2009
Messages
418
Location
WI
Just like Kevin54 said, you can put a 1/4" piece of plywood between the roller bracket and the door itself. This will push the track wheel against the track (into the garage) and push the door out (towards the weatherstripping you have moved). I have read this works several times here and may have to do the same with the top panel of my door soon as it doesn't want to sit tight against the weatherstripping naturally.

Yup, that's what I did.
See post #12
http://www.garagejournal.com/forum/showthread.php?t=85073
 

The_Tango

Active member
Joined
Dec 12, 2010
Messages
41
Location
Knoxville, TN
I ordered a 18' Cloplay door, after I installed it I called Cloplay about the adjustable of the door. They said that most of their doors now come with rivets, They sent me (at no charge) the needed bolts & nuts for use after drilling out the rivets.

It took me longer to remove the rivets than it did to install the door. If you drill the rivets will spin. So I used a grinder.
 

Motofixxer

Well-known member
Joined
Oct 10, 2009
Messages
681
I had the same problem with my doors, mostly in the middle. My tracks are the same with riveted brackets. I considered removing the rivets and bolting, giving me adjustment but was concerned with the door binding. I decided to go shopping and see what I could find. At my local Menards I found some weather stripping shown below. It is RCR Dennis model #3817 3/8" Bulb 17'. With the door closed I basically folded the weather stripping like an L and positioned it with the flat part over to the door edge with the bulb part folded toward the interior. It sits on the inside of the jamb between the track and the jamb. It seals that little gap well and stopped all the air flow. I feel much better now having the seal on the inside and outside. I also used #6x5\8 screws to hold it in place rather than the included nails. It would be pretty difficult to nail it with the door and track in the way.
 

Attachments

  • 2011-02-11 18.16.31.jpg
    2011-02-11 18.16.31.jpg
    98.2 KB · Views: 520

Kevin54

MEMBER EMERITUS
Joined
Jan 12, 2005
Messages
29,341
Location
Urbana, Ohio
I'll have to look at my dad's house when I go up this weekend, but I just had a new garage door installed. I know that they used the standard seals that is the plastic trim with the rubber seal on the outside, but I'll have to check the rails to see if they are adjustable or not. I always thought all rails were adjustable but as CSP stated, his newer door is not but the older door is. I am wondering if it is some kind of a time saver / budget saving thing to just pre-adjust the rails by riveting them. It would make sense in the perfect world with the same door framing on every single home, but we all know that isn't the case. Probably a case of new CEO's, new ideas, new cluster****s
 

Daniel Dudley

Well-known member
Joined
Sep 4, 2009
Messages
3,546
Nowadays the garage door opening is often cased with 2x6 on the sides, and a 2x10 or 12 at the top before the garage door goes on. This gives a really nice flat surface to mount the door brackets and spring hardware. On the outside this is covered by oversize weatherstrip, which covers the 2x and lips over the jamb trim. This weatherstrip is pushed tight to the door, so normally no adjustment of the door track is needed. The track is set for free play at the factory.

I expect that rivets are installed to prevent incorrect installation woes. There are several ways you can screw this up so that the door binds when opening.

You can put the sheet rock right under the 2x material using this method, and you get a totally finished interior without any framing showing on the inside. You can also rabbit the 2x over the rock, or rock up to the edge. Nobody cared about this when garages were just garages, but of course they care now.
 
Last edited:

hoffmand

Well-known member
Joined
Dec 11, 2010
Messages
73
Location
Austin, TX
With the door closed I basically folded the weather stripping like an L and positioned it with the flat part over to the door edge with the bulb part folded toward the interior. It sits on the inside of the jamb between the track and the jamb.

Would you mind taking a picture of how you attached this? I've read your description a few times and I'm having trouble picturing it.

Thanks!
 

BC911

New member
Joined
Nov 11, 2011
Messages
1
I too would appreciate a photo of how you installed the interior weatherstripping like an L etc.
 

Motofixxer

Well-known member
Joined
Oct 10, 2009
Messages
681
Here you can see the weatherstripping.
 

Attachments

  • 2011-11-12 17.46.44.jpg
    2011-11-12 17.46.44.jpg
    131.5 KB · Views: 525

Chetter

Well-known member
Joined
Nov 30, 2008
Messages
243
Location
Northern Ohio
I had the same problem with my doors which are Wayne Dalton doors, but was lucky that it had the flat head bolts with nuts that allowed me to snug it up to the frame which took all the slop out so when the wind blows the doors are not moving back and forth against the tracks since my doors face the west/northwest where the wind blows quite hard durning the winter and the doors would make all kinds of noise. I have the vinyl seals around the outside and I am going to use a bubble type seal around the inside perimeter of the doors to help seal it better. I also used the 1" foam panels glued to the inside panels for insulation. My garage stays comfy throughout the winter with my heater set at 48-50*. Next comes my Max Jax lift.
 

Brentocool

Well-known member
Joined
Aug 3, 2011
Messages
1,088
Location
Chicago.Il
First of all I worked on doors for a couple years when I was younger. If you cant tadjust the tracks . take the door stops off on the outside and reinstall them closer to the door! Its that easy. Or replace them with some new ones with the rubber seals.. Close the door and put them tight to the door and hammer them home. problem fixed!!
 

tpm419

New member
Joined
Nov 26, 2012
Messages
1
Mottofixer
I know this post is old but can you post or email me a picture of how and just where you attached the weatherstripping?
Thanks
 

c7fx

Well-known member
Joined
Oct 24, 2008
Messages
175
Location
ohio
I understand the need for the door to have some play when dealing with temp changes and many different materials. I would be fearful to adjust my door tight only to bind up when the weather changes. My doors fit OK but with any type of wind the door seals don't seal and the wind comes in. My doors are brand-new on a new home. I am looking into something like these.
http://www.sealeze.com/ws/sectional.html
http://www.summitracing.com/parts/SEZ-716/

I think if I install these on the inside of the door as an added protection from the wind.
 

1wheeldrive

Well-known member
Joined
Apr 10, 2012
Messages
45
I have a similar problem, I have adjusted/shimmed my doors until they are tight against the stripping, moved the stripping towards the door, it seals just sitting there but once a bit of wind hits it, it gets pushed in and opens an air gap all along the top. For me, it seems that the amount of movement between the rollers (which are new) and track is excessive letting the wind move it in/out. It doesn't help that I live in an area with prevalent east winds, and the garage door faces due east, constantly getting hammered with wind.
 

c7fx

Well-known member
Joined
Oct 24, 2008
Messages
175
Location
ohio
Well I took the plunge and blindly bought the weather seal from Summit. Turns out that its a Sealeze product. Anyways Its a 40-45 degree bend on the brushes to the mount and the brushes are about 3/4 of an inch long. the mounting part of the unit is maybe 1/4 inch wide. The kit also comes with the mounting hardware.
I plan to mount these on the inside of the garage door as a second seal to the rubber strip on the outside. This will eliminate the draft when the wind blows against the door. I think my fiancee would kill me if I mounted these to the outside. They are ugly!!!! They could probably be mounted under the rubber seal on the outside if anyone is planning on replacing the outside weather seal. I think it would be a good seal for the wind plus hide the ugly.

Anyways my only issue is the mounting holes are directly under the garage rail when installed the way I want them to be. This means I need to remove the rail to install. If the mounting edge was a little larger I could have mounted them easily without moving the rail. The Sealeze web site shows many different sizes. I think I would have ordered the one inch brushes with the 3/4 holder length.

I installed two sections last night and the seal looks good and no issue with the door moving up and down. I was worried the cable for the door would interfere with the brushes but the cable actually goes over the brushes and really isn't an issue. Just an issue when getting the strip lined up.

I need to figure out a way to loosen the top of the rail to mount the last four feet without taking down the door. I never really worked with doors other than installing a garage door opener so I'm a little leery of the spring. I have a wayne dalton door with the torque master spring. I'm hoping to just loosen the mount that holds the rail and move it out but its also part that holds the torque master rod.

I took a few pictures of the product so others can decide if its something useful. I will be installing the rest hopefully Saturday when its a little warmer and will take pictures on how I mounted them.

the brushes
IMG_2249.jpg


the rail
IMG_2253.jpg

IMG_2250.jpg


together

IMG_2255.jpg

IMG_2251.jpg
 
To avoid these ads, REGISTER NOW!
Top Bottom