To avoid these ads, REGISTER NOW!

Garage door side seals

vdotmatrix

Well-known member
Joined
Sep 13, 2011
Messages
489
Location
Northern Virginia
There is cold air coming from outside through the garage door. 18 years ago, the installers did not fine tune the installation so that the side seals sit flush and relatively air tight.

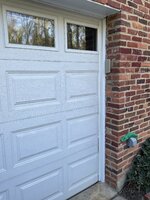
I never noticed the difference from side to side. The left side of the garage door the seal sweeps the side perfectly.
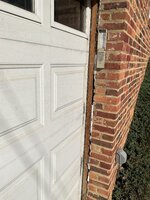
The right side the seal sweeps over the panels and this is where the draft comes from.
Upon closer examination the right side is padded with what looks like 1x3 to which the door seal is nailed to it. If the 1x3 was removed on one side the door seal would be lateral to the garage door panels and sweep flat.

Do you guys think it is okay to remove this 1x3?
I cannot add captions.
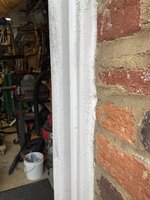
The first image is the right side of the door. Seal goes over the panels and allows a draft.
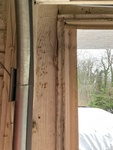
Second: Left side--seal lies flat on door away from panels--no draft.
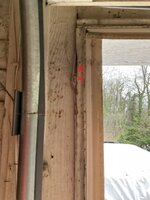
Third image shows the side of door...
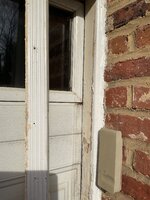
fourth image...where is the fourth image.... shows the inside of the right side.....won't display.....bandwidth limit?
 

Attachments

  • IMG_0973.jpeg
    IMG_0973.jpeg
    1 MB · Views: 201
  • IMG_0972.jpeg
    IMG_0972.jpeg
    1 MB · Views: 177
  • IMG_0971.jpeg
    IMG_0971.jpeg
    878.8 KB · Views: 191
Last edited:
To avoid these ads, REGISTER NOW!
OP
V

vdotmatrix

Well-known member
Joined
Sep 13, 2011
Messages
489
Location
Northern Virginia
shows the inside of the right side. So it is just a trim piece.
 

Attachments

  • 2FAF8DB2-DD4C-48E5-9375-396EE8883477.jpeg
    2FAF8DB2-DD4C-48E5-9375-396EE8883477.jpeg
    90.3 KB · Views: 159
Last edited:

BillK

Well-known member
Joined
Aug 24, 2006
Messages
9,382
Location
Beautiful Southern Maryland
I dont see any reason not to remove the extra trim piece. Have to wonder why they put it there to begin with ?? If you remove it will the door still be up against the framing ? Try your picture of the inside again. Might have to make it a little smaller to post.
 

BillK

Well-known member
Joined
Aug 24, 2006
Messages
9,382
Location
Beautiful Southern Maryland
After 18 yrs. the seals are probably sun, weather compromised and don’t seal great even in the best install. Cheap to replace as long as you’re addressing the issue.

But if you look at them, the right hand side is running across the recessed part of the panel and not doing anything. Thats why he wants to remove the trim piece so the seal can run on the flat part of the door like it is supposed to.
 
OP
V

vdotmatrix

Well-known member
Joined
Sep 13, 2011
Messages
489
Location
Northern Virginia
I dont see any reason not to remove the extra trim piece. Have to wonder why they put it there to begin with ?? If you remove it will the door still be up against the framing ? Try your picture of the inside again. Might have to make it a little smaller to post.
Thank you. Firstly, this is not the original door, probably first installed circa 1956??? The crew that gave us a free door because we spent a gozillion dollars on triple paned Shucco windows, didnt do a custom install….there….the picture posted. That piece of wood is trim. The entire garage door opening is framed by some big wood like 2x12” or something like that.. in my mind, it seems like it is only trim not attached to the workings of the door.
 
OP
V

vdotmatrix

Well-known member
Joined
Sep 13, 2011
Messages
489
Location
Northern Virginia
But if you look at them, the right hand side is running across the recessed part of the panel and not doing anything. Thats why he wants to remove the trim piece so the seal can run on the flat part of the door like it is supposed to.
Bingo! Spot on! Thank you!
 
OP
V

vdotmatrix

Well-known member
Joined
Sep 13, 2011
Messages
489
Location
Northern Virginia
Another thing I've heard is running carpet strips on the jamb behind the flap. Door should be centered. The rollers have adjustments, no?
You know, i have sat and stared at the door and the rollers and the frame and considered monkeying around with nudging the door with the mounting screws. There is wiggle room but……

well enough is best left alone after i saw the left side works and the right side is dysfunctional by a 1/2” or so….the with of the trim under the seal board.

garage door operation is mysterious Best left to people that know what they are doing….not me…is why i am here!!
 
Last edited:
OP
V

vdotmatrix

Well-known member
Joined
Sep 13, 2011
Messages
489
Location
Northern Virginia
It looks to me more like the door isn't centered? I know my door isn't centered but its a flat panel so not noticeable.
Soooooooo, i thought about this….if i move the entire door to the right, more panels are covered on the left, the problem i have on the right…if i move the door to the left , now those panels meet the same fate. Either the door was the wrong size or the opening was the wring size or I don’t know what i am talking about.
 
Last edited:

BillK

Well-known member
Joined
Aug 24, 2006
Messages
9,382
Location
Beautiful Southern Maryland
So the trim piece is only on the one side ? As long as the door extends far enough to be touching where the "x"s are it will be fine.

Show a picture with the door pulled down a foot or two

Garage door seal.jpeg
 
OP
V

vdotmatrix

Well-known member
Joined
Sep 13, 2011
Messages
489
Location
Northern Virginia
So the trim piece is only on the one side ? As long as the door extends far enough to be touching where the "x"s are it will be fine.

Show a picture with the door pulled down a foot or two

Garage door seal.jpeg
Thanks for looking. A picture of the hardware shows a little room for adjustment….
 

Attachments

  • 5F9F920F-090A-473D-99EF-9B2273EFBBFC.jpeg
    5F9F920F-090A-473D-99EF-9B2273EFBBFC.jpeg
    102.9 KB · Views: 149
  • 73C664BA-DB81-4006-8461-00B5970E8B0E.jpeg
    73C664BA-DB81-4006-8461-00B5970E8B0E.jpeg
    101 KB · Views: 144

CraigStu

Well-known member
Joined
May 22, 2014
Messages
4,062
Location
Blacksburg, Va
There isn't much room in that slot to adjust but...1- cut the slot longer and use a large OD fender washer, 2- drill a new hole in the 2x8, 3- going a little off normal here. Buy a new seal and nail it on so the flexible part goes the opposite direction. Rather than the flexible part being visible, it will be hidden but it may extend far enough to be sealing on the flat part of the door.
 
OP
V

vdotmatrix

Well-known member
Joined
Sep 13, 2011
Messages
489
Location
Northern Virginia
There isn't much room in that slot to adjust but...1- cut the slot longer and use a large OD fender washer, 2- drill a new hole in the 2x8, 3- going a little off normal here. Buy a new seal and nail it on so the flexible part goes the opposite direction. Rather than the flexible part being visible, it will be hidden but it may extend far enough to be sealing on the flat part of the door.
Thank you for responding. I am not too excited about the mechanical operation of the door Or modifying…i just dont know or havent studied the science behind this…i would think this coukd be really easy to “foul” up. I think removing that trim on one side will fix it. I have to replace the seal anyway on the sides and top as well as the bottom rubber. (8ft. Wide door).
 
Last edited:
To avoid these ads, REGISTER NOW!

duneslider

Well-known member
Joined
Jan 20, 2013
Messages
2,278
Location
Riverton, Utah
You can also add brush seals to the inside that rub on the door and that will help with the air.

It looks like your opening is a little small for the door which puts your exterior seals pretty close to the indents in the door.
 

dfiler2

Well-known member
Joined
Dec 15, 2014
Messages
2,859
Location
NW Minnesota
In the video, It looks to me like your door or floor are unlevel , I'll bet it's hitting the floor on the right side before the door is all the way down. I agree wwith the others on just removing that extra trim on the left side.
 
OP
V

vdotmatrix

Well-known member
Joined
Sep 13, 2011
Messages
489
Location
Northern Virginia
In the video, It looks to me like your door or floor are unlevel , I'll bet it's hitting the floor on the right side before the door is all the way down. I agree wwith the others on just removing that extra trim on the left side.
I think that is the easiest solution next to having the door replaced with the right sized door for the space. The door is a little , just a little wide for the opening. Are garage doors a standardized width?
 
OP
V

vdotmatrix

Well-known member
Joined
Sep 13, 2011
Messages
489
Location
Northern Virginia
There are pretty standard widths 8,9, 10, 12, 14, 16 & 18 are common residential widths. The doors are usually those exact widths if I remember right.
ok...So, standard widths and then tweaking fit during installation.

I don't think I can do much damage replacing the seal and removing the trim...which can easily be replaced if I chicken out
 

CraigStu

Well-known member
Joined
May 22, 2014
Messages
4,062
Location
Blacksburg, Va
When I typed my post I somehow was thinking that you were a little reluctant to remove that 1x3. So I was trying to figure out something that would help but not need the 1x3 removed. Apparently I was a little off there. I think that removing the 1x3 and installing new seals is the best repair.
 
OP
V

vdotmatrix

Well-known member
Joined
Sep 13, 2011
Messages
489
Location
Northern Virginia
When I typed my post I somehow was thinking that you were a little reluctant to remove that 1x3. So I was trying to figure out something that would help but not need the 1x3 removed. Apparently I was a little off there. I think that removing the 1x3 and installing new seals is the best repair.
I very much appreciate you taking the time for your thoughtful response.
 
Last edited:
OP
V

vdotmatrix

Well-known member
Joined
Sep 13, 2011
Messages
489
Location
Northern Virginia
Hi everyone...I am ready to bite the bullet in the morning. I brought the seals down from the attic. They looked a little worse for wear cooking up there in the heat...... I measured them and they are the same size as the the ones on there now except of course for length.

attachment: Do I need to add any adhesive or caulking between what I am attaching them to and the seals or just measure and nail them in place.? then caulk and then paint?
 

beemerphile

Well-known member
Joined
Jul 9, 2021
Messages
727
Location
Danielsville, GA USA
Moving the track doesn't move the door. The rollers float in the mounts. There are more ways to screw it up than there are to help it, plus you are looking at some dangerous spring tension. Study up on it or call someone.
 
OP
V

vdotmatrix

Well-known member
Joined
Sep 13, 2011
Messages
489
Location
Northern Virginia
Moving the track doesn't move the door. The rollers float in the mounts. There are more ways to screw it up than there are to help it, plus you are looking at some dangerous spring tension. Study up on it or call someone.
Post #5 sums up what I am doing today, no mention of tracks or rollers over here. I am waiting for a response to post #25. Thanks for responding.
 
OP
V

vdotmatrix

Well-known member
Joined
Sep 13, 2011
Messages
489
Location
Northern Virginia
i removed the sealsand this right sidewill seal better without the trim but I now have a space i need to fill in. Should I use mortar, cement caulk. The seal will be the only thing there. They used galvanized nails spaced apart with other nails shot with a nail gun that were rusted.
IMG_1434.jpeg
 

Attachments

  • IMG_1433.jpeg
    IMG_1433.jpeg
    896.6 KB · Views: 41
  • IMG_1435.jpeg
    IMG_1435.jpeg
    910.3 KB · Views: 30
  • IMG_1437.jpeg
    IMG_1437.jpeg
    1.1 MB · Views: 44
OP
V

vdotmatrix

Well-known member
Joined
Sep 13, 2011
Messages
489
Location
Northern Virginia
I guess the 1x3 pads it out to cover the backside of the bricks. Heading to the big box stores to see if there is anything that is 1x3x? i could use to pad this thing out. Perhaps that PVC PRODUCT. Yup, stressing out here.
 
Last edited:

kaymccampbell

Well-known member
Joined
Feb 27, 2015
Messages
29,634
Location
Upstate New York
So, what you do, is replace the 1 by with something thin, like 1/4 something. I've seen dead door seals, with the rubber ripped off, used as the trim to set new door seals on.
 
OP
V

vdotmatrix

Well-known member
Joined
Sep 13, 2011
Messages
489
Location
Northern Virginia
So, what you do, is replace the 1 by with something thin, like 1/4 something. I've seen dead door seals, with the rubber ripped off, used as the trim to set new door seals on.
God thank you! So should i mix mortar or buy a tube of something for the caulking gun?maybe even Luann or 1/4 “ ply….but the pvc would be ideal I suppose.
 

kaymccampbell

Well-known member
Joined
Feb 27, 2015
Messages
29,634
Location
Upstate New York
The PVC is more enduring than any wood product. Good caulk would be your friend here. There's mortar looking caulk. It's often called sanded caulk or sealer. Blowes and Dome Hepot often carry it, and well as siding suppliers.
 
OP
V

vdotmatrix

Well-known member
Joined
Sep 13, 2011
Messages
489
Location
Northern Virginia
found a 1/4" pvc board at Lowes. gonna rip two 2.5 x 88 inch sections and I think i will replace both sides. but, if it aint broke...

Do I want to use screws for the pvc that I can countersink since they be covered when O add the seals?
I also bout some galvanized nails for the seals.

PVC dust from ripping this board to width is some pretty evil stuff....it sticks to everything as if it gets electrically charged...really weird.
 
Last edited:
OP
V

vdotmatrix

Well-known member
Joined
Sep 13, 2011
Messages
489
Location
Northern Virginia
IMG_1442.jpeg
I screwed the pvc and seals instead of using galvanized. I still have to caulk and add a few more screws tomorrow. I gained a 1/2” on both sides but the door seals a lot better using the 1/4” PVC boards i ripped. I don’t even have to paint! I al going to trim away the mortar caulk and caulk with the white stuff I bought today. Whoever did this job decades ago did a pretty ****** job. The job is never going to be done better than the homeowner doing the work….
 

Attachments

  • IMG_1441.jpeg
    IMG_1441.jpeg
    925.1 KB · Views: 35
To avoid these ads, REGISTER NOW!
Top Bottom