To avoid these ads, REGISTER NOW!

Garage Leaning?

straight65

Member
Joined
Dec 2, 2009
Messages
11
Location
Ohio
How do I straighten up my garage? the back half is leaning about 8 degrees and the front is at 6 or so. I will get a picture up as soon as I can, but any ideas would help.

I don't have the money to rebuild right now since I'm back in college and unemployed because my job moved 4 hours away for no apparent reason.:confused:
 
To avoid these ads, REGISTER NOW!

kbs2244

Well-known member
Joined
Nov 11, 2006
Messages
14,065
rieferman has the way.

If the garage is stick built with 2x4 studs have some sheets of at least ½ inch plywood (NOT OSB) to nail to the studs as reinforcing gussets.
 

rieferman

Well-known member
Joined
May 18, 2009
Messages
2,586
Location
Collegeville PA (30 min west of Philly)
You can also use 2x4's nailed to the studs on an angle as your reinforcement at the end. Your goal is to tip it straight, and then provide a method of keeping it that way (some people use cables and turn buckles and leave them in place permanently, but in my opinion, this option tends to loosen up over time one way or another.. so I'd use plywood as kbs suggests, or 2x4 bracing)
 

mooman

Well-known member
Joined
Jun 9, 2005
Messages
2,788
Location
CHICAGO, IL
I have the same problem. I think it's due to a poor slab.
What do you attach the anchor poins to and what did you use?
 

kwb

Well-known member
Joined
May 1, 2009
Messages
1,770
Location
PNW
rieferman has the way.

If the garage is stick built with 2x4 studs have some sheets of at least ½ inch plywood (NOT OSB) to nail to the studs as reinforcing gussets.

Funny the OSB around here is rated for shear panels and generally speaking has better strength characteristics than plywood.

Say what you will about OSB but if kept out of the elements it is a very good building material and if you look at a lot of ACX or CDX plywood you will realize why the engineered lumbers are as common as they are. The OSB is flatter, more consistent, denser, Ply has voids, is very often warped.
 

rieferman

Well-known member
Joined
May 18, 2009
Messages
2,586
Location
Collegeville PA (30 min west of Philly)
mooman wrote
What do you attach the anchor poins to and what did you use?

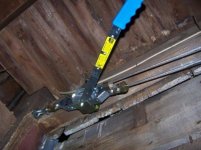
I bought 1/2 inch thick, 12 inch long, eye bolts and the thickest, biggest washers I could find.

I drilled diagonally through the sill plate low on the "lean away" side (the building is leaning away from this point). Did the same thing through the top plate on the "lean towards" side up high. Put eye bolts with washers on the outside of building. The more you can spread out the impact of where the eye bolt is pulling, the less you'll damage the exterior siding.

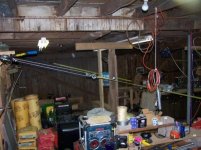
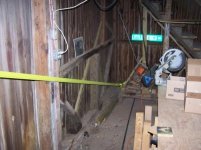
Attached come along to the low eye bolt (easier to reach here), truck towing strap (rated for 10,000 pounds break strength... FAR cheaper and more useful later than chain or cable) to the come along, other end of truck towing strap to the high eye bolt.

I would suggest in a smaller building to do this once at each corner and once in the middle.

Tighten all, and continue to cycle through tightening each one as needed until the building moves to where you want it to be.

Listen to the building. Noise will happen of course. The art is to decide how much noise is ok. Constantly inspect the eye bolts for evidence they're uncurling/bending. Constantly inspect whether eye bolts are threatening to pull though your damage. Constantly watch teh sill and top plate to make sure they're not separating from the framing.

Once it is where you want it to be, use aforementioned bracing options to keep it there. Once all bracing in place, SLOWLY release a notch from each come along one by one in a cycle while monitoring whether your bracing is working properly.

If any of the steps seem problematic.... STOP working on it, and post another question, or better yet get a pro in to look at it. (although, in my case, I got the pro in to inspect my ideas BEFORE I started and would highly recommend that)

Good luck!
(disclaimer, you're on your own, I take no responsibility)
 

Attachments

  • come along.jpg
    come along.jpg
    49.9 KB · Views: 155
  • come along 1.jpg
    come along 1.jpg
    41.5 KB · Views: 145
  • come along 2.jpg
    come along 2.jpg
    42.9 KB · Views: 146
  • come along 3.jpg
    come along 3.jpg
    42.6 KB · Views: 154
Last edited:

OccupantRJ

Well-known member
Joined
May 15, 2009
Messages
10,961
Location
Eastern North Carolina
My building was out of square all around. I stripped each outer wall and took a cable come-along and squared one wall at a time, nailing OSB on the outside as soon as it was true. I then installed 1/2" plywood on the inside walls. I just drilled a hole in the top plate and dropped a piece of threaded rod and nut through with enough standing up to hook to. I drilled a hole through the lower part of the corner posts and used more threaded rod to hook to for the pull(s). My building was built by a bunch of yokels who nailed masonite lap siding on the studs with no sheathing or bracing whatsoever. I could stand on a stepladder and move the building at the roof line before I started on it. It's now more solid than most buildings of it's type. The front wall was an inch wider at the top than at the bottom. I cut the top plates into in a staggered fashion, sawed loose all the trusses on one side, and used the puller to pull the 2 side top plates into proper perspective, then renailed and used hurricane clips on the trusses. A palm nailer really worked well for this. The left side wall had a 2 inch curve in it in 26 feet. I pulled a string and corrected this at the same time. I just left the weight of the roof on the crooked side, and bumped the wall into alignment with a sledgehammer at the outside of the upper top plate. I had blocks screwed to the underside of the trusses to stop the wall when correct, as I was outside while aligning. NOW I have a square solid building. It really was not as bad a job as it sounds, as I was going to sheath the building anyway.
 

lilredex

Well-known member
Joined
Apr 29, 2006
Messages
5,954
Location
Toronto
Had the same problem with the back wall. Hooked a chain and turnbuckle diagonally inside, pulled it up straight then braced it with a 2 X 4 on the wall (on the opposite diagonal). Built up the other studs to 2 X 6 size, insulated then sheathed with some re-useable 1 X 10 pine boards that I got down the road. That was twenty years ago, and still straight and solid.
 

Attachments

  • Copy of Garage Shots #1.jpg
    Copy of Garage Shots #1.jpg
    47 KB · Views: 54

hyisbm

Well-known member
Joined
Jun 1, 2009
Messages
119
mines doing the same, actually worse. I do plan on replacing so I'm doing my best to not put money into it. I keep joking I'm waiting for mother nature to help push it over. How would my insurance take that?:headscrat
 
To avoid these ads, REGISTER NOW!

Falcon67

Well-known member
Joined
Jun 11, 2009
Messages
18,371
Location
Merkel, TX
I fixed this one with floor jacks and careful maneuvering:
rnbooth1.jpg

garageA.jpg

garageC.jpg

garageF.jpg

garageM.jpg


When I built the new shop (one behind this "shed"), I used long 1x4s as diagonal braces notched into the wall framing. Made for a nice square stiff building.
 
Last edited:

rieferman

Well-known member
Joined
May 18, 2009
Messages
2,586
Location
Collegeville PA (30 min west of Philly)
good call Willy, I forgot that piece.. You seriously do need a good escape route.

Biggest dangers are:
- strap or eye bolt breaking causing a sling shot effect.. If you're in the line of fire, problems.
- Building gaining momentum as a result of broken anything.

When working a come along at high tension, I wear safety goggles and thick gloves, and keep my head turned away. Will it save me? Maybe, maybe not.
 

Falcon67

Well-known member
Joined
Jun 11, 2009
Messages
18,371
Location
Merkel, TX
Nice job, Falcon67. Patience is surely a positive to have, isn't it?
Yep, took 9 years of "thinking about fixin' the shed" to finally do it. :lol_hitti
"Escape" is a good idea. On that project of mine, the back wall was supported by the new shop in the rear. Left the main door open and the path to safety clear when jacking and went a little (2-3") at a time on one side, then over to the other. The west side was the worst, so when the east wall got in a decent level I braced that before really jacking on the west side.

The amazing thing is that after being in that condition for who knows how many years, the building just eased back into form without breaking anything, not even the curvy decking. It has maybe 1~2" of "twist" to the east in the front from where it was originally built, but I never got the impression that it was about to run away on me. BUT - never let the guard down until the new 4x4 supports on the west side were set and bolted up to the rafters and plate.
 

rieferman

Well-known member
Joined
May 18, 2009
Messages
2,586
Location
Collegeville PA (30 min west of Philly)
porschedude wrote
and don't use any tensioning hardware that stores energy like a web strap.

I went against this advice in my case, although I agree with it if you can afford it. I was spanning 30 feet in 3 places, and 50 feet in two more places to move my large two story building. To buy that much chain or cable of the correct break strength would have been extremely cost prohibitive. Instead, I sized tow straps with a higher break strength than the pull strength of my come alongs (i.e. 2 ton come alongs paired with straps with 10,000 pounds [more than 2 tons] break point).

Since I was pulling in multiple places on a diagonal (not a dead lift) and was watching it very closely, I was "comfortable" (i.e. still sweating bullets) with this :)
 

GarageEnvy

Well-known member
Joined
Nov 17, 2009
Messages
1,282
Location
Fresno
Other beat me to it but for the sake of reinforcement I'll repeat the advice of going slowly (it lets the building adjust and release some tension). Also x2 on not using energy storing straps. The escape route is critical as well. I've been under a cabin that was being leveled when there was a loud pop and a beam let go and I've seen straps snap and break bystanders legs. I also happened along a Jeep with a hood that had been sheared in half by a broken winch strap. If any of your cables, straps, chains or anchors are showing wear, don't use them.
 
OP
S

straight65

Member
Joined
Dec 2, 2009
Messages
11
Location
Ohio
Thanks for all of the great advice guys! I only have one question, can I use a chain type come-along or should it be cable? I already have a chain style, but I can borrow a few cable ones if that would be safer/easier.
 

Mattlt

Well-known member
Joined
Nov 30, 2005
Messages
1,382
Location
MN
Very good advice here. I'll just add that you make sure you have something to stop the movement - if you only want it to move ** inches, have something in place to make sure it doesn't move ** + yy inches.

Also, if you are lifting the building crib it up as you go. Use wood shims and blocks. Do NOT use bricks, concrete blocks, and the like. They could crumble.

And as mentioned, don't be in a hurry.
 
To avoid these ads, REGISTER NOW!
Top Bottom