Hey everyone,
I know people appreciate follow-up posts after installs to help with their own DIY projects, so I figured I'd share my experience.
Location: Central Kansas
Garage: Attached
Size: 1,184 sq. ft.
Layout: L-shaped
Ceiling Height: 10 ft.
Insulation: R-13 walls, R-38 ceiling
Garage Doors: 12' and 16', both insulated
Interior: Finished drywall
Air Sealed: Yes
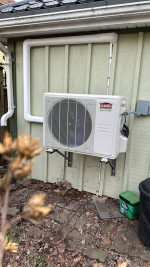
Mini Split: Pioneer Diamante Pro (Model WYT024GLS120RL) – 24,000 BTU, 21 SEER2
Vacuum Pump: XtremepowerUS 1/4 HP (Model 71093) — don't forget the adapter.
Line Set Cover: DuctlessAir 14'
Over the past year, I think I reached the end of YouTube and the internet researching mini splits before finally working up the courage to install one. HVAC isn't really in my wheelhouse, but I'm fairly handy. The only part that really made me nervous was pulling the vacuum and releasing the refrigerant.
I had the electrician install the disconnect when our house was built, so the electrical side was straightforward aside from connecting the whip. Even with the breaker off and the disconnect pulled, I was still convinced I was going to end up like the cat in Christmas Vacation. Thankfully, everything turned out to be much easier than I expected.
I chose the Pioneer because the price was right ($1,350 on sale at Home Depot), it appears to have good parts availability and support, and the warranty seemed solid. I seriously considered the MrCool DIY since it's recommended so often, but after buying a vacuum pump and adapter for about $135, I still came out roughly $250 ahead once I sell the pump. I also ended up with a higher-efficiency unit. Pioneer actually has very good installation instructions, and after reading through them once and following along, the process was surprisingly straightforward.
The installation took me about 13 hours from start to finish. That included a two-hour pressure test, a one-hour Harbor Freight run for crow's-foot wrenches, and watching Pioneer’s 30-minute installation video twice. If you're not an overthinker like I am, I honestly think this could be a solid 6–8 hour project.
I waited a few days before installing the line set cover just to make sure everything was operating correctly. I mounted the indoor unit right at the bend of the "L" so roughly one-third of the airflow feeds the long, narrow section while the remaining two-thirds cools the main 36' × 24' area. So far, it's worked out extremely well.
Verdict: Do it.
The biggest surprise was how much humidity was in my garage. I had no idea until this thing started pulling water out of the air. At one point I measured nearly a liter per hour during the initial cool-down.
I keep the garage set at 78°F during the summer. The inverter is fantastic—it loafs along at low speed most of the time and ramps up when one of the big doors opens, which happens often since our 16-foot garage door has basically become the family's front door. I will post back with power consumption, I will say last month went up from the previous month $30 but, it also was way hotter so the house unit was working harder as well.
When I'm planning to spend time working in the garage, I drop it to about 74°F, and I've found myself out there a lot more simply because it's comfortable now.
This has easily been one of the best upgrades I've made to the garage.
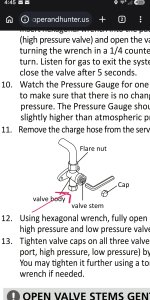
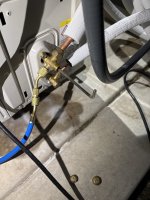
If you're nervous about pulling a vacuum, don't be. Looking back, it really isn't as intimidating as it seems. You still have to make the same flare connections regardless of which system you buy. The difference is that with a traditional system, the refrigerant stays sealed inside the outdoor unit until you're ready to release it. Pulling a vacuum removes air and moisture from the lines and lets you verify your flare connections are leak-free before opening the service valves. Once I understood what was actually happening, the process made a lot more sense.
Anyway, hopefully this helps someone who's on the fence. Feel free to ask if you have any questions, and thanks to everyone here who unknowingly answered mine while I was researching.
Lastly, I'd be remiss if I didn't give a shout-out to my pal ChatGPT. It was a real lifesaver in a few areas throughout this project!
I know people appreciate follow-up posts after installs to help with their own DIY projects, so I figured I'd share my experience.
Location: Central Kansas
Garage: Attached
Size: 1,184 sq. ft.
Layout: L-shaped
Ceiling Height: 10 ft.
Insulation: R-13 walls, R-38 ceiling
Garage Doors: 12' and 16', both insulated
Interior: Finished drywall
Air Sealed: Yes
Mini Split: Pioneer Diamante Pro (Model WYT024GLS120RL) – 24,000 BTU, 21 SEER2
Vacuum Pump: XtremepowerUS 1/4 HP (Model 71093) — don't forget the adapter.
Line Set Cover: DuctlessAir 14'
Over the past year, I think I reached the end of YouTube and the internet researching mini splits before finally working up the courage to install one. HVAC isn't really in my wheelhouse, but I'm fairly handy. The only part that really made me nervous was pulling the vacuum and releasing the refrigerant.
I had the electrician install the disconnect when our house was built, so the electrical side was straightforward aside from connecting the whip. Even with the breaker off and the disconnect pulled, I was still convinced I was going to end up like the cat in Christmas Vacation. Thankfully, everything turned out to be much easier than I expected.
I chose the Pioneer because the price was right ($1,350 on sale at Home Depot), it appears to have good parts availability and support, and the warranty seemed solid. I seriously considered the MrCool DIY since it's recommended so often, but after buying a vacuum pump and adapter for about $135, I still came out roughly $250 ahead once I sell the pump. I also ended up with a higher-efficiency unit. Pioneer actually has very good installation instructions, and after reading through them once and following along, the process was surprisingly straightforward.
The installation took me about 13 hours from start to finish. That included a two-hour pressure test, a one-hour Harbor Freight run for crow's-foot wrenches, and watching Pioneer’s 30-minute installation video twice. If you're not an overthinker like I am, I honestly think this could be a solid 6–8 hour project.
I waited a few days before installing the line set cover just to make sure everything was operating correctly. I mounted the indoor unit right at the bend of the "L" so roughly one-third of the airflow feeds the long, narrow section while the remaining two-thirds cools the main 36' × 24' area. So far, it's worked out extremely well.
Verdict: Do it.
The biggest surprise was how much humidity was in my garage. I had no idea until this thing started pulling water out of the air. At one point I measured nearly a liter per hour during the initial cool-down.
I keep the garage set at 78°F during the summer. The inverter is fantastic—it loafs along at low speed most of the time and ramps up when one of the big doors opens, which happens often since our 16-foot garage door has basically become the family's front door. I will post back with power consumption, I will say last month went up from the previous month $30 but, it also was way hotter so the house unit was working harder as well.
When I'm planning to spend time working in the garage, I drop it to about 74°F, and I've found myself out there a lot more simply because it's comfortable now.
This has easily been one of the best upgrades I've made to the garage.
If you're nervous about pulling a vacuum, don't be. Looking back, it really isn't as intimidating as it seems. You still have to make the same flare connections regardless of which system you buy. The difference is that with a traditional system, the refrigerant stays sealed inside the outdoor unit until you're ready to release it. Pulling a vacuum removes air and moisture from the lines and lets you verify your flare connections are leak-free before opening the service valves. Once I understood what was actually happening, the process made a lot more sense.
Anyway, hopefully this helps someone who's on the fence. Feel free to ask if you have any questions, and thanks to everyone here who unknowingly answered mine while I was researching.
Lastly, I'd be remiss if I didn't give a shout-out to my pal ChatGPT. It was a real lifesaver in a few areas throughout this project!