To avoid these ads, REGISTER NOW!

Garage Project: Nightstands

NUTTSGT

Super Moderator
Staff member
Joined
Sep 14, 2009
Messages
50,893
Location
Northern Central Ohio
Since I slowed down on the garage, I needed to work in the garage and do a much needed project. When we bought our house, we purchased a new bedroom suite. I urged the wife to put off buying the accompanying nightstands since we were buying so much other stuff. I told her we would come back and buy them in a few months. Well, a few months turned into a year and the place went out of business and she hasn't let me live that down.

So I have owed it to my wife to get a set of nightstands. Luckily with any good project, you need to have the proper tools and this gave me a reason to purchase some more pipe clamps. This followed with another set, a wood working vise and a doweling jig. I figured I was doing alright tool wise to start.


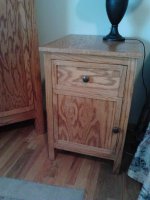
In the background, you can see the Poplar I purchased to make the nightstands with. What you can see is the sheet of hardwood plywood for the sides and back.

Getting this project started also included mounting the vise in to my worktable.
 
To avoid these ads, REGISTER NOW!
OP
N

NUTTSGT

Super Moderator
Staff member
Joined
Sep 14, 2009
Messages
50,893
Location
Northern Central Ohio
I had taken some measurements of what we were currently using for nightstands, a set of old Sansui speakers from the early 70's. I also checked out some pictures on line of them and came up with a plan.

The first thing I did was cut out the pieces and laid them out.


Once I was happy and knew the measurements were correct, I broke out the new doweling jig and started drilling. I clamped and drilled it together.
 
OP
N

NUTTSGT

Super Moderator
Staff member
Joined
Sep 14, 2009
Messages
50,893
Location
Northern Central Ohio
In the last picture, you can see the sides I made out of plywood. I cut dadoes for the top and bottom shelves. I stood them up to make sure everything looked good and I was happy with the way it was going.


About this time, I decided another tool purchase was in order, a new wrench as I was tired of going to the other side of the garage to get one out of my toolbox to swap out the blades for the table saw.. . . plywood blade, ripping blade, dado blade and crosscut blade One thing that made the project easier, was the cabinet I replaced the window with. Some of those of you that have followed my Refurb thread will remember it.


For me good organization has helped me with my projects and saved time.
 
OP
N

NUTTSGT

Super Moderator
Staff member
Joined
Sep 14, 2009
Messages
50,893
Location
Northern Central Ohio
Since everything lined up, I proceeded to screw the sides together with the shelves.


I made some drawers, glued and screwed them together. I also made some doors with a panel in the center. I was going to cut dadoes but decided to my fingers were to close to the blade, so I bought a new tool, a router and a few bits.
 
OP
N

NUTTSGT

Super Moderator
Staff member
Joined
Sep 14, 2009
Messages
50,893
Location
Northern Central Ohio
Another shot of them partially assembled.


Here is a shot of the back, I think you can see the blocks on the inside where I glued and screwed it together.
 
OP
N

NUTTSGT

Super Moderator
Staff member
Joined
Sep 14, 2009
Messages
50,893
Location
Northern Central Ohio
I broke out the hammer and chisel, marked the doors and went at it to make a recess for the hinges.


Recesses cut and the holes drilled for the screws.


I'm not sure you can pick it up yet in the pictures but the stands are "left" & "right" as to the way the door opens up.
 

MFolks

Well-known member
Joined
Feb 3, 2013
Messages
1,045
Location
Springfield Mo.
What's the Wife's opinion so far? Think your project will meet her high standards? Going to stain the nightstands, or just use varnish, or Tung oil?
 
OP
N

NUTTSGT

Super Moderator
Staff member
Joined
Sep 14, 2009
Messages
50,893
Location
Northern Central Ohio
What's the Wife's opinion so far? Think your project will meet her high standards? Going to stain the nightstands, or just use varnish, or Tung oil?

She's happy with them as they were an anniversary gift. :lol: I do have more pictures, took a break for supper.
 
OP
N

NUTTSGT

Super Moderator
Staff member
Joined
Sep 14, 2009
Messages
50,893
Location
Northern Central Ohio
Here's an up close picture of the bottom part of the front. It was cut with the bandsaw, another great investment if you're going to be wood working.


Next up was making the top. Since I don't have a planer, I didn't want to glue some smaller boards together. I choose to use a plywood center, trimmed with some poplar.

I cut everything to size.


Then I broke out the doweling jig once again.


All the pieces were doweled, glued and clamped together. I used some smal c-clamps to hold the corners flush.
 
OP
N

NUTTSGT

Super Moderator
Staff member
Joined
Sep 14, 2009
Messages
50,893
Location
Northern Central Ohio
Finally, after filling some screw & nail holes, some sanding and adding some hardware it was time for stain.


All that is left is a few coats of polycrylic.
 

pepi

Well-known member
Joined
Mar 27, 2013
Messages
2,883
Location
Woodstock, GA
Nice wood work and wood working shop well laid out. Wood working always looks so easy, but I know it is not. Takes a lot of practice to make things like you have there, nice and true looking, well done.
 
OP
N

NUTTSGT

Super Moderator
Staff member
Joined
Sep 14, 2009
Messages
50,893
Location
Northern Central Ohio
Nice wood work and wood working shop well laid out. Wood working always looks so easy, but I know it is not. Takes a lot of practice to make things like you have there, nice and true looking, well done.

Its been since high school since I made stuff like this, 25+ years ago. Believe me, there was more than once that I had to stop and make sure I was doing stuff right. I tried to take my time and do it right.
 
OP
N

NUTTSGT

Super Moderator
Staff member
Joined
Sep 14, 2009
Messages
50,893
Location
Northern Central Ohio
Nice work. I wish you were closer. I'd relieve you of those old heavy speakers.

Sorry, Zeke,the wife already asked where they were going and I told her the garage. I ended the conversation that I'll have to get a new receiver to run them too. :beer:
 
To avoid these ads, REGISTER NOW!

rharman

Well-known member
Joined
Apr 22, 2012
Messages
8,769
Location
SoCal
Very nice.

A couple of questions.....

1) Did you seal the poplar first? My experience staining poplar without sealing it produced less than desirable results (ie: really bad).
2) Did you consider pocket holes instead of dowels and, if so, why go the dowel route?

Good planning ahead on the opposite swing doors too.
 
OP
N

NUTTSGT

Super Moderator
Staff member
Joined
Sep 14, 2009
Messages
50,893
Location
Northern Central Ohio
Very nice.

A couple of questions.....

1) Did you seal the poplar first? My experience staining poplar without sealing it produced less than desirable results (ie: really bad).
2) Did you consider pocket holes instead of dowels and, if so, why go the dowel route?

Good planning ahead on the opposite swing doors too.

1. No I didn't seal it first. I put 2 coats on it followed by a heavier 3rd coat of stain. The first coat of Minwax polycrylic went on this a.m.

2. I considered it and talked about it with a guy at work. I checked out the Kreg jig but didn't want to spend another hundred bucks on it right now. I have too much other stuff to buy before I spend that much on a jig that I may not use for awhile.


Is that Minwax cherry stain?

No, the color is Colonial Maple. I bought some Minwax but took it back as it had very little pigments in the can. On a test piece of poplar, I put 4 coats and it still barely had enough color to stain the wood. I bought a sample pack of Varathane Colonial Maple from Menard's, they sell a test packet for 30¢. I tested it out in the parking lot on the same piece of wood. ( I brought it with me for that sole test purpose) It's first coat was as dark as the four coats of Minwax. I went back inside Menard's and bought a can.

What I bought (qt can and test packet) from Menard's


http://www.menards.com/main/interio...onial+Maple&vendorNameDisplay_facet=Varathane

Those came out beautifully.
Want to make a couple more? ;)

Thanks Steevo, and no thanks. :lol_hitti First off, I wouldn't know what to charge for a set of them and then I think the shipping would be a deal breaker, aside from the fact that you have skills yourself. :thumbup:
 

kfainf

Well-known member
Joined
Jul 28, 2007
Messages
300
Great job on those nightstands! They look like they have a Shaker furniture design influence. Great idea for an anniversary present!
 

Slednut

Well-known member
Joined
Dec 20, 2012
Messages
2,550
Location
Washington state
Those are really nice, you really don't need a lot of woodworking tools to make decent furniture. I've made most of the furniture in our house with a table saw, router, cut off saw and biscuit jointer. I built these night stands with material I had left over after building a chest of drawers and corner hutch for one of our bedrooms.
 

Attachments

  • Night Stand 2.jpg
    Night Stand 2.jpg
    139.2 KB · Views: 73

Lhorn

Well-known member
Joined
Sep 17, 2008
Messages
1,487
Man, for a guy who had to go out and buy some tools for the job, you sure look like you know what you're doing. Great job.
 
OP
N

NUTTSGT

Super Moderator
Staff member
Joined
Sep 14, 2009
Messages
50,893
Location
Northern Central Ohio
Great job on those nightstands! They look like they have a Shaker furniture design influence. Great idea for an anniversary present!
Yes, I guess they do have a shaker influence. Thanks.

Those are really nice, you really don't need a lot of woodworking tools to make decent furniture. I've made most of the furniture in our house with a table saw, router, cut off saw and biscuit jointer. I built these night stands with material I had left over after building a chest of drawers and corner hutch for one of our bedrooms.
Thanks and yours look very nice too.

Eric, you did a nice job on those night stands. A cabinetmaker you now be.
LOL, I still prefer to call myself a hack with a hammer. :lol_hitti

WOW, nice work.
Thanks for the compliment.

Man, for a guy who had to go out and buy some tools for the job, you sure look like you know what you're doing. Great job.
Thank you.

Basically what I bought I had used before, just been many years. It is great to have the tools though. I figure since I'm 43, I can still get 30 years of use out of them. :dunno:
 

sxk122

Well-known member
Joined
Sep 19, 2011
Messages
400
Location
Dallas, TX
Those look really good.

I'm in the same pickle..... I do believe I'm going to copy your idea and design..... *bookmarked*

My anniversary is August..... 13th?....... I need to get working... lol
 
OP
N

NUTTSGT

Super Moderator
Staff member
Joined
Sep 14, 2009
Messages
50,893
Location
Northern Central Ohio
Those look really good.

I'm in the same pickle..... I do believe I'm going to copy your idea and design..... *bookmarked*

My anniversary is August..... 13th?....... I need to get working... lol


Copy and paste all you want, August will be here before you know it. :beer:

They turned out nice.

I prefer biscuits over dowels. Once I bought my biscuit jointer, I haven't used my doweling jig.

Thanks. My step-dad has a biscuit cutter, I could have borrowed that but I wanted to use dowels, something old school that I was familiar with. :dunno:
 
To avoid these ads, REGISTER NOW!
Top Bottom