To avoid these ads, REGISTER NOW!

Above 1200 Sq/FT Garage Refurb®

Wokspaces above 1200 squarefeet.
OP
N

NUTTSGT

Super Moderator
Staff member
Joined
Sep 14, 2009
Messages
50,882
Location
Northern Central Ohio
Re: Garage Refurb

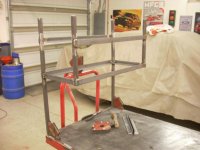
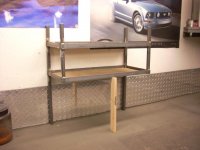
I'm just in a holding pattern right now as I'm waiting on a call from the fab shop for the rest of my steel, namely expanded metal.


Just an update for those wondering, still in a holding pattern. I haven't checked out to see if they have my expanded metal sheared or bent for a few weeks. I really don't want to piss them off and not get it at all. They have my cell number to give me a call when it's done.


. . . . been a month.
 
To avoid these ads, REGISTER NOW!
OP
N

NUTTSGT

Super Moderator
Staff member
Joined
Sep 14, 2009
Messages
50,882
Location
Northern Central Ohio
Re: Garage Refurb

Since it's so darn cold outside and been a victim of getting this crud that is going around, I haven't felt like doing much. I did remind myself yesterday since garage projects were slow that I should fix something that has been driving me nuts for a while.

It doesn't show very well in the picture but the center sticks out. I've been wanting to trim it down so it was flush.

It's hardly noticeable from this angle but I know it's there and time for it to get corrected.

Unscrew the OSB, break out the recip saw and it's trimmed back.
 

Attachments

  • GR985.jpg
    GR985.jpg
    84.5 KB · Views: 8
  • GR986.jpg
    GR986.jpg
    70 KB · Views: 9
  • GR987.jpg
    GR987.jpg
    93.6 KB · Views: 9
Last edited:
OP
N

NUTTSGT

Super Moderator
Staff member
Joined
Sep 14, 2009
Messages
50,882
Location
Northern Central Ohio
Re: Garage Refurb

Then I screwed the osb back on. It took less than 5 minutes to fix it but I've put it off for a few years, since I did the bathroom about 6 years ago.


While I was at it, I decided to repaint the lower section of gray on the wall.


2 hours out in the garage and I accomplished 2 things that have been on my list for awhile. All I have to do is let the paint dry and put a few things back.


sorry about the crappy pics.
 

Attachments

  • GR990.jpg
    GR990.jpg
    60.7 KB · Views: 7
  • GR989.jpg
    GR989.jpg
    46.3 KB · Views: 7
  • GR988.jpg
    GR988.jpg
    67 KB · Views: 7
Last edited:
OP
N

NUTTSGT

Super Moderator
Staff member
Joined
Sep 14, 2009
Messages
50,882
Location
Northern Central Ohio
Re: Garage Refurb

I hope in garage became much warmer now.


Yes, the insulation is helping so far it's been atleast 3 degrees warmer on average when I go out inthe morning.

Why are there holes drilled in the OSB? Don't y just love how the little things drive you nuts?


Originally I drilled those thinking some heat might pass through there and keep the plumbing from freezing. Now that the bathroom has been done for 6 years or so, I don't think freezing is an issue.

I was going to replace that piece but I figure it's a source of fresh air for the wood burner. While the crawlspace isn't vented, I know being an old building it's not air tight. I did staple some screen on the back side to help keep the creepy crawlies out of the garage.

Yeah, it really did drive me nuts. I doubt anybody ever noticed it but I knew it was there. Now that it's fixed, I'll probably forget all about it.
 

C_F

ALLIANCE MEMBER
Joined
Jan 21, 2005
Messages
9,675
Location
Utah...SNOW BLOWS!
Re: Garage Refurb

Whew!! I started this thread a little over two weeks ago here at work (reading when I had time), and finally reached the end!:eyecrazy: The transformation you have made to your garage, house & property over the years is really impressive.
Thanks for sharing life in your garage with us.:beer:

I received an email today from my wife, which was sent to her after a few FWDs. It was written several years by a gentlemen remembering about his Father and days gone by. I thought that it was an interesting read and wanted to share it with those of you that have followed along with my Garage Refurb.

That article is SO COOL!! If it were me, I would print it off on some paper that appears aged, frame it, and hang it next to the blueprint you have...or right next to your Gates belts. :thumbup:
 
OP
N

NUTTSGT

Super Moderator
Staff member
Joined
Sep 14, 2009
Messages
50,882
Location
Northern Central Ohio
Re: Garage Refurb

Whew!! I started this thread a little over two weeks ago here at work (reading when I had time), and finally reached the end!:eyecrazy: The transformation you have made to your garage, house & property over the years is really impressive.
Thanks for sharing life in your garage with us.:beer:


That article is SO COOL!! If it were me, I would print it off on some paper that appears aged, frame it, and hang it next to the blueprint you have...or right next to your Gates belts. :thumbup:


Thank you and that's a great idea. :beer:
 
OP
N

NUTTSGT

Super Moderator
Staff member
Joined
Sep 14, 2009
Messages
50,882
Location
Northern Central Ohio
Re: Garage Refurb

Just an update for those wondering, still in a holding pattern. I haven't checked out to see if they have my expanded metal sheared or bent for a few weeks. I really don't want to piss them off and not get it at all. They have my cell number to give me a call when it's done.


. . . . been a month.

I stopped in today to see if they had made any progress and found that the sheet of expanded metal was put back in the sheet rack. He originally told $30 for a approximately 4'x4' sheet or atleast I thought. I told him would just take it so they didn't have to bother with it. I realize they are busy doing real contracts so I would be out of their hair. Then he quoted me the price just for the metal.

$10 :dunno: 
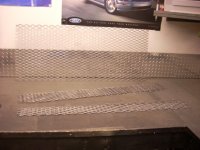
He said I was buying it for scrap price. Hell yeah. The actual size was 46.5" by 48.5" and I believe it's 14ga.


Since I couldn't bend it easily, I cut it into strips that should work just fine.


Basically, this will be how it will fit together.


Tomorrow, I will start grinding the paint on the beam in order to get it welded up. :thumbup:
 

Attachments

  • GR991.jpg
    GR991.jpg
    115.7 KB · Views: 6
  • GR992.jpg
    GR992.jpg
    92 KB · Views: 6
  • GR993.jpg
    GR993.jpg
    104.1 KB · Views: 6
Last edited:
OP
N

NUTTSGT

Super Moderator
Staff member
Joined
Sep 14, 2009
Messages
50,882
Location
Northern Central Ohio
Re: Garage Refurb

I started to weld the brackets up this afternoon. I wasted the morning waiting on a meeting that got cancelled then made a trip to Menard's. Since Menard's didn't have any lights I wanted, I went down the road to HD.

As you can see here, I have a few brackets up and part of the expanded metal laying in place. I was trying to make sure it all laid out correctly before I started welding.


A shot underneath of what it will look like. The expanded metal will allow me to "see" what's up there, I hope.


All the brackets in place and the bottom laying in place. I have pieces cut for the sides and those will get added after the bottom is tacked in place.


You might have noticed the two uprights (on the center brackets) that have holes in them. That was left over scrap from another project. I placed those brackets there because I thought it might add in hanging the light from. I'm not sure how I'm doing that but I buy a pair of T8 (2 bulb) fixtures with covers on them since they are closer to the floor than the ceiling lights.
 

Attachments

  • GR996.jpg
    GR996.jpg
    91.5 KB · Views: 7
  • GR995.jpg
    GR995.jpg
    86.2 KB · Views: 8
  • GR994.jpg
    GR994.jpg
    78.3 KB · Views: 8
Last edited:

buspilot23

Member
Joined
Jan 5, 2015
Messages
24
Location
Boise, Idaho
Re: Garage Refurb

I just killed two hours reading this thread, and I'm exhausted. Nice work Eric. Your perseverance is inspirational and the transformations to your house and garage are something to be very proud of.
 
OP
N

NUTTSGT

Super Moderator
Staff member
Joined
Sep 14, 2009
Messages
50,882
Location
Northern Central Ohio
Re: Garage Refurb

I finished up the steel rack and did get a coat of paint on it last night. Unfortunately, I no pics of the paint but I'll be putting another coat or two on it tomorrow and adding a fluorescent light to it. I'll also add a new T8 light to the other end of the beam.

Here is the finished rack. I think it should work out quite nicely for me.


Here's a shot from the ladder and gives you a better look at how the rack is made.


I tried to line up all the expanded metal and weld the edges together. It really tightened it up and took the bow out from between the brackets.
 

Attachments

  • GR997.jpg
    GR997.jpg
    92.9 KB · Views: 7
  • GR998.jpg
    GR998.jpg
    89.3 KB · Views: 8
  • GR999.jpg
    GR999.jpg
    96.8 KB · Views: 7
Last edited:
OP
N

NUTTSGT

Super Moderator
Staff member
Joined
Sep 14, 2009
Messages
50,882
Location
Northern Central Ohio
Re: Garage Refurb

The following quote came from another member's shop build. I didn't want to clog up his thread with my pics so I will post it in my own thread.

What is wrong with yours? It looks like a tank like mine. The new ones are **** compared to ours.


As I mentioned in your thread, I believe my stove needs some work or it's coming to the end of it's life. It's showing it's age and maybe some work will fix a few issues that have been getting worse. It's not to the point that I'm afraid to use it but I believe it does need some TLC.

I believe this is a small item. I can correct it easily. This little cover has been on the stove since I bought the place. The cover appears to be a small outlet cover and has warped over the years. There are times when the fire starts dying down I do get a little smoke out of it. On a whim, I decided to try to see if some Copper RTV would work. Many guys use it on their race cars instead of exhaust gaskets and it doesn't come in contact directly with the flames.
My fix will be to weld the hole shut.

At one point, I'm not sure if I got it too hot or the previous owner did. There appears to be some warpage on the backside. There's not much I can do here other than not build some extreme fires.
 

Attachments

  • GR1000.jpg
    GR1000.jpg
    66.8 KB · Views: 9
  • GR1001.jpg
    GR1001.jpg
    46.8 KB · Views: 10
Last edited:
OP
N

NUTTSGT

Super Moderator
Staff member
Joined
Sep 14, 2009
Messages
50,882
Location
Northern Central Ohio
Re: Garage Refurb

Between the stove and the heat exchanger the two sections bolt together.The piece on the stove actually bolts through the inside of the stove. When I first light the stove, I might get a small whiff of smoke and a tad bit of ash makes it's way out. Once the stove heats up, the gap closes up and there is no issue.


My fix will to be take it apart, clean it and reseal it. Once that is done, I'll bolt it back together, maybe. I've tried to tighten the bolts up which led us up to the next issue.


The flange on the inside, I know it's hard to see with the fire burning, but the bolts are square head. As I tried to tighten up the bolts, some of them seemed to spin. This leads me to think it's one of two problems, the bolts are broke or the square heads are spinning in the flange. The holes are square and the bolts are square so they shouldn't turn.
 

Attachments

  • GR1003.jpg
    GR1003.jpg
    48.4 KB · Views: 5
  • GR1002.jpg
    GR1002.jpg
    68.9 KB · Views: 4
Last edited:
OP
N

NUTTSGT

Super Moderator
Staff member
Joined
Sep 14, 2009
Messages
50,882
Location
Northern Central Ohio
Re: Garage Refurb

I forgot to add, until I saw the Hob Lob thread. I also picked up a dry erase board for the garage. I had to move a few things around but as soon as it was up, I was putting it to good use.


Attachments

  • GR1004.jpg
    GR1004.jpg
    82.4 KB · Views: 7
Last edited:

rixtrix1

Well-known member
Joined
Aug 25, 2013
Messages
3,010
Location
Chandler, AZ (from west NE)
Re: Garage Refurb

Glad I don't need a big ol stove to keep my garage warm. But on the other hand if I really needed it, I would probably have a lot more space. Hope it lasts the winter for you and is an easy fix when it gets warmer.
 
Last edited:
To avoid these ads, REGISTER NOW!
OP
N

NUTTSGT

Super Moderator
Staff member
Joined
Sep 14, 2009
Messages
50,882
Location
Northern Central Ohio
Re: Garage Refurb

Rack turned out nice, Eric. A lot of piecework, I'll bet. How did all the welding go; probably a little easier after the first 20 or so?

The welding was more of the easy part (other than the welding over my head) and cutting the expanded metal was the PITA. It would havebeen nice if they would have sheared and bent it for me but I was tired of waiting. Atleast I got to buy it for scrap price. Doing the small welding gave me a chance for some good practice. ;)


Glad I don't need a big ol stove to keep my garage warm. But on the other hand if I really needed it, I would probably have a lot more space. Hope it last the winter for you and is an easy fix when it gets warmer.

I don't think there will be an issue lasting the winter. I just think it needs some TLC this Spring after I'm done heating. . . .then it'll get put off till Summer, then fall and we'll be back to heating season again. :lol:
 
OP
N

NUTTSGT

Super Moderator
Staff member
Joined
Sep 14, 2009
Messages
50,882
Location
Northern Central Ohio
Re: Garage Refurb

Well, I went out to the garage this morning and decided to (for some unknown reason) work on my wood stove.


I popped the little cover off to find three holes, not just one like I thought there would be. Granted one off them is a bolt hole, but I was expecting just one hole.


I ground the area down including the inside edges of the hole. I cut a piece of steel, drilled a hole in the center and tack welded a bolt through it as a handle.

Once it was in place, I tacked it and then proceeded to slowly work my way around the three holes filling them. Since the stove front is cast steel, I tried to do a little by little and not put too much heat into it.


Being this was open for years, it did have a lot of **** in the steel. Even though I tried to grind, sand and wire brush most of the **** off the stove, there was still some impurities that showed up as I was welding.

After an hour or so of slow welding work, this is where I'm leaving it. mark one more thing off the list.


Attachments

  • GR1008.jpg
    GR1008.jpg
    79.1 KB · Views: 7
  • GR1007.jpg
    GR1007.jpg
    74 KB · Views: 7
  • GR1006.jpg
    GR1006.jpg
    60.8 KB · Views: 6
  • GR1005.jpg
    GR1005.jpg
    70.4 KB · Views: 7
Last edited:
OP
N

NUTTSGT

Super Moderator
Staff member
Joined
Sep 14, 2009
Messages
50,882
Location
Northern Central Ohio
Re: Garage Refurb

I managed to get one of the lights hung up today. After I stood back, I realized that my brackets were crooked and it shows with the light. It just might be coming back off to get straightened out.


After I made sure the light worked, I loaded the rack up with some steel. Hopefully, it's not laying on the floor in the morning.
 

Attachments

  • GR1009.jpg
    GR1009.jpg
    87.6 KB · Views: 5
  • GR1010.jpg
    GR1010.jpg
    89.4 KB · Views: 6
Last edited:

impala4speed

Well-known member
Joined
Oct 11, 2009
Messages
194
Location
Youngstown, Ohio
Re: Garage Refurb

Nice repair on the wood stove. Welding that cast iron couldn't have been easy.
The steel rack came out looking really good. Great idea and use of that space.
 
OP
N

NUTTSGT

Super Moderator
Staff member
Joined
Sep 14, 2009
Messages
50,882
Location
Northern Central Ohio
Re: Garage Refurb

Nice repair on the wood stove. Welding that cast iron couldn't have been easy.
The steel rack came out looking really good. Great idea and use of that space.

I might be wrong but I think the stove is cast steel and not cast iron. I welded a spot on the door last year where it had wore off over 50 years. I heated it up before I welded it and it came out ok. I figured with a fire going, it would be preheated (if needed) and when the fire went out later that night, it would slowly cool down.

So far, it looks ok, getting a slight dicoloration to it but no cracks.

:beer:
 

jeff g

Well-known member
Joined
Jul 16, 2011
Messages
191
Location
Manchester UK
Re: Garage Refurb

I managed to get one of the lights hung up today. After I stood back, I realized that my brackets were crooked and it shows with the light. It just might be coming back off to get straightened out.


After I made sure the light worked, I loaded the rack up with some steel. Hopefully, it's not laying on the floor in the morning.

Hi
Is the light not going to get in the way when loading the rack,
the first thing that would happen to me is that i would hit or drop some steel on the light.:dunno: lol
 
OP
N

NUTTSGT

Super Moderator
Staff member
Joined
Sep 14, 2009
Messages
50,882
Location
Northern Central Ohio
Re: Garage Refurb

Hi
Is the light not going to get in the way when loading the rack,
the first thing that would happen to me is that i would hit or drop some steel on the light.:dunno: lol

No it shouldn't. I'll be standing on a short step ladder to get steel in or take it out of the rack. If I hit it, it will be my fault, my dumb luck.

I'll have to get another picture showing how much access room I have.

EDIT

As promised, here's a picture showing how much access room I have above the light.


Attachments

  • GR1011.jpg
    GR1011.jpg
    73.7 KB · Views: 7
Last edited:
OP
N

NUTTSGT

Super Moderator
Staff member
Joined
Sep 14, 2009
Messages
50,882
Location
Northern Central Ohio
Re: Garage Refurb

The other light bracket shown above, I made heating and bending the steel. I decided to go another way for the other one, what I should have done in the first place.

I used this block of plywood as a mock up for the correct angle. I measured, cut the steel to the dimensions on the plywood and drilled a couple of mounting holes.


Next up was to weld them together. I used a different vise and not at the bench.


Attachments

  • GR1013.jpg
    GR1013.jpg
    73.6 KB · Views: 5
  • GR1012.jpg
    GR1012.jpg
    60.4 KB · Views: 5
Last edited:
OP
N

NUTTSGT

Super Moderator
Staff member
Joined
Sep 14, 2009
Messages
50,882
Location
Northern Central Ohio
Re: Garage Refurb

I got bracket temporarily bolted together and clamped them to the beam. Once it was where I wanted it, I welded the brackets up. Then it was just a matter of putting bulbs in the fixture, putting a cord on it and the difuser cover on.


I picked up a piece of slotted angle a few weeks ago to make a new drying rack. I used to hang painted parts off the the side of the wood stove but I had to duck when I walked by. On occassion, I came close to walking into them when I wasn't paying attention.
I lagged this angle above the wood stove to take advantage of it's dry heat to aid in drying and to keep it out of the way. I bent up some screw hooks into "S" hooks and some new drying wire hangers.


Attachments

  • GR1014.jpg
    GR1014.jpg
    81.7 KB · Views: 3
  • GR1015.jpg
    GR1015.jpg
    71 KB · Views: 3
Last edited:

rixtrix1

Well-known member
Joined
Aug 25, 2013
Messages
3,010
Location
Chandler, AZ (from west NE)
Re: Garage Refurb

Nice storage rack, Eric. You have a good inventory of steel, too. Always helps to have some around for those projects that just happen to pop up now and again.
 
OP
N

NUTTSGT

Super Moderator
Staff member
Joined
Sep 14, 2009
Messages
50,882
Location
Northern Central Ohio
Re: Garage Refurb

Nice storage rack, Eric. You have a good inventory of steel, too. Always helps to have some around for those projects that just happen to pop up now and again.

Thanks. I had some steel stock before I started this project, just a few pieces on hand. Once I got the idea, a buddy wanted to take a ride to a place about 15 minutes away and check out their steel rack. Fortunately, they are close and fair enough on price, that's where I'll buy my steel from now on.


I picked some up the other day, a 1/2"x 13' and 3/4" x 20', both 1/8" wall for less than $12. I thought that was fair as a piece of 3/4" x 4' at TSC was about $6-7.
 
OP
N

NUTTSGT

Super Moderator
Staff member
Joined
Sep 14, 2009
Messages
50,882
Location
Northern Central Ohio
Re: Garage Refurb

One of the projects that I was waiting on doing till the steel rack was finished was for the FD. It's a shelf bracket for one of the compartments on the ladder tower. It should free up floor space to fit the K12 saw in there also.

Working on the frame.


Trying to get myself some much needed practice.


Damn **** camera, I need to start using the wifes. :spit: I look at the pictures on the camera and they look ok til lI post them up and think, who's the camera hack ?
 

Attachments

  • GR1016.jpg
    GR1016.jpg
    70.6 KB · Views: 8
  • GR1017.jpg
    GR1017.jpg
    57 KB · Views: 8
Last edited:
OP
N

NUTTSGT

Super Moderator
Staff member
Joined
Sep 14, 2009
Messages
50,882
Location
Northern Central Ohio
Re: Garage Refurb

I have it propped against the wall and the wood stick is for that purpose only. It'll be bolted to the back wall of the compartment when finished. I'm going to take it in and mark for the mounting tabs this week.


The paint cans are for reference and that shelf will hold the two 1 gallon gas cans, regular and mixed. One box will hold stuff for the Stihl chainsaw and the other, petrogen torch accessories.


Attachments

  • GR1018.jpg
    GR1018.jpg
    75 KB · Views: 4
  • GR1019.jpg
    GR1019.jpg
    80.1 KB · Views: 6
Last edited:

captain14

Well-known member
Joined
Dec 19, 2012
Messages
7,025
Location
Near College Park Maryland 20740
Re: Garage Refurb

Please post a finished and installed shot of the new shelf/bracket on the Tower. I am sure there is interest among the members here on what is carried on the apparatus. I used to describe my Heavy Rescue Squad as a big toolbox on wheels.
 
OP
N

NUTTSGT

Super Moderator
Staff member
Joined
Sep 14, 2009
Messages
50,882
Location
Northern Central Ohio
Re: Garage Refurb

What is a "petrogen" torch? I've never heard that name.

A petrogen torch uses O2 and gasoline for fuel. It's on the right. The gasoline is a common item we use and the oxygen can be filled by our mother bottles at the station into a common EMS O2 bottle.

Please post a finished and installed shot of the new shelf/bracket on the Tower. I am sure there is interest among the members here on what is carried on the apparatus. I used to describe my Heavy Rescue Squad as a big toolbox on wheels.

Here it is the compartment. Top shelf has mixed and regular gas and bar oil for the Stihl. The second shelf has a box for the torch equipment and another for the chainsaw.


Another closer picture of the shelf.


. . . . . cell phone pics.
 

Attachments

  • GR1020.jpg
    GR1020.jpg
    145 KB · Views: 7
  • GR1021.jpg
    GR1021.jpg
    121.7 KB · Views: 6
Last edited:

rexpittman

Well-known member
Joined
Dec 27, 2014
Messages
55
Location
Corpus Christi
Re: Garage Refurb

:thumbup:Always a pleasure to keep up with your thread!! Well done as always! I hope my shop comes out as equipped as yours in time!!:thumbup:
 

Hounddog

Well-known member
Joined
Nov 3, 2013
Messages
386
Location
NW Florida
Re: Garage Refurb

Hey brother, glad to see your still at it. I've been gone awhile....distracted by other hobby forums. But I'm still working on my garage. Thanks for posting your stove project. I've got a stove that I'm wanting to install...

I'm finding out that insurance companies don't like them.... First you can't spank your kids now you can't have a wood stove in your garage...I'm guessing USAA won't like it. (crazy old man rant over)

Aggravating, that regardless if you do it all correct and maintain it as it should be...
 
OP
N

NUTTSGT

Super Moderator
Staff member
Joined
Sep 14, 2009
Messages
50,882
Location
Northern Central Ohio
Re: Garage Refurb

Hey brother, glad to see your still at it. I've been gone awhile....distracted by other hobby forums. But I'm still working on my garage. Thanks for posting your stove project. I've got a stove that I'm wanting to install...

I'm finding out that insurance companies don't like them.... First you can't spank your kids now you can't have a wood stove in your garage...I'm guessing USAA won't like it. (crazy old man rant over)

Aggravating, that regardless if you do it all correct and maintain it as it should be...

Glad to see you're still working on yours, I need to get back to check it out again.

Let me know what USAA says about wood stoves in garages. I've considered possibly making a switch to them.
 
To avoid these ads, REGISTER NOW!
Top Bottom