To avoid these ads, REGISTER NOW!

Above 1200 Sq/FT Garage Refurb®

Wokspaces above 1200 squarefeet.

BuickFarmer

Well-known member
Joined
Apr 5, 2006
Messages
1,415
Location
Athens, Georgia
All that work and then sell it. Can't you keep it for awhile just to admire it and the work you put into it then sell it. I know, the "then sell it" is the part that generally gives trouble.
Nice work!!
 
To avoid these ads, REGISTER NOW!
OP
N

NUTTSGT

Super Moderator
Staff member
Joined
Sep 14, 2009
Messages
50,891
Location
Northern Central Ohio
All that work and then sell it. Can't you keep it for awhile just to admire it and the work you put into it then sell it. I know, the "then sell it" is the part that generally gives trouble.
Nice work!!

I know it sound stupid but I have a chance for several people to see it, they can walk away from it (or with it) and I don't have to deal with CL tire kickers in the future. In fact it might already be sold. A friend was telling another friend about it. :dunno:
 
OP
N

NUTTSGT

Super Moderator
Staff member
Joined
Sep 14, 2009
Messages
50,891
Location
Northern Central Ohio
After getting it all done today and addin gthe new cord, I found something out. I knew the erason the belt was "figured 8" was because of the motor not running the proper direction. I assumed that I could simply reverse it and put on a new belt. My assumption screwed the pooch as the motor can't be reversed.

:(
 
Last edited:

mdbeck1

Well-known member
Joined
Mar 7, 2010
Messages
2,297
Location
Norman, OK
After gettin git all done today and addin gthe new cord, I found something out. I knew the erason the belt was "figured 8" was because of the motor not running the proper direction. I assumed that I could simply reverse it and put on a new belt. My assumption screwed the pooch as the motor can't be reversed.

:(

Can you.... Enlarge the mounting plate for the motor, turn the motor over and mount on the enlarged plate? Of course that messes up the look a little bit.

Hmmmm... build a countershaft to run the motor to and.....
 

bill_rollins

Member
Joined
Mar 31, 2016
Messages
8
Well this is my very first post, and I must say that this very thread is the reason I joined garage journal as Im refurbing my barn into a garage for me. Eric I have very much enjoyed this thread and look forward to more of it. Also I am in Bellevue Ohio and also use to drag race at Norwalk in my 83 stand get. Thanks for the post.
 

Kevin54

MEMBER EMERITUS
Joined
Jan 12, 2005
Messages
29,341
Location
Urbana, Ohio
Sounds like a certain design of a pike pole. If you ever have to rip down drywall, they work wonders. All of out pike poles have a fixed point/hook.

In the picture is one of the old ones that broke and somebody shortened it up. I mounted it to the door. Look similar to that ?


Eric.....Is this at your house or the Fire Department? I think that bench is super cool with the fire hose wrapping it like that. :thumbup:
 

Kevin54

MEMBER EMERITUS
Joined
Jan 12, 2005
Messages
29,341
Location
Urbana, Ohio
Well this is my very first post, and I must say that this very thread is the reason I joined garage journal as Im refurbing my barn into a garage for me. Eric I have very much enjoyed this thread and look forward to more of it. Also I am in Bellevue Ohio and also use to drag race at Norwalk in my 83 stand get. Thanks for the post.

Welcome to Garage Journal. If you would, could you put Ohio into your profile? No need for a city. It just helps when asking or answering questions at times. Thanks very much, and again Welcome!!!!

I don't know if you are interested, but a group of us usually get together and hit up the swap meets. We are having a get together at Canfield on April 30th and you are more than welcome to come.

Eric....the same goes for you to. I'm inviting again. And sorry to hijack.:eek:
 
OP
N

NUTTSGT

Super Moderator
Staff member
Joined
Sep 14, 2009
Messages
50,891
Location
Northern Central Ohio
Well this is my very first post, and I must say that this very thread is the reason I joined garage journal as Im refurbing my barn into a garage for me. Eric I have very much enjoyed this thread and look forward to more of it. Also I am in Bellevue Ohio and also use to drag race at Norwalk in my 83 stand get. Thanks for the post.
Welcome to GJ. I'm glad you enjoyed the thread.

Eric.....Is this at your house or the Fire Department? I think that bench is super cool with the fire hose wrapping it like that. :thumbup:

Kevin, that is the bench I made for up at the station, so yes, that is a TV room up at the fire station. The top is a section of the old floor that was removed back in the late eighties and the tools were old equipment I used. The hose and couplings were stuff I bought at city auction.
 
OP
N

NUTTSGT

Super Moderator
Staff member
Joined
Sep 14, 2009
Messages
50,891
Location
Northern Central Ohio
Sorry for the delay but here's a few pictures of the finished drill press.

Here it is going back together with the base and table mounted on the column.


The finished product.


Attachments

  • GR1135.jpg
    GR1135.jpg
    93.3 KB · Views: 50
  • GR1136.jpg
    GR1136.jpg
    81.8 KB · Views: 54
  • GR1137.jpg
    GR1137.jpg
    91.1 KB · Views: 57
Last edited:

drivesitfar

Well-known member
Joined
Oct 23, 2013
Messages
36,005
Location
Pacific Northwest
Nutts: looks awesome now. sure you don't want to keep it or do you already have a nicer DP? WELL DONE

Just curious what you are cleaning your wrenches with? simple green or do tell? also to make all that steel so shiny what grit disk were you using on your little air tool?
 
OP
N

NUTTSGT

Super Moderator
Staff member
Joined
Sep 14, 2009
Messages
50,891
Location
Northern Central Ohio
Nutts: looks awesome now. sure you don't want to keep it or do you already have a nicer DP? WELL DONE

Just curious what you are cleaning your wrenches with? simple green or do tell? also to make all that steel so shiny what grit disk were you using on your little air tool?

Drill press is gone, cash in hand. I have a small bench top Skil and a floor model (17" or 15" can't remember) older Craftsman.

The wrenches I was using some Evaporust or whatever it is called then I switched to vinegar. I also used a wire brush/brass brush and scotchbrite pads.

On the drill press, I used a strapping disc to knock the rust off, flap discs on the 4.5 grinder. Then cleaned that up with sanding disc and scotchbrites and die grinder. On the column, I also used some Mother's and a foam pad on the grinder to try to give it a nice quick shine.
 

pblanton

Well-known member
Joined
Oct 6, 2014
Messages
52
Location
Black Forest, Colorado
NUTTS: I just finished reading your thread and thoroughly enjoyed it. I have a shop behind my house and am itching to fix it up nice like you have. I even started a thread about it a while ago, but my photos weren't hosted anywhere good and are no longer available online.

I need to go take a few pictures and start up a new thread, and commit to stopping while I am working on a project, to take pictures and post them online. I get so much enjoyment reading about other people's projects and I'm sure people would enjoy reading about mine.

I spent two evenings reading up on your shop and you have really inspired me.
 
OP
N

NUTTSGT

Super Moderator
Staff member
Joined
Sep 14, 2009
Messages
50,891
Location
Northern Central Ohio
NUTTS: I just finished reading your thread and thoroughly enjoyed it. I have a shop behind my house and am itching to fix it up nice like you have. I even started a thread about it a while ago, but my photos weren't hosted anywhere good and are no longer available online.

I need to go take a few pictures and start up a new thread, and commit to stopping while I am working on a project, to take pictures and post them online. I get so much enjoyment reading about other people's projects and I'm sure people would enjoy reading about mine.

I spent two evenings reading up on your shop and you have really inspired me.

Thank you for the gracious compliments, they are appreciated.

You might want to try using Photobucket to host your pictures, it seems that Imgur no longer allows linking to GJ as we have a classified section here.

Best of luck to you on your shop, get a vision, make a plan, set goals and reach them one at a time.
 
OP
N

NUTTSGT

Super Moderator
Staff member
Joined
Sep 14, 2009
Messages
50,891
Location
Northern Central Ohio
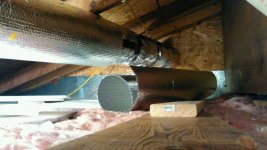
I finally finished something that I have been putting off. . . . the ductwork is completely wrapped.


The fiberglass I had wrapped around the duct work prior to today. The first thing was to wrap the fiberglass with the original foil covering. I tried to tape the seams with duct tape to close them up. After that was done, I cut pieces of the Reflectix bubble wrap and went over foil covering. I taped the Reflectix with some aluminum foil tape, again, doing all the seams.

Will it help, I think so. How much, not sure, but the heat coming out of the register on the other side seemed to be warmer. I should have taken temp readings but I didn't.

Once I was finished, I came in the house, tossed that shirt and pants in the washer and hopped in the shower. I remembered this time not to throw my boxers in the washer with the other clothes.Last time, I tossed them in with the two sets of dirty fiberglass laden work clothes and got itchy **** cheeks.

:lol_hitti
 

Attachments

  • GR1138.jpg
    GR1138.jpg
    85.5 KB · Views: 21
Last edited:
OP
N

NUTTSGT

Super Moderator
Staff member
Joined
Sep 14, 2009
Messages
50,891
Location
Northern Central Ohio
PLEASE DO NOT post pics of itchy **** cheeks.:spit: Nice job on the vent, I would think it'll make a big difference.

You're in luck, no pictures. Funny thing is, I was at work at the FD one day when I had those boxers on and had to literally to upstair and change them, they were driving me nuts.

I washed the shirt and jeans twice today, both cycles, extra rinse and spin. :lol:
 
To avoid these ads, REGISTER NOW!

racer-john

Well-known member
Joined
Apr 1, 2008
Messages
1,461
Location
Newmarket, ON Canada
Eric, I noticed something that upset me: all your receptacles are incorrectly installed. The ground portion of the plug (the "u" shaped hole) should point down, not up, or horizontally. The reason is in the event of something hitting the cord plug and attempting to pull it out, the ground will be the last to exit.
As a fireman I thought you would know that.
I just got up to page 12, sorry for beings late to the party.
 

dpljmurphy

Well-known member
Joined
Oct 13, 2015
Messages
200
Location
Near Agnew WA
Actually I've seen that episode but forgot about it. What did go through my head was the scene at the end of Sahara on top of the tower with all the mirrors.

OK, I'm only on page 33 of at least 83 pages, but you just referenced my favorite guys movie so time to say thanks for the adventure so far, nice work, you are setting a tough example for when I start my shop build out.

Cheers, David
 

rpenterics

Well-known member
Joined
Jun 7, 2012
Messages
362
Location
SE Michigan
Eric, I noticed something that upset me: all your receptacles are incorrectly installed. The ground portion of the plug (the "u" shaped hole) should point down, not up, or horizontally. The reason is in the event of something hitting the cord plug and attempting to pull it out, the ground will be the last to exit.
As a fireman I thought you would know that.
I just got up to page 12, sorry for beings late to the party.

I'll just leave this here..."it is commonly accepted that the National Electrical Code (NEC) of the United States, or NFPA 70, does not provide any specific direction for the orientation of the outlet." http://www.archtoolbox.com/materials-systems/electrical/groundorientation.html
 

ckadams00

Well-known member
Joined
Sep 12, 2011
Messages
1,273
Location
Seattle, WA
Nutts great thread! Just sat down with a cup of coffee and 2:15 hrs later I made it to page 33. Dunno how I never saw this before, it always kind of amazes me when I stumble on a 100+ page thread I've never seen on GJ, and there are lots of them. Man you do great work, or at least you were doing great work in 2012. . . .LOL I'll try to catch up!
 
OP
N

NUTTSGT

Super Moderator
Staff member
Joined
Sep 14, 2009
Messages
50,891
Location
Northern Central Ohio
Eric, I noticed something that upset me: all your receptacles are incorrectly installed. The ground portion of the plug (the "u" shaped hole) should point down, not up, or horizontally. The reason is in the event of something hitting the cord plug and attempting to pull it out, the ground will be the last to exit.
As a fireman I thought you would know that.
I just got up to page 12, sorry for beings late to the party.


No reason to be late to the party, I'm sure you won't be the last to check in.

I completely understand about the outlets. I worked part time for an electrician several years ago and it's one thing he showed me. His train of thought was if a plug was not all the way in or something did fall, hit it and go between the plug and outlet, it would hit the ground. In a perfect world, a breaker should trip before an issue is created, but there is no such thing as a perfect world. I guess I have continued to carry on that line of thought. If the next guy wants to flip them over, he is more than welcome to, after he has handed me a nice check.

So as a firefighter, I know things don't always work like they should, but that's just life.
 
OP
N

NUTTSGT

Super Moderator
Staff member
Joined
Sep 14, 2009
Messages
50,891
Location
Northern Central Ohio
OK, I'm only on page 33 of at least 83 pages, but you just referenced my favorite guys movie so time to say thanks for the adventure so far, nice work, you are setting a tough example for when I start my shop build out.

Cheers, David

Tough example, nah. Just a reminder to make a thread and take plenty of pictures to share.

:beer:

****, 109 pages...:)

Wow, I didn't realize it was that long myself and just checked, over a million views. Holy cow, I need to thank my fellow GJ members for that,.
 
OP
N

NUTTSGT

Super Moderator
Staff member
Joined
Sep 14, 2009
Messages
50,891
Location
Northern Central Ohio
I'll just leave this here..."it is commonly accepted that the National Electrical Code (NEC) of the United States, or NFPA 70, does not provide any specific direction for the orientation of the outlet." http://www.archtoolbox.com/materials-systems/electrical/groundorientation.html

Well that makes sense and thanks for the link.

Nutts great thread! Just sat down with a cup of coffee and 2:15 hrs later I made it to page 33. Dunno how I never saw this before, it always kind of amazes me when I stumble on a 100+ page thread I've never seen on GJ, and there are lots of them. Man you do great work, or at least you were doing great work in 2012. . . .LOL I'll try to catch up!

Well, four years later, I hope you'll be impressed or atleast enjoy the rest of the thread. :beer:
 

dpljmurphy

Well-known member
Joined
Oct 13, 2015
Messages
200
Location
Near Agnew WA
I figure if you're doing it yourself, you're saving money. If you're doing it yourself, you need the proper tool to do the job.. . .so you're doing it yourself and saving money, basically makes the tool free.

Words to live by my friend, no better way to grow the tool set than have a project to use them on. We've all done fixes or builds beating our knuckles into submission and then realize there was a tool to solve that issue: save the skin, save the swear words (or colourful language) and buy the right tool. And then the tool box to put them in and then the new shop addition...

great read, thanks,

David
 
OP
N

NUTTSGT

Super Moderator
Staff member
Joined
Sep 14, 2009
Messages
50,891
Location
Northern Central Ohio
While looking for something in a drawer the other day, I came across some pictures of building the house garage. Since everybody likes pictures, I thought I would share them. Please keep in mind they were taken with a regular camera, probably a disposable and I had to scan them to get them where they are now.

I've shown this picture before but it's nice to see where it was before I started bringing the old down.


I did soem work to the walls and then cut away the roof. Once that was done, I chained a corner and pulled it down. My thougth was to brn it all in the barrel instead of hauling it off. My thoughts were as I was building the new garage, I could just keep the barrel fire going.
 

Attachments

  • GR1140.jpg
    GR1140.jpg
    110.3 KB · Views: 11
  • GR1139.jpg
    GR1139.jpg
    78.9 KB · Views: 9
Last edited:
OP
N

NUTTSGT

Super Moderator
Staff member
Joined
Sep 14, 2009
Messages
50,891
Location
Northern Central Ohio
Needless to say, the garage burning plan lasted about a day or two. I loaded it up on the trailer and halued it away. It cost me $40 at the land fill to dispose of the "demolition." Money well and time well spent.

You can see here, in a previous life, the garage was added on and busted concrete underneath what was the porch. They also had a hokey roof line with a useless valley.


Busting out part of the old concrete and laying out the foot print of the much larger replacement garage.
 

Attachments

  • GR1141.jpg
    GR1141.jpg
    94.1 KB · Views: 8
  • GR1142.jpg
    GR1142.jpg
    91.3 KB · Views: 8
Last edited:
OP
N

NUTTSGT

Super Moderator
Staff member
Joined
Sep 14, 2009
Messages
50,891
Location
Northern Central Ohio
Commencing to dig for the footers, it was a real PITA getting dirt in the driveway stone. having a larger garage that i could park in also made it worthwhile though.


This was one job that I farmed out, laying of the block, however I did help with tending.
 

Attachments

  • GR1143.jpg
    GR1143.jpg
    106.2 KB · Views: 5
  • GR1144.jpg
    GR1144.jpg
    137.9 KB · Views: 5
Last edited:
OP
N

NUTTSGT

Super Moderator
Staff member
Joined
Sep 14, 2009
Messages
50,891
Location
Northern Central Ohio
Another course going down.


While I was doing the house garage, I had one of the retired fire guys come out and replace some standing seam roofing. There used to be a chimeny in the center of the garage. It was a hanging chimney and scared the **** out of me. When Ronnie came out and did the roof, he was in his late sixties. He kept doing roof work into his 70 till he had health issues that caused him to pass away. While he was there, he gave me an old spanner wrench, which I painted and having hanging on the wall of the garage.


Attachments

  • GR1146.jpg
    GR1146.jpg
    109.6 KB · Views: 5
  • GR1145.jpg
    GR1145.jpg
    120.4 KB · Views: 4
Last edited:
OP
N

NUTTSGT

Super Moderator
Staff member
Joined
Sep 14, 2009
Messages
50,891
Location
Northern Central Ohio
Foundation done and starting on the back wall. I saved a few of the old roof raters to use as braces.


Another view of the back wall and you can see the tamper out for the stone addtional floor space.
 

Attachments

  • GR1147.jpg
    GR1147.jpg
    105.6 KB · Views: 3
  • GR1148.jpg
    GR1148.jpg
    100.1 KB · Views: 4
Last edited:
OP
N

NUTTSGT

Super Moderator
Staff member
Joined
Sep 14, 2009
Messages
50,891
Location
Northern Central Ohio
Walls up and trusses in place.


I have always enjoyed the view looking up at newly hung trusses.


Attachments

  • GR1149.jpg
    GR1149.jpg
    111.4 KB · Views: 7
  • GR1150.jpg
    GR1150.jpg
    118.5 KB · Views: 7
Last edited:
OP
N

NUTTSGT

Super Moderator
Staff member
Joined
Sep 14, 2009
Messages
50,891
Location
Northern Central Ohio
Another shot from the front of the new trusses. It's really taking shape and I have learned alot by this time.


Notice the large pile of dirt, rock and concrete which had to get halued off.


Before I could finish the roof, I had to tie into the roof on the back of the house. I had to remove the standing seam, shakes and the batten boards. It was here that I learned to leave the batten boards on the top of the house and nail the OSB onto that.
 

Attachments

  • GR1152.jpg
    GR1152.jpg
    92.6 KB · Views: 7
  • GR1151.jpg
    GR1151.jpg
    120.9 KB · Views: 7
Last edited:

Bob Heine

ALLIANCE MEMBER
Joined
Oct 24, 2009
Messages
10,703
Location
Boca Raton, Florida
NuttsGT, very interesting flashback! Amazing how amateurs like me can screw up a roof. The guy who did that was probably so proud of his innovative solution. "I don't need no stinking architect! or professional roofer"
 
OP
N

NUTTSGT

Super Moderator
Staff member
Joined
Sep 14, 2009
Messages
50,891
Location
Northern Central Ohio
Another view showing the back of the garage with the house roof being stripped.


Man door and O/H doors installed.


As the wife was looking through these pictures, she says look, "we have a nice garage and a dumpy looking house" and laughed.


Once the garage was done, I added new windows to the house, a new front door, new roof on the top of the house, the front porchand finally after all that, siding.

I hope you enjoyed a little trip back through time into 2004.
 

Attachments

  • GR1153.jpg
    GR1153.jpg
    62.2 KB · Views: 10
  • GR1154.jpg
    GR1154.jpg
    91.3 KB · Views: 9
  • GR1155.jpg
    GR1155.jpg
    76.1 KB · Views: 22
Last edited:
OP
N

NUTTSGT

Super Moderator
Staff member
Joined
Sep 14, 2009
Messages
50,891
Location
Northern Central Ohio
NuttsGT, very interesting flashback! Amazing how amateurs like me can screw up a roof. The guy who did that was probably so proud of his innovative solution. "I don't need no stinking architect! or professional roofer"

Thanks Bob. I'm not a professional by any means, but damn, some of the stuff that I have had to correct boggles my mind. :willy_nil
 

jeff g

Well-known member
Joined
Jul 16, 2011
Messages
191
Location
Manchester UK
"we have a nice garage and a dumpy looking house"

Hi
The house, garage & workshop have come a long way in that time.
You have done a great job, & i have enjoyed coming a long for the ride.
It makes me tired just thinking of all the work completed. LOL
Keep it up & have a :beer:
 
To avoid these ads, REGISTER NOW!
Top Bottom