To avoid these ads, REGISTER NOW!

Above 1200 Sq/FT Garage Refurb®

Wokspaces above 1200 squarefeet.

jbmatth

Well-known member
Joined
Jun 3, 2013
Messages
5,681
Location
Northern Ok.
Nutts,
I don't know how I missed out, but somehow I became unsubscribed to your thread about a year ago. I'm back now and following along. Keep up the good work, I enjoy reading what you have going on.
JB
 
To avoid these ads, REGISTER NOW!

C_F

ALLIANCE MEMBER
Joined
Jan 21, 2005
Messages
9,675
Location
Utah...SNOW BLOWS!
Wow, I'm surprised the floor didn't cave in along that side. No wonder the floor felt spongy in places! That's quite a project you have there, at least you get to do it indoors with heat! :)
 

krcoomer

Well-known member
Joined
Jul 22, 2016
Messages
379
Location
Bluegrass region
I know you did a lot of home renovation before you got to the garage, but some things still make you scratch your head. The rot in the floor shows how a little bit of captured moisture over enough years will do a number on wood. If you have any question about mold, spray everything old down with Concrobium. It is a pretty good mold inhibitor.

You said you had plaster over drywall. Are you sure it wasn't sheetrock? I repaired some plumbing required holes in a house a few weeks ago that had 1/2" covered by 1/4" sheetrock. I doubled up 3/8" drywall and it came out quite well. The customer was pleased because apparently the plumber who cut the holes told her it would never quite look right.

Just think, it made sense to someone at some time before you. The little horizontal channel in the drywall for the romex and that someone didn't drive a nail into it sometimes amazes me.
 
OP
N

NUTTSGT

Super Moderator
Staff member
Joined
Sep 14, 2009
Messages
50,903
Location
Northern Central Ohio
Wow, I'm surprised the floor didn't cave in along that side. No wonder the floor felt spongy in places! That's quite a project you have there, at least you get to do it indoors with heat! :)

Yeah it was a bit cool for when the ceiling was open to the attic. It's amazing how much heat a pair of 500W halogens create.


Fortunately, all the sub floor is down now. Next up, another layer of 3/4" OSB that will get shimmed and leveled out.
 
OP
N

NUTTSGT

Super Moderator
Staff member
Joined
Sep 14, 2009
Messages
50,903
Location
Northern Central Ohio
I know you did a lot of home renovation before you got to the garage, but some things still make you scratch your head. The rot in the floor shows how a little bit of captured moisture over enough years will do a number on wood. If you have any question about mold, spray everything old down with Concrobium. It is a pretty good mold inhibitor.

You said you had plaster over drywall. Are you sure it wasn't sheetrock? I repaired some plumbing required holes in a house a few weeks ago that had 1/2" covered by 1/4" sheetrock. I doubled up 3/8" drywall and it came out quite well. The customer was pleased because apparently the plumber who cut the holes told her it would never quite look right.

Just think, it made sense to someone at some time before you. The little horizontal channel in the drywall for the romex and that someone didn't drive a nail into it sometimes amazes me.

It didn't help that the basement (cellar) was basically a dirt floor for a very long time. It's almost completely dry as I have dug down, lowered the floor level and replaced many 5 gallon buckets of dirt with buckets of concrete. A small section at a time. I need to snap a picture of what is looks like now, too bad I never took a before picture.

You can see the channel for the Romex but what you didn't see where it went horizontal. It was actually buried in the plaster. Yeah, some one plastered over the wiring. :dunno:
 
OP
N

NUTTSGT

Super Moderator
Staff member
Joined
Sep 14, 2009
Messages
50,903
Location
Northern Central Ohio
Dude...that is some serious...craftsmanship? Wow!

This place has been a nightmare every time I try to do a project. It's a matter of doing this, to do that and and to do that I have to do this first.

I've snapped a few pictures in the last day or so. I need to take a few more and get them uploaded. You'll have to give me a day or two. I can't remember what all I took pictures of so far but I hope I got a few of my engineering to remove a post.
 

jp828108

Well-known member
Joined
Jun 28, 2011
Messages
484
Location
Ohio
I have really enjoyed browsing through your thread. If you have time would love to see an update, and what you have been up to.
 
OP
N

NUTTSGT

Super Moderator
Staff member
Joined
Sep 14, 2009
Messages
50,903
Location
Northern Central Ohio
Any updates on your home project? :)

I did finally get some pictures uploaded. I had them on the camera SD since PB isn't so friendly. I uploaded them last night. I need to take a few more pics in the house and get them posted up. That remodel project kicked my *** damn near each and every day. I literally had a problem daily trying to get stuff done.

I have really enjoyed browsing through your thread. If you have time would love to see an update, and what you have been up to.

Not much in the garage, I spent the last few months working in/on the house. I finally have that done, for the most part, Sunday I got some garage time, changed oil and rotated tires on the truck. Then I started this project...

https://www.garagejournal.com/forum/showthread.php?t=386586
 
OP
N

NUTTSGT

Super Moderator
Staff member
Joined
Sep 14, 2009
Messages
50,903
Location
Northern Central Ohio
Since we got hit with some snow last night, more snow this Spring than we had at one time during the Winter, I'll make an update on the utility room. It doesn't help that the granddaughter's school got closed and her mother (my daughter) had to exams today for college so good old pop pop is in the house today with the granddaughter. Fortunately at age 6, she can entertain herself but we'll probably make a trip to McDonald's and get her a Happy Meal at lunch time.

Apparently, these attachments are two big so I can only upload two at a time.

Having the very rotted floor, I needed to replace it. I started cutting it out little by little. I didn't want the floor rafters to move around. You might also notice how I spray foamed along the exterior wall at the sill. The other side of this wall is the garage. Another keen eye might spot the large 10" beams the house has for the sill which sits on a stone foundation.

I got one sheet of OSB in and started to remove more flooring. In the second picture, notice the multiple different types of sub-flooring ?
 

Attachments

  • DSCN3557.jpg
    DSCN3557.jpg
    149.1 KB · Views: 160
  • DSCN3558.jpg
    DSCN3558.jpg
    147.5 KB · Views: 154
OP
N

NUTTSGT

Super Moderator
Staff member
Joined
Sep 14, 2009
Messages
50,903
Location
Northern Central Ohio
Once I got the first layer of sub-flooring down, I had to level it out for the second layer to make it flush. Notice the two levels sitting on the floor. That back corner is 2 1/4" low. That needs a little bit more than a few shims.

The second picture is from the utility room doorway. The 2 1/4" drop happens over 7 feet along the back wall. From the middle of the room back (6' level) it's caused by the beam that's under the floor that you could see in the previous post.
 

Attachments

  • DSCN3559.jpg
    DSCN3559.jpg
    144.3 KB · Views: 96
  • DSCN3561.jpg
    DSCN3561.jpg
    147 KB · Views: 97

drivesitfar

Well-known member
Joined
Oct 23, 2013
Messages
36,006
Location
Pacific Northwest
Nutts: best of luck on the new projects. are you going to race this year or did i hear you are putting that hobby on hold?

as far as pictures loading while GJ is making this change i've been able to load 7 pictures per post using the paperclip method by downloading 1, 2 and sometimes 3 pics at a time until i get all 7 loaded. so once you pick a picture (or 2 or 3) just click upload and when it's downloaded add another one or two at a time.

hope this helps.

cheers!!
 
OP
N

NUTTSGT

Super Moderator
Staff member
Joined
Sep 14, 2009
Messages
50,903
Location
Northern Central Ohio
After adding some blocking along the back wall, I had a reference as to how much it was going to take to level the floor. I proceeded to make a grid system to level the floor. Marking it every foot, front to back and side to side, I measured and ripped 2x4s to fit. Once I was done side to side, I added front to back creating a grid that was a 12" square to support the next layer of flooring. Each one of those 9" filler pieces had a taper cut on them.
 

Attachments

  • DSCN3562.jpg
    DSCN3562.jpg
    153.7 KB · Views: 128
  • DSCN3563.jpg
    DSCN3563.jpg
    148 KB · Views: 110
OP
N

NUTTSGT

Super Moderator
Staff member
Joined
Sep 14, 2009
Messages
50,903
Location
Northern Central Ohio
Nutts: best of luck on the new projects. are you going to race this year or did i hear you are putting that hobby on hold?

as far as pictures loading while GJ is making this change i've been able to load 7 pictures per post using the paperclip method by downloading 1, 2 and sometimes 3 pics at a time until i get all 7 loaded. so once you pick a picture (or 2 or 3) just click upload and when it's downloaded add another one or two at a time.

hope this helps.

cheers!!


I'm planning on racing, the car and trailer will be coming out of storage, I believe the middle of next week....give or take a day. Mine is in the back of the row, so every one else ahead of me has to get theirs out.

A buddy of mine, who lives in Michigan, pulled his RV out and he can't come get it yet. So it is sitting on my trailer pad at the moment. I figures the wife wouldn't even notice it as I call her Miss Oblivious. She walked right in the door and asked me if I bought an RV. :lol:
 
OP
N

NUTTSGT

Super Moderator
Staff member
Joined
Sep 14, 2009
Messages
50,903
Location
Northern Central Ohio
After it was all leveled, I glued and screwed and nailed the floor down. I probably went overboard with the PL 375 using multiple tubes but I didn't want this floor creating any future problems. Once I had it laid in place, I added some screws to make sure it stayed then went with 8d nails with the framing nailer. I pity the poor sumbitch that ever tries to take it up.

The second picture shows the bracket I made when I removed a large post. Without going into great detail, the house is built with posts and beams. The front of the house has separate structure than the back of the house. I fretted over this detail for a few days working out the details of if I do this or that. I worked out a mental plan. I didn't consult an engineer nor do I feel what I did is going to cause any issue.
 

Attachments

  • DSCN3564.jpg
    DSCN3564.jpg
    147.8 KB · Views: 181
  • DSCN3560.jpg
    DSCN3560.jpg
    119 KB · Views: 181
OP
N

NUTTSGT

Super Moderator
Staff member
Joined
Sep 14, 2009
Messages
50,903
Location
Northern Central Ohio
Having a project going on, we were without a washer/dryer and I was the nice guy. I hooked them up in my garage to prevent the wife from having to go to the laundry mat. It did create an issue in my garage. Doing laundry and storing all the material out there, left me literal no room to work on anything else.
 

Attachments

  • DSCN3544.jpg
    DSCN3544.jpg
    112.6 KB · Views: 149
  • DSCN3556.jpg
    DSCN3556.jpg
    109.6 KB · Views: 143
  • DSCN3554.jpg
    DSCN3554.jpg
    134.2 KB · Views: 152
To avoid these ads, REGISTER NOW!
OP
N

NUTTSGT

Super Moderator
Staff member
Joined
Sep 14, 2009
Messages
50,903
Location
Northern Central Ohio
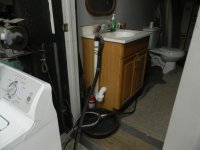
I'm basically finished, just a few small things that can wait. I know it might seem odd, the location of the toilet, it really can't be moved. The utility room is split where it sits between the front and back half of the home. . . . part of it is basement under it and the other part is over the crawl space.

The cabinets are nothing fancy. They are from Menard's unfinished Quality One brand. Nice oak faces but built with particle board. I considered making my own but the sheer magnitude this project turned into, I didn't have the time to make them. This was quick, easy and if one of them has a problem, I can rebuild it at that time.

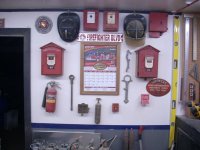
Notice the stuff the wife wants to decorate with...tonight's project.


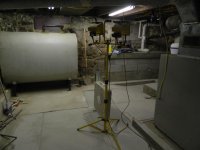
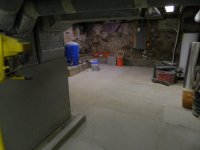
While I admit, this project took longer than expected, it wasn't a simple paint project. I think the wife forgot about that a few times. This room when down to bare studs/joists. Reframing and structure work with new flooring from joists up. Completely rewired, insulated, replumbed (drain/supply) and a new basement doorway for a stock size door was added. Then it got drywall, paint, finish flooring and trim work.
 

Attachments

  • DSCN3574.jpg
    DSCN3574.jpg
    118.2 KB · Views: 218
  • DSCN3575.jpg
    DSCN3575.jpg
    109.9 KB · Views: 208
Last edited:
OP
N

NUTTSGT

Super Moderator
Staff member
Joined
Sep 14, 2009
Messages
50,903
Location
Northern Central Ohio
My closet is in the utility room which is fine. I can grab my stuff without waking the wife when I get up on the weekend mornings when I work. Also lets me stash my boots/coat in here rather than elsewhere in the house. I do want to get a bi-fold door for it. The flooring is a Pergo Outlast we bought at HD. It went in nicely.
 

Attachments

  • DSCN3576.jpg
    DSCN3576.jpg
    81.9 KB · Views: 193
  • DSCN3577.jpg
    DSCN3577.jpg
    108.7 KB · Views: 179
OP
N

NUTTSGT

Super Moderator
Staff member
Joined
Sep 14, 2009
Messages
50,903
Location
Northern Central Ohio
While I'm here, I'll add these.

The front half of the house is a basement and the back is crawlspace. Honestly, it's more of a cellar than basement with a stone foundation. Originally it was not much more than a dirt floor with the sump pump sitting in a mud hole.

One of the first things I did was to make a proper sump pump basin. I started with an 18" tile (might be 15") cutting two holes for 4" tile to fit through. I added some concrete to the bottom as a base. Once that was done, I dug out for some tile in the floor. I had to go deep as I was also going to lower the floor level.

The tile also provides a place for the drains near the well pump/pressure tank and water heater and softner too. The water heater you see in that picture is not in use and just sitting there until it gets installed.
 

Attachments

  • DSCN3578.jpg
    DSCN3578.jpg
    118.2 KB · Views: 222
OP
N

NUTTSGT

Super Moderator
Staff member
Joined
Sep 14, 2009
Messages
50,903
Location
Northern Central Ohio
Like I mentioned, I lowered the floor level. When we bought it, I had to stand up between the floor joists. Now I can stand up every where except under some of the duct work.

I have most of the floor done and I need to add a short wall around the base of the walls in a few places. I started this project shortly after we bought the house and didn't get far. Believe it or not, all the dirt left the basement in 5 gallon buckets and the stone/concrete came back in the same way. The summer before last, I finally got back to work on it getting about half done. Last Summer, I turned up the wick and busted my *** trying to finish before it got cold. I can't tell you how many 80lb bags I used but probably somewhere around 200 plus.

I tried to leave all the utility stuff up on concrete pads in case we ever get water in the basement. Once it warms back up, I'll finish the concrete work and save the wall work for Winter time. My plan is to do some tuck pointing on the walls and make it atleast look better.
 

Attachments

  • DSCN3580.jpg
    DSCN3580.jpg
    116.4 KB · Views: 292
  • DSCN3579.jpg
    DSCN3579.jpg
    109.9 KB · Views: 291

ODIS

Well-known member
Joined
Apr 30, 2012
Messages
2,110
Location
Pacific Northwest
That basement reminds me of visiting my cousins during the winter. We would play in the basement and it would collect water. We made wood hydroplanes, attached some string to them and ran in circles dragging our boats through the water. A ton of fun we had but if we made anything of value wet from our antics, Uncle Hans would kick our butts!

Nice work as always and very much respect your work ethic.

Thank you.
 

C_F

ALLIANCE MEMBER
Joined
Jan 21, 2005
Messages
9,675
Location
Utah...SNOW BLOWS!
Your utility room turned out fantastic! Man, redoing that floor looks like a ton of work just from the photos. Your basement looks nice too...so when do you dig out the rest of the crawl space & make it a full basement? :lol_hitti
 
OP
N

NUTTSGT

Super Moderator
Staff member
Joined
Sep 14, 2009
Messages
50,903
Location
Northern Central Ohio
Your utility room turned out fantastic! Man, redoing that floor looks like a ton of work just from the photos. Your basement looks nice too...so when do you dig out the rest of the crawl space & make it a full basement? :lol_hitti

That will not be happening. The only way to get that dirt out is through a hole in the side of the foundation under the back porch.
 

krcoomer

Well-known member
Joined
Jul 22, 2016
Messages
379
Location
Bluegrass region
That will not be happening. The only way to get that dirt out is through a hole in the side of the foundation under the back porch.

That reminded me of a story a man told me about from before he went into WWII. He had bought one of the old shotgun houses that are prevalent around here. When his wife got pregnant for the nth time they needed more room. He, his father in law and neighbors dug out the crawl space/cellar in his house and poured a floor and walls. He said the first week or so was the hardest because they didn't want to cut down more than one shovel handle to dig with. I have been in several basements added like this where the walls were inset from the footers to keep the house stable. God only knows about moisture levels in those.
 
OP
N

NUTTSGT

Super Moderator
Staff member
Joined
Sep 14, 2009
Messages
50,903
Location
Northern Central Ohio
That reminded me of a story a man told me about from before he went into WWII. He had bought one of the old shotgun houses that are prevalent around here. When his wife got pregnant for the nth time they needed more room. He, his father in law and neighbors dug out the crawl space/cellar in his house and poured a floor and walls. He said the first week or so was the hardest because they didn't want to cut down more than one shovel handle to dig with. I have been in several basements added like this where the walls were inset from the footers to keep the house stable. God only knows about moisture levels in those.

I know the moisture level in our basement since I started this project is way way down. Even though I used no moisture barrier like plastic, it has helped dramatically.
 
OP
N

NUTTSGT

Super Moderator
Staff member
Joined
Sep 14, 2009
Messages
50,903
Location
Northern Central Ohio
Somewhere in the outside pictures when I was siding the last exterior wall, you may have seen a concrete pad. I have no idea why it was put there or what it was used for. Even my neighbor, whose dad used to own the place couldn't remember.

The other night I decided that i had enough of it and started to tear it out. The end I started on with the sledge hammer wasn't bad and thinner. As I got halfway, it got thick at 7 plus inches. So I broke out the rotary hammer drill. Once I was done, I filled it in and topped it off with several bags of top soil I purchased at Family, Farm and Home. Then added some grass seed, well almost 2 lbs.
 

Attachments

  • Copy KIMG0005.jpg
    Copy KIMG0005.jpg
    145.9 KB · Views: 238
  • Copy KIMG0006.jpg
    Copy KIMG0006.jpg
    133.5 KB · Views: 242
OP
N

NUTTSGT

Super Moderator
Staff member
Joined
Sep 14, 2009
Messages
50,903
Location
Northern Central Ohio
Been awhile and have done a few things so I might as well post up some pictures.


First off, one of the LED can lights died and I needed to replace it. Small project. I don't use these lights under the outside overhang very often but they are nice to have.

I also hung a few more things on my firefighter wall.
 

Attachments

  • 12212018 misc garage pic 001.jpg
    12212018 misc garage pic 001.jpg
    151.2 KB · Views: 93
  • 12212018 misc garage pic 003.jpg
    12212018 misc garage pic 003.jpg
    128.6 KB · Views: 111
OP
N

NUTTSGT

Super Moderator
Staff member
Joined
Sep 14, 2009
Messages
50,903
Location
Northern Central Ohio
I decided awhile back that I wanted to put some wire wheels on my bench grinder and the decision was made to buy a second grinder. I used some Menard's rebates to buy a MasterForce 8" grinder.

It was going to replace the small Skil 5" grinder that I have had for about 20 years. The Skil them would get wire wheels, coarse and fine. I picked up second stone for the larger 8" grinder.

Turns out 5" wire wheels are hard to come by locally, so I grabbed a 6" wheel hoping it would fit in the guard. Nope, so I started enlarging the guard.
 

Attachments

  • 01032019 grinder 001.jpg
    01032019 grinder 001.jpg
    111 KB · Views: 103
  • 01032019 grinder 002.jpg
    01032019 grinder 002.jpg
    156 KB · Views: 89
  • 01032019 grinder 003.jpg
    01032019 grinder 003.jpg
    123.5 KB · Views: 107
OP
N

NUTTSGT

Super Moderator
Staff member
Joined
Sep 14, 2009
Messages
50,903
Location
Northern Central Ohio
I finished up the guard but didn't really like the look, even though it's sole purpose was to do nothing but contain errant wires that came loose.


Now to mount the grinders, I chose to a receiver hitch mounting system and stack the grinders. This way they took up the same foot print but could be rotated top/bottom as needed.

First wall mounting plate fabbed up.
 

Attachments

  • 01052019 grinder 002.jpg
    01052019 grinder 002.jpg
    110.2 KB · Views: 110
  • 01052019 grinder 001.jpg
    01052019 grinder 001.jpg
    130.8 KB · Views: 125
OP
N

NUTTSGT

Super Moderator
Staff member
Joined
Sep 14, 2009
Messages
50,903
Location
Northern Central Ohio
This morning I hopped online and saw Menard's have brought the 11% sale back again. I did a quick count on rebate $$ I had on hand and checked out bench grinders on their site. The decision was made to replace to replace the Skil. I bought an Performax 8" grinder and it will have the wire wheels on it. I also picked up a coarse wire wheel from HD. I'll be using the brass wire wheel that came with the MasterForce grinder.

I needed to make a second wall mount, so I cut more tubing. I drilled it like the first one and then welded a nut on the side. This is what I'll be securing the grinders with so they don't vibrate about or out.
 

Attachments

  • 01062019 grinder 001.jpg
    01062019 grinder 001.jpg
    156.4 KB · Views: 95
  • 01062019 grinder 002.jpg
    01062019 grinder 002.jpg
    114.4 KB · Views: 85
  • 01062019 grinder 003.jpg
    01062019 grinder 003.jpg
    111.9 KB · Views: 91
OP
N

NUTTSGT

Super Moderator
Staff member
Joined
Sep 14, 2009
Messages
50,903
Location
Northern Central Ohio
Next up was welding it to another piece plate steel. This is the old piece the Skil grinder used to sit on it, the reason for the middle set of holes.

I'll admit my welds aren't the best but they'll work for this project.
 

Attachments

  • 01062019 grinder 004.jpg
    01062019 grinder 004.jpg
    125.4 KB · Views: 75
  • 01062019 grinder 005.jpg
    01062019 grinder 005.jpg
    138.4 KB · Views: 86
OP
N

NUTTSGT

Super Moderator
Staff member
Joined
Sep 14, 2009
Messages
50,903
Location
Northern Central Ohio
The first grinder mount made and waiting on paint. These are the two grinders that I will be using, both 8" bench grinders. I still need to swap out the stones for wire wheels on the Performax grinder.
 

Attachments

  • 01062019 grinder 009.jpg
    01062019 grinder 009.jpg
    129.7 KB · Views: 132
  • 01062019 grinder 008.jpg
    01062019 grinder 008.jpg
    121.1 KB · Views: 99
To avoid these ads, REGISTER NOW!
Top Bottom