OP

You are using an out of date browser. It may not display this or other websites correctly.
You should upgrade or use an alternative browser.
You should upgrade or use an alternative browser.
Above 1200 Sq/FT Garage Refurb®
- Thread starter NUTTSGT
- Start date
Wokspaces above 1200 squarefeet.


OP


Nick_Wa
Well-known member
Can't wait to see the finished product. I'm getting ready to surface Mount a Siemens 100A in my garage.
Sent from a Galaxy Nexus in Canada.
Sent from a Galaxy Nexus in Canada.
jeffmoss26
Well-known member
Re: garage refurb
Looks like fun!
Looks like fun!
Fyrme
Well-known member
Re: garage refurb
Looking great Eric.
Looking great Eric.
Vernmotor
Well-known member
Re: garage refurb
Looks like you got a rat's nest there ! EEK
Looks like you got a rat's nest there ! EEK
OP
Re: garage refurb
Good luck on your future project there.
Yeah fun alright.")
Yeah it's a bit of a mess or least it looks like it. While the power is back on, the only thing that is hooked up are part of the lights and the air compressor. Hopefully, I can get most of the wiring back in without having to extend anything. I truly wish it was a new build with all new wiring so I could make it look neater but I have to make do with what I have.
Can't wait to see the finished product. I'm getting ready to surface Mount a Siemens 100A in my garage.
Good luck on your future project there.
Looks like fun!
Yeah fun alright.
Thanks.Looking great Eric.
Looks like you got a rat's nest there ! EEK
Yeah it's a bit of a mess or least it looks like it. While the power is back on, the only thing that is hooked up are part of the lights and the air compressor. Hopefully, I can get most of the wiring back in without having to extend anything. I truly wish it was a new build with all new wiring so I could make it look neater but I have to make do with what I have.
Vernmotor
Well-known member
Re: garage refurb
Thumbs UP !!
Let me get this straight. Your background is not in construction. You watched home improvement shows on tv and you went and did this to your garage.
You are ...garage... hero level.
Thumbs UP !!
OP
Re: garage refurb
Just a hack with a hammer
Let me get this straight. Your background is not in construction. You watched home improvement shows on tv and you went and did this to your garage.
You are ...garage... hero level.
Just a hack with a hammer
OP
Re: garage refurb
Not much progress today, I had a few things to do in town, stopped by a friend's house to BS and went out to eat with my parents. I did get a few circuits hooked back up and still have another 7-8 to go. One of them, the one for the welder, I have to cut and extend the conduit and rewire it.
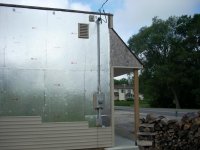
I did snap a few pictures of the new meter base and mast.

From a different angle.

You can see that I used a siding block for mounting the anchor up top. I actually took the anchor apart and added a longer 5" lag screw. This allowed it to go through the 2x material inside the block, the 7/16" OSB, the 3/4" wood siding and still grab plenty of meat in the wall stud.
I had made up the mounting plate behind the meter base last year and wrapped it with coil stock. The one issue I had with doing that is the offset it created. I used a premade offset and still had to bend the PVC conduit. I also used a siding block for the conduit/LB at the bottom to make a clean siding installation. Using the siding blocks, above and below, will allow me to trim and fit the siding where it should look better.
Not much progress today, I had a few things to do in town, stopped by a friend's house to BS and went out to eat with my parents. I did get a few circuits hooked back up and still have another 7-8 to go. One of them, the one for the welder, I have to cut and extend the conduit and rewire it.
I did snap a few pictures of the new meter base and mast.

From a different angle.

You can see that I used a siding block for mounting the anchor up top. I actually took the anchor apart and added a longer 5" lag screw. This allowed it to go through the 2x material inside the block, the 7/16" OSB, the 3/4" wood siding and still grab plenty of meat in the wall stud.
I had made up the mounting plate behind the meter base last year and wrapped it with coil stock. The one issue I had with doing that is the offset it created. I used a premade offset and still had to bend the PVC conduit. I also used a siding block for the conduit/LB at the bottom to make a clean siding installation. Using the siding blocks, above and below, will allow me to trim and fit the siding where it should look better.
Attachments

Last edited:
lloyd.plywood
New member
Re: garage refurb
Nice. lots of space. Looking good!
Nice. lots of space. Looking good!
Motown 454
Well-known member
- Joined
- Sep 25, 2008
- Messages
- 1,359
Re: garage refurb
It looks nice.
It looks nice.
OP
Re: garage refurb
Thank you gentleman.
Nice. lots of space. Looking good!
It looks nice.
Thank you gentleman.
OP


Re: garage refurb
Holy cow. 66 pages. 7 days (at work). Loved every minute of it. I'd like to know more detail about how you wired everything, as re/wiring is something I'm going to take on in my garage, when the time comes.
Thanks for all the sharing of your work!
Holy cow. 66 pages. 7 days (at work). Loved every minute of it. I'd like to know more detail about how you wired everything, as re/wiring is something I'm going to take on in my garage, when the time comes.
Thanks for all the sharing of your work!
crashclement
New member
Re: garage refurb
Well Mr. Nutt's/Eric, No Disrespect on my beginning name choices. I just didn't know how you wanted to be addressed. This is my 1st post ever on the GJ. I only have one regret posting you as my 1st post and that is, I didn't find the GJ sooner in my life. When I started reading your build/refurb it brought back my teen years when I began working in a fillin' station as my first job. I would like to thank you for your in depth breakdown of your adventures and patience while making a great/beautiful place for your whole family to live in and for you to have some alone time in your great man cave/wood shop/garage on occasions!!!!!! Thanks again, Joe ps. Thanks for your service to our country and the people of your community!
Well Mr. Nutt's/Eric, No Disrespect on my beginning name choices. I just didn't know how you wanted to be addressed. This is my 1st post ever on the GJ. I only have one regret posting you as my 1st post and that is, I didn't find the GJ sooner in my life. When I started reading your build/refurb it brought back my teen years when I began working in a fillin' station as my first job. I would like to thank you for your in depth breakdown of your adventures and patience while making a great/beautiful place for your whole family to live in and for you to have some alone time in your great man cave/wood shop/garage on occasions!!!!!! Thanks again, Joe ps. Thanks for your service to our country and the people of your community!
Last edited:
OP
Re: garage refurb
Thanks for the compliments and glad you enjoyed the thread.
What type of details would you like to know ?
I ran everything in 2" conduit, 4/0 and 2/0 for the neutral. Everything inside the breaker box was put on separate circuits like it was before. Other than the air comp and welder, I used 12/2 romex (NM) for all my wiring through out the garage.
If you have specific questions about wiring for your upcoming project, I'll answer what I can but the electrical section here is filled great knowledge coming from awesome and experienced guys.
Holy cow. 66 pages. 7 days (at work). Loved every minute of it. I'd like to know more detail about how you wired everything, as re/wiring is something I'm going to take on in my garage, when the time comes.
Thanks for all the sharing of your work!
Thanks for the compliments and glad you enjoyed the thread.
What type of details would you like to know ?
I ran everything in 2" conduit, 4/0 and 2/0 for the neutral. Everything inside the breaker box was put on separate circuits like it was before. Other than the air comp and welder, I used 12/2 romex (NM) for all my wiring through out the garage.
If you have specific questions about wiring for your upcoming project, I'll answer what I can but the electrical section here is filled great knowledge coming from awesome and experienced guys.
OP
Re: garage refurb
Eric or Nutts is fine.
I understand your regret not finding GJ sooner, I felt the same thing when I found this place. It's a very informative and entertaining site with some great knowledge available just for asking.
As boring as I thought I was making this thread at times, I was hoping to make it easy for others to understand and pass on somethings that I have learned during my project. I've learned more from everyone here than I have passed on.
Thank you for the compliments, they are greatly appreciated.
Well Mr. Nutt's/Eric, No Disrespect on my beginning name choices. I just didn't know how you wanted to be addressed. This is my 1st post ever on the GJ. I only have one regret posting you as my 1st post and that is, I didn't find the GJ sooner in my life. When I started reading your build/refurb it brought back my teen years when I began working in a fillin' station as my first job. I would like to thank you for your in depth breakdown of your adventures and patience while making a great/beautiful place for your whole family to live in and for you to have some alone time in your great man cave/wood shop/garage on occasions!!!!!! Thanks again, Joe ps. Thanks for your service to our country and the people of your community!
Eric or Nutts is fine.
I understand your regret not finding GJ sooner, I felt the same thing when I found this place. It's a very informative and entertaining site with some great knowledge available just for asking.
As boring as I thought I was making this thread at times, I was hoping to make it easy for others to understand and pass on somethings that I have learned during my project. I've learned more from everyone here than I have passed on.
Thank you for the compliments, they are greatly appreciated.
Re: garage refurb
I'll definitely check out the electrical section - been browsing there as well.
I don't have specific details, yet - once i start into my garage renno i'll check back with you - but I'll start by asking how 'easy' it was for you to switch the circuit breakers, the mains, everything outside..?
I've only ever done some basic lighting wiring in college, but nothing to do with adding breakers or replacing the whole box/main line..
I've subscribed to this thread for continued updates!
-Steve
Thanks for the compliments and glad you enjoyed the thread.
What type of details would you like to know ?
I ran everything in 2" conduit, 4/0 and 2/0 for the neutral. Everything inside the breaker box was put on separate circuits like it was before. Other than the air comp and welder, I used 12/2 romex (NM) for all my wiring through out the garage.
If you have specific questions about wiring for your upcoming project, I'll answer what I can but the electrical section here is filled great knowledge coming from awesome and experienced guys.
I'll definitely check out the electrical section - been browsing there as well.
I don't have specific details, yet - once i start into my garage renno i'll check back with you - but I'll start by asking how 'easy' it was for you to switch the circuit breakers, the mains, everything outside..?
I've only ever done some basic lighting wiring in college, but nothing to do with adding breakers or replacing the whole box/main line..
I've subscribed to this thread for continued updates!
-Steve
OP
Re: garage refurb
It's not for the weak at heart and does take some knowledge to do it. Some people would rather pay to have it done as they don't want their hands in the breaker box.
I have done this before on the house, my step-dad is a retired electrician and I worked PT for a guy about 6-8 months. Does it make me an expert, no, not at all. I do feel comfortable working in a breaker box, but don't get complacent.
You'll need to contact your power company (if you can do it yourself by code) to have the service disconnected at the mast/service entrance, AEP (my electric supplier) charges $150 for this service. I started pulling circuits out of the box before the service was disconnect to save time. After the power was cut, I pulled the rest out of the box, removed the breaker box, took down the old service cable on the outside along with the old meter base.
I made sure to install the new meter base so it was attached to a wall stud, same thing with the anchor point. That anchor point definetly needs to go into a stud as it's holding the weight of the wire. The conduit is basically the same as doing any other plumbing. After the conduit is up, it's a matter of pulling the new service wire, it's stiff and hard to bend, an extra set of hands will make it easier to make sure you don't scrap the insulation off the wire as you pull it.
I'll definitely check out the electrical section - been browsing there as well.
I don't have specific details, yet - once i start into my garage renno i'll check back with you - but I'll start by asking how 'easy' it was for you to switch the circuit breakers, the mains, everything outside..?
I've only ever done some basic lighting wiring in college, but nothing to do with adding breakers or replacing the whole box/main line..
I've subscribed to this thread for continued updates!
-Steve
It's not for the weak at heart and does take some knowledge to do it. Some people would rather pay to have it done as they don't want their hands in the breaker box.
I have done this before on the house, my step-dad is a retired electrician and I worked PT for a guy about 6-8 months. Does it make me an expert, no, not at all. I do feel comfortable working in a breaker box, but don't get complacent.
You'll need to contact your power company (if you can do it yourself by code) to have the service disconnected at the mast/service entrance, AEP (my electric supplier) charges $150 for this service. I started pulling circuits out of the box before the service was disconnect to save time. After the power was cut, I pulled the rest out of the box, removed the breaker box, took down the old service cable on the outside along with the old meter base.
I made sure to install the new meter base so it was attached to a wall stud, same thing with the anchor point. That anchor point definetly needs to go into a stud as it's holding the weight of the wire. The conduit is basically the same as doing any other plumbing. After the conduit is up, it's a matter of pulling the new service wire, it's stiff and hard to bend, an extra set of hands will make it easier to make sure you don't scrap the insulation off the wire as you pull it.
Graham08
Well-known member
Re: garage refurb
The new install looks great! You won't regret going with a QO box.
If you're going very far, upping the size of the conduit from 2" to 2-1/2" can make a world of difference. We did this for my new service, and it still was a lot of work to pull 4/0, 4/0, 2/0 through it.
The new install looks great! You won't regret going with a QO box.
After the conduit is up, it's a matter of pulling the new service wire, it's stiff and hard to bend, an extra set of hands will make it easier to make sure you don't scrap the insulation off the wire as you pull it.
If you're going very far, upping the size of the conduit from 2" to 2-1/2" can make a world of difference. We did this for my new service, and it still was a lot of work to pull 4/0, 4/0, 2/0 through it.
OP
Re: garage refurb
Thanks, Since I have a SQ D QO box in the house, it was a no brainer.
I was thinking about that as I was pulling wire. . . .maybe I should have used a larger conduit. WE used 2" when we did the new service on the house and I couldn't remember it being that hard to pull. But then again, I had help.
The new install looks great! You won't regret going with a QO box.
If you're going very far, upping the size of the conduit from 2" to 2-1/2" can make a world of difference. We did this for my new service, and it still was a lot of work to pull 4/0, 4/0, 2/0 through it.
Thanks, Since I have a SQ D QO box in the house, it was a no brainer.
I was thinking about that as I was pulling wire. . . .maybe I should have used a larger conduit. WE used 2" when we did the new service on the house and I couldn't remember it being that hard to pull. But then again, I had help.
OP
Re: garage refurb
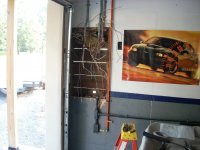
Since the electric service doesn't enter through the top of the box anymore, I wanted to replace the piece of OSB above it. I tore off the old, which you can see had been notched at various times for wire to pass through.

Which left a hideous hole.

Which was covered by a new piece of OSB that had it's edges caulked primer to some primer and paint which will be coming along soon.

Attachments

Last edited:
Press_Corpse
Well-known member
Re: garage refurb
Eric, This garage is still coming along nicely. If you lived closer, I'd offer you a hand! I love the detailed posts and explanations you give us. Please keep us updated, Love it!
Eric, This garage is still coming along nicely. If you lived closer, I'd offer you a hand! I love the detailed posts and explanations you give us. Please keep us updated, Love it!
OP
Re: garage refurb
Thanks for the compliments.
I put up a couple rows of siding today and trimmed around the meter base with J-channel. While I was measuring, bent down and then stood back up smacking my head on the corner of the meter base, ouch, the garage drew some blood again. Not much but enough that I had to go easy when I washed my hair tonight in the shower.
I cut off early as I had to wash up a half dozen hazmat booms at the fire house, so no more pics of progress.
Eric, This garage is still coming along nicely. If you lived closer, I'd offer you a hand! I love the detailed posts and explanations you give us. Please keep us updated, Love it!
Thanks for the compliments.
I put up a couple rows of siding today and trimmed around the meter base with J-channel. While I was measuring, bent down and then stood back up smacking my head on the corner of the meter base, ouch, the garage drew some blood again. Not much but enough that I had to go easy when I washed my hair tonight in the shower.
I cut off early as I had to wash up a half dozen hazmat booms at the fire house, so no more pics of progress.
OP
Re: garage refurb
Put up 2 more courses of siding today before I decided to mow. The rest of the siding that goes up, will have to be done off ladders and plank.

Here's another picture I'll share. Like I've said before, I'm no professional but I suppose it'll work for me.
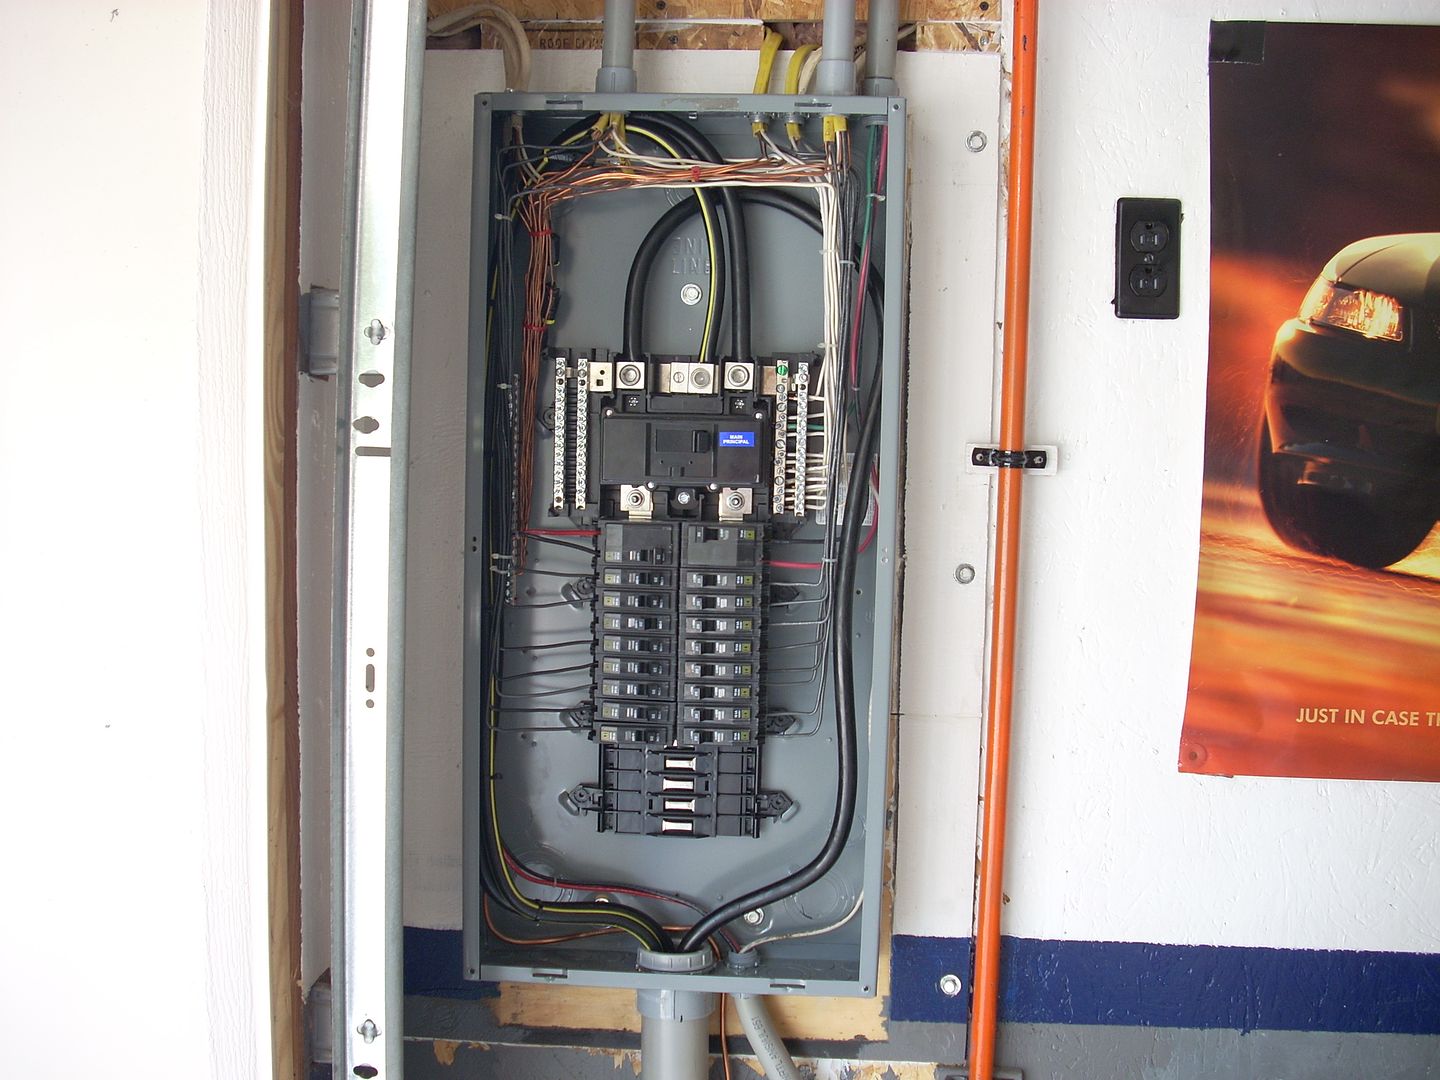
* If this was new construction, I would have had plenty of wire. Seeing as this was an upgrade, (from a previous upgrade) I did have to lengthen a few of the ground wires inside the box, which is why you are seeing the wire nuts.
Attachments

Last edited:
OP
Re: garage refurb
After today, I'll be in a holding pattern for a couple of days. I need to borrow the siding brake from the wife's cousin. I'm fortunate that he's not using it and allows me to get some use out of it.
I went up as far as I could with the siding. I have to wrap the corner on the south end and put J-channel up. I'm also thinking I should borrow a co-workers aluminum plank. My 2x12 gets a little unnerving and isn't quite long enough unless I play the ladder shuffle.
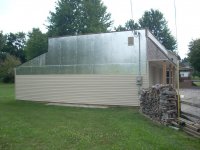
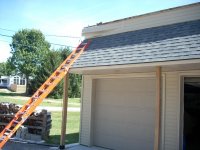
Getting a few course up to meet the front overhang. I'm not sure why I didn't do it sooner but I added some tar paper over the bare OSB.

Where I stopped today and about 1 square of siding to go.

I took another picture because the one above was taken into the Sun, which is never a good thing.

If you notice the J-channel that appears to be too long, it is. It will get trimmed off once I wrap that corner and put up some vertical J-channel.
After today, I'll be in a holding pattern for a couple of days. I need to borrow the siding brake from the wife's cousin. I'm fortunate that he's not using it and allows me to get some use out of it.
I went up as far as I could with the siding. I have to wrap the corner on the south end and put J-channel up. I'm also thinking I should borrow a co-workers aluminum plank. My 2x12 gets a little unnerving and isn't quite long enough unless I play the ladder shuffle.
Getting a few course up to meet the front overhang. I'm not sure why I didn't do it sooner but I added some tar paper over the bare OSB.

Where I stopped today and about 1 square of siding to go.

I took another picture because the one above was taken into the Sun, which is never a good thing.

If you notice the J-channel that appears to be too long, it is. It will get trimmed off once I wrap that corner and put up some vertical J-channel.
Attachments


Last edited:
Vernmotor
Well-known member
Re: garage refurb
Looking good !
Looking good !
OP
Fyrme
Well-known member
Re: garage refurb
Almost there
Almost there
dave67fd
Well-known member
Re: garage refurb
Eric,
Glad to see your staying with the upgrades. Sweet install on the new service and the sidewall reconstruction. Keep up the great work sir.
Eric,
Glad to see your staying with the upgrades. Sweet install on the new service and the sidewall reconstruction. Keep up the great work sir.
OP
Re: garage refurb
Thanks for the compliments gentlemen.
Almost there
Eric,
Glad to see your staying with the upgrades. Sweet install on the new service and the sidewall reconstruction. Keep up the great work sir.
Thanks for the compliments gentlemen.
GRS DESIGN
Well-known member
- Joined
- Aug 9, 2013
- Messages
- 46
Re: garage refurb
Hi Eric....I am new to GJ and have been following your thread with great interest. You look like you have done a fantastic restoration on the garage and also your house...I know its all about the garage but do you have any before and after pics of your house from the inside...cheers Glenn (GRS Design) down under NSW Australia
Hi Eric....I am new to GJ and have been following your thread with great interest. You look like you have done a fantastic restoration on the garage and also your house...I know its all about the garage but do you have any before and after pics of your house from the inside...cheers Glenn (GRS Design) down under NSW Australia
OP
Re: garage refurb
Glenn,
I only took a few pictures of the inside and those were with a regular camera, before my days of getting "modern". Most of what was done inside was paint, carpet and replace cheap luan door with solid 6 panel pine doors. There was some drywall work in the front room, insulation, replacement windows and electrical upgrades. Nothing earth-shattering, just normal upgrades.
Thanks for the compliments.
Hi Eric....I am new to GJ and have been following your thread with great interest. You look like you have done a fantastic restoration on the garage and also your house...I know its all about the garage but do you have any before and after pics of your house from the inside...cheers Glenn (GRS Design) down under NSW Australia
Glenn,
I only took a few pictures of the inside and those were with a regular camera, before my days of getting "modern". Most of what was done inside was paint, carpet and replace cheap luan door with solid 6 panel pine doors. There was some drywall work in the front room, insulation, replacement windows and electrical upgrades. Nothing earth-shattering, just normal upgrades.
Thanks for the compliments.
Drewstang
Well-known member
Re: garage refurb
I spent over an hour viewing this thread Monday. You have done an amazing job and given me some ideas to organize my own garage. I'm currently on a break from Volunteer Fire Fighting but waiting on my app to be processed to go back. I do alot of light and siren installs for other fire fighters who don't know how so organizing connectors and screws has been tough. I'm going to borrom your bin idea and add a wire spool rack to make installs a little easier. Thanks for the ideas and keep up the good work.
I spent over an hour viewing this thread Monday. You have done an amazing job and given me some ideas to organize my own garage. I'm currently on a break from Volunteer Fire Fighting but waiting on my app to be processed to go back. I do alot of light and siren installs for other fire fighters who don't know how so organizing connectors and screws has been tough. I'm going to borrom your bin idea and add a wire spool rack to make installs a little easier. Thanks for the ideas and keep up the good work.
OP
Re: garage refurb
Drew,
Use any or all my ideas, nothing is patented or copyrighted. I post them here to help out my fellow GJers. Thanks for the compliments.
Drew,
Use any or all my ideas, nothing is patented or copyrighted. I post them here to help out my fellow GJers. Thanks for the compliments.
OP
Re: garage refurb
While I was adding apiece of J-channel the other day on the end of the front over hang, I didn't like the way the corner trim looked. I guess it was done last year and I should have put up the J-channel first. It bothered me enough that I wanted to replace it.
This would be the corner I'm talking about, notice the gap ?

I set up the ladder, pulled a few nails and pulled back the siding out front. I had my head behind that siding. I'm sure the people passing by wondered what I was doing.

While I was adding apiece of J-channel the other day on the end of the front over hang, I didn't like the way the corner trim looked. I guess it was done last year and I should have put up the J-channel first. It bothered me enough that I wanted to replace it.
This would be the corner I'm talking about, notice the gap ?

I set up the ladder, pulled a few nails and pulled back the siding out front. I had my head behind that siding. I'm sure the people passing by wondered
what I was doing.
Attachments

Last edited:
OP
Re: garage refurb
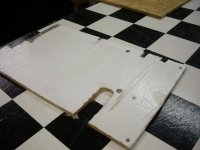
I made up a template yesterday transferred it to a new section of corner trim and cut it out. This is a comparison. new to old.

New corner piece installed and every back to where it should be.

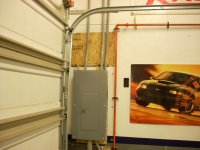
I also painted over the primer around the new breaker box. I'm going to paint the blue stripe tomorrow along with painting over the gray at the bottom.

Post #1328 shows the unpainted areas.
I made up a template yesterday transferred it to a new section of corner trim and cut it out. This is a comparison. new to old.

New corner piece installed and every back to where it should be.

I also painted over the primer around the new breaker box. I'm going to paint the blue stripe tomorrow along with painting over the gray at the bottom.

Post #1328 shows the unpainted areas.
Attachments


Last edited:
Re: garage refurb
You should know better than to set up a ladder like that!
Not trying to be an A$$, but safety first right.
I set up the ladder, pulled a few nails and pulled back the siding out front. I had my head behind that siding. I'm sure the people passing by wondered

You should know better than to set up a ladder like that!
Not trying to be an A$$, but safety first right.