To avoid these ads, REGISTER NOW!

Garage rehab

madmax908

Well-known member
Joined
Sep 9, 2008
Messages
101
Location
DeLand, FL
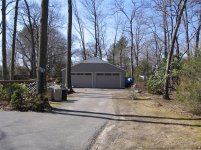
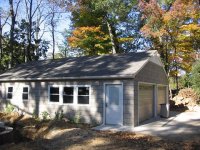
I late '05 I traded up from my old house with a 10x20 garage to one that was 30x40.
This is a rather large garage by local standards, but it needed a lot of work.
I started with the outside.

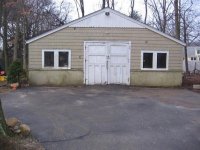
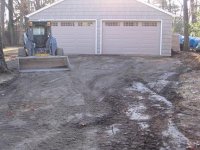
For starters I cleared the bushes that were growing in the dirt in front of the garage.
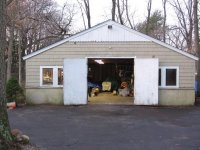
They made the 8' doorway feel smaller than it was when you couldn't open the barn doors all the way.
A Barn door is aethetically nice (on a barn) but a PITA to open compared to a garage door w/ remote opener.
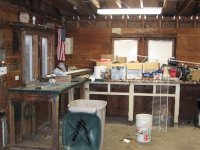
The lower 1/2 of the garage had plywood/metal screen/cement covering.
This was an ideal, protected home for the termites, who started eating the structure from the front to about mid-way in the garage, where the oversized oak had expanded into the wall.
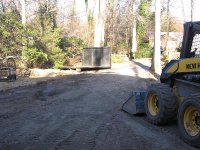
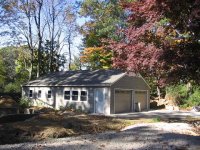
as you can see in the third picture, the roof was shot, with some soft spots here and there.
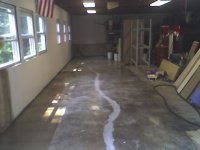
The lack of gutters also allowed water to leak into the garage.
Lastly, yellowed, plexiglass windows didn't cut it either.
 

Attachments

  • IMG_0075B.jpg
    IMG_0075B.jpg
    55.1 KB · Views: 80
  • IMG_0080b.jpg
    IMG_0080b.jpg
    57.9 KB · Views: 105
  • IMG_0078b.jpg
    IMG_0078b.jpg
    22.6 KB · Views: 85
To avoid these ads, REGISTER NOW!
OP
M

madmax908

Well-known member
Joined
Sep 9, 2008
Messages
101
Location
DeLand, FL
I jumped right in and tore off the front of the garage.
I put in two large micro-lam headers for the 12' wide, insulated garage doors.
You can see in the first picture the square of plywood being replaced.
This is how high the wood eating b'stards had reached.
The cold weather didn't help, but kept you from sitting down for a rest.
The last picture jumps ahead, but shows the finished doors and siding on the front.
You can seen in the third picture that I'm starting to drive on the grass, now dirt on the right.
A driveway widening is needed, as the garage doors no longer line up with the blacktop entrance into the garage.
 

Attachments

  • IMG_0093b.jpg
    IMG_0093b.jpg
    66.9 KB · Views: 123
  • IMG_0104b.jpg
    IMG_0104b.jpg
    66.1 KB · Views: 95
  • IMG_0203b.jpg
    IMG_0203b.jpg
    75.4 KB · Views: 143
Last edited:
OP
M

madmax908

Well-known member
Joined
Sep 9, 2008
Messages
101
Location
DeLand, FL
Next I started with the windows.
I replaced all of the windows in the house with double hung Andersens.
The old replacement windows came out and were sorted by size.
I installed them as I replaced the termite/rotted sections of side.
The opposite side of the structure that can't be seen from the house, I put in small basement style windows.
They are too small to crawl through, but are mounted high up, and let in some light and fresh air.
The side door was installed with sealed/internal blinds.
They never get dirty, and don't bang against the door when you close it.
The siding I used matches the house.
In the last picture you can see the weathered roof, no rain gutters, and the bush that grows in the dirt in the front of the garage.
This means there is a 6" transition from the blacktop/dirt to the floor of the garage.
 

Attachments

  • IMG_0078b.jpg
    IMG_0078b.jpg
    22.6 KB · Views: 36
  • IMG_0077b.jpg
    IMG_0077b.jpg
    70 KB · Views: 48
  • IMG_0204b.jpg
    IMG_0204b.jpg
    69.3 KB · Views: 117
OP
M

madmax908

Well-known member
Joined
Sep 9, 2008
Messages
101
Location
DeLand, FL
It was about this time that the "friendly" neighborhood inspector just happened to drive by. He wanted to know how much living space I'd be making, and when they'd live there.
I told him I'd live there when the wife was in a bad mood, and then opened the door to show him the living space. (see first pic) (Kill 'em with kindness and humor)

Aside from that, the transition from the drive to the garage was really starting to rub on me, and the bottom of my car.
This is when I decided to replace the cracking blacktop with a larger, jack friendly, cement driveway.

I was a little suprised when my mason told me the garage was 11" lower than the street. This meant I would need a drain near the doorway.
Also the electric issue was starting to wear on me.
I figured while the equipment was there, a trench from the garge to the house would be in order.
 

Attachments

  • IMG_0081b.jpg
    IMG_0081b.jpg
    55.7 KB · Views: 147
  • IMG_1534a.jpg
    IMG_1534a.jpg
    38.5 KB · Views: 51
  • IMG_1530b.jpg
    IMG_1530b.jpg
    63.9 KB · Views: 66
  • IMG_1532b.jpg
    IMG_1532b.jpg
    30.9 KB · Views: 55
To avoid these ads, REGISTER NOW!
OP
M

madmax908

Well-known member
Joined
Sep 9, 2008
Messages
101
Location
DeLand, FL
The driveway and drain were finished and I quickly covered it with more vehicles. :)

The trench was now filled with conduit and electric.
Lucky for me the price of copper went up or this could have been cheap. :(

The 14/3 direct burial line was amusing, especially when digging in the garden.
My wife couldn't figure out who kept shutting off the radio in the garage when she was digging! :shocking:
(This is payback for turning on the 3 way switch downstairs when I was working upstairs on the electric, while on the ladder :eek:)

I installed 3 strands of 4/0 with a single 8/0 ground to 125A main lug servcice. The difference is literally night and day. I now can keep the lights on while running my portable compressor.

While I had the ground open, I also ran pex pipe for cold water, Cat 5, cable, telephone, and alarm wires to the house. The alarm was hard wired to the panel, and the house. I feel better knowing everythings secure, and if its not, I will know immediately. (I'm sure the video will be entertaining to somebody.)

In the 3rd and 5th pictures, you can notice the new roof, and the rain gutters, which dried the inside up considerably.
 

Attachments

  • IMG_1630b.jpg
    IMG_1630b.jpg
    28.7 KB · Views: 45
  • IMG_1631b.jpg
    IMG_1631b.jpg
    38.9 KB · Views: 65
  • IMG_2116b.jpg
    IMG_2116b.jpg
    73.3 KB · Views: 59
  • IMG_2117b.jpg
    IMG_2117b.jpg
    56.3 KB · Views: 66
  • IMG_2121b.jpg
    IMG_2121b.jpg
    68.3 KB · Views: 68
OP
M

madmax908

Well-known member
Joined
Sep 9, 2008
Messages
101
Location
DeLand, FL
Thank you everybody for the kind words.
I am finally able to post on this site as I completed the "honey-do" list for the year.

I went out and took more pics of some of the things I've done.

The first pic is the sprinkler box I recessed in the ground while the driveway was poured. It eliminates the hose being coiled on the garage or being run over when not in use. Any suggestions on preventing the wife eating spiders inside?

The second pic shows the small windows on the unseen side of the garage. Hard to get into, but cheap and functional. I admit I am a wood hoarder. (The wife says ***** but doesn't complain about the heat from the wood stove). In the foreground is my first holz hausen, and some of next years firewood.

The third pic is my old fusebox. (Notice the resettable fuses) I wanted to make something out of this, instead of just throwing it out. My wife says I just collect junk...
The new panel is much bigger and safer as there is no longer a space to put the pennies when the fuse blows :shocking:
 

Attachments

  • IMG_2125b.jpg
    IMG_2125b.jpg
    18.7 KB · Views: 57
  • IMG_2126b.jpg
    IMG_2126b.jpg
    39.2 KB · Views: 50
  • IMG_2127b.jpg
    IMG_2127b.jpg
    25.2 KB · Views: 71
  • IMG_2128b.jpg
    IMG_2128b.jpg
    26.4 KB · Views: 44
OP
M

madmax908

Well-known member
Joined
Sep 9, 2008
Messages
101
Location
DeLand, FL
On the inside, I removed all of the wood that was being used as "panelling", but probably held up one side of the garage. I put in hurricane clips to appease my brother the engineer, and insulated what I could. I put up 1/2" drywall, 2 coats of drywall compound, and painted/primed the walls white.

I meticulously repaired/prepared for garage floor paint. I used the rustoleum product http://www.rustoleum.com/CBGProduct.asp?pid=16 with mixed results. Some areas wear like iron, and some have started to peel/chip. I want to put some cheap carpet tiles down in the workbench area for insulation and a softer walking surface.

I've purchased a "high-boy" oil fired, hot air furnace. I have to run and exhaust pipe (need to to look up the code) and some duct-work. I'm sure this will become more of a priority for me as it gets colder.
 

Attachments

  • Photo_100806_005.jpg
    Photo_100806_005.jpg
    46.8 KB · Views: 49
  • Photo_100806_004[1].jpg
    Photo_100806_004[1].jpg
    28.7 KB · Views: 39
  • Photo_100806_002.jpg
    Photo_100806_002.jpg
    47.6 KB · Views: 35
  • Photo_072606_002.jpg
    Photo_072606_002.jpg
    53.1 KB · Views: 59
  • IMG_0081b.jpg
    IMG_0081b.jpg
    55.7 KB · Views: 53
  • IMG_2129b.jpg
    IMG_2129b.jpg
    23.3 KB · Views: 60
OP
M

madmax908

Well-known member
Joined
Sep 9, 2008
Messages
101
Location
DeLand, FL
OK last pictures for today.


You would think with this much room I'd have plenty of space.
I need to find some old kitchen cabinets to put against the windows to store some of the "stuff" and provide me with a workbench.
Then I'll find a way to get the lawn mower, atv, and bicycles out of my way.

The ceiling needs to be "cathederal-ed", but will require collar ties that are bolted in. After that, I can insulate, re-arrange/install more lighting, and paint. If all goes well, then a 4 post lift will fit.

I just got IM'd by the wife.
If I have time to post, why can't I start on next years "honey-do's".

Gotta find a shovel with a metal handle. :evil:
 

Attachments

  • IMG_2131a.jpg
    IMG_2131a.jpg
    33.2 KB · Views: 143
  • IMG_2130a.jpg
    IMG_2130a.jpg
    31.6 KB · Views: 109

russlaferrera

Well-known member
Joined
Nov 24, 2006
Messages
2,035
Location
Central Virginia
madmax, I'm tired, just reading about your accomplishments. Excellent job, looks great, need more space. Need a big big shed, for the lawn equipment and gardening stuff. Keep us posted!
 
To avoid these ads, REGISTER NOW!
Top Bottom