To avoid these ads, REGISTER NOW!

Garage workbench build

bob_s2

Well-known member
Joined
Nov 28, 2005
Messages
178
Location
Westmont, Illinois
I finally found the pictures and write-ups I did for a workbench I built a while back. I figure I'd post the details on how it went. So here it goes, below are notes I took as I went along. Keep in mind that I built this probably 3 years ago. I will update with comments as I go along. So here it goes..

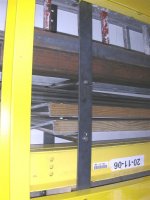
I've got a pile of 9 foot long 5 inch channel that I'm using to build a workbench for my garage similar in concept to the shelving unit in the first picture. I've made a rough drawing (See pic I attached). It's going to be 8 feet 8 inches long, 30 inches deep, topped with 1.5 inch thick science table tops. It will be bolted to the wall at the top to protect against tipping, and maybe also near the bottom. It will have the 2 uprights going up 80 inches (it's got to clear the garage door) and will sit away from the wall 6 inches. This will allow brackets on the backside of it to hold the extension ladder and full length steel to be slid in behind the workbench. I'm envisioning the ladder being able to be slid on a short roller behind the bench. The front of it will have several 2 inch hitch openings where I'll be able to swap out and move around a vise, etc. Shelves above will not be deep - 12 inches is plenty.

I'm planning on welding the rectangular frame for the table itself, but the uprights and floor supports are going to be bolted, so if we ever move it can come with. In doing so, I've been drilling holes into 1/4 thick steel until I'm sick of it. I need a drill doctor but don't have one. I've got a combination of HSS and cobalt drill bits. Existing holes in the channel are 9/16, I'm drilling to 1/2 now while waiting on my supply of 9/16 bolts to come in. I'll re-drill when I get the bolts in.
My current method is to drill a 1/8 hole with a cobalt bit in the 1/4 steel channel, then use the 1/4 cobalt bit, and then go to 1/2 using the HSS bit. I don't have a cobalt 1/2 or 9/16 bit yet, maybe this weekend I'll pick one up. I'm using a heavy duty dewalt hand drill, going VERY slow, and putting a lot of weight behind it, like most of my weight. I've got plywood on the floor of the garage, and the channel on top of that, so I can use a lot of force. To keep the bit cool, I've got a large dropper that can pick up like 1/2 cup of water. I'm using that to drip right next to the bit, keeping the bit in water to keep cool. (NOTE in Hindsite: Water REALLY not good idea to use.)
 

Attachments
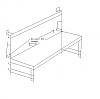
  • rough%20drawing%20of%20workbench.jpg
    rough%20drawing%20of%20workbench.jpg
    1.9 KB · Views: 1,398
Last edited:
To avoid these ads, REGISTER NOW!
OP
B

bob_s2

Well-known member
Joined
Nov 28, 2005
Messages
178
Location
Westmont, Illinois
Last night I carried each piece down into the basement to my small craftsman drill press, and with a fresh 1/2 cobalt bit in my drill press, drilled 4 holes clean as can be, nice and snug for the bolts. I got out those real nice little curly ribbons like usual. Never got them with the hand drill, I must have been bouncing around too much out in the garage.
I'd drilled 1/8 pilot holes in the garage using my dewalt hand drill. One of them snapped off in the hole, but I got it all out or so I thought. <Note in hindsite: always check twice!>
On the 5th hole, the drill just started bouncing around, squealing each time, etc. It started smoking no matter what I used for oil. Thinking the bit was dulling, stupidity stepped in and helped me out. Tried forcing the bit through with some more pressure, didn't go. Probably ruined the bit, if not at least the edge. Tried another hole and it went in very slowly, since the bit was very dull at that point.
Flipped the piece over, and found a small bump where the pilot hole was. What! With a small nail and a few taps of a hammer, PLINK something hit the bench below. A small piece of the bit that snapped off was left in the hole! This is what killed the big bit.

So this $19 bit lasted 4 holes. Good news is that I can buy another drill bit, and using the drill press is SOOO much better than doing it by hand. I've also come to the conclusion that the 9/16 holes probably aren't going to work for me, I may end up welding them up and going 1/2 inch. Availability of 9/16 cobalt drill bits (and bolts, for that matter) are nill around here, where 1/2 inch are everywhere. I do have a uni-bit that I may try on the holes I've already drilled, but unless it goes very well, I think I'm going to go with 1/2 bolts.
 
OP
B

bob_s2

Well-known member
Joined
Nov 28, 2005
Messages
178
Location
Westmont, Illinois
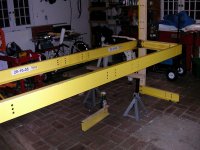
Well, a LOT of progress has been made this weekend. Along the way my design has changed in my head. I've decided to make this a cantilever design, for the following reasons. I've got a lot of stuff in the garage that has handles that stick out, such as lawn mowers, snowblowers, garden cart, etc. I want to put the workbench where these things currently are. With a conventional design, I have to have the handles stick out in front of the bench. With a cantilever design, the handles can stick out the side, out of the way. The channel I'm using is 5inch channel, which should be plenty strong.

I've finished drilling most if not all of the 1/2 inch holes. What number drill bit am I on now? Lost count, I think I'm on the 3rd one. I stopped using the water for cooling, and the bit stayed sharper when completely dry. The water was if anything dulling it FASTER than without. After 16 holes drilled the bit is still sharp.
Anyway, I'm at the point of starting to prep for the welding - read this as a lot of grinding. All the pieces are cut at 45 degrees, just need to grind them down for the V's I'll need.

Grade 8 bolts by the way.

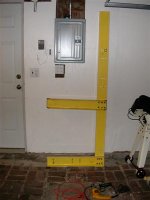
Here are some pics of what one side is going to look like, both sides are done just need to assemble the other side to ensure all bolt holes line up properly.
--bob
 

Attachments

  • DSCN0679%20(Medium).JPG
    DSCN0679%20(Medium).JPG
    34.6 KB · Views: 89
  • DSCN0678%20(Medium).JPG
    DSCN0678%20(Medium).JPG
    44.1 KB · Views: 93
  • DSCN0682%20(Medium).JPG
    DSCN0682%20(Medium).JPG
    93 KB · Views: 117
  • DSCN0677%20(Medium).JPG
    DSCN0677%20(Medium).JPG
    32.6 KB · Views: 115

CraigP

Well-known member
Joined
Dec 13, 2010
Messages
61
That looks like it will be crazy overbuilt, but you'll never have to worry about it collapsing! :)
 
OP
B

bob_s2

Well-known member
Joined
Nov 28, 2005
Messages
178
Location
Westmont, Illinois
A few days later.....

I made some progress this weekend on the bench. Got it all grinded and beveled. Test fitup showed too much gap at a few places because of the beveling, but tomorrow night I should be starting to weld it up. Progress!

I'm thinking there's this place in Lemont that does sandblasting, I may just call and see how much it would be to have it all sand-blasted. That way it would be easier to paint. <Note: I never did this, never had time. Just painted over the original where needed. Channel was originally yellow and I chose to keep it yellow.>
--Bob
 

Attachments

  • DSCN0687%20(Large).JPG
    DSCN0687%20(Large).JPG
    2.7 KB · Views: 1,122
  • DSCN0688 (Large).JPG
    DSCN0688 (Large).JPG
    121.3 KB · Views: 90
OP
B

bob_s2

Well-known member
Joined
Nov 28, 2005
Messages
178
Location
Westmont, Illinois
The following night....

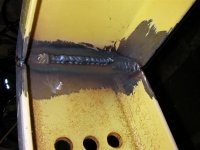
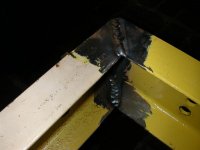
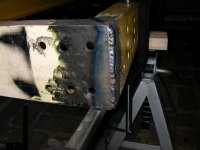
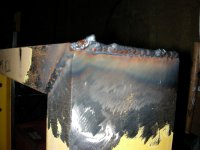
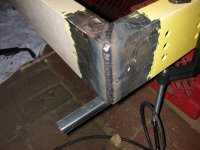
Tonight I got about 80% of the welding done for the workbench tabletop frame. Here are my shots of the inside and outside welds, both horizontal and vertical(up). The last shot looks like I was having problems with gas, I'll have to grind it down and re-weld it. The hardest ones were the inside ones, it was really hard to get into any position to weld them properly. I need to flip it over tomorrow to get the top inside corners, I couldn't get all the way up no matter what I tried.
The outside corners went much better, better access. I could see the edges melting into the puddle right up to the inside welds, so aside from any inclusions I've at least got decent penetration up to the back side of the inside weld, if that makes sense. Or do I? All were done with a single pass, I was going to multi-pass it but with the verticals I was focusing on getting in the gap and then flaring out to each side and pow, it was full. Maybe it was the vertical position that made me do it in only one pass, I don't know.
Still seems straight after all the welding, not twisted or pretzeled or anything. didn't check for square after the welding, but just before the welding I was less than a 1/4 inch out of square total, probably about an 1/8 inch out.
<Note on the welding: Looking back, these welds are not pretty at all, but they have proven to be strong. You can tell I was new to welding back then! >
--Bob
 

Attachments

  • DSCN0693%20(Large).JPG
    DSCN0693%20(Large).JPG
    112.8 KB · Views: 63
  • DSCN0692%20(Large).JPG
    DSCN0692%20(Large).JPG
    92.7 KB · Views: 60
  • DSCN0691%20(Large).JPG
    DSCN0691%20(Large).JPG
    66.7 KB · Views: 57
  • DSCN0690%20(Large).JPG
    DSCN0690%20(Large).JPG
    99 KB · Views: 59
  • DSCN0689%20(Large).JPG
    DSCN0689%20(Large).JPG
    72.6 KB · Views: 65
Last edited:
OP
B

bob_s2

Well-known member
Joined
Nov 28, 2005
Messages
178
Location
Westmont, Illinois
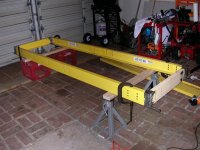
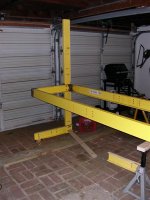
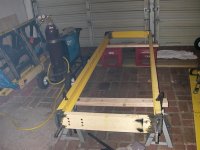
Well, I made some progress over the last few days on the workbench - It's standing upright and level. Next steps are to put some cross bracing in, and angle iron across the workbench top frame so the top isn't only supported on the outside edges. I figure the top is probably strong enough to do so, but it would make putting it on and taking it off easier if it couldn't fall through.
I'm reconsidering my origininal idea of hanging everything off the back side of this - spare steel, the ladder, the wooden ramps for my truck, etc. Maybe this should sit up close to the wall and the ladder hangs underneath in front.
Hmm, maybe I need to position it this weekend and figure out what would work the best. I also need to go get the tabletops from my moms house.
Here are some pics.
 

Attachments

  • DSCN0701%20(Large).JPG
    DSCN0701%20(Large).JPG
    102 KB · Views: 38
  • DSCN0700%20(Large).JPG
    DSCN0700%20(Large).JPG
    69.3 KB · Views: 42
  • DSCN0699%20(Large).JPG
    DSCN0699%20(Large).JPG
    66 KB · Views: 32
  • DSCN0697%20(Large).JPG
    DSCN0697%20(Large).JPG
    100.8 KB · Views: 27
  • DSCN0696%20(Large).JPG
    DSCN0696%20(Large).JPG
    80.1 KB · Views: 24
  • DSCN0695%20(Large).JPG
    DSCN0695%20(Large).JPG
    86.1 KB · Views: 21
  • DSCN0694%20(Large).JPG
    DSCN0694%20(Large).JPG
    112.7 KB · Views: 26
To avoid these ads, REGISTER NOW!

wfochris

Well-known member
Joined
Aug 1, 2010
Messages
131
You may be able to unbolt it, but I still don't see how that'll help in moving that monstrosity!

Thanks for the pics.
 
OP
B

bob_s2

Well-known member
Joined
Nov 28, 2005
Messages
178
Location
Westmont, Illinois
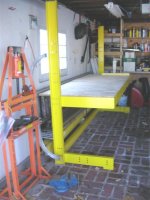
Well, just thought I'd post some pics on how the workbench turned out. It's not finished, but it's in working condition as a bench for the winter. Haven't gotten the science table tops for it yet, for now I put plywood I had up there.
I'm actually reconsidering the 3 science table tops - I've promised one to a friend, and the garage workbench would take 1 1/2 of them - which means not having one in the basement as a result. I may just go with plywood for the garage.
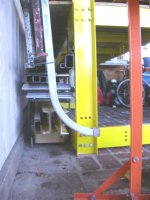
I made a 10.5 inch wide storage rack off the back of it - same 5 inch channel on the bottom with adjustable feet carry the weight of all of it. The channel is bolted on, flat stock goes up to the workbench top. It's got 2 sets of rollers on each side, made from pipe, welded on washers, and 1/2 solid bar stock. Cotter pins allow me to remove and slide out each bar without unbolting the whole thing. This rack holds my truck ramps, the left over 5 inch yellow C channel, and a whole host of long smaller stuff. It also holds my ladder, which just slides in on the top set of rollers.
Anyway, here are the pictures.
 

Attachments

  • DSCN0761%20(Large).JPG
    DSCN0761%20(Large).JPG
    54 KB · Views: 57
  • DSCN0766%20(Large).JPG
    DSCN0766%20(Large).JPG
    49.5 KB · Views: 32
  • DSCN0678%20(Medium).JPG
    DSCN0678%20(Medium).JPG
    44.1 KB · Views: 33
  • DSCN0764%20(Large).JPG
    DSCN0764%20(Large).JPG
    48.4 KB · Views: 33

rickairmedic

Well-known member
Joined
May 31, 2005
Messages
4,165
Location
louisville ,Ky
Bob can we see a shot of it today :D. I seem to recall seeing your buildup on it over on SFT a few years ago just wondering if you can still se the top of it today ;).


Rick
 
OP
B

bob_s2

Well-known member
Joined
Nov 28, 2005
Messages
178
Location
Westmont, Illinois
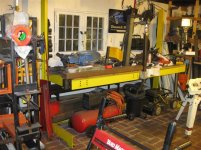
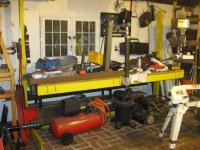
Here are a few pictures taken tonight, 12/20/2010. As you can see right now it's piled with stuff. The cantilever sides work great - I normally have the snowblower on one side with the handles sticking out, with the compressor, and other stuff underneath. My old welder rolled underneath easily, but the new mm210 doesn't do that. I'm really glad I built it, it takes that part of the garage that has all the wheeled things, and gives me useful space above it. I've had full orders of steel on top of it with no worries. 20 foot lengths of steel cut in half fit just fine on it. In back I'm storing all my spare steel. Right now the ladder isn't there but it stores easily when it is. The storage behind also holds the truck ramps, and all other long sections of steel. I had a red tool cart also parked under there but with my plasma cutter on the cart the cart doesn't fit. Need to lower the top of the cart so it all slides underneath better.

I'm not using the vertical arms right now. I originally had plans to have shelves for more steel storage up the back of the bench, but I haven't done that because of our window would be blocked. If we move, I'll probably do that. I've used the uprights quite a few times however, to hold jigs or clamp stuff to them, etc. Right now the one side gives me a spot to mount the air filter for the plasma. I don't have the science tables on them, the 'temp' plywood is still there.

If you look in the middle front, and again on the left side, I've welded on 2" hitch tubing. I welded it vertically. My bike repair stand is on a long piece of tubing that slides into either one. It's got multiple holes in it so I can adjust the height of the stand depending on the bike. I also have a mount for the harbor freight bender. The vertical square allows me to turn it in 90* increments.

I should get around to painting those things some time.


--Bob
 

Attachments

  • IMG_1747 (Medium).JPG
    IMG_1747 (Medium).JPG
    120.8 KB · Views: 42
  • IMG_1746 (Medium).JPG
    IMG_1746 (Medium).JPG
    82.9 KB · Views: 38
  • IMG_1745 (Medium).JPG
    IMG_1745 (Medium).JPG
    127.4 KB · Views: 42
  • IMG_1744 (Medium).jpg
    IMG_1744 (Medium).jpg
    127.8 KB · Views: 57
  • IMG_1743 (Medium).JPG
    IMG_1743 (Medium).JPG
    126.7 KB · Views: 74
Last edited:
To avoid these ads, REGISTER NOW!
Top Bottom