Ever since we bought our house, Wife has wanted a fire pit. Problem is, our city is pretty strict on woodburning fire pits, so gas is really the only option. After shopping around for some of the "off the shelf" options, I was really disappointed in the options. Either spend a few hundred dollars on some poorly built piece of super thin stamped sheet metal, or spend thousands on something that will actually last. The third option - build it yourself. So I pulled out some of the 3/16" drop from my workbench tops and got to measuring.
View media item 90196
I used my grinder with a cutoff wheel to knock the sheet down to size and then used my miter saw (cuts both metal and wood) to make the final cuts.
View media item 90197
I then welded the four sides together and blended the welds.
View media item 88582
View media item 90198
I then cut the baseplate. Note the nipped corners - these will provide both drainage and airflow.
View media item 90200
Getting the most for my money out of my cutoff wheels.
View media item 90199
Got the baseplate welded on and blended the welds.
View media item 88667
I then got busy building the wood base. I collected a bunch of hardwood pallets to make a pallet board accent wall in my office, along with that I had a bunch of 2x4 stringers piled up waiting to be used.
View media item 90201
View media item 90202
View media item 88771
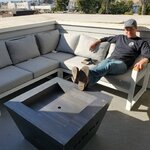
Making sure the ergonomics are correct...
View media item 88772
I spent about $100 on Amazon getting a burner, adjustable regulator, mixer, and adapter. Besides the $8 I spent on wood stain, this would be the only money I spent on the project - everything else I had on hand.
View media item 90203
I did a test run to make sure everything would work as expected. Norma Jean wasn't going to let a good fire go to waste.
View media item 88957
Once I was happy with how everything was going to work, I did the final plumbing of the gas line.
View media item 90204
View media item 90205
I then used a wire cup brush on my angle grinder to clean up the outside surface. I also decided to grain the metal using sandpaper. The bottom would eventually get painted with high temp paint, so I used this as my test area.
View media item 90206
Once everything was grained, the fire box was pretty bright. I wanted to give it a dark grey/brown look. Something that would patina, but not be bright red. I ended up putting my kerosene heater under the box, heated it up to about 200 degrees, and then rubbed it with danish oil.
View media item 90207
View media item 90208
I then used a PPG deck stain to give the wood a nice, weather resistant coat.
View media item 89130
Final test fit before giving it to Wife on Christmas morning.
View media item 89131
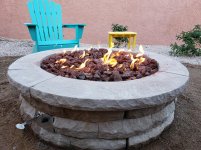
On Christmas eve night, I waited until Wife was asleep and snuck outside to setup the firepit and filled it with lava rock. On Christmas morning, I woke up early and started it up and left it burning. When Wife finally woke up, she went to grab a cup of coffee and saw the fire outside the window. At first she panicked, but figured it out pretty quickly. She knew I had been working on making her Christmas gift, but had no idea what it was. I got some happy tears, which was the goal.
View media item 89315
View media item 90196
I used my grinder with a cutoff wheel to knock the sheet down to size and then used my miter saw (cuts both metal and wood) to make the final cuts.
View media item 90197
I then welded the four sides together and blended the welds.
View media item 88582
View media item 90198
I then cut the baseplate. Note the nipped corners - these will provide both drainage and airflow.
View media item 90200
Getting the most for my money out of my cutoff wheels.
View media item 90199
Got the baseplate welded on and blended the welds.
View media item 88667
I then got busy building the wood base. I collected a bunch of hardwood pallets to make a pallet board accent wall in my office, along with that I had a bunch of 2x4 stringers piled up waiting to be used.
View media item 90201
View media item 90202
View media item 88771
Making sure the ergonomics are correct...
View media item 88772
I spent about $100 on Amazon getting a burner, adjustable regulator, mixer, and adapter. Besides the $8 I spent on wood stain, this would be the only money I spent on the project - everything else I had on hand.
View media item 90203
I did a test run to make sure everything would work as expected. Norma Jean wasn't going to let a good fire go to waste.
View media item 88957
Once I was happy with how everything was going to work, I did the final plumbing of the gas line.
View media item 90204
View media item 90205
I then used a wire cup brush on my angle grinder to clean up the outside surface. I also decided to grain the metal using sandpaper. The bottom would eventually get painted with high temp paint, so I used this as my test area.
View media item 90206
Once everything was grained, the fire box was pretty bright. I wanted to give it a dark grey/brown look. Something that would patina, but not be bright red. I ended up putting my kerosene heater under the box, heated it up to about 200 degrees, and then rubbed it with danish oil.
View media item 90207
View media item 90208
I then used a PPG deck stain to give the wood a nice, weather resistant coat.
View media item 89130
Final test fit before giving it to Wife on Christmas morning.
View media item 89131
On Christmas eve night, I waited until Wife was asleep and snuck outside to setup the firepit and filled it with lava rock. On Christmas morning, I woke up early and started it up and left it burning. When Wife finally woke up, she went to grab a cup of coffee and saw the fire outside the window. At first she panicked, but figured it out pretty quickly. She knew I had been working on making her Christmas gift, but had no idea what it was. I got some happy tears, which was the goal.
View media item 89315