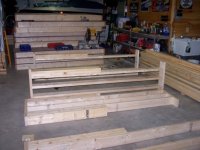
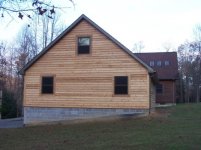
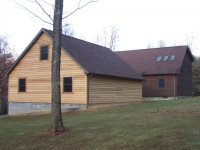
Well, I am finally getting around to posting some updated pics of my garage build. I built all of the walls in my basement in 8’, 10’, or 12’ sections. When the weather cleared up in the spring I carried them out (with a little help) and set them up. It only took a few hours and it actually went together as planned. I then hired out the trusses and roofing. Other than that, I have done all of the work myself. (Some help from wife & dad)

You are using an out of date browser. It may not display this or other websites correctly.
You should upgrade or use an alternative browser.
You should upgrade or use an alternative browser.
gdchapma garage updated pics
- Thread starter gdchapma
- Start date

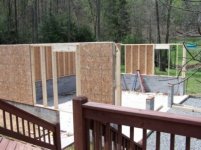

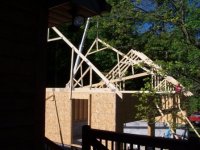
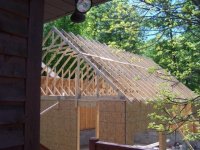
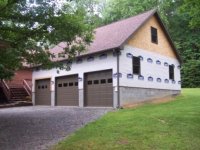
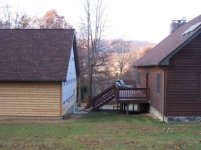
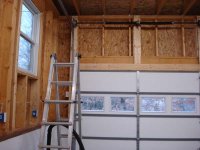
The garage is 36' x 28' x 12'6" with a 12' x 36' room above. The doors are
(2)9'x8' and (1)10'x8' Raynor insulated doors with high lift tracks. The outside is finished with 8" bevel cedar siding. The blocks will be covered with stone and the cedar stained to match the house in the spring. It will someday be attached to the house with a breezeway and the upstairs will be accessed from the deck by steps. (thinking about some pull down steps on the inside also)
(2)9'x8' and (1)10'x8' Raynor insulated doors with high lift tracks. The outside is finished with 8" bevel cedar siding. The blocks will be covered with stone and the cedar stained to match the house in the spring. It will someday be attached to the house with a breezeway and the upstairs will be accessed from the deck by steps. (thinking about some pull down steps on the inside also)
Attachments


You can tell from the leaves on the trees, that this took me all spring, summer and fall to get this far. Not much is getting done till spring. I will be putting Rustoleum Pro epoxy down when the weather allows me to. Let me know what you think, This site has been a huge help,(i dont post much but I lurk most every day) thanks to everyone for the great advice!!!
Attachments

cdrewferd
Well-known member
Great looking garage. Do you plan to insulate it?
chaingang
Well-known member
Very nice. The attic trusses are the way to go for extra room. I am currently doing the same for an 18x32 upstairs room. Love the cedar and rock on the bottom will finish it off nicely.
Down Under Bloke
Well-known member
Well done, looks great.
So last winter you built a garage in your basement, what are you doing this winter????
What will you be doing in the garage when it’s done?
So last winter you built a garage in your basement, what are you doing this winter????
What will you be doing in the garage when it’s done?
The upstairs is really just a bonus. I wanted a steep roof (10/12) to match the house and it really didn't add much money for the attic trusses so I went with them. Right now it will most likely be light storage. My plan is to clean out my basement for a media/rec room. I will insulate and finish off the inside a little at a time after I figure out what to do with the electrical. I would love to have a four post lift put in sometime but I have yet to win the lotterybenjacobs said:It looks great, gdchapma! I really like the breezeway idea. What are you going to use the upstairs for?
 (maybe this is my week!!!)Thank for all the comments, keep em coming!!
Gary
zipper
Active member
what part of WV do you live in ?
I live a couple miles outside of Huntington.
I live a couple miles outside of Huntington.
I like the doors a lot so far, they seem to be very well built. I think the R-value of the doors is 7, as to how the insulation works, its hard to tell when the rest of the garage isn't insulated yet.AGBill said:Looks Great! The steep roof really works well here....
What do you think of your Raynor insulated doors? Does the insulation work well? How about the quality? I currently have some on order for my workshop/garage....
Zipper, I live about 2 hours SE of Huntington in Fayette County
stihl036
Member
gdchapma said:The upstairs is really just a bonus. I wanted a steep roof (10/12) to match the house and it really didn't add much money for the attic trusses so I went with them. Right now it will most likely be light storage. ....
Gary
Fantastic build! You have done a great job and I love your idea of building the walls inside then moving them outside when you need them.
How tall is the roof in the upstairs? Looks like 8 feet. Could you put an inlaw suite up there? Where are the stairs?
Keep the pics coming, please

Care to add any costs to your thread?
Thanks
WW
Hades12
Well-known member
So very ****.
I like the ideal of pre building the walls, Did you setup a jig to do them? how did you connect them together once on the wall?
I like the ideal of pre building the walls, Did you setup a jig to do them? how did you connect them together once on the wall?
C_F
ALLIANCE MEMBER
Great garage, congrats to you!
snorvet
Well-known member
Very nice!
Hades12 said:So very ****.
I like the ideal of pre building the walls, Did you setup a jig to do them? how did you connect them together once on the wall?
No jigs were used. I actually designed all of the walls using AutoCAD. I detailed all of the wall sections like they were mechanical drawings. So I knew the measurements for every stud or plate. It took more time, but it was worth it when everything went together. I squared the walls up by measuring corner to corner then nailed on the 7/16" OSB so it would stay square. I layed out the tob and bottom plates on the actual wall where they would end up so there would be no suprises. When I put up the walls, i used 3" screws to attach the bottom plate and theb same screws to attach the wall sections together. After all of the sections were up, I put on the second top plate that tied everything together. They were pretty sturdy at this point. Then the trusses tied it all together nicely.
Building the wall sections in a shop is great. Right now I'm getting my BS in Construction Mngt. Each year we build a house for program. The walls are built in our shop, then taken to the site when we are ready to frame. With a group of about 10-12 guys, we did the floor joist in one 4 hour period. The next class period we framed up the first floor, next perior second floor-joists, next period second story walls framed. So in about 16 hours, 4 class periods of 4 hours we had completely framed a two story 2800sqft. house. That included interior walls as well. There are more and more medium to large scale residential contractors doing the shop built walls becuase it cuts down on time as well as errors/waste. The amount of waste produced onsite versus shop built is incredible, and who do you think picks up the bill for that...the buyer! Plus there's always something to do when the weather doesn't permit you to work on site. If I ever start building houses, that will be the direction I go.
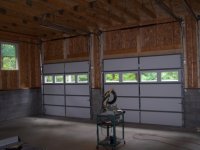
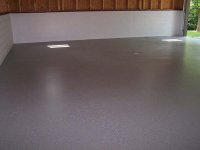
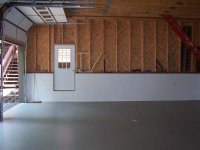
Finally getting around to posting some progress pics. I put down Rustoleum Pro Epoxy. Seem to be holding up pretty well considering it only cost me about $250 for my 3 car garage (36' x 28'). I got it on clearence at Lowe's
Attachments


HiHoSilver
Well-known member
very nice, actually it is awesome....good to see a fellow West Virginian on the site.
....good to see a fellow West Virginian on the site.Next , I got my electrical completed. About 25 outlets including 2 in the ceiling, 1 220 outlet, and 9 8' 4 t8 bulb fixtures (pretty bright).
Attachments


HiHoSilver
Well-known member
what part of WV do you live in ?
I live a couple miles outside of Huntington.
LETS GO....Mountaineers!!!!!!!!!!!
sorry.... had to do it
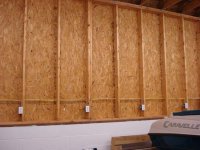
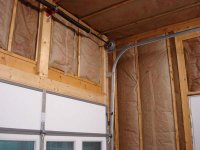
And finally I got my insulation done. R19 all over. Now I just have to make a decision on what to put on the walls. Thanks again to everone on the boards for all of the help and ideas.
Attachments


LETS GO....Mountaineers!!!!!!!!!!!
sorry.... had to do it
Funny you should mention the "eers", I was just playing with a new toy at work today and made this. I made the drawing on AutoCAD 2008 and cut it out of 1/4" plate steel with our new torchmate CNC plasma cutter. Gonna be fun to play with but with the price of steel these days i will have to watch myself.
Attachments

HiHoSilver
Well-known member
Funny you should mention the "eers", I was just playing with a new toy at work today and made this. I made the drawing on AutoCAD 2008 and cut it out of 1/4" plate steel with our new torchmate CNC plasma cutter. Gonna be fun to play with but with the price of steel these days i will have to watch myself.
Very nice.....
you wouldn't happen to work for Lamplighter Industries in Oakhill...do you?
anyway.... anytime you get to play with CNC equipment, it got be sweet....
connorB
Well-known member
blkhonda1991
Well-known member
looks good, one question though...i assume theres no space for stairs coming into the garage where you placed the side door?
flyin ryan
Well-known member
nice job")
Very nice.....
you wouldn't happen to work for Lamplighter Industries in Oakhill...do you?
anyway.... anytime you get to play with CNC equipment, it got be sweet....
Close, I work in Oak Hill, but I teach Computer Aided Drafting at the vocational center. The CNC equipment is in the Welding Technology shop.
looks good, one question though...i assume theres no space for stairs coming into the garage where you placed the side door?
I have stairs built now. There is not a lot of room, but there is enuf.