To avoid these ads, REGISTER NOW!

General purpose workbench

blaze_125

Well-known member
Joined
Mar 4, 2008
Messages
260
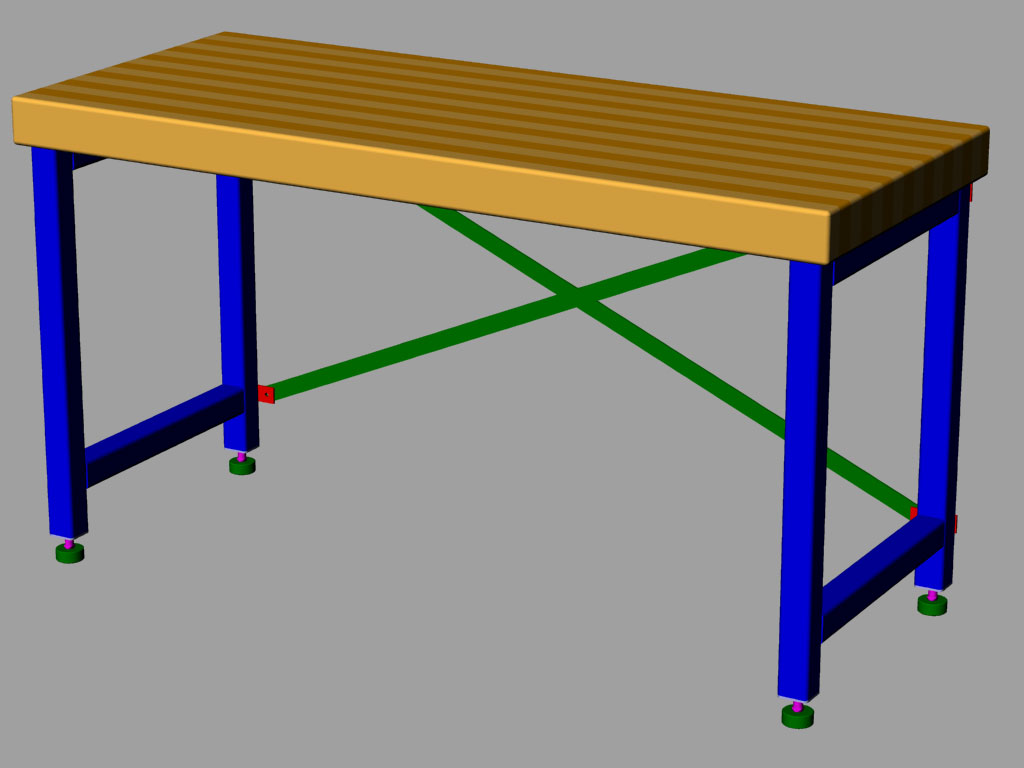
So I started playing with google sketchup a little bit today... attached is what came out.

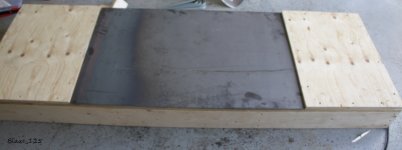
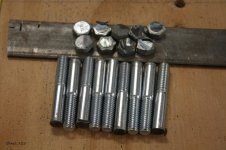
Center portion will be 1/4" steel plate for welding.
I'm almost done fencing the backyard, so I should be able to get onto that project earlier than I thaught. The plate should be home when I get off work, so who knows... maybe the fencing will get postponed :lol_hitti

I'm just not sure about the pegboard. I'm afraid it may catch fire when welding, but I'd like to have my angle grinder near the bench instead of in the tool box drawer.

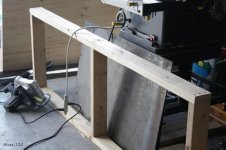
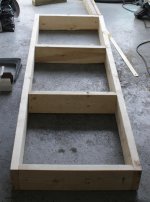
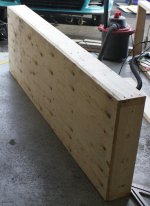
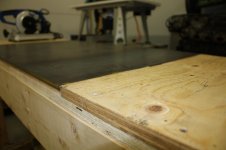
Dimensions of the bench are 6'x2'
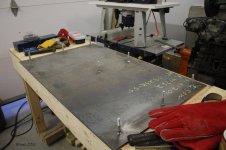
The metal plate is 3'x2'
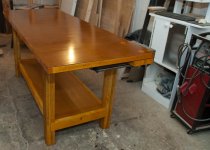
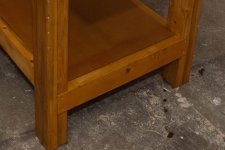
 

Attachments

  • WorkBench2.jpg
    WorkBench2.jpg
    72 KB · Views: 197
  • WorkBench-Xray.jpg
    WorkBench-Xray.jpg
    95.9 KB · Views: 151
To avoid these ads, REGISTER NOW!

Jack Olsen

Super Moderator
Staff member
Joined
Mar 22, 2009
Messages
6,678
Location
Los Angeles
A couple of thoughts. It might just be that you're working quickly in Sketchup, but you should have some lateral support for the bench -- either a pair of diagonals in the back (connecting the two rear legs), or a single sheet of plywood spanning the back. Even if you're bolting sistered sets of 2x4s for the legs to 2x4s around the perimeter of the undercarriage, you're going to have a heck of a time getting right angles, since the slightest warp of the 2x4s will mean the legs come out at slightly-off-of perpendicular angles. If you connect the legs lower down, you'll be able to correct for that. Plus, you'll have strength for any side-to-side force on the bench.

If you imagine a 6-foot perimeter spanning out from the rectangle formed by the steel, then you'll be able to visualize the area that's going to end up with black burn marks from welding and grinding. Your bench surface, tool box and pegboard will all get freckled. If you're okay with that, then no problem. If not, I'd use the 14" plate to make a specifically-for-welding table that you can store underneath the bench and pull out into the middle of the garage (or the driveway) when you want to weld.

Pegboard won't hold up to the weight of grinders if you're putting them up and taking them down frequently. The stuff is glorified cardboard. There is metal pegboard available, but you could put a 1"x1'8" strip of steel on the little welding table I suggested and hang them from there. That's how I do it (although, clearly, I've got stuff stacked up on top of -- and underneath -- my little table in this picture, which kind of defeats the purpose):

clampsgrinders.jpg


Welding is messy. It's prone to start fires. And if you don't have a dedicated ventilation system to get the fumes out of there, it's not particularly good for your health. I think a smaller, dedicated table makes sense for most hobbyists, since you can set it up outside, or at least far away from other stuff so you can weld with the door open.

That's my two cents, at least. And in the spirit of full disclosure, I'll admit that I was welding most of the morning on the bench I didn't design -- or intend -- for welding.
 
OP
B

blaze_125

Well-known member
Joined
Mar 4, 2008
Messages
260
I intend to use 4"x4" for the legs, but I agree; A brace between the legs should be added to my drawing.

As far as burn marks... that, I'm not too worried about. Especially on the bench itself. Because I mean... it's a "workshop" ;) I like that tool holder on your table, maybe I could come up with something similar. Or maybe just put a 20ga sheet against the backwall and weld hooks on it?

Now what about a legs in the center of the table?
I usually work projects that are not really that heavy, so I figured I could go without legs in the center of the table since the table is only 6' long... Am I making the wrong assumption? I received the steel plate yesterday and that alone has to be around 75 pounds. 1 thing for sure, is I'll revise the table top subframe braces. There is currently only 1 brace in the center... I'll add 2 more.

Ventilation is also something I'm working on.
 

reinhardt

Well-known member
Joined
Jun 2, 2010
Messages
384
wild and crazy idea here, why dont u build the bench out of steel? either some 2x2 box tube or maybe some 2x2 angle. i hate working with wood, it warps and all that happy ****. for the most part steel stays true. i built a 14 foot long x 2 foot deep bench out of 2x2 angle iron. it makes it easy to add shelves later, just weld some more angle up. you dont like the shelf there, cut it out and re-weld it where u want. weld flat pads on the bottoms of the legs w/ nuts welded to the pads. thread a bolt through it, and now u have an adjustable leg. i work in ship repair, so i work with steel all day. find a decent place that sells used steel and u should be able to pick up ur metal fairly cheap.

as far as setting the pegboard on fire, i have pegboard up on the wall behind my bench. i have yet to set it on fire. it takes more than u would think to set wood on fire. u may scar it a little, but i doubt even that. if sparks are bouncing off of it, it probably wont burn it. if sparks land on it, they probably burn it. meaning vertical surfaces shoudlnt be too much of a concern, its ur horizontal surfaces that get burned up. like the wood top on my bench. i didnt want a metal top, because i hate hammering against a metal bench. would rather hammer against a wood top, less noise that way.

as a safety note, please make sure you have a fire extiguisher mounted to the wall in easy reach away from the area of hotwork. by the door is a good spot to hang it. verify your metal is cool to the touch before walking away. check back on your work area approx 30 minutes later for any smoke/ burning smell. store all flammibles in a shed away from garage u r welding in.

and... i'm done rambling.
 
OP
B

blaze_125

Well-known member
Joined
Mar 4, 2008
Messages
260
At first I wanted to make a 100% steel build, but the price tag turned me off. Even the price tag of covering the whole tabe with a steel plate turned me off. That's why I' building 90% wood, and 10% steel. And quite frankly, I love the way the table top looks with wooden sides and a steel center section :) Hopefuly it'll look as good built, as it does in sketchup :lol:
 

Attachments

  • WorkBench3.jpg
    WorkBench3.jpg
    58.9 KB · Views: 1,341

reinhardt

Well-known member
Joined
Jun 2, 2010
Messages
384
the cost was that high? i was fortunate enough to find the steel i needed in the scrap bin (freebie!). but before i found it i called around town for prices. i found new steel at roughly $.60 a pound, and used at roughly $.40 a pound. might be able to hit up some smaller fab shops in the area and buy some drop pieces from them.

i do realize that 60 cents a pound adds up quickly, but u could get away with 1/8 thick box tube, or 3/16 angle. you dont have to go 1/4 thick. i dont imagine u plan on building the space shuttle on your bench. my bench is 2x2x3/16 and it has a 160 pound vise bolted to it. i would feel comfortable dropping an engine on it. my wife and i have stood on top of the bench at the same time (we were doing a project, i forget what), it held fine, felt solid, didnt flex any.

i seem to remember something like $100 in steel for a steel frame w/ wood top. i built a wood bench 4 ft wide x 2 ft deep for something like $75 dollars, but a good chunk of that was the plywood for the top.

either way, wish u luck. post up some pics of the bench when its done.
 

msnow

Well-known member
Joined
Nov 16, 2009
Messages
192
I intend to use 4"x4" for the legs, but I agree; A brace between the legs should be added to my drawing.

As far as burn marks... that, I'm not too worried about. Especially on the bench itself. Because I mean... it's a "workshop" ;) I like that tool holder on your table, maybe I could come up with something similar. Or maybe just put a 20ga sheet against the backwall and weld hooks on it?

Now what about a legs in the center of the table?
I usually work projects that are not really that heavy, so I figured I could go without legs in the center of the table since the table is only 6' long... Am I making the wrong assumption? I received the steel plate yesterday and that alone has to be around 75 pounds. 1 thing for sure, is I'll revise the table top subframe braces. There is currently only 1 brace in the center... I'll add 2 more.

Ventilation is also something I'm working on.

Just a comment on legs on the center of the table. Instead of putting legs in the center of the table I would just make my main beams taller. Think of it like a bridge instead of using 2x4 use 2x6 if you are really concerned about the weight. Legs in the center I find annoying because they always seem to be in the way. All you are doing is trying to keep those two main beams from deflecting so I would go with a taller beam instead of adding more legs. Also trying to maintain levelness and floor contact on four points is easier then 6.
 
OP
B

blaze_125

Well-known member
Joined
Mar 4, 2008
Messages
260
So this was my evening... :beer:

I started with a 2x2 frame I made a couple weeks ago and switched to 2X6 after reading this thread.
I'm still missing a 1/2" sheet under the steel plate to make it even with the sides, and a brace in the back of the legs.
I also went with doubled 2X4 for the legs, instead of 4x4s
 

Attachments

  • oldframe.jpg
    oldframe.jpg
    90.9 KB · Views: 90
  • frame1.jpg
    frame1.jpg
    135.9 KB · Views: 82
  • tableup.jpg
    tableup.jpg
    121.5 KB · Views: 132
  • plateon.jpg
    plateon.jpg
    96.1 KB · Views: 102
  • firstlayer2.jpg
    firstlayer2.jpg
    114.3 KB · Views: 85
  • firstlayer.jpg
    firstlayer.jpg
    136.9 KB · Views: 76
Last edited:
OP
B

blaze_125

Well-known member
Joined
Mar 4, 2008
Messages
260
I got the half inch ply, hopefuly tonight I'll be able to finish it all and secure the steel plate to the table.

More pics to come :p
 

reinhardt

Well-known member
Joined
Jun 2, 2010
Messages
384
looking good. i like the steel center. i may have to do that on my bench. i have wood all the way across. the area all around my vice is covered w/ burn marks from welding.
 

Jack Olsen

Super Moderator
Staff member
Joined
Mar 22, 2009
Messages
6,678
Location
Los Angeles
Is there any provision for where to attach your ground clamp, while welding?

And it's probably too late, but some overhang with the steel (and the rest of the top) would make clamping things to the bench a lot easier.
 
OP
B

blaze_125

Well-known member
Joined
Mar 4, 2008
Messages
260
Is there any provision for where to attach your ground clamp, while welding?

There is none, but there is an idea :shocking:
I was thinking of threading a bolt through the table(head under the table,thread sticking up top) and just bolt my clamp to it. I have some bolts left over, so I'd just need to drill a hole through my clamp so the thread can go through it and secure it with a nut on top.

Clamping things to the table... well... that's something that struck*sp?* me after the fact :lol_hitti

Attached are the images of what's been done tonight.
Tonight's work was about securing the steel plate on the bench.

First, I got to open an unexpected package when I got to the garage. My cutoff saw arrive a day early:beer: That means I don't have to chop my bolts with the grinder anymore :thumbup:

attachment.php


attachment.php


attachment.php


Then I made some hole in the table and marked the steel plate for bolt locations. Once the plate was properly marked, I could start welding the bolts on. If you're wondering why there is a missing bolt in the picture... that'd be because I ran out of wire and it was too late to go buy some.:mad: I think 8 should be enough anyway.


attachment.php


attachment.php


attachment.php


attachment.php


With the bolts on, just flip the plate over and align the bolts with the holes. Hammer the !@#$% in there, put some washers and nuts and tighten it down :thumbup:


Forgive my not so great looking welds, but feel free to comment on them. I'm using a 110 flux core machine, and I only have a few hours of welding under my belt. And also, never mind the engine with a big hole in the background :lol:
 

Attachments

  • plateisready.jpg
    plateisready.jpg
    96.4 KB · Views: 1,822
  • weldboltson.jpg
    weldboltson.jpg
    57.6 KB · Views: 1,829
  • weldboltson3.jpg
    weldboltson3.jpg
    121.3 KB · Views: 1,832
  • marktheplate.jpg
    marktheplate.jpg
    83.2 KB · Views: 1,831
  • giotinestyle.jpg
    giotinestyle.jpg
    107.7 KB · Views: 1,842
  • bolts-beforeafter.jpg
    bolts-beforeafter.jpg
    99.6 KB · Views: 1,841
  • newtoy1.jpg
    newtoy1.jpg
    97.4 KB · Views: 1,846
Last edited:
OP
B

blaze_125

Well-known member
Joined
Mar 4, 2008
Messages
260
more pics...

Next steps are to get the old bench ouf of the way, and bring this one to its new home :p And I got some other projects in mind.
 

Attachments

  • platesecured.jpg
    platesecured.jpg
    74.8 KB · Views: 94
  • plateison.jpg
    plateison.jpg
    83.5 KB · Views: 10,057
  • surfacecloseup.jpg
    surfacecloseup.jpg
    68.5 KB · Views: 121
Last edited:
OP
B

blaze_125

Well-known member
Joined
Mar 4, 2008
Messages
260
Last edited:
To avoid these ads, REGISTER NOW!

Richard D

Well-known member
Joined
Jan 19, 2007
Messages
1,922
Location
Texas City, between Houston and Galveston
I don't mess with pegboard. It's expensive, as are the hooks, and you are limited by the holes as to where you can hang things. I like good 'ol plywood and drywall screws. Makes for easy hanging of odd-shaped tools, and cheap to boot.
 

zer01

Well-known member
Joined
Oct 14, 2009
Messages
366
Location
Michigan
A 4x8 sheet of pegboard is relatively cheap and can be found at any lumber store, Lowes, Home depot, ect.... I would mount the pegboard to the wall separate from the bench. Put it 6" higher than the work surface, make sure to space the pegboard off the wall so the hooks will work. Hooks also can be found at any store for relatively cheap but I prefer the Wallpeg brand found on ebay, they lock into place and come in a couple different sizes. Longer metal hooks can be found by the case load on ebay as well. Pegboard give you flexibility of rearranging your tools as you acquire more. For the versatility it is hard to beat pegboard and looks nicer than plain ol plywood. Don't waste your money on the stuff from sears, it is usually priced at what you could get a whole sheet (or three) at the lumber yard. I have welded around my pegboard and it has never been an issue. You could always fab a folding work screen to surround your welding area on the bench if you are worried about it.
 
Last edited:

zer01

Well-known member
Joined
Oct 14, 2009
Messages
366
Location
Michigan
Something like this only made of sheet metal with piano hinges, or smaller hinges with overlapped joints. Or make it out of a welding curtain with a metal frame to support. Could be made to fold flat and store along side your work bench when not in use. Would keep all the splatter on the table rather than letting them go in all sorts of places in the garage.
 

Attachments

  • welding screen.jpg
    welding screen.jpg
    89.5 KB · Views: 39

leftyz

Well-known member
Joined
Mar 30, 2010
Messages
1,408
Location
Upstate, NY
If you did the back bracing the way you showed in the sketchup, parallel to the top of the bench & floor, it will do very little for lateral support, which is why Jack Olsen suggested diagonals.

Did you end up bracing it like this?

attachment.php


Or, the better way:

benchrendering.jpg


Another option (not sure if its as good as full diagonals)

wsxtwb34amk_workbench.jpg
 
Last edited:

zer01

Well-known member
Joined
Oct 14, 2009
Messages
366
Location
Michigan
I won't argue the looks of pegboard, but I like the fact that a whole box of screws is only $4-$5, way way way cheaper than the pegs. But won't win any beauty contests.

Just giving my opinion and experience as well. Not discounting your opinion at all. Pegboard works for me, plywood for you, no problems with which ever he chooses, just sharing my opinion/experience.
 

Zengineer

Well-known member
Joined
Apr 10, 2010
Messages
781
Location
British Columbia, Canada
Good choice doubling up 2x4's instead of using 4x4's, but you are missing a key benefit from doing that. See the cross-tie detail I used in my workbench attached.

The great thing about that bench, is it was made with only 2 tools. A miter saw (or something else to cut 2x4's) and a powered screwdriver.

Total cost for this bench was about $100, and $70 of that was for the 7' solid core door that became the bench top.
 

Attachments

  • RGL_7584.jpg
    RGL_7584.jpg
    119.1 KB · Views: 192
  • RGL_7585.jpg
    RGL_7585.jpg
    106.4 KB · Views: 138
Last edited:

BOONEY7750

Well-known member
Joined
May 13, 2010
Messages
147
I use 4x4 post with cross braces perpendictular to the floor dado'd in. same as Jack mentions for sistering, but cleans up nicer. If you cut the dados tight it will cut way down on the flex. Might not be as sound as diagnles, but plenty for what I do at least. The other thing I do instead of diangles is a solid back, (OSB is cheap) I like having a solid back to keep everything tight and sometimes to set depth to keep boxes or a shop vac from going to far back, I keep my benches about 6 inches from the walls for the ocasional leak on one side and baseboard heat on the other side.
 
Last edited:
To avoid these ads, REGISTER NOW!
Top Bottom