To avoid these ads, REGISTER NOW!

German concrete Lego build workshop

Sahib

Member
Joined
Sep 30, 2018
Messages
16
Location
Germany
Hello Forum,

as said in the 'Introduction-Area' my name is Adrian and as the Topic suggests I'm from Germany (please excuse my lumpy english).
After years of reading here in the Forum and dreaming of my own workshop, I stopped dreaming an took a shovel (or maybe it was an excavator shovel...) to start building.
As I've read you folks are always interested in builds of a different kind, I tought it would only be fair to share my path along my concrete-road with you lot.
For starters:
My shop will be 20 x 7m (65,61 x 22,97 ft) tall. Here is an early crude drawing:
Screenshot-v.1.0.jpg
It will get a single pitch roof and will be mostly build by hand. Having an Eye on the budget is a major concern. In the end it is just a hobby...
As it will be partly build into a hill (sort of) it will be half build out of concrete and half out of bricks.
Enough talk, let's get to the dirty pictures!

At first I dug out a big hole behind my house and formed a "U" shaped trench for the first part of the ice wall. Therefore the ready-mixed concrete trucks could drive directly into the pit and I could save the money for a large concrete pump:
gnal-2020-05-22-133846_compress96_768_cw768_ch1024.jpg
And the third truck only got nearly stuck in the dirt...*phew*
After drying (and a first delivery of crushed rock) I placed some oriented strand board on top of the first layer of the ice wall:
img_20200712_135422_resize_21.jpg
I used threaded bar inside ductwork as spacers.
Then again it was time for the concrete trucks:
img_20200720_114504_resize_91.jpg
After removing the threaded bars and the OSB, all what is left are the pieces of duct work inside the concrete:
img_20200725_104214_resize_22.jpg
Nice, easy and again: cheap
Leaving my "U"-shaped 80 cm ice wall ready.
Next stop was the trench up front to form a square:
img_20200727_160927_resize_23_1024_cw1024_ch768.jpg
Again, concrete Truck time.
Last the crushed rock was packed and leveled:
img_20200910_154618_compress11_1024_cw1024_ch768.jpg
That is the current state.
At the End of October it is time for the bottom slab with rebar and ancors for the concrete walls.
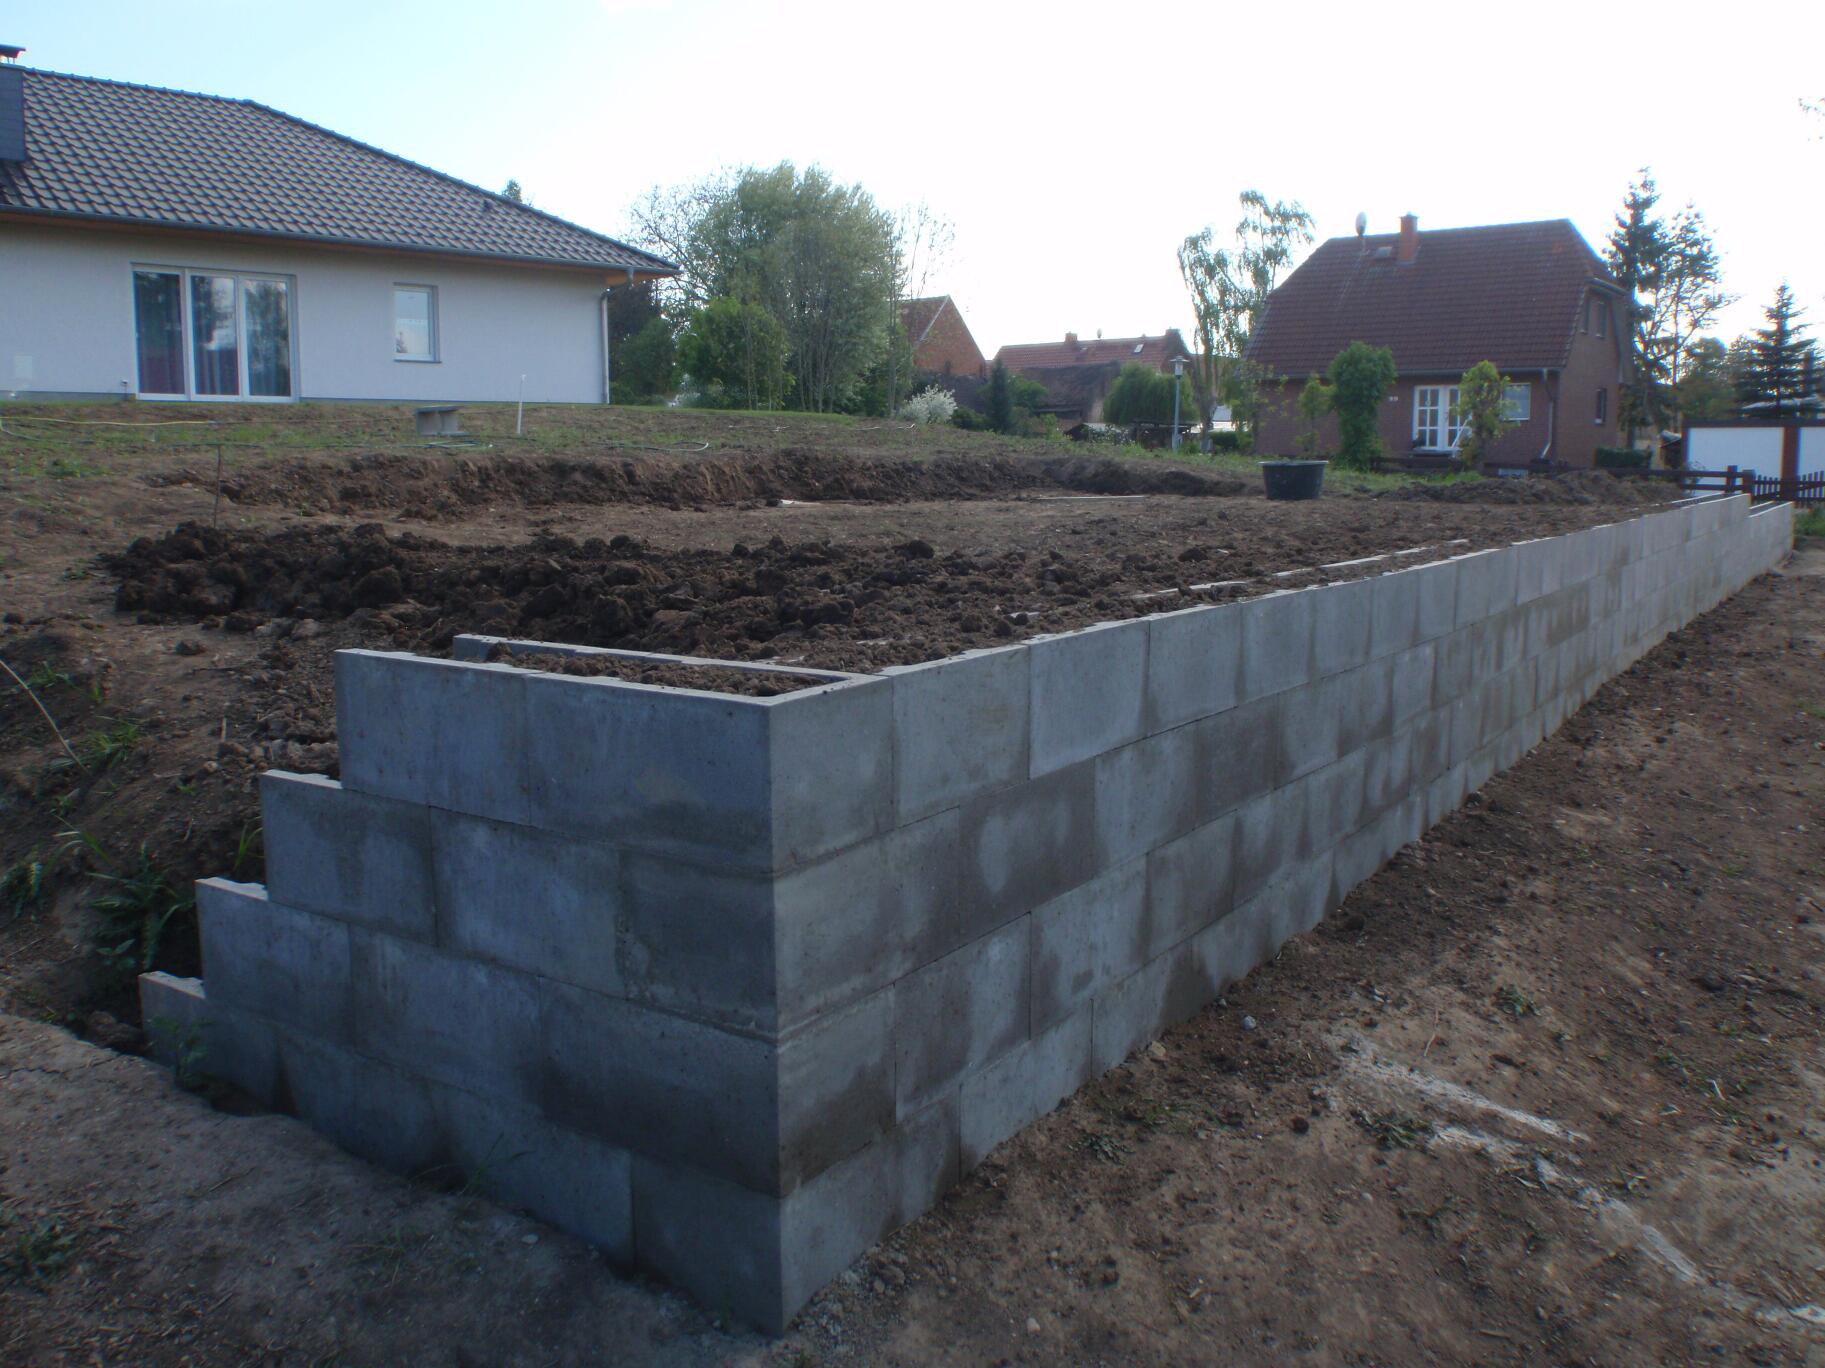
The walls will be build out of "Schalungssteine" (dict.leo.org doesn't know an english word for it. Is there any?). These Schalungssteine are hollow concrete stones, which can be placed like LEGO and be filled afterwards with rebar and concrete, leaving a massive reinforced concrete wall. I used them before for a retaining wall:
P3235857resized.jpg
Very cheap, easy to build with and sturdy enough to withstand the imperialists comming through the Fulda Gap.

I hope it was so far understandable. If you have questions or suggestions feel free to reply!

Best regards
Adrian
 
To avoid these ads, REGISTER NOW!

matt_i

Well-known member
Joined
Mar 14, 2008
Messages
10,726
Location
SE Michigan
Hi Adrian, this looks like a great project. Welcome to the forum! In the US I would call your building materials: "concrete blocks", maybe "hollow blocks".

We would love to see more pictures as the project continues. Looks like you have a nice 3D model of the plan and that's always an excellent start. I am always interested to see what unique building materials show up in builds across the world.
 
OP
S

Sahib

Member
Joined
Sep 30, 2018
Messages
16
Location
Germany
No, you just dry stack them up to five rows, place the rebar inside and fill everything with concrete. More then five rows in one filling is to much pressure from the wet concrete for the bottom blocks.

The male/female fit holds them in place whilst filling with concrete. Only the first bottom row is set in mortar to fill any gaps to the bottom slab and make everything straight and upright.
 
Last edited:
OP
S

Sahib

Member
Joined
Sep 30, 2018
Messages
16
Location
Germany
Here is a picture of the final retaining wall I build with these blocks bevor:
P5086024resized.jpg

As you can see, there is no mortar between the layers.
Makes building really fast.
 

firebirdparts

Well-known member
Joined
Jun 8, 2016
Messages
10,609
Location
Kingsport, TN
I have not seen a block like that in the states. A "bond beam" block we have here is similar, and a "retaining wall unit" block is very similar. Neither of the ones we have here are equipped with the interlocking ends.
 

californiamilleghia

Well-known member
Joined
Apr 11, 2020
Messages
537
Location
SoCal
Looks great ,

may I suggest that you put some anchors in the floor concrete .

in the back corners and maybe along the side wall,

I used chain but there are special anchors made for this ,

With the anchors you can pull heavy things with a hand winch and chains, or cars that are not running and heavy to push.
 

eastbaysubaru

Well-known member
Joined
Dec 6, 2009
Messages
340
Location
NorCal
Awesome to see a build from Germany! Thanks for sharing. Those interlocking cinder blocks are very cool.

-Brian
 

ford33

Well-known member
Joined
Feb 26, 2011
Messages
2,118
Location
Chicago, IL. USA
Thanks for sharing. I enjoy seeing what other countries construction practices are for buildings.

This is an interesting build. Keep us updated.
 

fourjeepin

Well-known member
Joined
Feb 12, 2011
Messages
3,658
Location
Atlanta, GA
I noticed every other void in the block has a large diameter yellow tube in it. What is the purpose of this? Those blocks are really interesting. I’m sure they cost more than our equalivent but save so much time, especially if are a slow mason like I am.
 
OP
S

Sahib

Member
Joined
Sep 30, 2018
Messages
16
Location
Germany
Looks great ,

may I suggest that you put some anchors in the floor concrete .

in the back corners and maybe along the side wall,

I used chain but there are special anchors made for this ,

With the anchors you can pull heavy things with a hand winch and chains, or cars that are not running and heavy to push.

Thank you for your suggestion! These are always welcome!
Those anchors are planed but I don't intend to include them in the slab. As the final layout is still a work in progress I don't want to interfere them with a Lift or something else. The plan is to drill holes after the tiles are layed and everything is set up. The anchors I have in mind are specially intended to be placed in such holes and hold by friction.
 
OP
S

Sahib

Member
Joined
Sep 30, 2018
Messages
16
Location
Germany
I noticed every other void in the block has a large diameter yellow tube in it. What is the purpose of this? Those blocks are really interesting. I’m sure they cost more than our equalivent but save so much time, especially if are a slow mason like I am.

The concrete blocks are about 3$ a piece. They are roughly 20 inches long and 10 inches high/wide. Costly compared to wood but very cheap compared to any other "underground pressure resistant building material". Yes the slow-mason is also one reason. But having afterwards a solid reinforced concrete wall and the idiot proof building process (they are premade with very little tolerances, so everything stays level while you stack them) were the major reasons.

The yellow tubes in the retaining wall are to drain any water out.
I only filled every second rectangular space with concert. The others were filled with gravel and soil. The top layer of blocks was completely filled with soil and afterwards plants were planted. Here a picture after two years:
IMG_20180520_105138-.jpg

But that was only for the retaining wall! The walls of the workshop will be solid reinforced concrete.
 
OP
S

Sahib

Member
Joined
Sep 30, 2018
Messages
16
Location
Germany
Yes that system is quiet similar. No wonder he knows this System, Mr. Haener says he studied in Berlin.... Here you can get these blocks in every hardware store.
 

acer66

Well-known member
Joined
Dec 4, 2010
Messages
4,418
Location
Western North Carolina
Yes that system is quiet similar. No wonder he knows this System, Mr. Haener says he studied in Berlin.... Here you can get these blocks in every hardware store.

Yeah, labor prices and energy prices are creeping up here too so the european or in this case the german way of designing things in a way that cuts down on the labor costs are getting a bit more popular.

Sometimes they even build houses here using Gasbetonsteine, not sure what the english word for that is.

Anyway looks good and I am looking forward to more progress.
 

Cobra5150

Well-known member
Joined
Feb 2, 2008
Messages
1,953
Location
GA
Last year I had the opportunity to visit a friend of mine who is in the process of building his retirement home in Austria. The building methods are vastly different there compared to the US. I was impressed. His house should still be standing in a hundred years.
 
To avoid these ads, REGISTER NOW!
OP
S

Sahib

Member
Joined
Sep 30, 2018
Messages
16
Location
Germany
Google says "aerated concrete blocks"

Idk if you can find those over here or not.

Sent from my SM-N981U using The Garage Journal mobile app

No aerated concrete blocks are something different. They have little "airpockets" to help insulation and reduce weight. The blocks I use are massive concrete. Heavy, badly insulating but very solid to withstand the underground pressure coming from the nearby house.
 

AP514

Well-known member
Joined
Jan 23, 2014
Messages
768
Location
Pearland, Tx
Watching this Thread.. Very Interesting.

more House Build **** please (Pictures of your build)


I also Noted the WOOD STACK in 1 of your Pictures...Some Serious Snow you must get.
 
Last edited:

acer66

Well-known member
Joined
Dec 4, 2010
Messages
4,418
Location
Western North Carolina
No aerated concrete blocks are something different. They have little "airpockets" to help insulation and reduce weight. The blocks I use are massive concrete. Heavy, badly insulating but very solid to withstand the underground pressure coming from the nearby house.

He might have referred to Gasbetonsteine.
 
OP
S

Sahib

Member
Joined
Sep 30, 2018
Messages
16
Location
Germany
Watching this Thread.. Very Interesting.

more House Build **** please (Pictures of your build)


I also Noted the WOOD STACK in 1 of your Pictures...Some Serious Snow you must get.

Hehe, the wood stack is more a cosmetic solution to hide the Container I use as a garden shed from the eyes of my wife:
img_20191116_145646_resize_86_1024_cw1024_ch768.jpg

It's much more pleasant to the eye then the bare metal:
img_20191122_140535_resize_68_1024_cw1024_ch768.jpg
 
OP
S

Sahib

Member
Joined
Sep 30, 2018
Messages
16
Location
Germany
Update:
In the meantime we layed the slab (25cm/10"), starting with the delivery of some rebar:
img_20201106_133044_compress47_1024_cw1024_ch768.jpg

First the plastic spacers underneath the first layer of Q335-rebar:
img_20201107_114658_compress32_1024_cw1024_ch768.jpg

On top of the first layer of rebar came "snake-rebar" as a spacer to the seconde layer of rebar:
img_20201107_120429_compress13_1024_cw1024_ch768.jpg

Final view at the end of day one:
img_20201107_145456_compress22_768_cw768_ch1024.jpg

Whilst the 'L'-shaped connecting rods for the concrete walls were tied in at day two the concrete pump arrived:
img_20201113_133904_compress82_1024_cw1024_ch768.jpg

The slab was placed:
img_20201113_141513_compress8_768_cw768_ch1024.jpg

And soon after the surface was smoothed:
img_20201113_141959_compress76_1024_cw1024_ch768.jpg

With the fading daylight we finished our work:
img_20201113_163105_compress14_1024_cw1024_ch768.jpg

From the other angle:
img_20201113_161950_compress88_1024_cw1024_ch768.jpg

Two days later:
img_20201115_150802_compress44_1024_cw1024_ch768.jpg

The Rebar to connect the walls to the slab is massive (16mm/5/8"):
img_20201115_150621_compress83_768_cw768_ch1024.jpg

As you've seen above I take massive advantege of child labor.
To protect my little workers (despite the fence around the excavation) I covered the upright rebar:
img_20201123_142117_compress16_1024_cw1024_ch768.jpg

Next step is the drainage.
 

Bruce 993 SEA

Well-known member
Joined
Oct 22, 2016
Messages
1,033
Location
La Conner, WA
Yes, we have "Cinder Blocks" that are light weight and do not have much compressive strength and we also have "Concrete Blocks" that are much stronger...and heavier. They both need mortar between like bricks and rebar and filled cavities with concrete. Depending, not all cavities are filled.

This looks like a really nice project...Looking forward to following!
 

Pacha

Member
Joined
Jul 14, 2015
Messages
7
Location
Buenos Aires, Argentina
Update:
In the meantime we layed the slab (25cm/10"), starting with the delivery of some rebar:
img_20201106_133044_compress47_1024_cw1024_ch768.jpg

First the plastic spacers underneath the first layer of Q335-rebar:
img_20201107_114658_compress32_1024_cw1024_ch768.jpg

On top of the first layer of rebar came "snake-rebar" as a spacer to the seconde layer of rebar:
img_20201107_120429_compress13_1024_cw1024_ch768.jpg

Final view at the end of day one:
img_20201107_145456_compress22_768_cw768_ch1024.jpg

Whilst the 'L'-shaped connecting rods for the concrete walls were tied in at day two the concrete pump arrived:
img_20201113_133904_compress82_1024_cw1024_ch768.jpg

The slab was placed:
img_20201113_141513_compress8_768_cw768_ch1024.jpg

And soon after the surface was smoothed:
img_20201113_141959_compress76_1024_cw1024_ch768.jpg

With the fading daylight we finished our work:
img_20201113_163105_compress14_1024_cw1024_ch768.jpg

From the other angle:
img_20201113_161950_compress88_1024_cw1024_ch768.jpg

Two days later:
img_20201115_150802_compress44_1024_cw1024_ch768.jpg

The Rebar to connect the walls to the slab is massive (16mm/5/8"):
img_20201115_150621_compress83_768_cw768_ch1024.jpg

As you've seen above I take massive advantege of child labor.
To protect my little workers (despite the fence around the excavation) I covered the upright rebar:
img_20201123_142117_compress16_1024_cw1024_ch768.jpg

Next step is the drainage.
Nice garage build!!. What kind of concrete did you use? In Argentina we still use conrete base and brick wall construction method. It takes a ton of hours to rise and finish a wall.
For the railroad crossing we use a 5 cm thicker (30 cm) concrete slab but it is certified for heavy truck circulation so your garage will last for centuries.
 

loganb

ALLIANCE MEMBER
Joined
Dec 29, 2011
Messages
5,524
Location
Omaha, NE
Looks great, keep the progress coming! Really enjoy the threads showing the building practices and methods in other countries!
 

oldironfarmer

Well-known member
Joined
Jun 25, 2016
Messages
6,664
Location
Terlton, Oklahoma
I'm really enjoying your build. Especially that you are doing the parts that you can, and have your children helping. They will remember that through their life.

Nice work so far!

Your English is very understandable, my German not so much.
 
OP
S

Sahib

Member
Joined
Sep 30, 2018
Messages
16
Location
Germany
I like the snake rebar concept- Looks like the first layer goes in over unistrut spacers?

Yes they look like unistrut spacers, but they are made from recycled plastic. They are a bit flimsy and crude whilst handling, but as spacers for rebar they work great and are very cheap. Much easier then bending spacers from rebar.
The holes are there to allow concrete to flow inside.
 
OP
S

Sahib

Member
Joined
Sep 30, 2018
Messages
16
Location
Germany
Nice garage build!!. What kind of concrete did you use?

It was a 'C25/30' concrete. I have no idea if this is international code or just a german classification.

Thank you for your kind words. Yes the one who has to demolish this in 150 years will find many unkind words for me using so much steel and concrete...:eyecrazy:
 
To avoid these ads, REGISTER NOW!
Top Bottom