To avoid these ads, REGISTER NOW!

getting some needed storage

driftpin

Well-known member
Joined
Dec 22, 2016
Messages
11,192
Location
Miami-Dade/Broward Co. Florida
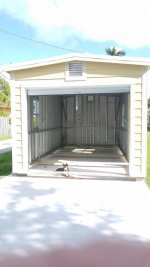
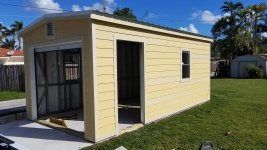
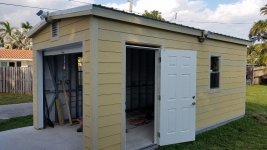
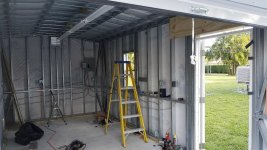
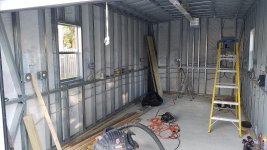
I don't have the time, or the ability on my own to get some quick storage, by making my own. The zoning restrictions are keeping me from making something myself. I'm going with a pre-fab 10' X 20' steel-framed, 3/4" plywood-sheathed, Hardieplank-covered gable ended building with a roll-up door at one end. The concrete slab will be the floor. Ten-by-twenty is the largest stand-alone accessory structure I'm allowed.

Right now I'm getting the concrete poured for the floor slab. The building will be craned into place on the slab. I've got plenty of room to do that.

The contract called for the poured slab to match the elevation of the house at the entrance from the carport into the house. The slab is a T-off the driveway which was asphalt, it's been removed, and will be replaced by a concrete poured driveway. I've lived here on the block nearly 40 years and never had rising waters approach the threshold of the dwelling. That includes a storm of 14" of rain in eight hours, which really did make the area look like "the Venice of America," as Ft. Lauderdale likes to refer to itself, which is close-by.

The contract for scope of work was written expressly for that slab elevation. I asked repeatedly that the layout crew come out and shoot the elevation, but they just eyeballed it and threw up the forms after the excavation. I used a surveyor's twine and a clip-on line level to see that their estimate was probably 2 inches too-low. I've called the business office and spoken in person with the excavator, who seems to be the responsible layout person. He assured me they will 'make it right,' the same thing I've heard from the business office. But when I ask, "when is someone coming with a transit to shoot the elevation," no one is making an appointment. I want to be here when they do, so that they can show me it's accurately laid-out.

I had an acquaintance who's a GC come-out and lay it out on his time/money, and for his crew to do the work, but then two weeks of ignored phone calls, hang-ups, and ignored texts, I gave up on them and signed a contract with another company that I had known-of that specializes in driveways and slabs. That's the company who has done the excavation and formwork.

Today I sent them an email about the need to not pour the slab and driveway until I was satisfied that my elevation requirement specified in the scope of work contract was satisfied. I referenced the written contract, the site visit when I spoke w/the demolition guy while he was removing the asphalt driveway and excavating for the slab, the phone call following-up when I saw the form work done but not to contract, a text to him about the corrections, and sent an email to the business office with all of that.

I shortly got a reply that said because of the heavy rains south Florida has been having (up-to 5 inches in places, in the past 24 hours) that they haven't been able to get out to adjust the formboards. OK, I accept that, it's been torrential at times. But I still haven't had anyone tell me, "we can be there Monday after 9 am to make the formboard adjustments."

My question still is, are you going to use a transit to give me what I asked-for?"

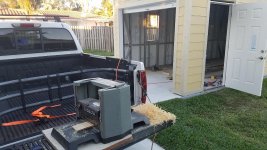
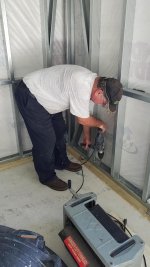
Today I was going from one campus to another, where I teach, and stopped at Habitat for Humanity. I think Jesus was listening, because He put a nearly-new CST/berger 54-200K transit level in the tools section! Here's the Wally World ad for it: https://www.walmart.com/ip/Berger-S...0X-1-4-in-at-75-ft-Accuracy-Aluminum/15676025 They want $416 for it. It looks like it was used a few times and brought to H for H. OK! It's not even dirty, and all the parts are there, it's in the factory cardboard box. So, I'm gonna shoot my own elevations and set some batterboards, and tell the driveway/slab contractor, "this is what the contract calls-for."

I almost called a local surveyor to see what they would charge, which I know is a lot-more than I paid for the transit level! Compared to Wally World, it was downright cheap, less than one-third price. Take a look at the pics. It's perfect.

I wanted the slab in and done before I placed my order for the premanufactured building. The local jobber said it's two weeks from order to delivery, and it includes delivery and set-up. Where I live is a HVHZ area (high-velocity hurricane zone) and the product is approved by the state to withstand 175 mph gusts. Seeing as this week is the twenty-fifth anniversary of Hurricane Andrew ( http://www.nhc.noaa.gov/pastdeadly5.shtml) which caused $43 billion loss adjusted by the Consumer Price Index, I'm happy for the requirement! Andrew had winds of 165 mph, and destroyed thousands of homes, entire trailer parks, commercial and industrial sites, and caused tens of thousands residing in the areas where homes were destroyed to take their insurance payouts and move north. It also force multiple revisions in the Florida Building Code. I was a firefighter/paramedic here when it hit, and I saw the devastation first-hand. It was horrible, for months. If you were within 20 miles of where it made landfall, and you got your electricity back within 4 weeks, you were lucky, and one of the few who got it back that quickly. Downtown Miami curtain wall high-rise buildings looked more-like Beirut, with all the missing panes of glass. If it made landfall 20 miles further north of where it did hit in Homestead which was low-density housing, and rural in nature; it would have hit downtown Miami, and Miami Beach before that. Estimates of expected losses would have been triple what they actually were for the Homestead landfall. I think that figure is low. The housing density of the City of Miami (and Miami Beach) is much higher because of hundreds of high-rises. The City of Miami had in 1992 probably fourteen times the population of Homestead (359,000 vs 25,000).

It took the local municipality a month to approve the driveway permit, I hope it takes less time for the premanufactured garage plans, which has sealed drawings from a P.E. I'd like to think that I could get the building up before October, but Thanksgiving may be more-realistic. As the POTUS tweets, "sad!"
 

Attachments

  • CST-Berger transit level 54-200K.02.jpg
    CST-Berger transit level 54-200K.02.jpg
    157.9 KB · Views: 571
  • driveway excavation.01.jpg
    driveway excavation.01.jpg
    147.9 KB · Views: 581
  • driveway excavation after rain.01.jpg
    driveway excavation after rain.01.jpg
    152.6 KB · Views: 642
  • CST-Berger transit level 54-200K.01.jpg
    CST-Berger transit level 54-200K.01.jpg
    161.3 KB · Views: 501
Last edited:
To avoid these ads, REGISTER NOW!
OP
D

driftpin

Well-known member
Joined
Dec 22, 2016
Messages
11,192
Location
Miami-Dade/Broward Co. Florida
OK, today is the day as Mel Fischer, finder of the Atocha, the FL Keys Spanish galleon with hundreds of millions of dollars in gold and jewels on it, used to tell his dive crew, when they were facing another day on the water in the Florida Keys, trying to find that elusive treasure. One of my fire/rescue coworkers worked for him. http://atochastory.com/

So the pour is done, a 6" slab, thickened edges, two #5 rebar in the perimeter, #10 gauge WWM 6" x 6", 3000 psi concrete, fiber-reinforced. Gonna let it cure 84 hours before driving on it.

Hope the city doesn't take a month to approve 'phase II' like they did the driveway. :headscrat
 

Attachments

  • 20170927_182545.jpg
    20170927_182545.jpg
    149.5 KB · Views: 391
Last edited:
OP
D

driftpin

Well-known member
Joined
Dec 22, 2016
Messages
11,192
Location
Miami-Dade/Broward Co. Florida
I had my morning coffee walking the slab, it felt good underneath me. Then I left for work. Permitting for the premanufactured building is next. I won't place an order until the permit is approved.
 
OP
D

driftpin

Well-known member
Joined
Dec 22, 2016
Messages
11,192
Location
Miami-Dade/Broward Co. Florida
Please see the initial post, zoning regulations limit me to that maximum size for a stand-alone accessory building. I could do an addition on the single-family dwelling, which would require demolishing a 1-car carport, and then doing pilings for a slab, and a CBS construction, which would probably mean being able to have a larger addition, but would also mean probably costs of >$125/sq. ft. So a 20' X 25' building addition would be $62,500. I don't have that budget for this. I did what I could afford.

I see people bragging about scrounging recycled building material and incorporating it into their 'on-the-cheap' construction projects. No $20 apiece windows, no $100 OH garage doors, no 2 x 4 walls, no used roofing materials. The Florida Building Code is one of the most-strict in the country, you can thank Hurricanes Andrew, Matthew and Wilma for that.

Seems my Thanksgiving date for the installation was also optimistic. Oh well, forward from here.

All of this for a 10 x 20?
 

Attachments

  • gable end OH door.02.jpg
    gable end OH door.02.jpg
    128.4 KB · Views: 350
Last edited:
OP
D

driftpin

Well-known member
Joined
Dec 22, 2016
Messages
11,192
Location
Miami-Dade/Broward Co. Florida
They finally got around to setting the pre-fab 10' X 20' building, supposed to be coming back to bolt it to the slab. Plans call for 5" X 1/2" wedge anchors into the concrete slab that I had poured for the building. They were going to use 3/8" and I told them, "follow the city approved plan, please!" I don't want to fail a structural inspection because they want to use-up what's "on-hand."

It's a good thing I stayed home from work to supervise, because I insisted on how I wanted it to be done. Here are some pics. A bit of patience, as I have to download them from my phone to the site, it's quicker than doing it from my computer, and then they may need to be rotated.

Ok, that's done.

#1: shed situated on slab, waiting to be bolted down. The 2x6 in the overhead door opening will be removed once the building is secured to the slab. The 2x6 in the exterior passageway opening is going to be removed, here. I have an impact fiberglass door, 36" x 80" for there, much more-sturdy than what the shed manufacturer supplies.

#2: A double bead (0.5") of OSI QUAD sealant between the concrete and the 2 x 6" footer plate.

#3: expansion foam being applied on the inside and outside at the joint of the 2 x 6 and the slab. Then, on the outside is going to be applied a strip of bituminous tape, after the foam has been trimmed, to cover the edge of the 2 x 6 footer plate and the side of the slab, for waterproofing. The slab on the prevailing wind side (the southeast) has a 1-1/2" siding overhang past the edge of the slab. I think this should take care of any water infiltration possibilities. I've lived in the same site for 37 years and have never seen any accumulation of water during any hurricane or deluge, come anywhere near to what the height of the slab is. That includes 16" in eight hours, standing groundwater. That storm made my block look like Venice Italy, the asphalt was completely underwater for blocks around. I had to call my fire station to send out a 4x4 to come pick me up for work because there was no way I was going to get there in my Fox-bodied Mustang GT. As I tried to leave the house, the water was washing across my hood. I was lucky I didn't have the car stall-out, there were plenty of other stalled cars the entire way to work.

#4: sealant products.
 

Attachments

  • 20171204_103654.jpg
    20171204_103654.jpg
    153 KB · Views: 337
  • shed caulk.01.jpg
    shed caulk.01.jpg
    129.1 KB · Views: 312
  • shed caulk.02.jpg
    shed caulk.02.jpg
    122.3 KB · Views: 308
  • shed caulk.03.jpg
    shed caulk.03.jpg
    128.6 KB · Views: 298
Last edited:
OP
D

driftpin

Well-known member
Joined
Dec 22, 2016
Messages
11,192
Location
Miami-Dade/Broward Co. Florida
I'm doing the stuff that needs to be done to make good use out of the building, or, to finish what needs to be done from the installation.

The exterior passageway door opening I had roughed-in by the manufacturer. I didn't want the standard door they offered. I found a Masonite 36" X 80" fiberglass pre-hung impact door, got the rough-in specs, and added a bit to the rough-in measurements. The factory gave me what I needed, a good opening.

Because the concrete slab I had poured for this garage has a slight slope, when the garage was set by crane, the door rough-in opening took a bit of a parallelogram-shape. I trial fit the impact exterior door, and got an idea about the shimming I'd need, in dimension. I tried for a 2x4 shim, ripped-lengthwise to give me a single-piece each side, tapered shim, but it wasn't what I wanted. I decided to use about 7" X 4" shims, planed to the thickness I needed to make everything solid. I used 2" and 3" T-25 flathead construction screws, depending on the thickness of the shims, to fasten the impact door pre-hung frame to the metal studs of the rough-in opening. While this was time-consuming, it resulted in a very solidly-built door assembly. I'd never make it doing this type of work on a crew, I'm not fast-enough. But, I'm doing it for myself, and it's not a matter of 'beat the clock.' The pic is of the power planer used to thin the 4-1/2" wide boards used to shim the pre-hung exterior impact door. The C-shape structural steel framing members can be seen, the same dimension beams are used walls and ceiling.

I'm fortunate to have a next-door neighbor who's a structural engineer, and he's been kind-enough to observe the work, and to make suggestions. One thing I've tried to think-out is how to insulate the ceiling. I'm thinking of using kraft-faced fiberglass rolls in 15" X 4" thick for the ceiling. The roof has a vapor barrier beneath the roof sheathing, I'm thinking that in an un-conditioned air space (the garage), I need breathability for the migration of humid air in the stud bays even if they are filled with insulation. I expect to lay the insulation in, and to tape it on the roof rafters, which are galvanized 18 ga. C-shaped flanges and web steel beams mostly 16" o.c. Then I was thinking of installing poly-iso cyanurate rigid sheathing in a 2" thickness below the roof rafters. The 4" fiberglass is rated at R-13 and the 2" poly iso insulation (GAF brand) is rated at 11.7-R value. Now, I'm not sure that the calculation is as-simple as adding the two R-values together, but I'll use that premise, and say that I can end-up with an R-24 rating or better, my main goal is to reduce radiant heat entering through the roof on a typical humid Florida summer day.

The walls are also 4" X 16" stud bays, and are covered first with the vapor barrier, 3/4" TP plywood, and Hardi-board exterior sheathing.

My structural engineer neighbor suggested doing as-little drilling into the narrow dimension of the steel C-shaped 2x4" beams, the flange, and that it would be better to use fasteners into the web, instead (see a discussion of using this advice, below). The only penetrations into the C-beam ceiling structural members (and their flanges) would be the lighting screws, and if I chose to cover the 2" thickness poly iso cyanurate insulation with 1/4" waferboard (an alternative to this is in the next paragraph). I've contemplated just leaving the poly iso board exposed. I wonder if the heat of the Florida summer sun might cause a bond failure of whatever tape I use to hold the poly iso insulation board up (fasteners will also be used for the poly iso board). In any event, I think that I will need some fasteners and wide, flat retention washers to hold the 4' X 8' poly iso insulation sheets (or whatever size the cut-down pieces are) in-place, I'm assuming perhaps 16" o.c. if left exposed, or more-than that, if the poly iso insulation is going to be covered by waferboard, as the fasteners for the waferboard will be penetrating the poly iso insulation, and holding it in-place. I expect that 12" o.c. probably would be good spacing for the 'sandwich' of the 2" poly iso insulation and the 1/4" waferboard.

Out of consideration for the remark of my structural engineer neighbor, I thought I might get some L-flanges made of steel, maybe 1-1/2" ea. dimension, of a gauge similar to what the ceiling and wall C-shaped beams are, G-90 galvanized 18 ga steel, and using self-tapping hex screws to fasten one side of the flange to the web of the ceiling beams, and having the other flange flush with the bottom of each of the ceiling beams. This would be the surface that I would use to fasten the ceiling insulation in-place whether left exposed, or covered with 1/4" waferboard, beneath the poly iso 2" ceiling insulation. That way, I'm not drilling any penetrations into the flange of the ceiling beams, but into the web, instead. And the L-shaped 1-1/2" flange would then become the surface to-which fasteners for retaining the poly iso 2" insulation and if-used, the waferboard, to the ceiling structural members. I would avoid having any flange penetrations to the ceiling structural members.

I'm sure this will generate some helpful comments, I'll wear my thick rhinoceros skin to avoid hurt feelings if criticism is forthcoming.

I'm waiting on several electricians to give me quotes for a sub-panel feed to the stand-alone building. There doesn't seem to be much price difference between a 60 amp service panel and a 125 amp one, and the distance from the outside main disconnect for the house to the garage outbuilding is about 60 ft. I know the cost of the wire feed is in the gauge needed for the run and load. I want to be able to install a mini-split AC just to keep the humidity down in the summer, and other 220V equipment would be an air compressor, and outlets for a small 220 V welder, and a couple of saws (Powermatic 66 tablesaw and a Craftsman 12" RAS I bought new nearly 40 years-ago). I want to be able to not have issues if the AC is running, the air compressor cycles-on, and I'm using the welder or one of the saws, simultaneously.
 

Attachments

  • passageway garage door shim.01.jpg
    passageway garage door shim.01.jpg
    136.1 KB · Views: 211
OP
D

driftpin

Well-known member
Joined
Dec 22, 2016
Messages
11,192
Location
Miami-Dade/Broward Co. Florida
I'm installing the Costco FEIT LED 4 FT luminaires, got 3 in & one to go. I decided to use the supplied hanging wires because I can easily remove/replace the fixtures when I'm insulating the ceiling. I installed 2 X blocking below the ridge beam from-which to hang the FEIT mounting wires for the luminaires.

OK, I finished the last one, now I have four hung (lighting fixtures/luminaires). I have to wait for the evening to see what type of light I get from them. Pic #1 is daylight ambient light w/the overhead LED lights on.

I also had an electrical contractor come-by, and he worked me up a quote, I'm getting my outside boxes replaced, the inside branch circuit panel replaced, new wire feed to the inside branch circuit panel from the outside main disconnect, a new weatherhead (the old one terminates beneath the eaves, the new one will penetrate the roof next-to the outside wall, and extend 3 ft, required by code), and new meter can. He said he's going to use a combination main disconnect box and meter can.

I am also having run a below-grade service to the new stand-alone garage, with a 110/220 V branch service panel as previously-described.

He showed-up on a Can-Am Spyder, the trike, he said his Ford Transit is in the shop for warranty work. It looked pretty-neat (I have motorcycles).

Post update:
Here's the LED output at night (pic #2), see the view out the side window. I'm very happy w/the lighting the FEIT LED luminaires provide.

Second update:
I selected an electrical contractor based upon the most-responsive tradesman who actually followed-through on giving me an itemized bid. I signed a contract, and gave him the notarized paper the city requires for the permit process to begin. Since it took me a month to be awarded a permit to replace my asphalt driveway with a concrete one, including a 'T' off it for the pre-manufactured garage, I am pessimistic about the permit review and issuance being done anytime-soon.

Third update:
Wow, I cannot believe it! I just got my electrical permit after signing the application yesterday, having it notarized, and giving it to the master license-holder. He called me this morning, & said, " I've got your electrical permit I'm coming to your house!" As he mentioned, "that's the service you get when you have a forty-year relationship with the senior electrical plans examiner!" The city employee was his foreman when my electrical contractor was an apprentice in the union. Now he's a small business owner and runs his business as a Union shop. Being a 25+ year AFL-CIO member and now retiree (IAFF, the firefighters union) I am ok with paying for the quality of work, and the speediness of the permit issuance. Here's the master electrician, running me the permit (attachment). He said, "if FP&L cooperates (disconnect/reconnect), we should be done by next weekend."

I'm replacing the old original to the 1961 house 150 amp branch panel, outside disconnect, and meter can. I'm also getting a sub-panel in the garage, 80 amps, and 110/220 V outlets or boxes for the uses there, 220 V AC, air compressor, 220 V RA Saw, Powermatic 66 bench saw, welder, and 110V duplex outlets.
 

Attachments

  • FEIT LED shop lights.02.jpg
    FEIT LED shop lights.02.jpg
    134.3 KB · Views: 188
  • FEIT LED shop lights.03.jpg
    FEIT LED shop lights.03.jpg
    93 KB · Views: 172
Last edited:
OP
D

driftpin

Well-known member
Joined
Dec 22, 2016
Messages
11,192
Location
Miami-Dade/Broward Co. Florida
Doing my own installation of Hilti 1/2" X 5" threaded concrete anchors. The crew was drilling the holes too-close to the edge of the slab, and too-shallow. Too-much exposed thread showing. I found one hole coming through the edge of the slab, they drilled on an angle instead of perpendicular to the slab. I'm also spacing the anchors much-closer than the approved plans require, & using Hilti epoxy instead of just relying on the spreading collar of the anchor. My Harbor Freight demolition impact drill & hammer comes-through again. Best $94 tool investment I ever made. SDS Max 1-9/16" & 8-1/2 amps. They were using cordless drills to try and drill the concrete holes for the threaded anchors, and they couldn't even drill one hole deep-enough before the battery would peter-out. "Right tool for the job," boys! I just told them to forget working on it, and have taken-over the bolt-down myself. I negotiated a lower final payment because of it.

The last pic shows one of their fasteners installed close to the outside, exterior edge of the 18 gauge steel channel which is on top of a 2 X 8" PT footer plate for the building wall. The edge of the slab is pretty-much the outside edge of the metal channel footer of the wall, on-top of the 2 X 8" PT lumber; the excess width of the 2 X 8" footer plate is what you see, on the inside of the building. My fastener holes are much-closer to the center of the 2 X 8" PT footer plate, so more like 3-1/2" from the edge of the slab.
 

Attachments

  • garage anchor holes .01.jpg
    garage anchor holes .01.jpg
    132.5 KB · Views: 192
  • garage anchor holes .02.jpg
    garage anchor holes .02.jpg
    131.5 KB · Views: 176
  • garage anchor holes .03.jpg
    garage anchor holes .03.jpg
    129.6 KB · Views: 194
Last edited:
OP
D

driftpin

Well-known member
Joined
Dec 22, 2016
Messages
11,192
Location
Miami-Dade/Broward Co. Florida
Today's scope of work:
Florida Power & Light just restored my power. I have a new 200 amp branch circuit panel, for the single family detached dwelling, I got a new combination meter can & main disconnect/breaker box, they eliminated my separate 30 amp AC disconnect that was next-to the meter can, for a circuit breaker in the new outside main disconnect & circuit breaker box. Next is the below-grade (read, 'buried') service to the detached garage, pvc conduit is already laid, they have to feed the service wire, hang the inside branch circuit panel, and connect to the service cable that was pulled. Then there are the branch circuits in the garage for the 240V outlets, I already have four duplex outlets hung, all on GFCI. Gonna get some Costco LED lamps, the rectangular ones for outside perimeter security. I already hung the Costco LED 4 ft lamps inside, they work great.
 

Attachments

  • weatherhead install.01.jpg
    weatherhead install.01.jpg
    81.6 KB · Views: 150
Last edited:
OP
D

driftpin

Well-known member
Joined
Dec 22, 2016
Messages
11,192
Location
Miami-Dade/Broward Co. Florida
At quitting time:
The garage has electric. It's not completed, that's supposed to be done by Saturday. Thursday is other work for them. Friday they come-back, and Saturday is whatever isn't done Friday. Of course, no inspections 12/25, so the electrical contractor expects to be calling for a Tuesday final electrical inspection for the house and the detached garage electrical work. The electrical inspectors were there today for the service change for the dwelling, it passed.

Here's the detached garage outside sub-panel disconnect fed from the new combination meter can/main disconnect/circuit panel below the new weatherhead. It goes to a 100 amp branch circuit sub-panel inside on the enclosed gable end wall, opposite the overhead door gable end wall. I'm getting a bunch of 240 V outlets of various ampere sizes to run my tools and one 240 V circuit for a mini-split AC, which I'll probably wait to install when spring arrives.

The temporary 110 V circuit is two duplex outlets, protected by GFCI.

I went to Costco to get some more LED 4 ft luminaires, but there wasn't one to be found. The electrical contractor recommended the LED dual-head security flood lights, w/motion sensor. I got four, one for each wall. Is there any reason why you would want them on four separate wall switches? I was planning to have them on one circuit. Also, to mount them, I think I'm going to enlist the assistance of one of my fellow firefighter retirees, he's got a TIG welder. I pondered how to mount the security lights. I think what I'm going to do is to bolt a plate to the backside of the fascia board for each light, have the plate come-forward away from the wall, horizontally, and then go upwards, and have the light fixture bolt to the vertical surface. In simpler terms, a "U" where one side bolts to the fascia, and the other side has the luminaire bolted to it. The 'floor' of the "U" will space the light out from the wall instead of just screwing the luminaire to the fascia. My friend loves to work with aluminum. I'll mock something up out of plywood, and have him duplicate the dimensions in probably 1/4" aluminum alloy sheet stock. Aesthetically, I think the luminaire will look better on a bracket, and it will also be a bit higher, than if I mounted it under the eaves, or even to the fascia. The security lamp installation directions say, "do not mount below the eaves!"
 

Attachments

  • detached garage outside disconnect.01.jpg
    detached garage outside disconnect.01.jpg
    69.5 KB · Views: 98
  • detached garage outside disconnect.02.jpg
    detached garage outside disconnect.02.jpg
    87.4 KB · Views: 109
  • detached garage security light.01.jpg
    detached garage security light.01.jpg
    126.1 KB · Views: 137
Last edited:
OP
D

driftpin

Well-known member
Joined
Dec 22, 2016
Messages
11,192
Location
Miami-Dade/Broward Co. Florida
From Bob Heine's Auto Emporium thread, post #2276 which was by me, talking about the garage: Bottom-line: this is my Christmas present. My wife helped, of course.

My wife has tolerantly allowed me to store tools in the house, they will be going into the garage, and she (and I) get the use of the vacated space back. She has waited a long time, and we have been saving a long time.

I was just at Costco today and looked at their heavy-duty steel shelving. I've used a similar item before, and might get some. https://www.costco.com/Whalen-Industrial-Rack<br>77”W-x-24”D-x-72”H-2-pack.product.100341995.html

So this counts as your holiday gift to yourself or Does your wife get credit also?

Looks good so far Can’t wait to see what projects you Will have going on inside !
 
Last edited:
OP
D

driftpin

Well-known member
Joined
Dec 22, 2016
Messages
11,192
Location
Miami-Dade/Broward Co. Florida
The electrical contractor came to my home today to finish the detached garage. He had said, "my guys will be there Friday and if needed, Saturday." Then last night, he texted me and asked, "can we finish Thursday?" Ok by me!

So, today (Thursday) they showed-up. By the end of the day, 4 p.m. they were done. A lot got done.

Now, this space is only 10 X 20 ft because that's all zoning will allow for a 'shed' though it's a garage according to the zoning regulations. Whatever. It is detached, and because of the hurricanes we get here, the building has to be capable of withstanding HVHZ (high-velocity, hurricane zone) wind loads. It is on a concrete slab. many sheds have plywood floors, this has a concrete floor I had poured, along with the replacement of my asphalt driveway, in concrete. The detached garage is a "T" off the middle of the driveway.

I also had my house branch circuit panel replaced, a new 200 amp Square D panel, and a sub-panel for the garage, 100 amps. It has its own ground rod.

Today the electrical crew finished the work they previously began earlier in the week. Each wall of the garage has its own 20 amp 120 V GFCI circuit, w/multiple duplex outlets. I have three different 240 V boxes. I have plenty of overhead lighting, the LED twin 'bulb' luminaires from Costco. They run down the ridge beam 16 ft, plenty of light. I also had installed Costco flood lights for the overhead door gable end of the building, and the side on-which is the passageway exterior impact-rated door, which I hung. The building is a steel-framed (18 ga.), 3/4" PT plywood and Hardi-Board-clad pre-manufactured building.

The electrical final is called-in for Dec 27, after Christmas. My wife encouraged me to get this done so she could see tools stored inside, migrate to the garage. I didn't have anyplace secure outside the house to store my tools, but now I will.

Here are shots of the garage with the electrical circuits run in armored cable, the 240 V are 10 ga. The shot of the outside, you can see the security lights. They are very bright, and are actuated by motion and ambient light.
 

Attachments

  • detached garage security lights.01.jpg
    detached garage security lights.01.jpg
    107.5 KB · Views: 155
  • detached garage elec.02.jpg
    detached garage elec.02.jpg
    133.9 KB · Views: 132
  • detached garage elec.01.jpg
    detached garage elec.01.jpg
    123 KB · Views: 139
Last edited:
OP
D

driftpin

Well-known member
Joined
Dec 22, 2016
Messages
11,192
Location
Miami-Dade/Broward Co. Florida
Here is a shot of the night illumination, one of my brothers told me, "you're going to have to cut the grass more-frequently with that lighting!" Well, this is the winter solstice.

I am very pleased with the Costco LED security lamps.
 

Attachments

  • detached garage security lights night.01.jpg
    detached garage security lights night.01.jpg
    60.6 KB · Views: 131
To avoid these ads, REGISTER NOW!
OP
D

driftpin

Well-known member
Joined
Dec 22, 2016
Messages
11,192
Location
Miami-Dade/Broward Co. Florida
I epoxied the Hilti 1/2" X 5-1/2" threaded fasteners into the holes through the footer plates on the perimeter walls. The fastener spacing in the sealed plans was much-larger than I thought I would prefer, so I did the threaded anchor holes roughly four feet on-center, or less.

I didn't believe I could handle this critical structural installation, so I had it done by a Venezuelan P.E. brought-into the workplace (my very kind neighbor, a mechanical/structural engineer, generously volunteered his services, he's done hundreds of such installation holes). The epoxy we used was Sika 'Pro Select' anchoring adhesive. This stuff has a limited working time, measured as single-digit minutes at temperatures of 70 degrees F. They aren't kidding! It has what appears to be sand as an aggregate. I'd read online about people having trouble with using standard cheap caulk guns, like the type you buy for < $4 everywhere, I looked into buying a specialty tool, but the variety of guns seems to be aimed at only allowing that manufacturer's epoxy in many cases. Simpson has a double-barreled one for their proprietary double cartridges. I only had 14 Hilti fasteners to epoxy in-place, so I'd have to probably discard half the contents of the 22 ox. Simpson epoxy cartridges. So no Simpson. https://jet.com/product/detail/1731...&clickid=8a124a5f-dcea-4cc6-928d-325dff285080 Simpson also makes single-cartridge guns. The Big Orange Box Store was out of the single cartridge guns.

Here's a vendor with a selection of epoxy guns ranging from manually-triggered/fed, to pneumatic, to battery-operated, and with varying capacities, to suit the epoxy cartridge of choice. https://www.chembar.com/cat/adhesiv...MIjMOEq6yv2AIV1rXACh2BPA05EAAYAyAAEgJIPfD_BwE

And another vendor with a good selection of guns:
https://jet.com/c/tools-and-home-improvement/power-and-hand-tools/caulking-guns/19000154

Campbell Hausfeld has a reasonably-priced pneumatic gun for 10 oz. cartridges that I considered & it's relatively-inexpensive, < $30 on Amazon. https://campbellhausfeld.com/air-powered-caulk-gun-pl155800av.html

https://www.amazon.com/dp/B0009F8936/?tag=atomicindus08-20

But in the end, I chose to use a Home Depot HDX gun, it's sturdy-enough to work, is cheap, and it was on the shelf where I bought the epoxy, so that was the tool. The construction isn't the light-duty stamped thin-gauge steel of the cheap $3 caulk guns, it appears to be die-cast, it has some-weight to it, and was <$20. It worked fine, no issues getting a good flow, stopping the flow when necessary, just recall that you have very limited working time, and if you aren't going to use the entire tube, you'll have the mucilage harden in the dispensing tip, where a matrix-labrynth passageway mixes the two components. That's why they give you two tips, when the one becomes stopped, you throw it away, affix the second tip and get-back to it. For the Sika epoxy, I didn't see a 5-pack of spare tips, like I did for the Simpson epoxy, which I guess is an advantage of using the larger cartridges, if you have a lot of work to do, you get more-than a one-time use out of the double tubes. That wasn't my need, nor my use.

Now I can call for my tie-down inspection, and begin to empty my tools out of the spare bedroom and elsewhere, which will make my wife very happy!
 

Attachments

  • Hilti-Sika epoxy.03.jpg
    Hilti-Sika epoxy.03.jpg
    131.1 KB · Views: 74
  • Hilti-Sika epoxy.02.jpg
    Hilti-Sika epoxy.02.jpg
    99.9 KB · Views: 78
  • Hilti-Sika epoxy.01.jpg
    Hilti-Sika epoxy.01.jpg
    98.9 KB · Views: 76
OP
D

driftpin

Well-known member
Joined
Dec 22, 2016
Messages
11,192
Location
Miami-Dade/Broward Co. Florida
Also, Wednesday, two days after Christmas, I got a great delayed 'gift,' I passed my electrical final! It was for the detached garage main disconnect, sub-panel, sub-panel branch circuits (three 20 amp 120 V GFCI-protected circuits, three 240 V circuits, 30 amp, and the lighting circuits inside and out, for the garage) the below-grade line to the detached garage and a replacement of the weatherhead, meter can, main disconnect, and replacement of the inside branch circuit panel.

So, a productive week, and several steps closer to being done with the detached garage. I still have a bit of trim carpentry to do.
 

Attachments

  • detached garage elec.01.jpg
    detached garage elec.01.jpg
    123 KB · Views: 64
Last edited:
OP
D

driftpin

Well-known member
Joined
Dec 22, 2016
Messages
11,192
Location
Miami-Dade/Broward Co. Florida
Thank-you for the positive feedback. I've waited a long time to be able to do this. I really wanted a two-car detached garage, but zoning reg's and the cost of a CBS construction didn't allow me to follow that path. A soil bore said I needed pilings if I was going to build CBS. The quickest way to gain some secure, dry, durable storage was a pre-manufactured building. After research, and checking available vendors, this was the best I found. Since the State of Florida (and the P.E. who sealed the plans) says it's good for withstanding winds to 174 mph, and it's an 18 gauge galvanized steel framework, sheathed in 3/4" PT plywood, covered by Hardi-board, and anchored to a new concrete slab, I think it's going to be in-service after I'm gone, it's got a 30-year guarantee, but, I don't! Having just retired for the second time, and now a Social Security collector, I hope to have plenty of time to do things where my tools, now well-protected, and in a decent, if small space, allow me to do things I've put-off for years. I have a number of motorcycles just waiting to be worked-upon, and of course, my wife has things she wants done. I need to make her happy, because she's worked very hard in her life. She just retired after 41+ years as an electrical engineer, in a career that saw many of her co-workers fall by the wayside, she had the same employer the entire time, with a horrible commute. Would you spend 17% of your time in traffic, if driving isn't your career? Living where we did was our priority, so she put up with a 90 mile one-way commute, sometimes she was able to work from home. She also didn't have to travel most days in rush-hour traffic, but that meant she got home very late.

We now have a recently-renovated home in a great part of southeast Florida, grandkids to see and to care-for, and this little refuge is going to help me to keep things rolling.

One of the things I'm trying to do with our four year-old grandson is to introduce him to shop work, tools, and safety in the workplace. He has his own play tools, and a small number of real tools that he's been instructed on how to care-for and how to use them. A couple stories of his behavior:

His mommy and daddy and he were on a plane to visit family. There was a delay because something mechanical on the airframe had to be addressed, though the plane was full, the door was locked and everyone was waiting for whatever maintenance needed to be completed. The lead pilot had made an announcement about the delay, the reason for the delay, and how-soon he hoped the plane would depart. Our grandson asked mommy and daddy to speak to the flight attendant, and when she came by, they hailed her, and told her the child had asked to speak to her. She bent-down and asked, "hello, I heard you would like to speak to me?"

He looked he in the eye, and said, "if the airplane can't fly and needs repairs, they probably need to use a screwdriver to fix it!" I think he wasn't quite age 4, and I had just taught him about slot-head and Phillips screwdrivers, and "righty-tighty, lefty-loosie."

Everyone got a laugh about his comment.

Another time, we were working on something, and I was wearing a "Peanuts" t-shirt, with Charlie Brown and Lucy on it. I asked him, "if I want to remove this screw, which-way do I need to turn it?"

He looked-up at me, pointed at my shirt, and said, "righty-tighty, lefty-Lucy, Charlie Brown!"
 

Attachments

  • iPhone Dec. 8 2016 478.JPG
    iPhone Dec. 8 2016 478.JPG
    82.6 KB · Views: 126
Last edited:
OP
D

driftpin

Well-known member
Joined
Dec 22, 2016
Messages
11,192
Location
Miami-Dade/Broward Co. Florida
A garage-warming gift!

Here's something I found locally, I'm not scared by the reputation of these, as I've had one (twelve-inch Craftsman 240 V only) for 39 years I bought new. This one turned-up (craigslist) and when I saw it, I knew it needed to be restored to service. I spend more-than this to take the wife to dinner.

I had this past year turned in a 10" radial arm saw (RAS) motor for the Emerson reward of $100, and had sold another 10" Craftsman RAS I'd had for probably 35 years, I got it used from a fellow firefighter who bought it to do a re-roof, he made his own trusses. When he was done, I bought it from him, along with a bunch of other tools including a 120 V stick welder, still in my inventory.

I had hung onto the chassis from the RAS rebate, but am now junking it, I advertised it on here for any parts anyone might need, pay for shipping, no takers. So, I grabbed the table surface I had previously made for it, and it's on the new to me 12" RAS.

This is probably a 1970's Craftsman, it's a split-phase 120/240 V, twelve-inch blade and it didn't come w/legs, but I had the set off the 10" RAS I'm junking. This came w/a 60-tooth carbide blade which looks to have a table-saw hook angle, rather than the correct minimal or negative hook angle blade that is correct for a RAS, which avoids it 'grabbing' the wood. When you use the wrong blade, you're putting yourself at risk of operator error, something to avoid, obviously.

It powers-up OK, I don't have anything to do on it right-away, and I have to finish adjusting the leg set to the 12" RAS frame. Soon it will be ready, I'll probably finish the legs this weekend, and be able to run the saw, after I do all the indexing.
 

Attachments

  • Craftsman RAS-split phase side view.02.jpg
    Craftsman RAS-split phase side view.02.jpg
    101.6 KB · Views: 58
  • Craftsman RAS motor plate-split phase.jpg
    Craftsman RAS motor plate-split phase.jpg
    100.1 KB · Views: 48
Last edited:
OP
D

driftpin

Well-known member
Joined
Dec 22, 2016
Messages
11,192
Location
Miami-Dade/Broward Co. Florida
As Mel Fischer, the sea explorer who found the Spanish galleon, Atocha off the coast of south Florida, making him a millionaire many-times over, used to tell the divers working for him, "today's the day!"

Well, for me, it was, I had my structural inspections for the 1 car garage today, they were actually covered under other permits I already had finaled, but the automated system spits-out "required inspections," on the permit card. It's up-to the inspector to determine that the prior finaled permits cover what's on this permit.

I had a slab permit, an electrical permit, and now a structural permit for the garage. The inspector looked through the paperwork, saw that I had greatly-exceeded the minimum requirements for fastening the building to the slab (size, type of, number of and location of fasteners), and that the exterior passageway door is 'impact-rated.' So, he said, "there's no-point in me coming back out to inspect this again, I'm going to sign-off on the structural final today, too!"

It's not my birthday, but I feel like it is!

I also got some steel stock from the local steel millworks to fabricate some burglar bars and my fellow retired firefighter who has a commercial TIG setup is going to do it for me. There will be two vertical 1/2" square solid stock bars and the clear-spacing between bars is going to be seven inches, welded to 1-1/2" X 1/4" bar stock, which will then be through-bolted to the steel perimeter casing for the windows. I'll probably use white Rustoleum on the finished steel. I plan to mount them inside the windows rather than on the outside. Aesthetically, I think that will be better in appearance, and since they're being through-bolted to the steel structural framework of the building, they will be very resistant to intrusion.

So, all-in-all, a very good day!
 

Attachments

  • garage window security.01.jpg
    garage window security.01.jpg
    89.2 KB · Views: 72
Last edited:

Vegaman_Dan

Well-known member
Joined
Jun 1, 2012
Messages
2,453
Location
Pacific, WA
Out of curiousity, and this is asked in complete ignorance, but would have a 20' long shipping container have worked for this purpose, skinned with siding or other material with roof to disguise the container? There wouldn't be much doubt about it surviving a hurricane if bolted down and seems like an interesting precaution in that region for strong storm resistant storage.
 
OP
D

driftpin

Well-known member
Joined
Dec 22, 2016
Messages
11,192
Location
Miami-Dade/Broward Co. Florida
Yes, a good question, one that I asked of the local government, years-ago.

Having worked as a planner, and a now-retired firefighter/paramedic, where I did site inspections, and still holding a state certification as a fire inspector/firefighter/paramedic/plans examiner, I know the local codes in my areas of function.

One of my friends did exactly that, in the community where this premanufactured 1 car garage is, he used a truck body for a storage unit. This happened over 20 years-ago. He did minimal trim to disguise it, and it was very apparent to any person who is familiar with trucks, what the "storage shed" was. Zoning closed the loophole after he installed his 'building.' He met the requirements for tiedowns, the height restriction, square footage and setbacks, there wasn't any landscaping required. But Zoning chose to say, "no" to any other such installations. In fact, some local governmental bodies specifically prohibit the use of truck bodies for storage, in their land development code. Do you want to fight city hall? It's expensive, frustrating, and ultimately, you could end-up in federal district court, if you choose to spend that much money, and are on the losing-side through the local application and appeal process. All local remedies are to be exhausted before the courts will agree to hear a case. Also, the amount of the variance application fee is whatever the municipality says it is, paraphrased, to recoup any and all costs associated with processing such a request. Commonly, this means thousands of dollars! Not in this particular jurisdiction, I have participated in the variance process for accepting, processing, serving legal notices, including posting on subject properties, advertising, and participating in public hearings for variances. The process is neither speedy, inexpensive, nor ultimately, likely to bear fruit for the petitioner. Any person can speak-against the petition for variance, and the municipal governing body can use this as their reason for denial. And ultimately, they don't need a reason, supplied by another party, they can deny it based upon the Building, Zoning, Engineering, Police, Fire-Rescue or other departments not in-agreement with the petitioner. Or they can deny it themselves as a municipal body.

For meeting the local Land Development Code, and the Florida Building Code, you need sealed drawings by a P.E. for the structural elements, which includes wind load calculations. To get those types of specs done for a truck body is just going to be an expensive struggle in futility, yes, it could be done, but then they will deny you on the basis of aesthetics, an important issue as I reside in a 'designated historic district.' That affects 1960's construction mid-century ranch-style homes, too. I first attempted to get permission for a 12' X 24' same-style building, and the Zoning dept. denied it because the single family dwelling on the legal lot of record is not designed in the style of a ship-lap siding building, as-is the premanufactured 1-car garage, the single family dwelling is CBS construction, smooth-finish stucco. My proposed accessory use also exceeded the allowed maximum square-footage for an accessory structure. Want to fight the aesthetic requirement, and the square-footage requirement? Each is a separate variance, and you now just doubled your variance cost. A decade ago, where I worked as a planner, in the same county, the variance cost per item was $3,000 to begin, and could be adjusted upwards, if the cost to process the variance request exceeded that amount. I'm sure the cost has been adjusted upwards since then.

Out of curiousity, and this is asked in complete ignorance, but would have a 20' long shipping container have worked for this purpose, skinned with siding or other material with roof to disguise the container? There wouldn't be much doubt about it surviving a hurricane if bolted down and seems like an interesting precaution in that region for strong storm resistant storage.
 
Last edited:
OP
D

driftpin

Well-known member
Joined
Dec 22, 2016
Messages
11,192
Location
Miami-Dade/Broward Co. Florida
The project for today is (was) security bars for the two windows. I want them on the inside, but plainly visible to any &^%$#! lowlife scumbag thief/burglar who thinks a window is an easy way in.

I have a fellow firefighter retiree who has a big Miller TIG machine, who helps me with welding. I go over there ready to cut and drill, but he likes the projects, so he does most of the cutting to my marks if he allows me to do the layout, or he just does it himself, off my plans. I don't care, I do drilling, grinding, and whatever else he lets me do.

So, I measured (twice) and brought my dimensions and steel stock to the friend's shop. He's got it crammed with equipment, he likes working with aluminum more-than steel. It's "cleaner," he says, I cannot argue that.

The top and bottom of the window barrier system is 1/4" X 2" mild steel, the mullions are to be 1/2" X 1/2" square bar. The top/bottom pieces will lie flat against the steel structural rough-in window openings. The two mullions will be spaced 1/3 of the width of the window rough-in dimension. It's a single-hung window, the bottom opens. All I need to do is to prevent any breaking of the 22" X 36" rough-in window opening area from providing a means of egress to the &^%$#! lowlife scumbag thief/burglar. There aren't many 6-1/2" thick &^%$#! lowlife scumbag thief/burglars out there, and the fewer bars, I think will look better, while the spacing is adequate to stop unlawful entry.

So the pics show the stock, being cut.

Results of the cutting.

Then the first welds.

Halfway done.

All welding done.

Next, an assembly fitted in its opening (photo from the inside), looks like a single fender washer at the top bolts should do it, to shim the height snug. I'm using carriage bolts, which will be a snug fit into the mounting holes of the 1/4" X 2" strap stock, sitting flush against the bottom and top 2" X 4" 18 ga. window steel structural openings.

Finally, from the outside, at night. The two dark vertical bars are the denial of entry system. I was planning to paint the pieces black, but I think I'll paint them white, I want any &^%$#! lowlife scumbag thief/burglar who's casing the joint to see them, and to abandon his designs on my garage for 'easier pickin's'.
 

Attachments

  • window bars.03.jpg
    window bars.03.jpg
    125 KB · Views: 80
  • window bars.02.jpg
    window bars.02.jpg
    147.2 KB · Views: 77
  • window bars.01.jpg
    window bars.01.jpg
    116.6 KB · Views: 89
  • window bars.04.jpg
    window bars.04.jpg
    146.3 KB · Views: 76
  • window bars.05.jpg
    window bars.05.jpg
    136.6 KB · Views: 73
  • window bars.06.jpg
    window bars.06.jpg
    131.4 KB · Views: 82
  • window bars.07.jpg
    window bars.07.jpg
    142.3 KB · Views: 77

Vegaman_Dan

Well-known member
Joined
Jun 1, 2012
Messages
2,453
Location
Pacific, WA
Shipping containers are one of those unusual situations where they do get wind ratings as they have to be on ships and other transports where they will be exposed to winds in different configurations. A steel 20' shipping container is rated for 150 mph unsecured. Secured and tied down, it can resist most hurricane force winds- far and exceeding anything a structure built on site can.

Unlike a truck body, a shipping container is very easy to disguise. And when you're done using it, you can move it.

The steel bars on your windows look good and not too obtrusive. I wouldn't mind a window on my garage, but I do not have any wall space not already taken up by storage.
 
OP
D

driftpin

Well-known member
Joined
Dec 22, 2016
Messages
11,192
Location
Miami-Dade/Broward Co. Florida
Unfortunately, here in Florida for a structure, you have to have engineered plans, sealed by a P.E., meeting the requirements of the Florida Building Code. My building is certified capable of withstanding gusts to 174 MPH, approved by the State of Florida. I live in a 'high-velocity hurricane zone' (HVHZ) and all products of the type I have need to be designed to this standard.

Who's going to be able to give you a set of plans for the shipping container, sealed by an engineer, licensed in Florida?

Many years ago I tried to get the same municipality to allow me to use a 8 X 16 truck box anchored on-site, and was denied, and that was before Hurricane Andrew. Post Andrew, there have been several rounds of increasingly-strict building code regulations. Hurricanes Wilma and Matthew had impacts on the code too.

Building projects and agricultural areas may be allowed leeway on the use of shipping containers in Florida, according to state and local codes. Those 'cubes' people rent for temporary storage, brought to your homes for loading and then removed, are required by code to be removed prior to a hurricane.

I don't think there is any advantage to concealing a shipping container compared to a truck body, unless you're speaking of some 40 ft truck body, like a moving company would use. A forty-foot shipping container, a forty-foot truck body, the construction to conceal either under a veneer of 'building-like' material, including a gable roof, would be very similar.

Your avatar reminds me of the Cushman 3-wheelers popular here in the 1960's/'70's, used by the USPS, and then sold-off. They were very popular with teenagers, because you could get a license for one earlier than you could for a car.
 

Vegaman_Dan

Well-known member
Joined
Jun 1, 2012
Messages
2,453
Location
Pacific, WA
A shipping container is made of heavy gauge steel that is heavily reinforced, meant to be stacked on top of 10+ containers high. They are exceedingly strong.

A box truck is built as lightly as possible with aluminum sides, wood slats inside, and usually an aluminum or fiberglass roof. They are meant to be water resistant and mobile, not structural. Completely different use cases and not comparable.

No worries, was just a curiousity of mine.

As for the Cushman in the avatar, that is a 1982 Type 10 with the alternate cabover design. I have that, a standard police model, and a four wheel industrial one as well. That, and a 3 wheel Interceptor that needs someone to fix the propane fuel setup.
 
OP
D

driftpin

Well-known member
Joined
Dec 22, 2016
Messages
11,192
Location
Miami-Dade/Broward Co. Florida
Actually, while a shipping container would have given me service for storage, I don't mind that they aren't allowed in the city, in my zoning district, they are ug-ly! Sure, it would have made a quick storage solution, and there are ways to disguise them, but you still come-down to the requirement of needing a sealed set of plans. I don't know how to comply with that, economically.

I've read that they use core10 as the steel for the shipping containers. One of the most impressive fabrications I've ever seen is on the campus of the University of Miami, they have a sphere of that stuff, no visible weld seams, and it's about the size of Paul Bunyan's bowling ball.
 

mikegt4

Well-known member
Joined
Sep 12, 2005
Messages
3,265
Location
sw ohio
A job well done Driftpin. That should be the last building standing when "the big one" comes.
I have been curious since the OP, how were you able to build a garage in your front yard? I would think that you would have to have some acreage to get away with that.

OT,
Vegaman Dan, I like your Cushman too. A good friend of mine had a Mailster back in the 1960's when we were in HS. It, IIRC, was made in the late 1950's. It had a fiberglass body that notched down over the storage compartment, fabric "doors" and a big single cyl. engine with a 3 spd trans. We filled it with people and drove it everywhere until he bought a Triumph TR3 which he still has today. He gave the Mailster away when he moved to California in the mid 1970's. He still talks fondly of his long gone Mailster.
 
OP
D

driftpin

Well-known member
Joined
Dec 22, 2016
Messages
11,192
Location
Miami-Dade/Broward Co. Florida
Gosh, I don't have it in my front yard, sorry if I gave that info! It's in my back yard, I have an alley behind the house, and it's off the alley. The house has a rear attached carport also off the alley. I replaced the asphalt driveway and poured a connected pad for the detached 1-car garage.

Phase II is tearing-down the carport and replacing it with another 1-car (attached to the dwelling) garage. The draftsman is meeting me tomorrow on-site and I hope to get his sealed plans soon.
 
OP
D

driftpin

Well-known member
Joined
Dec 22, 2016
Messages
11,192
Location
Miami-Dade/Broward Co. Florida
Met w/the draftsman who is doing the plans for my attached 1 car garage in-place of the existing carport. He liked the new detached garage. I'm almost ready for the garage final inspection. Then it will be time to fill the garage w/tools. And, on to Phase II, carport-to-garage. These two projects are going to make fundamental changes in my shop access, tool storage, and project space.

Painted the security hardware w/Rustoleum. Waiting for it to dry in 70 degree weather, I can hear a lot of motorcycles running around. One of the problems is the "economically-disadvantaged minority housing residents" who fly down the roads on their ATV's or dirtbikes, running red lights, front wheels in the air, daring the cops to pursue them. I've narrowly-avoided being hit by them when they ran illegally through an intersection in front of me.

Gonna work on some other stuff for the garage, & checked this morning w/my HVAC master license holder about a mini-split for the garage. I am not interested so much in having it air conditioned to work in, as I am in controlling the humidity in the summer. Looks like a 9000 btu system will work for my space of 200 sq ft.

I'm gonna do some prep for insulating w/fiberglass 4" for the walls & ceiling (R13), and additional 2" poly iso rigid insulation (R11) for the ceiling.

Update:
I got the security bars mounted, through-bolted to the steel perimeter frame of the window opening.

I'm also adding a duplex outlet on each side of the gable end which has the overhead rollup door. I may install an outside weatherproof duplex outlet on that wall as well, so I don't have to open the door to get 120 V power outside.
 

Attachments

  • window bars.08.jpg
    window bars.08.jpg
    129.2 KB · Views: 24
  • window bars.10.jpg
    window bars.10.jpg
    137.7 KB · Views: 33
  • window bars.09.jpg
    window bars.09.jpg
    91.8 KB · Views: 25
Last edited:
OP
D

driftpin

Well-known member
Joined
Dec 22, 2016
Messages
11,192
Location
Miami-Dade/Broward Co. Florida
Piddling around with little things before I do the insulation, things that need to be completed before the insulation goes-in. Do you dislike loose electrical boxes? That's a pet peeve. Here's a shot of sinking some screws into the steel framing, blocking-up the electrical boxes so they don't wiggle when plugging or unplugging. You can see one box has a screw already driven-home in the middle of the back plate. The toenail screw isn't yet sunk. All the boxes, whether switches or outlets, were backed-up with wood backing plates. No loose boxes now.

I added a 120 volt duplex outlet off the end of the GFCI circuit for the south wall, and am going to place a die-cast box for a duplex outlet w/a weatherproof cover on the garage door gable end, outside, which is right-next to the outlet I just added. Then I won't have to open the garage if I need electric. That will be handy, I can cut and weld on the OH garage door apron w/the door closed if I want-to, saving the debris, sawdust & etc from being blown-into the garage. Like today when I was using my 12" Porter Cable power planer to make the electrical box 2x4 or 2x6 backing blocks. I just take the planer out of the garage, and use it on the tailgate of my truck, so all the chips and sawdust just goes into the yard.
 

Attachments

  • detached garage elec.03.jpg
    detached garage elec.03.jpg
    141.7 KB · Views: 33
  • detached garage elec.04.jpg
    detached garage elec.04.jpg
    129.1 KB · Views: 31
Last edited:
OP
D

driftpin

Well-known member
Joined
Dec 22, 2016
Messages
11,192
Location
Miami-Dade/Broward Co. Florida
Well, a friend came by to see the progress. I showed him the window security bars, and he said, "I can fit between those!" And he did. He's a health freak, he eats no solid food. He lives on protein powder and vitamins. His body fat is about 3% and he's been living on this stuff probably 35 years. He's a buyer in the vitamin section for Whole Foods Market. He rides a bicycle everywhere, though he has an IROC Camaro w/a 454 for a toy.

So here my friend is TIG welding bars across the verticals to eliminate potential access by a skinny intruder.
 

Attachments

  • window bars.12.jpg
    window bars.12.jpg
    127.8 KB · Views: 35
  • window bars.11.jpg
    window bars.11.jpg
    119.6 KB · Views: 36
Last edited:
To avoid these ads, REGISTER NOW!
Top Bottom