To avoid these ads, REGISTER NOW!

getting some needed storage

OP
D

driftpin

Well-known member
Joined
Dec 22, 2016
Messages
11,202
Location
Miami-Dade/Broward Co. Florida
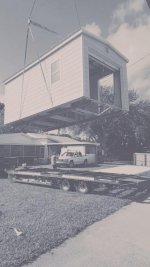
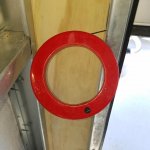
So after getting the 'new, improved' security bars TIG welded-up, I sanded and painted them in Rustoleum. I used white because I want the bars, which are mounted in-between the window returns, to be easily visible to any miscreants outside, "no easy access here, move-along!" Then I re-mounted them. They look fine. Actually I prefer the looks of this install more-than the vertical security bars, alone. It makes the window look more-like a 3 X 4 mullion/muntin window.

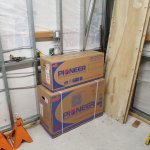
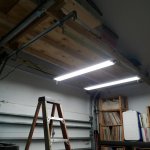
The Big News of the Day is my acquisition of a new mini-split AC system for the garage. I'm not looking to make this Florida garage be a 25-degree temperature differential in an August 100% humidity typical day, but I am looking to reduce the humidity significantly during the humid summer months, as this will be a tool storage area. My friend who is a master HVAC guy since his twenties, got it for me, and will help to get it up & running. The distributor is in Miami, so it was an easy trip to acquire it. SEER of 22.8, 3/4-ton unit, well-suited to the 200 sq. ft. space I have. Now I can proceed with insulation of the wall stud and rafter cavities, and sheathe the interior walls.
 

Attachments

  • detached garage AC.01.jpg
    detached garage AC.01.jpg
    135.3 KB · Views: 53
  • window bars.13.jpg
    window bars.13.jpg
    133.4 KB · Views: 48
To avoid these ads, REGISTER NOW!
OP
D

driftpin

Well-known member
Joined
Dec 22, 2016
Messages
11,202
Location
Miami-Dade/Broward Co. Florida
"Botox" for the overhead door-bottom rubber seal:

My small project for today was to do some caulking around the roll-up overhead garage door, and to alter the overhead door bottom seal to stop any water intrusion in a driving rain.

The garage door seal is an aluminum extrusion/rubber seal that is a single extruded channel for the rubber, the molded rubber looks like an upside-down balloon on a string. The 'string' is the piece of rubber that slides into the aluminum extrusion channel. The 'balloon' is a hollow rubber molding about 3/4" in diameter.

I noticed in a driving rainstorm (something that is a frequent summer occurrence in south Florida) that my new building would allow a slow trickle past one side of the overhead door, bottom weatherstripping. Here's what I decided to do.

I got some round solid foam 5/8" dia, the stuff you pack-into door or window installations to close-up any perimeter rough-in gaps, before you seal it, and install trim. I believe one name is 'backer rod.'

One of my recent 'picks' was a GB electrical fish-tape, and a small-diameter wire fish lead, the piece you use to pull wire through conduit, to hold the wire end to the fish lead. It looks like a Chinese finger trap. I checked online, a common term is "wire mesh grip." I already had both of these, in larger, longer sizes, but this stuff was almost unused, so I bought it, along with a lot of other hand tools I posted in another thread awhile ago.

I threw the fish tape down the length of the single-wide overhead door-bottom, weather seal rubber extrusion. The wire mesh grip was inserted over the end of the foam backer rod, and pulled taut. The end of the fish-tape was connected to the clip of the wire mesh grip, and taped in-place with some electrical tape.

I sprayed the rubber weather seal/weatherstripping interior with WD-40, and used some on the foam backer rod not-yet pulled into the weatherstripping. Then I began to retrieve the fish-tape from the other side, pulling carefully so the foam backer rod fed-into the interior of the round molded hollow weatherstripping. The foam backer rod isn't particularly-strong, a too-vigorous yank on the fish-tape could rip it apart inside the hollow weatherstripping. I managed to get the foam backer rod to the other side, and detached the wire mesh grip tool. I cut the opposite end of the foam backer rod, and admired the new 'body' that the door bottom weatherstripping now had. Hence, the "Botox" label at the beginning.

I pulled-down the door, and with a bit of 'persuasion' by stepping on the pull-down exterior door handles, I can throw the side bolts to lock the overhead door in-place.

Some caulking around the door opening which I did should also re-direct the water elsewhere.

It appears this was an easy method of getting a good overhead door-bottom weatherstrip seal improvement.
 

Attachments

  • Asta Door overhead door seal.05.jpg
    Asta Door overhead door seal.05.jpg
    105.2 KB · Views: 26
  • Asta Door overhead door seal.04.jpg
    Asta Door overhead door seal.04.jpg
    112.1 KB · Views: 28
  • Asta Door overhead door seal.03.jpg
    Asta Door overhead door seal.03.jpg
    90 KB · Views: 27
  • Asta Door overhead door seal.02.jpg
    Asta Door overhead door seal.02.jpg
    145.8 KB · Views: 28
  • Asta Door overhead door seal.01.jpg
    Asta Door overhead door seal.01.jpg
    104.2 KB · Views: 30
  • Asta Door overhead door seal.06.jpg
    Asta Door overhead door seal.06.jpg
    145.5 KB · Views: 30
OP
D

driftpin

Well-known member
Joined
Dec 22, 2016
Messages
11,202
Location
Miami-Dade/Broward Co. Florida
I went to an Antique Motorcycle Club of America (AMCA) meet in Dania Beach for most of the day, w/a friend, and then returned home. I wanted to install an exterior weatherproof box for 120 V on the outside of the garage, so I did that.

If you are a fan of "On Any Sunday," the Bruce Brown movie which made many people aware of different forms of motorcycle competition, one of the guys with his bike he rode in the movie was there, he's an Ottawa 'snowbird' who vacations for 4 months of the year in south Florida. His name is Fred Kolman. In the movie, he's racing a legend of competition, Yuvon Duhamel. On the ice, with his studded tires. They have a duel, and Fred makes fewer mistakes and wins the race. Yuvon had a reputation of being a hard rider: either win, break, or wreck. Fred said that his win in "On Any Sunday" was the only time he won against Yuvon Duhamel. I'd say, "pretty-fortunate to have Bruce Brown capture that on film and turn it into easily-viewed motorcycle history."

Pics of the outside duplex box, the inside conduit run for it, and then pics of Fred Kolman's ice racer, and a pic of me with my long-time friend Bill Boyce, who is a venerable Yamaha factory mechanic, and Fred and his wife.

If you ever get to Ottawa, Canada, Fred has a motorcycle museum. His tolerant wife said he has "hundreds of bikes."
 

Attachments

  • Fred Kolman ice racer On Any Sunday.02.jpg
    Fred Kolman ice racer On Any Sunday.02.jpg
    140.4 KB · Views: 26
  • Fred Kolman ice racer On Any Sunday.01.jpg
    Fred Kolman ice racer On Any Sunday.01.jpg
    147.8 KB · Views: 31
  • electrical-outside duplex outlet.02.jpg
    electrical-outside duplex outlet.02.jpg
    109.8 KB · Views: 29
  • electrical-outside duplex outlet.01.jpg
    electrical-outside duplex outlet.01.jpg
    95.7 KB · Views: 27
OP
D

driftpin

Well-known member
Joined
Dec 22, 2016
Messages
11,202
Location
Miami-Dade/Broward Co. Florida
I've wanted to add lighting to the two bays of my small 2-car garage. I have a loft over the rear-half of the garage, and luminaires are mounted to the underside of the loft, which lights the rear half of the garage. They're 4-bulb flourescents, four ft. long.

The front half didn't have much for light other than the spill-over from the rear of the garage lights. I used the space above the two high-lift overhead panel garage doors as storage for light, bulky things like Christmas decorations, and storage crates not yet filled. So there was no ceiling space available.

I have been thinking about what to do, and here is what I came-up with. I still have to do the other bay, and finish the fasteners installation, but it's in-place on one side where I can use it, and do the final work.

What I wanted was to install some sort of a lightweight frame to support the luminaires. I bought the FEIT LED four foot two-bulb luminaires from Costco, I had used them elsewhere and was pleased with their function and ease of installation. I decided two luminaires on each bay would be good, and I made a plan to hang them beneath the door tracks. Actually, the hangers are attached to the overhead door tracks, and have plenty of clearance.

I used Simpson galvanized steel L-brackets, and right and left hand butterflies, bolted or riveted together. Where I needed a bit more clearance I used a 1/2" plywood spacer/flitch plate between the butterfly and the L-angle bracket, using machine screws to fasten the assembly together. A single 1/4" machine screw holds the assembly to the overhead door track.

Where I didn't need the extra space for clearance, I just riveted the L-angle and the butterflies together, and then hung them from the overhead door track with 1/4" machine screws again.

I ripped a 1" X 6" PT board to give me two 1"X 3" boards. A length of 100" allowed me to span from one overhead garage door rail to the other overhead rail, and to have the Simpson steel bracket assemblies in-position to fasten the 1"x 3" boards to; the boards will be held in-place by 1/4" machine screws & washers/nuts. To get everything aligned, levelled, and hanging, I'm using exterior-grade phillips screws until I drill the holes to through-bolt the 1" X 3" boards to the Simpson brackets.

The two boards are about 40" apart, and each light extends past its board about 3-1/4" at the light's end, the boards are on edge to act as lightweight beams. I used exterior-grade 1-5/8" phillips screws and fender washers to fasten the luminaires to the wood beams.

The Simpson brackets were a time and labor-saving idea, instead of cutting, welding, sanding, and painting brackets from mild steel strap.

The lighting is a big improvement over previously, and all the luminaire hanging framework is spaced well-away from the overhead door panels. I will secure the lamp cord to ensure it never becomes an issue, for now I just looped it around the 1 X 3's and it's out of the way of the moving overhead door in operation.
 

Attachments

  • 20180131_151333.jpg
    20180131_151333.jpg
    116.5 KB · Views: 30
  • 20180131_151409.jpg
    20180131_151409.jpg
    136.8 KB · Views: 44
  • 20180131_112709.jpg
    20180131_112709.jpg
    147 KB · Views: 29
  • 20180131_112505.jpg
    20180131_112505.jpg
    146.5 KB · Views: 30
  • 20180130_223712.jpg
    20180130_223712.jpg
    126.4 KB · Views: 32
  • 20180130_214741.jpg
    20180130_214741.jpg
    131.8 KB · Views: 27
  • 20180130_214720.jpg
    20180130_214720.jpg
    122.9 KB · Views: 35
Last edited:
To avoid these ads, REGISTER NOW!

C_F

ALLIANCE MEMBER
Joined
Jan 21, 2005
Messages
9,675
Location
Utah...SNOW BLOWS!
Man, reading through your thread just reminded me I need to watch On Any Sunday again! :D That's pretty neat that you know Fred, and also pretty neat that he still has his bike.

Nice work on your garage, it turned out great!
 

chargermann

Active member
Joined
Mar 21, 2015
Messages
29
Location
Ocala, Florida
...been following your thread on your new building. Very nice!
You brought back many memories of August 92' and Andrew. I was one of those folks down in Cutler Ridge who lost their roof, along with every window, door, etc. Acting as the Owner-Builder, took me two years to fully rebuild the house, but was fortunate to not be involved with the hordes of dishonest Contractors.
Regarding South Florida having strict building codes, just finishing my 2000SF mancave and though we have significantly-reduced windload factors in Marion County, all precast lentils, windows and doors are still labeled with "Miami-Dade County Approved".
 
OP
D

driftpin

Well-known member
Joined
Dec 22, 2016
Messages
11,202
Location
Miami-Dade/Broward Co. Florida
...been following your thread on your new building. Very nice!
You brought back many memories of August 92' and Andrew. I was one of those folks down in Cutler Ridge who lost their roof, along with every window, door, etc. Acting as the Owner-Builder, took me two years to fully rebuild the house, but was fortunate to not be involved with the hordes of dishonest Contractors.
Regarding South Florida having strict building codes, just finishing my 2000SF mancave and though we have significantly-reduced windload factors in Marion County, all precast lentils, windows and doors are still labeled with "Miami-Dade County Approved".

The Miami-Dade County Approved materials are probably among the best products on the market. I have an acquaintance who is a P.E. and he does the testing and site inspections for the certifications. FIU (local state universitt branch) built a 'wall of wind' using Chevy 350 V-8's driving big fans, and stacked one-above another to make hurricane-force winds. Watching videos of that thing fired-up, and just destroying building materials and methods of construction is sobering.

I was working fire-rescue for Andrew, and at a certain wind velocity we come off the streets and wait for the hurricane to pass. The damage that caused, is the closest to a war zone I've seen. Entire blocks of buildings, just gone.

I understand why a lot of people took their insurance $ and moved to Broward Co (the next-north county). A friend of mine had a roofing company in the Tampa area, he moved to Miami-Dade Co. for 2-years to work. My acquaintance who is an AC master license holder served as the local qualifier for the out of state companies who sent in crews to work here. He ended up with a big 2-story home in Weston on a golf course (Weston is a planned community built by the Westinghouse Corp. in the next-north county, it's where Dan Marino lives), he had thousands of permits issued. At night in south Miami-Dade Co.after the hurricane, the only light was from generators, people were walking around with guns on their hips because of the crime, it was like the wild west. Drugs, hookers, burglaries, robberies, assaults, a bad scene. They had the National Guard there for awhile. The materials supply houses were in high cotton for a couple of years.The tool distributors couldn't get stock in quickly-enough, getting full-list for tools and consumables. People were driving upstate just to buy materials and shipping them hundreds of miles south trying to keep working.

I bought a BMW touring motorcycle with 7K miles on it from a guy who lived in south Miami-Dace Co., < a month before the hurricane, the entire townhouse complex he lived-in was just gone. That bike would have been in the landfill if I hadn't moved it north.

One of my friends who worked fire-rescue with me bought a damaged house for 25% of its before-Hurricane Andrew price, he rebuilt it. He kept a pair of replacement wheels in his truck because of all the flats he'd get from the debris like roofing nails on the roadways.

The local economy was affected to the cost of tens of billions of dollars, in $ lost and $ spent to rebuild.
 
Last edited:
To avoid these ads, REGISTER NOW!
Top Bottom