So we are needing a trench to run the service cable out to the shop. I made several phone calls to electricians and plumbers to find one with a trencher. I found an plumber with a trencher and he quoted me a fair price and showed up as promised . Took him about 45 min. to run the ditch and then I spent several hours putting the conduit together and I have a little more assembly to do and then get the inspector to come check the ditch. We are moving right along.

You are using an out of date browser. It may not display this or other websites correctly.
You should upgrade or use an alternative browser.
You should upgrade or use an alternative browser.
Getting started
- Thread starter DTE
- Start date


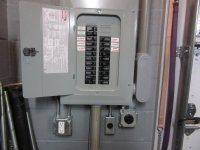
We got a little done on the shop project this week, mounted the electrical panel . $34.00 clearance item at Lowes. And then we pulled the wire. That was a first for me and that was a lot harder than I expected. 1/0 wire through 2in. conduit and at he end of the 125 ft. It was a chore with one pushing and the other pulling. I am getting to old for this. All my friends are at the beach or sitting on the deck and I still got my head in a ditch or some other back breaking chore.
Attachments
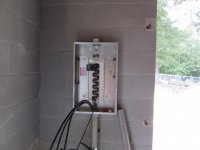
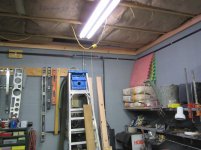
It has been a week or so, but we now have power to the building. Service panel is hooked up along with some wall receptacles and the ones in the ceiling for lights which are yet to come. Just have a minimum right now , not sure what will go where and still need to install the overhead doors and it will be easier to run the conduit after the install.
Attachments

I have been laboring all Labor day weekend, I got the final coat of paint on the gables and the eves. The floor is ready for the concrete, I have the vapor barrier down and found some nice foam expansion joint for the perimeter that lets you peel off the top 1/2 inch and caulk the edge so I glued that around the perimeter as my screed line, and I picked up a nice wooden table that I can leave as is or cut it in half and have 16 ft of work bench. Which is probably what will happen. And I have a 1/4 inch thick sheet of aluminum to cover it with. Hopefully we will get the floor down this week.
Attachments
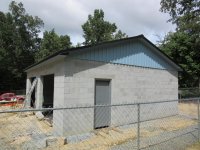


Haven't had any updates in a few weeks, but we made some progress this weekend. The overhead doors came in this week and we did a DIY install, my son and myself.It went well, we have both doors up and one operating very smooth and I am well pleased. First time to install a door and it went pretty good. I did the rear hangers a little different than most where there will be just one piece of angle iron coming through the ceiling to hold the track up. I will be putting up a metal ceiling and I think this will have a cleaner look.
Attachments

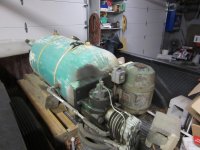
I was planning on not moving my stuff into my new shop until spring, but things change so we stepped it up a little. I still have to insulate and install the ceiling and finish the wiring and plumb the air lines. Moved the compressor home today. We put it in a carport next to the new shop. It has to be wired and plumbed. I thought about selling it and not even moving it. It has been in my possession and running 5 days a week since 1978. we put rings in it about 20 yrs ago. I hope it doesn't quit now.
Attachments
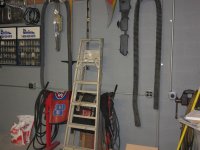
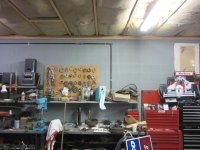
It's been nice having a few day's off to work in the shop. I have been making some progress on getting things put in there place and throwing out some things I will not need ( maybe ) There is a lot of truth to build it as big as possible , but my wife and myself have been down sizing for several years so this is just the next step. I have a hard time getting rid of some things. But you have to draw the line somewhere.
Attachments


Re: Getting started , wiring is done
We finished running the conduit and got the wiring completed yesterday. I installed a 100 amp service with 1/0 al. wire and I got a panel with a lot of spaces and that was a good thing. We used all of them. I could free up some room if needed by installing switches for the lights but the breakers work and I have everything hooked up that I will ever need.
We finished running the conduit and got the wiring completed yesterday. I installed a 100 amp service with 1/0 al. wire and I got a panel with a lot of spaces and that was a good thing. We used all of them. I could free up some room if needed by installing switches for the lights but the breakers work and I have everything hooked up that I will ever need.
Attachments
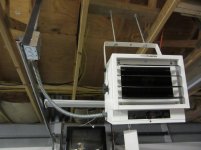
Re: Getting started - Pro Fusion heater install
Got the 7500 watt Pro Fusion electric heater from Northern tool installed and running today. I was surprised by the amount of heat it put out. I believe it will work good after we finish the insulation. For $200.00 you can't beat it.
Got the 7500 watt Pro Fusion electric heater from Northern tool installed and running today. I was surprised by the amount of heat it put out. I believe it will work good after we finish the insulation. For $200.00 you can't beat it.
Attachments
madoc1
Well-known member
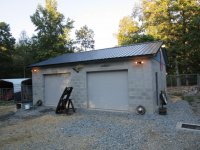
your shop turned out nice. you can be proud of all that hard work.`
jim
jim
Re: Getting started - installing the air lines
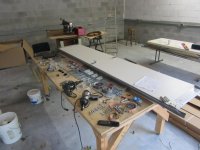
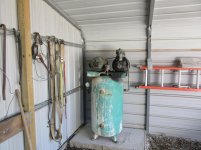
I have not posted on my build recently but have done a little work to the shop. I have enjoyed it all winter though. The Pro-fusion 7500 watt heater has been great, I was really surprised how well it worked. I still need to finish my insulation and put the ceiling in and that will happen this summer. This weekend we worked on running the air line and made a little progress as seen in the photos. The line will go down and exit through the bottom of the end wall and go to the carport next door where the compressor is located. The line is 1/2 inch black iron. In all there will be 110 feet of line, with about half being ran being before it enters the shop allowing for some cooling time for the air.
I have not posted on my build recently but have done a little work to the shop. I have enjoyed it all winter though. The Pro-fusion 7500 watt heater has been great, I was really surprised how well it worked. I still need to finish my insulation and put the ceiling in and that will happen this summer. This weekend we worked on running the air line and made a little progress as seen in the photos. The line will go down and exit through the bottom of the end wall and go to the carport next door where the compressor is located. The line is 1/2 inch black iron. In all there will be 110 feet of line, with about half being ran being before it enters the shop allowing for some cooling time for the air.
Attachments


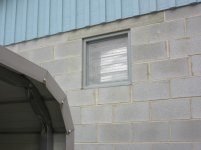
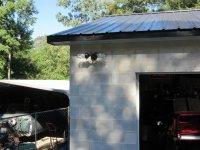
Re: Getting started - exhaust fan installation
I finished up my exhaust fan installation, I framed in the outside and left some room for a piece of foam and a door or cover of some type for the winter months. Put a nice screen over it to keep the birds and the bugs out. I installed a variable speed switch and am pleased with how it all works.
I finished up my exhaust fan installation, I framed in the outside and left some room for a piece of foam and a door or cover of some type for the winter months. Put a nice screen over it to keep the birds and the bugs out. I installed a variable speed switch and am pleased with how it all works.
Attachments

Finished up the air line install in the shop, we have 3 outlets , one has a regulator on it. I still need to get some type of filter and we have to plumb it next door to the compressor yet. It has been a fair amount of work cutting and threading the pipe. I pressurized what we have done so far and there are no leaks.
Attachments

Re: Getting started - water line install
I ran the water line part way when we were building , I also stubbed in a line under the footing to a meter box with the plan to go back and finish the install at a later date. That date came this weekend, I rented a trencher and bought the PEX tool needed and we know have water in the shop. At least a hose connection until I get the laundry tub hooked up and a faucet installed. I also had stubbed in some conduit for a Internet line, I got that finished up today also. Now I just have to pull the wire.
I ran the water line part way when we were building , I also stubbed in a line under the footing to a meter box with the plan to go back and finish the install at a later date. That date came this weekend, I rented a trencher and bought the PEX tool needed and we know have water in the shop. At least a hose connection until I get the laundry tub hooked up and a faucet installed. I also had stubbed in some conduit for a Internet line, I got that finished up today also. Now I just have to pull the wire.
Attachments


Re: Getting started - catch basin install
I am building a catch basin to move some water away from the building down to the yard, so while I had a trencher for the water line I installed part of that line. I used 4 inch double wall pipe so it can be driven over or paved over. Building my own catch basin's ( fits my low end budget ) and putting one at the front and one at the rear corner. When we built the building we installed a perimeter drain around the building both inside and out and it works really well and I run a dehumidifier 24/7 so the humidity runs around 50% during a time when we have had a lot of rain. When the floor was poured and the vapor barrier was put down it was several layers thick , I had quite a bit of plastic so we just used it up, and I have had no regrets there. Between my wife and myself we kept the floor wet 24/7 for several weeks and no troubles so far. ( NO FIBER, NO REBAR AND NO WIRE )
I am building a catch basin to move some water away from the building down to the yard, so while I had a trencher for the water line I installed part of that line. I used 4 inch double wall pipe so it can be driven over or paved over. Building my own catch basin's ( fits my low end budget ) and putting one at the front and one at the rear corner. When we built the building we installed a perimeter drain around the building both inside and out and it works really well and I run a dehumidifier 24/7 so the humidity runs around 50% during a time when we have had a lot of rain. When the floor was poured and the vapor barrier was put down it was several layers thick , I had quite a bit of plastic so we just used it up, and I have had no regrets there. Between my wife and myself we kept the floor wet 24/7 for several weeks and no troubles so far. ( NO FIBER, NO REBAR AND NO WIRE )
Attachments


sean Buick 76
Well-known member
Nice work, I like the father son combo!
1/2 Cup
Member Emeritus
Progress, going great guns..
Thank you for the update..
Thank you for the update..
Re: Getting started - getting ready for a ceiling
Spent a rainy Saturday trimming the walls out with some 2 x 4' I am going to caulk and paint them. Then will put a metal ceiling in and **** the edge of the metal up to the 2 x 4 or might install some J channel. This is still a work in progress but it is almost done with the ceiling being the last big piece. But it is nice having my shop done and being able to use it. We have heat , running water and a plumbed air compressor , what more could a man ask for ! oh I forgot, we still need to do the lighting.
Spent a rainy Saturday trimming the walls out with some 2 x 4' I am going to caulk and paint them. Then will put a metal ceiling in and **** the edge of the metal up to the 2 x 4 or might install some J channel. This is still a work in progress but it is almost done with the ceiling being the last big piece. But it is nice having my shop done and being able to use it. We have heat , running water and a plumbed air compressor , what more could a man ask for ! oh I forgot, we still need to do the lighting.
Attachments
millwrightfabricator
Active member
Do you still have the wrench racks for sale?
How well has the heater worked?
Wanting to add something similar to my shop...
Great project!
It works really well, I was surprised how good it does. It does cost more to run it and I have changed my planes somewhat and will be putting in a mini split at some point. But today it was in the forties and the shop was seventy and it only ran about 5 min. on the hour.
trbomax
Well-known member
I have been laboring all Labor day weekend, I got the final coat of paint on the gables and the eves. The floor is ready for the concrete, I have the vapor barrier down and found some nice foam expansion joint for the perimeter that lets you peel off the top 1/2 inch and caulk the edge so I glued that around the perimeter as my screed line, and I picked up a nice wooden table that I can leave as is or cut it in half and have 16 ft of work bench. Which is probably what will happen. And I have a 1/4 inch thick sheet of aluminum to cover it with. Hopefully we will get the floor down this week.
I like your GSD ! can u shoot some pics of it?