To avoid these ads, REGISTER NOW!

Getting that real shine on drill press posts

bahmi

Active member
Joined
Feb 18, 2009
Messages
31
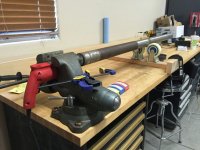
I brought home a nice used drill press, ran good but had a light to moderate coat of rust on it. I took my angle drive, put on a soft wire cup, and went at it.
It did a nice job cleaning off the rust, but the surface is not uniformly glossy.

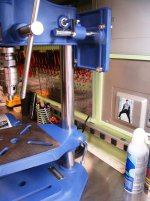
Just wondering how material and technique would bring out a uniform and shiny surface on the post.
 
To avoid these ads, REGISTER NOW!

Mike W.

Well-known member
Joined
Sep 30, 2015
Messages
178
I had one I restored years ago that had the same problem, you could see the original tooling marks. At that time I had access to a lathe with a bed about 8 feet long. Chucked it up using the live Center , and sanded it down with Emery cloth. Then some Scotch Brite on it. don't have access to a long bed lathe anymore and I've got another dp that I want to restore , I've been thinking of buying a cheap wood lathe just to sand shafts like this.

Sent from my XT1254 using Tapatalk
 

jdlong

Well-known member
Joined
Oct 2, 2016
Messages
333
Location
Kaukauna Wisconsin
I would try spritzing it with WD-40 followed by a good scrubbing with Scotch Brite pads. If that don't work, 1000 grit emery cloth. Wipe it down good with some clean cloths while spritzing with WD-40.
 

fsantana

Member
Joined
Oct 23, 2014
Messages
20
Location
Bulverde, Texas
I just cleaned up a delta and I used different grades of sandpaper starting with 100 grit and working up to 400 grit. I wrapped the sandpaper around the post and sanded like I was polishing shoes. I finished up by spraying T-9 on to protect it against flash rust. Hope this helps.

Sent from my SM-G900V using Tapatalk
 

crguy

Well-known member
Joined
Jan 24, 2016
Messages
2,652
Location
SW Washington
I would try spritzing it with WD-40 followed by a good scrubbing with Scotch Brite pads. If that don't work, 1000 grit emery cloth. Wipe it down good with some clean cloths while spritzing with WD-40.

1000 grit? Good God man - Talk about going a little overboard. :lol_hitti
 

bmw57isetta

Well-known member
Joined
Apr 27, 2010
Messages
268
Location
Austin, Texas
I am finishing the resto of an Atlas / Dunlap pre-war bench top DP. Thing was a crime scene when it was given to me.

Thanks to tips from GJ'ers, I got a 3M EXL De-Burring wheel from Amazon and mounted it on my buffer. In under five minutes the column went to rusted to knockout just like that. Finished it off with a pass of jeweler's rouge on the buffing wheel and Gibbs Penetrant.

Those de-burring wheels ain't exactly cheap but they produce some amazing results. More than one person who saw the DP before I started the resto has asked "How did you do that?"
 

pendragon1998

Well-known member
Joined
Mar 24, 2012
Messages
3,733
Location
NE Georgia
I am going to do it this way when I polish mine. Got the idea from a fellow GJer. I already bought my casters and the pipe plug. It is my next project. :evil:

attachment.php
 

Attachments

  • 14763299154721.jpg
    14763299154721.jpg
    122.5 KB · Views: 575
Last edited:

rharman

Well-known member
Joined
Apr 22, 2012
Messages
8,784
Location
SoCal
1000 grit? Good God man - Talk about going a little overboard. :lol_hitti

If you really want that shine.... that would probably do it.

I use WD-40 with very fine steel wool and then Johnson paste wax so the table slides easily.
 

Mike W.

Well-known member
Joined
Sep 30, 2015
Messages
178
I am finishing the resto of an Atlas / Dunlap pre-war bench top DP. Thing was a crime scene when it was given to me.

Thanks to tips from GJ'ers, I got a 3M EXL De-Burring wheel from Amazon and mounted it on my buffer. In under five minutes the column went to rusted to knockout just like that. Finished it off with a pass of jeweler's rouge on the buffing wheel and Gibbs Penetrant.

Those de-burring wheels ain't exactly cheap but they produce some amazing results. More than one person who saw the DP before I started the resto has asked "How did you do that?"
Pics?

Sent from my XT1254 using Tapatalk
 

Mike W.

Well-known member
Joined
Sep 30, 2015
Messages
178
I am going to do it this way when I polish mine. Got the idea from a fellow GJer. I already bought my casters and the pipe plug. It is my next project. :evil:

attachment.php
How did he Chuck to that tube?


Sent from my XT1254 using Tapatalk
 

Zeeman

Well-known member
Joined
Mar 21, 2016
Messages
1,185
Location
Bartow County Georgia
There is a thread on how to do this I believe. Sorry I can't post a link. I believe I would fabricate two top guards over the post just in case that thing decides to let loose! Great idea with the casters.
 

Davefr

Well-known member
Joined
Jan 7, 2010
Messages
11,822
Location
OR
How did he Chuck to that tube?


Sent from my XT1254 using Tapatalk

You could use a sewer plug or maybe a large sanding drum mandrel.

I just set my column on saw horses and used strips of 2" sandpaper. I didn't get the polished look he got. Satin was good enough for me and I stopped at around 400 grit. Make sure you wax the column.


6695.jpg


ncu62b2.jpg
 

Mike W.

Well-known member
Joined
Sep 30, 2015
Messages
178
You could use a sewer plug or maybe a large sanding drum mandrel.

I just set my column on saw horses and used strips of 2" sandpaper. I didn't get the polished look he got. Satin was good enough for me and I stopped at around 400 grit. Make sure you wax the column.


6695.jpg


ncu62b2.jpg
Good idea, thanks Dave

Sent from my XT1254 using Tapatalk
 
To avoid these ads, REGISTER NOW!

pendragon1998

Well-known member
Joined
Mar 24, 2012
Messages
3,733
Location
NE Georgia
I got a sewer plug and it fits really well in the tube. It has a threaded end sticking out. I made a drill jig to hold it. Take a bolt witha half threaded shank and put it halfway into a coupling nut with locktite. Cut off the head and that end will go in a drill chuck. Screw in the sewer plug into the other side of the coupling nut and that way you won't damage the threads in the chuck.

attachment.php
 

Attachments

  • 14763709154430.jpg
    14763709154430.jpg
    55.7 KB · Views: 445
Last edited:

the gypsy

Well-known member
Joined
Mar 13, 2013
Messages
1,780
Location
Montreal, Quebec, Canada
I had the same idea, but seeing as I was not ready to start the project, I did not solve all the minute details on what to use to spin the tube while sanding. My original idea was to use sanding drums. But I think the plumbing cap is better.
 

bmw57isetta

Well-known member
Joined
Apr 27, 2010
Messages
268
Location
Austin, Texas
Mike W:

Here ya go.
 

Attachments

  • Dunlap Left Side Before 1.jpg
    Dunlap Left Side Before 1.jpg
    80.7 KB · Views: 133
  • DSC04439.jpg
    DSC04439.jpg
    105.6 KB · Views: 177
  • DSC04440.jpg
    DSC04440.jpg
    112.1 KB · Views: 168

bmw57isetta

Well-known member
Joined
Apr 27, 2010
Messages
268
Location
Austin, Texas
By the way, I used the 'electric drill chucked up in a vise' method mentioned above on a Craftsman 150 a couple of years ago. For the caster part I had a small HF furniture dolly and just relocated two of the casters for the duration. On the drill end I used a hole saw for a plug. Job is easier with two people buffing a column for a floor standing DP. Finished product was a huge improvement as seen above.
 

Mike W.

Well-known member
Joined
Sep 30, 2015
Messages
178
Why couldn't you hand lap it with a roll of emery cloth and be done in moments?
Does no one use emery cloth anymore?
I think that's what the setup with the hand drill in the vise is for,

Sent from my XT1254 using Tapatalk
 

Mike W.

Well-known member
Joined
Sep 30, 2015
Messages
178
Mike W:

Here ya go.
Dang dude that's beyond rebuild and moving into the realm of art lol.

How did you make or buy that center part on your motor? The aluminum part with the cool pattern?


Sent from my XT1254 using Tapatalk
 

Mike W.

Well-known member
Joined
Sep 30, 2015
Messages
178
Mike W:

Here ya go.

I happen to have one of those de-burring wheels in a cabinet somewhere. I used it on some drill press handles and it actually took some material off. So with the deburring wheel in your pedestal buffer you held the column and just kind of spun it by hand working your way down? I'd like to try this with mine latest dp (attached) but I don't want it coming out uneven.

Mike
 

Attachments

  • craftsman drill press (2).jpg
    craftsman drill press (2).jpg
    146.6 KB · Views: 93

JZiggy

Well-known member
Joined
Dec 1, 2014
Messages
990
Location
Atlanta
I use FrankLee's method too. Some sandpaper with WD40 or mineral spirits seems to work well.

In my humble opinion, a slightly-textured column surface is probably superior to a mirror-smooth one since the texture will hold lubricants and allow the table to move more easily.
 

bmw57isetta

Well-known member
Joined
Apr 27, 2010
Messages
268
Location
Austin, Texas
Mike W:

I tend to WAY overdo everything but I want this DP to still be in use and lookin' good for the next 75 years. It's had a hard life between the time I got it and the time it was new in 1941.

The engine-turned adhesive trim came from metrorestyling.com, another GJ tip. That's the 'small' pattern. (Search on 'engine turned') There is also a 'large' pattern but the proportions wouldn't have been right. That's a 24" by 12" sheet for $3.99 plus postage, plenty do several bands. They also have sheets large enough to cover a small mobile home.

Another online vendor is rvinyl.com. They only sell the larger 1/4" pattern though. Fast shipping from both companies.

Thanks for the kind words and best of luck with your drill press!
 

Mark in Indiana

Well-known member
Joined
Aug 11, 2010
Messages
3,057
Location
Southern Indiana
All.
I'm in the process of restoring my 1948 Atlas DP. Pictured is how I rigged the post to my mill to clean off the rust. As you can see the post is going to be a challenge. I started with a cup wheel to take out most of the heavy rust. Then went to 80G sand paper and ended up at 150G sand paper (rust is nearly gone). I plan to end at 400G sand paper, then apply furniture paste wax to help precent flash rust. When my DP is reassembled and operational, I'll create a thread that goes through all of the restoration steps.
 

Attachments

  • DP POST REFINISH1.jpg
    DP POST REFINISH1.jpg
    144.7 KB · Views: 105

bmw57isetta

Well-known member
Joined
Apr 27, 2010
Messages
268
Location
Austin, Texas
Mike W:

I used a 3M EXL medium grit deburring wheel. I just moved it slowly from left to right letting the wheel just kiss it enough to watch the rust disappear. Bearing down on it or staying in one spot for too long will do exactly what you described. Using that method, it's a fast job.

Frank Lee, et al's method produces excellent results. The Craftsman 150 tall column I did using the same method has a nice satin finish that has remained looking great after 3+ years. Once a year I wipe it down with Gibbs Penetrant that not only protects the finish but gives is a very nice patina. The pic posted below was taken in 2013. Still looks the same today.
 

Attachments

  • DP 150 Resto 80.jpg
    DP 150 Resto 80.jpg
    81.2 KB · Views: 98

Steroblan

Well-known member
Joined
Jan 31, 2012
Messages
259
Location
Northern Calif
Orbital polisher and some coarse automotive rubbing compound if you can find it. Follow up with paste floor wax for protection against rust.
 
To avoid these ads, REGISTER NOW!
Top Bottom