To avoid these ads, REGISTER NOW!

Got my Armorpoxy/ArmorClad floor down this weekend!

CarCrazyRDM

Well-known member
Joined
Oct 24, 2015
Messages
298
Location
Raleigh, NC
I ordered three of their ArmorClad kits, including the primer and the upgraded "military" topcoat. This was obviously more than enough to do my 24x36 detached garage but I also plan to do my attached garage once I am "settled" in the detached.

Edit: I wanted to add for other's research that I ended up going with their Khaki Tan epoxy with black, white, and gray flakes. I'm fairly certain I am going to paint the bottom half of the garage walls gray, the top half will remain white, and I will likely do some type of black accent stripe in between. So I think when it's all said and done it will tie in nicely.

Overall I am very pleased. The products themselves seem to be great (only time will really tell though) and the install process was pretty much as advertised. My only real complaint is that after coming home today and having a good look at the completed process (I just finished applying the topcoat this morning) that the topcoat with friction additive (FA) has definitely dulled the gloss that was on the epoxy only floor. I don't think this has anything to do with the topcoat itself as much as it does the FA. Which erks me a little because this was a specific question I ask and was told I wouldn't even know the stuff was there. Had I known it was going to turn out as it did I might not have used the FA or certainly would have gone with less of it.

To spite following the directions and making sure to thoroughly mix the topcoat and additive each time before pouring it into a paint tray and rolling it on, the FA still didn't go on evenly throughout the floor and as mentioned above took some of the glossy shine away. :( You can tell in spots where the FA only got on the "bottom" of the roller (where I think it began to settle in my paint tray) and so when I rolled it on it goes, more sandy, less sandy, more sandy, less sandy over 3 -4 foot sections. And towards the end of my application process you can tell there is more FA in the floor as a whole.

While that was a little bit of a bummer after seeing it look so fantastic the day before and all the time, money, and energy invested in it, it still looks great. And the truth is, after I start filling the building up with work benches, cabinets, a lift, tools, etc it will all be so broken up that hopefully I won't notice. Actually, I'll still notice but hopefully not quite as much, lol. I'm hoping when I get lights in there that it'll be so bright that I won't notice the inconsistencies in the floor. Although it could make it worse. I guess we'll find out soon enough.

But I also want to add that Armorpoxy's customer service was top notch, both in helping me select the product, the amount, the type and color, and on through the application process. They answered multiple emails from me over the weekend and usually within a very short period of time, including Sunday night at 10:00 pm within 15 minutes!

So anyway, I know most folks skipped right over all the above and only came in here to look at pics, lol. So without further ado...


Everything I ordered-


After cleaning and acid etching-


I separated my flakes out into bags and quantities to help me evenly distribute them over the 8 sections of concrete. Turns out you'd have to very heavily cover the floor to use up all the flakes that come with these kits. I don't think I even used half of what was provided.


After primer-


The next three photos are after epoxy only-


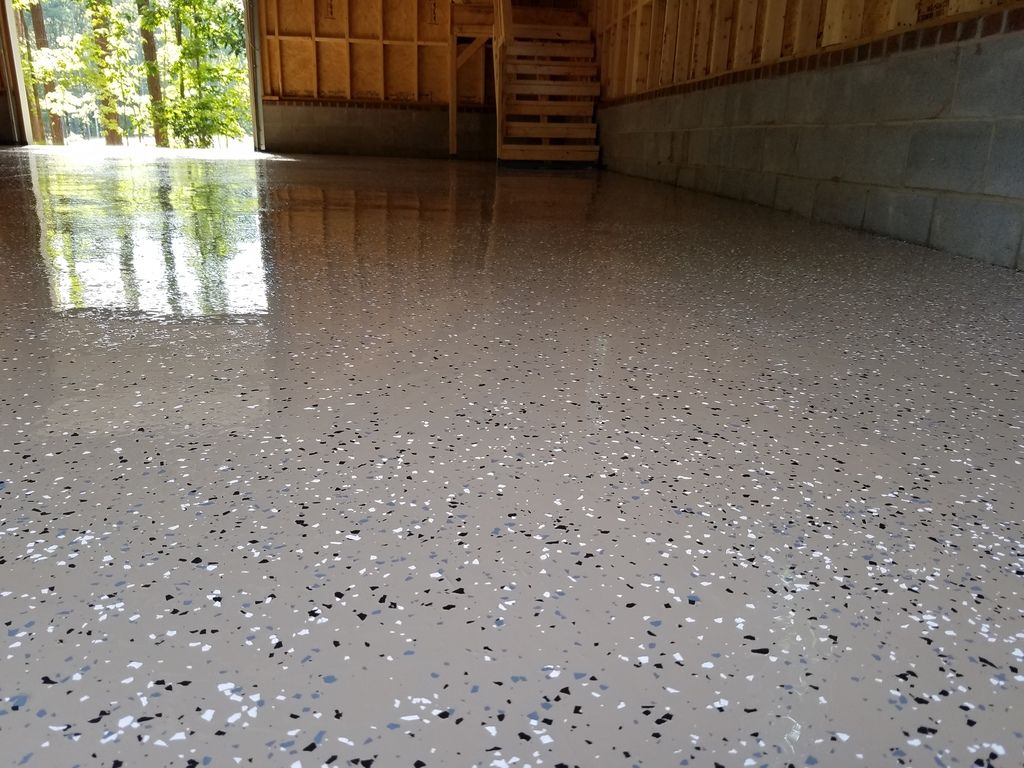
And these pics are after the topcoat with friction additive application-


Last edited:
To avoid these ads, REGISTER NOW!

texas123

Well-known member
Joined
May 19, 2016
Messages
136
Location
Fulshear, TX
Looks nice, i went with designer grey. I did mine last week & noticed it didn't look as nice after the top coat. Thought I was imagining that but I guess not. Armorpoxy sent me an extra can after I mentioned this to them & it helped a lot. Still very happy & spot on review.
 
OP
C

CarCrazyRDM

Well-known member
Joined
Oct 24, 2015
Messages
298
Location
Raleigh, NC
Looks awesome, I am considering using AC on my new floor. What did you do with the control joint cuts between the slabs?

Nothing really. You can fill them if you want and then epoxy over them but from what Armorpoxy recommended and others said, it sounded like it was going to potentially cause more problems than it was worth. With potential cracking down the road. I just rolled right over the joints with both the epoxy and the top coat with no issue. The only thing I did do was after the epoxy coat had hardened and before putting down the topcoat I went around with a screw driver and broke off some of the flakes that had either gotten semi-stuck in or over the joints. I just wanted the joints to be "clean." I'm sure this could have also been done after the topcoat was put down but then they just would have been that much harder to break off and/or remove.
 
OP
C

CarCrazyRDM

Well-known member
Joined
Oct 24, 2015
Messages
298
Location
Raleigh, NC
Thanks 120zd.

So after talking with Armorpoxy this morning on the phone I decided to put another coat of topcoat down... using slightly less FA and a 3/8" nap roller instead of the 1/4" that comes with the kit. Doing those two things and varying my application process just a bit I think the results will be much better. It still won't be as glossy as just the epoxy coat but I am hoping for a more consistent look to the FA. It looked good when I finished this evening, we'll find out for sure tomorrow.

And I want to give another shout out to Armor's customer service. I probably spent 30 minutes on the phone this morning with Arthur who listened to all I had to say and I feel like advised me well on how to proceed in order to get the results I am looking for.

Hopefully some more pics to come this weekend.
 
OP
C

CarCrazyRDM

Well-known member
Joined
Oct 24, 2015
Messages
298
Location
Raleigh, NC
Here are a few pics after the second top coat application. It's probably hard to tell any difference from these pics but the more even distribution of the friction additive was definitely noticeable in person.


Our dog is even enjoying the new floor. :)
 

bigjon

Well-known member
Joined
Apr 21, 2007
Messages
499
Location
NSW Australia
I'm not a Bud Light fan, but you may as well get me one out of your open fridge while I'm sitting here admiring your floor.
 
OP
C

CarCrazyRDM

Well-known member
Joined
Oct 24, 2015
Messages
298
Location
Raleigh, NC
I'm not a Bud Light fan, but you may as well get me one out of your open fridge while I'm sitting here admiring your floor.

Funny enough when I posted that picture I almost put a footnote on it about the beer and the fridge, lol. I'm not really a BL fan either, that's why its sitting in the detached garage in a fridge that isn't plugged in. :) The fridge is simply a storage unit for the time being and the doors are open to keep it from growing mold etc. We had some friends over that brought the BL and I've only kept it around as "backup" beer. All my good beer is in the mini-fridge in the attached garage or in the house.
 

Firering

Active member
Joined
Jun 28, 2013
Messages
40
Location
St. Louis
Great job on the floor!! How much of the FA did you use on your final re-coat? 1/4 can per gallon or less. Have you had a chance to see how it feels with water on the surface?
 
OP
C

CarCrazyRDM

Well-known member
Joined
Oct 24, 2015
Messages
298
Location
Raleigh, NC
Firering, sorry for the late response. I think I used approximately 3/4 of the can of FA. If I am not mistaken AP calls for a full can of FA for every two gallons of mixed clear (I could be wrong on this so check... it's been a while since I did it at this point). Whatever was recommended I used slightly less than that and I know I didn't dump the entire can of FA into whatever amount I was mixing up. No matter how much you mix it up you'll still end up with some portion of the FA on settling on the bottom and not being distributed into what is going on your floor. Just be sure not to roll your roller through anything that settles in your paint tray... that'll keep it looking uniform on the floor as you apply it.
 

racerex

Well-known member
Joined
Dec 3, 2013
Messages
345
Location
NY
CarCrazyRDM: The floor looks great. I was just wondering, did you have to do any prep before you applied the second top coat (i.e., scuff up the existing top coat) ?
 
To avoid these ads, REGISTER NOW!
OP
C

CarCrazyRDM

Well-known member
Joined
Oct 24, 2015
Messages
298
Location
Raleigh, NC
racerex, thanks and I did not. I believe AP told me as long as the second application went down within maybe a week or two of the first and I hadn't gotten it dirty in any way that the second coat would adhere without issue. So far so good.
 

LuckyRugger

Well-known member
Joined
Mar 23, 2008
Messages
119
Location
Mid-Michigan
I had the same issue with my AP flooring when I put it down this weekend using their Ultraglaze topcoat. The floor looked really good and glossy after I put the epoxy and flake down. Then when I put down the Ultraglaze top coat it now looks like it's a flat finish. I called AP today, they said this was rare that this happened and is sending me another gallon of Ultraglaze. I used the entire package of the anti-slip, which they said it was a proprietary anti-slip aggregate that does not dissolve or change the finish of the top coat. The customer service rep I talked too was not as helpful as to suggest other techniques or other ideas how to get the finish as I expected. They said that I could try to not add any anti-slip if I wanted to but it was up to me.

I advised them that their instructions state this: "...Use 1 package per gallon. Slowly pour the contents of the non skid into the topcoat and mix well to thoroughly suspend in the mixture. Ultraglaze coat will go on 'milky white' but clear up shortly to a high gloss shine..." So I told the rep that I expected it to be high gloss just as your product states, but he said it would be more of a satin to gloss finish.

Just a little frustrated because now I can't do anything in my attached garage until I get my second topcoat and it dries. I wanted to be able to start to put my garage back together this week and start some other projects in their this weekend. Now it looks like it will be pushed back another week.
 

Crashcup

Member
Joined
Sep 7, 2016
Messages
12
Wow, helluva garage! Beautiful floor, too.

CarCrazy, do you happen to know how much $ this worked out to per sq ft?

Also wondering, for you or anyone else here, about whether the flakes might make it harder to find small parts dropped on the floor? I intend to do an epoxy floor coating in my garage and I'm kind of on the fence about the color flakes.

Keith
 
OP
C

CarCrazyRDM

Well-known member
Joined
Oct 24, 2015
Messages
298
Location
Raleigh, NC
Lucky, I understand your frustration and best of luck with the fix. Use less FA for sure if you want it to be less cloudy. I think AP needs to be more honest/up-front about how the FA will effect the glossiness but I imagine they don't want to scare people away from it for safety reasons. I know without the FA and as glossy as just the epoxy coat was it would be a slip & fall nightmare. I think a good balance between the two is probably 1/2 - 3/4 a can of FA per gallon of topcoat. But I suppose each individuals intended use of the area where they are putting the epoxy may vary so who knows. If it's in your daily driver garage and you know it's going to be/get wet frequently and/or your wife and kids are going to be on it then I'd say use all the FA. But if it's in a shop which will rarely or never see wet cars or feet and will be dry 99.9% of the time I think less or no FA might be an option. Either way, I hope you find a good balance and are happy with the results.

Crashcup, thanks. And yes, with the primer and military topcoat I'd say it comes out to roughly $1/sqft (that was with the Garage Journal discount though). I bought enough to do my 860 sqft detached garage and my 576 sqft attached garage as well. And I probably could have squeeked by with only 2 of their kits and saved some money but I didn't want to get nearly done and find I was short on material. I had that happen at my last house/garage and it was a pain.

And speaking of my last house/garage, I had a similar colored floor in it along with flakes and I will say yes, the flakes do make finding small dropped objects like bolts, screws, nuts, etc more difficult. Not ridiculously difficult, just more so than a plain colored floor. But IMHO the flakes are very worth it. One, just for outright looks... just looks nicer/fancier to me but also for the sake of helping "hide" or diminish the amount of dirt, tire tracks, scratches, etc that will end up on the floor. And that is more important to me than maybe having to get down on my hands and knees every once in a while to find a dropped screw. But definitely something to consider if you're already on the fence about how the flakes look in the first place.
 

LuckyRugger

Well-known member
Joined
Mar 23, 2008
Messages
119
Location
Mid-Michigan
I agree, they know of the issue but claim it does not exist, but then mentioned that many of them spend time on GJ. I'm attaching a few pictures of my floor. The first is the dullest, and the second is the glossiest.
5bfdff15569300e4b89ae33548dd1111.jpg


Sent from my iPad using Tapatalkfc17e114d3c428021373942f821effb2.jpg

I may try using only 1/2 of the anti-slip, but I am concerned that it might be slick when wet or if there is snow on it or boots. This is my attached garage and I have a detached for my shop.
 
Last edited:

LuckyRugger

Well-known member
Joined
Mar 23, 2008
Messages
119
Location
Mid-Michigan
I received my second gallon of Ultraglaze from AP on Thursday and that evening I vacuumed my garage again. I mixed 34 grams (~1/2 a pack of anti-slip) with my drill and mixer at a slow speed. I then rolled it similar to painting walls out of a rolling pan. My 660 sqft attached garage only used a 1/2 gallon with this method. The next morning it looked decent, so then I rolled another coat Friday after work 90 degrees of the previous coat to improve consistency.

With only using 1/2 the anti-slip it has plenty of traction, and it is glossy this time. AP needs to improve their paper and online instructions for installation to improve the appearance of the top coat.

b4ade7219f1ee3805c1a8c25ba8afaa7.jpg
021de5aa5e5b81142bb6b0d448d422c5.jpg


Sent from my iPad using Tapatalk
 

vroach1951

Well-known member
Joined
Aug 20, 2015
Messages
53
What were your weather conditions and about how long was your working time with the epoxy?

Sent from my SM-G935V using Tapatalk
 
OP
C

CarCrazyRDM

Well-known member
Joined
Oct 24, 2015
Messages
298
Location
Raleigh, NC
Sorry I didn't see this question until 5 months later!!! You may not care any more but for future readers of this post... I don't remember exactly what the temps were but I know I felt it might be the last opportunity before the summer heat and humidity rolled in to do it. I think AP recommends not putting it down if temps are above 90 (or it might be 80) and I think more importantly the humidity.

It was warm when I did it (I want to say upper 60's in the morning but low to mid 80's in the afternoon) but it went down and seemed to cure without issue. The warmer it is the faster it will dry, so that was my only concern. But I felt I had enough working time, I just broke the garage down into 1/3rds or 1/4's and mixed materials in ratios to match such.
 

LegacyIndustrial

ALLIANCE MEMBER
Joined
Jun 7, 2010
Messages
7,994
Location
deerfield, IL
We coat 365 here in central florida with 100% Solids Epoxy, Polyaspartics, etc...
Keep your materials cool prior to using and have enough hands to help make the work go easier.

We never break down a kit, easy way to a problem. Dump and roll, don't look back.
 

CaptainBraap

Member
Joined
Feb 14, 2017
Messages
16
Location
Houston, TX
Can I ask how slick the epoxy coat was before you put on the topcoat? I am putting down epoxy only and am curious about a potential slip and fall.
Thanks,
 
OP
C

CarCrazyRDM

Well-known member
Joined
Oct 24, 2015
Messages
298
Location
Raleigh, NC
I never really got the floor wet when it was just the epoxy but based on slickness even with the topcoat and friction modifier and on a previous epoxy floor I had before this house with some areas without good friction additive coverage, I would say it will be pretty slick. If you're going to use it as more of a workshop (ie maybe not pulling a lot of wet cars in/out) then I think as long as you keep a mat to wipe your shoes on when it's raining you'll be good. And I'm sure you can manage just fine even if you are going to have wet vehicles going in and out but I'd just be careful. Let us know how it comes out.
 
Last edited:

rrangus

Well-known member
Joined
Jan 15, 2006
Messages
47
Location
Wilkesboro, NC
I did one of my shops with no FA. You have to pay attention when the floor is wet:shocking: or you will end up getting up close and personal with the finish:lol_hitti
 

Armorpoxy

Well-known member
Joined
Aug 18, 2013
Messages
3,735
Location
NJ
Hi,
While we have not had reports of inter coat delamination after somewhat long recoat times, our opinion is that if you wait more than 48 hours between coats we suggest light sanding or scratching up with a floor buffer and wiping down with denatured alcohol before starting the next coat just to make sure.
 

cohen

Member
Joined
Jan 29, 2018
Messages
11
Location
Charleston, SC
Have any updates on how this is holding up? Looking at doing the same next month. Can you repost a couple pictures, the links expired in the original post.

Was your floor brand new? What prep work did you do?
 
OP
C

CarCrazyRDM

Well-known member
Joined
Oct 24, 2015
Messages
298
Location
Raleigh, NC
Cohen,

The floor is holding up just fine. And I'm sorry the pics no longer work, you can thank PhotoSuckIt for that! Half the build threads on all forums were ruin when they essentially began holding our photos for ransom last year. With that said, I think you can still access all of my detached garage pics at the below link (the album should be "public"). Although admittedly since PB started wanting a ridiculous fee I haven't updated that album either. But you can see all the install pics and couple follow up pics on pages 1 - 4 I think.

http://s34.photobucket.com/user/CarCrazyRDM/library/Detached%20Garage?sort=3&page=1

And yes, the floor was brand new. They tell you to wait 30 days for new concrete to cure before installing the epoxy, I chose to wait 60 days I think. I also had the concrete guys not "polish" the floor but just smooth it out but leaving some texture to it for better adhesion. I think followed all of Armorpoxy's instructions (cleaned, acid etch and primer) followed by the epoxy and top coat.

I saw you had PM'd me as well. If you have more questions let me know.

This link should take you to one of the more recent photos I have of the garage (and in "use" as well).

https://www.amazon.com/photos/share/KtEZ7glAM0R78M32Wg559pXh7vExv5MJHeuSEbANnWt
 

AP514

Well-known member
Joined
Jan 23, 2014
Messages
768
Location
Pearland, Tx
even the last link above for PB is worthless...so many Spam Adds pop up over your pic's you can hardly have a look at them..I gave up..too bad I really wanted to have a peek at them.
 
OP
C

CarCrazyRDM

Well-known member
Joined
Oct 24, 2015
Messages
298
Location
Raleigh, NC
even the last link above for PB is worthless...so many Spam Adds pop up over your pic's you can hardly have a look at them..I gave up..too bad I really wanted to have a peek at them.

Yeah, PB is ridiculous now. They really shot themselves in the foot. They had the opportunity to charge users without screwing them over and blew it. But I just clicked on the link above (not signed in) because I got a few popups last night but not an over-whelming amount... then I looked at my add-blocker plug-in... it listed 62 ads blocked within the first 10 seconds I was on the page!!! That's insane.

I added some more pics to my Prime Photos album. Obviously there aren't any descriptions with them but you'll see there is a bare concrete, primer, epoxy and then top coat photo, plus a few others.

https://www.amazon.com/photos/share/Y1rWQH3RRZXpfriRCAoFhWxoaH21aQplG6qjiAJSx7c
 
To avoid these ads, REGISTER NOW!
Top Bottom