To avoid these ads, REGISTER NOW!

Got started on our 28x30

Ray-CA

Well-known member
Joined
Jan 6, 2007
Messages
3,451
Location
San Diego CA
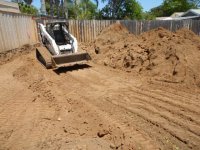
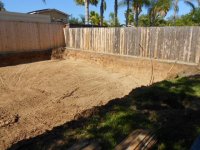
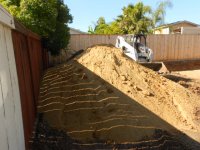
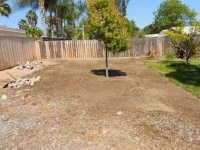
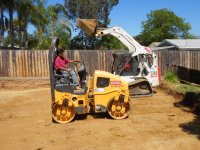
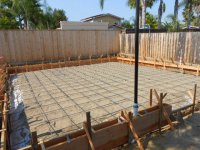
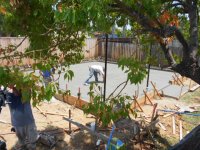
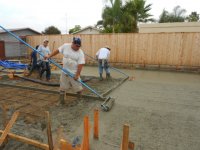
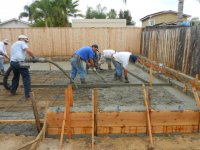
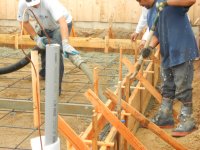
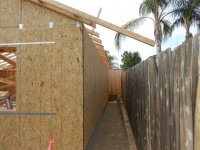
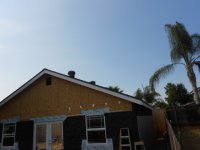
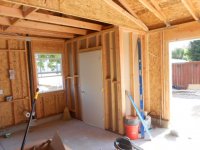
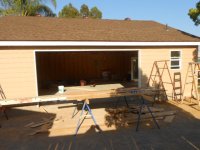
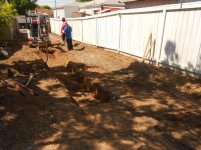
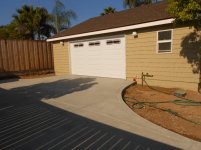
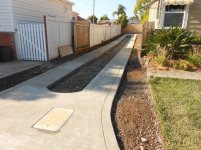
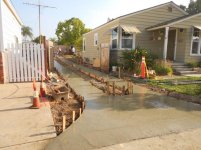
We finally were able to get started on our 28x30 garage/shop. First day of digging we found a big surprise....more clay then we expected which required more digging. Ended up with a 35x35x4 hole in the yard that will require approximately 80 to 100 cubic yards of compacted fill before we can start the foundation work.
 

Attachments

  • dig-02.JPG
    dig-02.JPG
    137.8 KB · Views: 141
  • dig-03.JPG
    dig-03.JPG
    118.6 KB · Views: 136
  • Done digging.JPG
    Done digging.JPG
    121 KB · Views: 143
  • 4-feet down.JPG
    4-feet down.JPG
    124.2 KB · Views: 137
  • 25cu-yds (need 75 more).JPG
    25cu-yds (need 75 more).JPG
    123.3 KB · Views: 135
To avoid these ads, REGISTER NOW!

Bib Overalls

Well-known member
Joined
Dec 4, 2006
Messages
3,318
Location
Jonesboro, Arkansas
Dirt is one of the few commodities that defies the law of supply and demand. There is an almost infinite supply. But you will have to pay dearly to get rid of the 80 to 100 cubic yards of dirt that you don't need and dearly to get the kind of dirt that you do need. If your dirt broker (excavating contractor) is on the ball he will sell your excess dirt to someone else who needs it. Happens around here all the time.
 
OP
R

Ray-CA

Well-known member
Joined
Jan 6, 2007
Messages
3,451
Location
San Diego CA
Dirt is one of the few commodities that defies the law of supply and demand. There is an almost infinite supply. But you will have to pay dearly to get rid of the 80 to 100 cubic yards of dirt that you don't need and dearly to get the kind of dirt that you do need. If your dirt broker (excavating contractor) is on the ball he will sell your excess dirt to someone else who needs it. Happens around here all the time.

He did that with the foot or so of top soil but the rest of it.....nobody wants it!

Ray
 
OP
R

Ray-CA

Well-known member
Joined
Jan 6, 2007
Messages
3,451
Location
San Diego CA
Well, all the "bad" dirt is out and now we start to fill and compact. Looks like it's going to take twice the estimated cubic yardage of fill to get this up to grade.

If things go as planned, we'll be ready for concrete Monday (Tuesday at the latest.)

Ray
 

Attachments

  • Compaction results.JPG
    Compaction results.JPG
    127.7 KB · Views: 288
  • Compaction testing-01.JPG
    Compaction testing-01.JPG
    134.2 KB · Views: 176
  • 3rd layer.JPG
    3rd layer.JPG
    122.8 KB · Views: 150
  • F&C-02.JPG
    F&C-02.JPG
    127.4 KB · Views: 132
  • Fill & compaction-01.JPG
    Fill & compaction-01.JPG
    124.4 KB · Views: 152

Bib Overalls

Well-known member
Joined
Dec 4, 2006
Messages
3,318
Location
Jonesboro, Arkansas
Did you have to hire a soils engineer? I'm thinking that deep hole was something of a budget buster. All that money and you are basically right back where you started. Cutting corners always comes back to bite you. Doing the job right is always the best way.
 
OP
R

Ray-CA

Well-known member
Joined
Jan 6, 2007
Messages
3,451
Location
San Diego CA
Did you have to hire a soils engineer? I'm thinking that deep hole was something of a budget buster. All that money and you are basically right back where you started. Cutting corners always comes back to bite you. Doing the job right is always the best way.


Yep the city required a geo-tech report but the bids all stated that the ground work would be done "per the specification of the geo-tech report." There in about a $1000 is extra work but the rest is all covered in the contract price. The same contractor that is doing the digging is also the concrete guy. I'd rather do it right than do it over.

Ray
 
Last edited:
OP
R

Ray-CA

Well-known member
Joined
Jan 6, 2007
Messages
3,451
Location
San Diego CA
Looks pretty residential, where about in San Diego? Love to see some pictures from the street, house etc. to set the stage.

Here are a few shots showing the approach and one of the front of the house. The garage is being built in the N/E corner of the lot with the entrance being on the west facing wall. Access is along the west side of the lot where we have a double wide gate (basically an RV access.)

Ray
 

Attachments

  • Pullin' in.JPG
    Pullin' in.JPG
    117.6 KB · Views: 120
  • Makin' the turn.JPG
    Makin' the turn.JPG
    118.2 KB · Views: 111
  • A bit closer.JPG
    A bit closer.JPG
    117.9 KB · Views: 117
  • There's the new garage.JPG
    There's the new garage.JPG
    121.4 KB · Views: 114
  • Headin' up the driveway.JPG
    Headin' up the driveway.JPG
    125.9 KB · Views: 122
  • 100_2436 (2).jpg
    100_2436 (2).jpg
    143.3 KB · Views: 174
OP
R

Ray-CA

Well-known member
Joined
Jan 6, 2007
Messages
3,451
Location
San Diego CA
Not a whole lot of interesting stuff today. More fill-compact-fill stuff. But, it looks like one more layer (about 8-9 inches worth) and we'll be ready to start the gravel-sand-vapor barrier etc. in preparation for the concrete work.

Ray
 

Attachments

  • Almost there!.JPG
    Almost there!.JPG
    122.1 KB · Views: 67
  • Like a tractor square dance.JPG
    Like a tractor square dance.JPG
    122.2 KB · Views: 64
  • About 9-inches to go..JPG
    About 9-inches to go..JPG
    117.4 KB · Views: 88

astroracer

Well-known member
Joined
Jun 22, 2005
Messages
3,001
Location
Mid_Michigan
No chance of building a pole barn instead of a stick built? Sure would have simplified the prep work. Peel out the topsoil (which is salable) a layer of compacted sand and pore on top of that... With all of the added cost and headaches of a stick built I would never consider going that route with a workshop build.
Mark
 
OP
R

Ray-CA

Well-known member
Joined
Jan 6, 2007
Messages
3,451
Location
San Diego CA
No chance of building a pole barn instead of a stick built? Sure would have simplified the prep work. Peel out the topsoil (which is salable) a layer of compacted sand and pore on top of that... With all of the added cost and headaches of a stick built I would never consider going that route with a workshop build.
Mark

Yes it certainly would have been easier and simpler to build (and believe me I looked hard at that option.) The City will only allow pole barns for RV storage and not in our neighborhood. It has taken almost 2-years of design and back-n-forth with the City to get to this point. We've taken 2-feet off the height and 10-feet off the width to pass code (plus jumped through hoops etc.)

My wife offered to sell this place and buy another home but I turned that down. But, it's almost done and soon we'll be pouring concrete-framing etc.

Ray
 
Last edited:
OP
R

Ray-CA

Well-known member
Joined
Jan 6, 2007
Messages
3,451
Location
San Diego CA
Final excavation done....

Well, all the extra excavation costs are in. Almost $11k in additional expenses not including a goof by the survey company which required another 10x35x4 to be dug (but they are paying for that.)

Started framing for the pour today and I'll have photos up later when they are done. Sand goes in tomorrow along with the re-bar. Rough plumbing will also be in today with the under ground electrical sweep.

Should be able to start framing the structure on the 10th or 11th so we are keeping our fingers crossed.

Ray
 

Attachments

  • Foundation ex-02.JPG
    Foundation ex-02.JPG
    121.1 KB · Views: 142
  • Foundation ex-01.JPG
    Foundation ex-01.JPG
    121.6 KB · Views: 135
  • Foundation ex overview.JPG
    Foundation ex overview.JPG
    124.3 KB · Views: 140
  • Forms up ready for sand.JPG
    Forms up ready for sand.JPG
    121.6 KB · Views: 135
  • FURFS.JPG
    FURFS.JPG
    120.4 KB · Views: 133
  • Most important room....JPG
    Most important room....JPG
    124.6 KB · Views: 140
Last edited:
OP
R

Ray-CA

Well-known member
Joined
Jan 6, 2007
Messages
3,451
Location
San Diego CA
Ready for inspection and then concrete on Tuesday

The sand base and re-bar went in Friday. Inspection Monday, concrete on Tuesday. Material drop and framing start Wednesday.

Ray
 

Attachments

  • Re-bar 04.JPG
    Re-bar 04.JPG
    123 KB · Views: 123
  • Re-bar 03.JPG
    Re-bar 03.JPG
    119.2 KB · Views: 109
  • Re-bar 02.JPG
    Re-bar 02.JPG
    123.6 KB · Views: 115
  • Re-bar 01.JPG
    Re-bar 01.JPG
    123.7 KB · Views: 122
OP
R

Ray-CA

Well-known member
Joined
Jan 6, 2007
Messages
3,451
Location
San Diego CA
Poured concrete today!!!!

2.5 trucks, 6-hours of work and we finally have a slab 28'x30'x5". Framing starts tomorrow as soon as the material gets here. Until then we'll be digging electrical and sewer trenches.

Ray
 

Attachments

  • Concrete-09.JPG
    Concrete-09.JPG
    120.8 KB · Views: 147
  • Concrete-08.JPG
    Concrete-08.JPG
    124 KB · Views: 147
  • Concrete-06.JPG
    Concrete-06.JPG
    126.4 KB · Views: 160
  • Concrete-05.JPG
    Concrete-05.JPG
    125.3 KB · Views: 138
  • Concrete-04.JPG
    Concrete-04.JPG
    124 KB · Views: 136
  • Concrete-03.JPG
    Concrete-03.JPG
    127 KB · Views: 137
  • Concrete-01.JPG
    Concrete-01.JPG
    136.9 KB · Views: 141
Last edited:
OP
R

Ray-CA

Well-known member
Joined
Jan 6, 2007
Messages
3,451
Location
San Diego CA
A couple of shots from my neighbors yard. The garage is located in the N/E corner of the lot with a 14ft door on the west wall. There is a bathroom going into the S/W corner and the first 8-ft from the south wall will be attic storage trusses with an 8ft ceiling. The remaining 22ft are scissor trusses with a 12ft ceiling at the peak.
 

Attachments

  • Concrete-10.JPG
    Concrete-10.JPG
    126.9 KB · Views: 142
  • Concrete-12.JPG
    Concrete-12.JPG
    125.9 KB · Views: 122
OP
R

Ray-CA

Well-known member
Joined
Jan 6, 2007
Messages
3,451
Location
San Diego CA
1st day of framing.....

...man these guys are FAST!!! The walls are up and 5-trusses set.

Ray
 

Attachments

  • Hey, I'm saving $50hr doing this myself.JPG
    Hey, I'm saving $50hr doing this myself.JPG
    127.3 KB · Views: 149
  • End of the day-02.JPG
    End of the day-02.JPG
    126.5 KB · Views: 147
  • End of the day-01.JPG
    End of the day-01.JPG
    124.4 KB · Views: 159
  • 1st truss.JPG
    1st truss.JPG
    127 KB · Views: 147
  • 1st wall.JPG
    1st wall.JPG
    126.9 KB · Views: 148

Mystic142

Well-known member
Joined
Dec 22, 2011
Messages
46
Location
Creedmoor, NC
Nuclear Density testing seems to be way overkill for a garage project. However, it is a very effective way to get compaction density and much faster than a sand cone.
 

redturbo

Member
Joined
Apr 7, 2013
Messages
22
Location
Alberta
I'm going to ask cause I don't know. What is the issue with clay? Where I'm from, the grass is taken off, then the black dirt/top soil to get to the clay. Then clay is used to get above grade, then either slab or grade beam is poured. Please fill me in, thanks.
 
To avoid these ads, REGISTER NOW!
OP
R

Ray-CA

Well-known member
Joined
Jan 6, 2007
Messages
3,451
Location
San Diego CA
I'm going to ask cause I don't know. What is the issue with clay? Where I'm from, the grass is taken off, then the black dirt/top soil to get to the clay. Then clay is used to get above grade, then either slab or grade beam is poured. Please fill me in, thanks.

According to the soil engineer and the testing, the soil is very expansive. Lower numbers are better and ours was at the top of the scale (120.) We had to fill the foundation with compacted fill. The clay, I believe, will liquify in earthquakes allowing the building to move than desired.

Anyway, the bottom line is the City wouldn't pass us for the foundation inspection if we had built on clay. Not quite sure that I understand all the science, but that's the reason.

Ray
 
OP
R

Ray-CA

Well-known member
Joined
Jan 6, 2007
Messages
3,451
Location
San Diego CA
I was out of town the last couple of days and my wife took some photos while I was gone. Trusses are up, sheathing (wall and roof) is done, the windows and door are in and the garage door has been ordered.

Ray
 

Attachments

  • Doors on the south wall.JPG
    Doors on the south wall.JPG
    124.2 KB · Views: 172
  • East wall.JPG
    East wall.JPG
    122.3 KB · Views: 159
  • North wall.JPG
    North wall.JPG
    124 KB · Views: 173
  • 1st beer in the garage.JPG
    1st beer in the garage.JPG
    126.4 KB · Views: 256
  • Looking north.JPG
    Looking north.JPG
    126.3 KB · Views: 209
  • Looking south.JPG
    Looking south.JPG
    126.9 KB · Views: 194
Last edited:
OP
R

Ray-CA

Well-known member
Joined
Jan 6, 2007
Messages
3,451
Location
San Diego CA
Not much to report.....

...just some trenches dug, inspection and back fill. Water (to the garage and for the fire sprinklers) sewer and electrical. Put an 1.5" pipe with a pull tape in one of the trenches for "just in case" later.

Next is roofing/siding and fire sprinkler installation with the hope to get inspected and signed off Monday or Tuesday.

Ray
 

Attachments

  • water line-01.JPG
    water line-01.JPG
    121.5 KB · Views: 55
  • DSCN0753.JPG
    DSCN0753.JPG
    135.5 KB · Views: 49
  • DSCN0752.JPG
    DSCN0752.JPG
    121.2 KB · Views: 55
OP
R

Ray-CA

Well-known member
Joined
Jan 6, 2007
Messages
3,451
Location
San Diego CA
Shingled and vents installed

The roof got completed Friday. There are a total of 5-roof vents. I know that seems like a lot for 840-sqft but the 2-dormer vents are for the attic space over the shop area, 1-turbine vent is placed over the attic loft/storage area and the remaining 2-turbines will have ducting installed to vent shop. This, I hope will keep the air moving enough that I won't need to install a rear door or window. Ceiling fans are also in the plans as is insulation.

The bathroom got framed, rocked and the toilet installed as well. Got rid of the funky construction toilet that was along the side of the house.

Ray
 

Attachments

  • attic vents.JPG
    attic vents.JPG
    125.4 KB · Views: 102
  • south.JPG
    south.JPG
    129.3 KB · Views: 95
  • western roof.JPG
    western roof.JPG
    131.7 KB · Views: 106
  • DSCN0767.JPG
    DSCN0767.JPG
    128.3 KB · Views: 122
OP
R

Ray-CA

Well-known member
Joined
Jan 6, 2007
Messages
3,451
Location
San Diego CA
Fire sprinklers and electrical work...

The fire sprinklers went in on Saturday and were finished up today (Monday.) We also got the electric done today and are just waiting for the inspection on Tuesday, then the wait for SDG&E to do the dis-connect/re-connect. After that, flip the 100-amp breaker and we've got power to the garage.

Ray
 

Attachments

  • Sprinkler-02.JPG
    Sprinkler-02.JPG
    136.1 KB · Views: 67
  • Sprinkler-01.JPG
    Sprinkler-01.JPG
    136.9 KB · Views: 60
  • Fire sprinkler manifold.JPG
    Fire sprinkler manifold.JPG
    122.8 KB · Views: 64
  • 100amp garage panel.JPG
    100amp garage panel.JPG
    122.5 KB · Views: 55
  • Where the old 50amp panel was.JPG
    Where the old 50amp panel was.JPG
    125.2 KB · Views: 58
  • New 200amp panel.JPG
    New 200amp panel.JPG
    123.8 KB · Views: 57
  • New electric.JPG
    New electric.JPG
    128.3 KB · Views: 57
OP
R

Ray-CA

Well-known member
Joined
Jan 6, 2007
Messages
3,451
Location
San Diego CA
Almost all done...

Soffits done, three walls sided, remaining wall needs 3.5 rows of siding to be done. Caulking, painting, a little finish work, final electrical hook-up (SDG&E has been scheduled) and we'll be done. Today was the end of 5-weeks since we started. Paint tomorrow if it's not to windy. Not to bad of a schedule.

Ray
 

Attachments

  • West wall-done.JPG
    West wall-done.JPG
    126.8 KB · Views: 82
  • South wall-done.JPG
    South wall-done.JPG
    126.6 KB · Views: 78
  • Soffits-done.JPG
    Soffits-done.JPG
    124.5 KB · Views: 79
OP
R

Ray-CA

Well-known member
Joined
Jan 6, 2007
Messages
3,451
Location
San Diego CA
That was quick Ray! So are you going to finish it inside then?

Sometime down the road a bit. I want to get inside and see where I want to put things etc. Plus, we took a pretty big hit $$$$ with extra cost on the excavation that sucked some money that was being held back for stuff.

Ray
 
OP
R

Ray-CA

Well-known member
Joined
Jan 6, 2007
Messages
3,451
Location
San Diego CA
Final inspection done and we passed!!

We had our final building inspection Monday. He found two very minor issues (a miss wired outlet and we didn't have a back-flow valve on the hose bib.) 5-minutes to correct both and the Inspector passed us on Tuesday.

Here are some shots of the new lights on the south and west walls. We also got a call from the concrete contractor this afternoon. He finished a job early and can start our driveway/parking pad tomorrow instead of the 19th! 2-weeks early....I'll be able to drive on it and get the Roadster in it's new home by the end of August.

We moved all the holiday decorations etc. from the old 1-car garage to the storage area above the french-doors (8x8x5) lots of left over room up there, enough for a new engine maybe?

Ray
 

Attachments

  • New light-01.jpg
    New light-01.jpg
    57.8 KB · Views: 51
  • New light-02.jpg
    New light-02.jpg
    78.1 KB · Views: 62
OP
R

Ray-CA

Well-known member
Joined
Jan 6, 2007
Messages
3,451
Location
San Diego CA
Building is done....

...for now, until the wallet recovers a bit. The driveway and parking pad should be poured no later then Wednesday.

Ray
 

Attachments

  • Driveway-02.jpg
    Driveway-02.jpg
    130.2 KB · Views: 39
  • Driveway-01.jpg
    Driveway-01.jpg
    122.4 KB · Views: 42
  • New light-02.jpg
    New light-02.jpg
    78.1 KB · Views: 41
  • New light-01.jpg
    New light-01.jpg
    57.8 KB · Views: 29
OP
R

Ray-CA

Well-known member
Joined
Jan 6, 2007
Messages
3,451
Location
San Diego CA
Driveway got poured!!!!

Truck and crew showed up right on time. 2 full trucks (20-yards) later we had a driveway and parking pad. 24-hrs later they returned to power wash the top-cast treatment off the cement and we had a finished driveway and pad. Wait 2-weeks to drive on it, 4-weeks to seal it but I can finally fully move in by the end of September.

Ray
 

Attachments

  • Driveway-22.jpg
    Driveway-22.jpg
    77.3 KB · Views: 108
  • Driveway-21.jpg
    Driveway-21.jpg
    94.6 KB · Views: 122
  • Driveway-20.jpg
    Driveway-20.jpg
    76.3 KB · Views: 112
  • Driveway-19.jpg
    Driveway-19.jpg
    89.1 KB · Views: 108
  • Driveway-18.jpg
    Driveway-18.jpg
    136.6 KB · Views: 142
  • Driveway-12.jpg
    Driveway-12.jpg
    111.1 KB · Views: 116
  • Driveway-10.jpg
    Driveway-10.jpg
    128.5 KB · Views: 94

Hephaestus29

Well-known member
Joined
Mar 13, 2011
Messages
2,975
Location
Indianapolis
Looks Nice, were you just saving money by not pouring the middle ? What do you plan for the middle of the driveway ? Grass??
 
OP
R

Ray-CA

Well-known member
Joined
Jan 6, 2007
Messages
3,451
Location
San Diego CA
Looks Nice, were you just saving money by not pouring the middle ? What do you plan for the middle of the driveway ? Grass??

Not trying to save money (that ship sailed a few thousand ago!) The home was built in 1939 and had this style of driveway when it was new. We're trying to bring back the 1939 feeling. There will be a low grow ground cover planted in that area, a drainage system leading to a pop-up drain at the southern end of the planted area. The City is real picky about run off (to the point that you can't allow run off while washing your car) so, my stuff is 140-ft away from the street and behind a 7-ft gate.

Ray
 
OP
R

Ray-CA

Well-known member
Joined
Jan 6, 2007
Messages
3,451
Location
San Diego CA
Not to much to report. We did just finish a 9x12 redwood deck off the south end.

That pile of dirt under the tarp came from the driveway excavation and is going to be used when we terrace the back and side yards.

Ray
 

Attachments

  • DSCN0916.jpg
    DSCN0916.jpg
    128.4 KB · Views: 80
  • DSCN0917.jpg
    DSCN0917.jpg
    124.5 KB · Views: 64
  • DSCN0919.jpg
    DSCN0919.jpg
    102.6 KB · Views: 59

MrMark

Well-known member
Joined
Jan 25, 2010
Messages
4,626
Location
Southern Cal.
That's a quality build right there. Nicer than your house. If an earthquake comes I assume you will be running to the garage.

On the electrical, how did they get what I'm assuming is the UFER wire INSIDE the 2" main conduit? You don't have 2" elect conduit all the way back to the house? Did you use direct bury until the EL up through the garage foundation?

You are lucky, I don't know exactly where in SD county you are, but parts of San Diego are the nicest in the U.S. other than the islands. Certainly, the most ideal climate in the U.S.
 
Last edited:
OP
R

Ray-CA

Well-known member
Joined
Jan 6, 2007
Messages
3,451
Location
San Diego CA
... If an earthquake comes I assume you will be running to the garage. Yes we are!

On the electrical, how did they get what I'm assuming is the UFER wire INSIDE the 2" main conduit? You don't have 2" elect conduit all the way back to the house? Did you use direct bury until the EL up through the garage foundation? Look at image 4, in reply #25. The UFER wire is external to the conduit. The 2" conduit does go all the way back to the house (about 80-ft.)

You are lucky, I don't know exactly where in SD county you are, but parts of San Diego are the nicest in the U.S. other than the islands. Certainly, the most ideal climate in the U.S.

Thanks for the compliments. We did a lot of work with more still to come. Where in So. Cal are you?
 

MrMark

Well-known member
Joined
Jan 25, 2010
Messages
4,626
Location
Southern Cal.
I see that now Ray, looks good.

I was looking at post 15 where I see the UFER wire in the conduit, but now I see that the free end of the wire was just looped up and put in the top of the conduit to protect it. I misread the picture. I am in Newport Beach.
 

MrMark

Well-known member
Joined
Jan 25, 2010
Messages
4,626
Location
Southern Cal.
I've been looking at a few builds recently, and yours really stands out for overall construction strength and quality. It says something about the CA/SD building codes.

So a few questions:

So on the pour, they popped the forms off the inside of the stem wall and finished the inside as they were pouring out the slab? Cool one shot pour. What was the process there? How deep are the footings?

Did you pour that slab level?

How deep did you run that electrical conduit? 18 inches to top?

What did you run for water supply? plastic or soft copper? How deep?

How did you tie in sewer?

Is this 2X4 or 2X6 construction? Looks like 2X4.

You don't need AC I assume.

Is that Hardi or Certainteed Cement siding?

Why did you use those lap clips?

No plinth blocks for the lights?

Any pan under the french door?

The boxed soffits are nice and code I assume.

Why is the vapor barrier UNDER the sand? Wouldn't it do more good on top of the sand?

I know that is common old school CA way to build but I was wondering if newer builds had switched to the barrier on top. From my reading, I probably would have made them put it on top.
 
Last edited:
To avoid these ads, REGISTER NOW!
Top Bottom