Bigblue&Goldie
Well-known member
It's been a while since I've actually made anything, but I (mostly) finished up a project I've had on the backburner for a while that some of the board's shooters might find interesting. Last year I started to streamline my reloading, which has resulted in me rearranging my reloading bench. Part of that is I wanted a way to mount some of my various tools to the bench in a secure fashion, but still have them quickly removed. I've decided to sink some 1/4"-20 anchors into my butcher block top and have my various tools mounted to 4"x6" plates with a corresponding hole pattern for socket head cap screws. I've yet to drill my bench for the anchors.....
First, here's the "universal" plate that everything starts with. I'm not sure what the material grade is, but they're .500" thick, 4"x6"ish bar stock. This one is actually a spare for a future tool, so it's blank other than the mounting holes. The holes are all drilled .281", then a counterbore was used, followed by a countersink to remove the sharp edge.

First tool I mounted was my old Forster case lathe. I used some SS button head 6-32 screws from another project that happened to be the perfect size. Simple drill and tap. There are 4 total screws, 2 on the backside out of view.
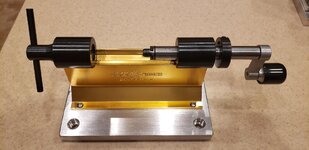
Next is the Primal Rights priming tool....an absolute work of art! The maker is a little kooky, but his products are beautiful. This one required (2) 3/8"-24 bolts. I only had some grade 8 hardware on hand, but I'll pick up some nice round head hex screws next time I'm at the hardware store.
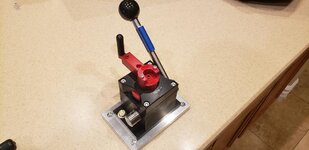
Next up was something I've been wanting for a while. I have tried various methods for cleaning my rifles throughout the years. Everything from using their respective bipod, to a Tipton gun vise. Ultimately, nothing has been great. I designed this vise strictly for cleaning, with an additional purpose of mounting optics. The goal was to be able to stick a heavy *** target rifle barrel in the vise, crank it down, and be able to clean the rifle without having to hold it while working the cleaning rod ( ).
).

The key elements were big ol' knobs to grab( ), spring loaded top, soft rubber to protect the nicer gun barrels finishes.

The top plate was machined to allow for tilt caused by the barrel contour. 2 piece coned washers allow for bind free movement.

Here is an exploded breakdown of the parts. The base is the same "universal" plate as the other tool mounts. The padded jaws were made as separate pieces in case I wanted to make a different set down the road. The rubber is some outrageously expensive stuff that is chemical resistant and super sticky. The pads are 4"x4"X.500". It sits recessed into plates that are machined down .125" to locate it, and then clamped down on either side. Clamping hardware is SS 1" 10-32 bevel head screws leftover from another project that happened to work perfectly. The studs are 3/8"-16 on the base side and 3/8"-24 where the knobs thread on. The springs are flat ground so they sit nicely. All of the hardware came from McMaster Carr.

I would've liked to have had all of this stuff hard anodized, but the barstock was pretty rough. Instead, I'm sending it all to @CudaChick1968 to have her powdercoat it semi-gloss black. I'll post some follow up pics when I get it all coated and the bench top drilled......whenever that happens.
First, here's the "universal" plate that everything starts with. I'm not sure what the material grade is, but they're .500" thick, 4"x6"ish bar stock. This one is actually a spare for a future tool, so it's blank other than the mounting holes. The holes are all drilled .281", then a counterbore was used, followed by a countersink to remove the sharp edge.
First tool I mounted was my old Forster case lathe. I used some SS button head 6-32 screws from another project that happened to be the perfect size. Simple drill and tap. There are 4 total screws, 2 on the backside out of view.
Next is the Primal Rights priming tool....an absolute work of art! The maker is a little kooky, but his products are beautiful. This one required (2) 3/8"-24 bolts. I only had some grade 8 hardware on hand, but I'll pick up some nice round head hex screws next time I'm at the hardware store.
Next up was something I've been wanting for a while. I have tried various methods for cleaning my rifles throughout the years. Everything from using their respective bipod, to a Tipton gun vise. Ultimately, nothing has been great. I designed this vise strictly for cleaning, with an additional purpose of mounting optics. The goal was to be able to stick a heavy *** target rifle barrel in the vise, crank it down, and be able to clean the rifle without having to hold it while working the cleaning rod (
).The key elements were big ol' knobs to grab(
), spring loaded top, soft rubber to protect the nicer gun barrels finishes.The top plate was machined to allow for tilt caused by the barrel contour. 2 piece coned washers allow for bind free movement.
Here is an exploded breakdown of the parts. The base is the same "universal" plate as the other tool mounts. The padded jaws were made as separate pieces in case I wanted to make a different set down the road. The rubber is some outrageously expensive stuff that is chemical resistant and super sticky. The pads are 4"x4"X.500". It sits recessed into plates that are machined down .125" to locate it, and then clamped down on either side. Clamping hardware is SS 1" 10-32 bevel head screws leftover from another project that happened to work perfectly. The studs are 3/8"-16 on the base side and 3/8"-24 where the knobs thread on. The springs are flat ground so they sit nicely. All of the hardware came from McMaster Carr.
I would've liked to have had all of this stuff hard anodized, but the barstock was pretty rough. Instead, I'm sending it all to @CudaChick1968 to have her powdercoat it semi-gloss black. I'll post some follow up pics when I get it all coated and the bench top drilled......whenever that happens.
Last edited:
 Not bleeding right now but I'm not doing anything either, Harry