To avoid these ads, REGISTER NOW!

Hand tool restoration challenge contest (Read post #1 for the rules)

Shiftless

Well-known member
Joined
Mar 9, 2014
Messages
14,553
Location
East Bay SFO
I’m starting a thread that will challenge your tool restoration skills.

The idea is to find a tool in your stash of old junk that you maybe or maybe not were planning on restoring or at least making it useable and not be ashamed of how it looks.

To participate, you have to post several good pictures of your restoration candidate and promise to send it to another GJ member at your own expense.

(edit: 6/6/22… let’s limit the shipping expense to reasonable $$…international shipping might be too much to expect, right? donors have the right to opt out)

If you see something you’d like to have, you have to post on this thread and publicly pledge to do the restoration work and finish within 30 days. Then post back on this thread with before and after pictures. After you finish of course you can keep the item. But if you don’t finish in time, you will be subject to some penalty I haven’t thought of yet. :) (any ideas for that??)

If any of you have suggestions to make this more fun or interesting for the group, please let me know.
 
Last edited:
To avoid these ads, REGISTER NOW!
OP
S

Shiftless

Well-known member
Joined
Mar 9, 2014
Messages
14,553
Location
East Bay SFO
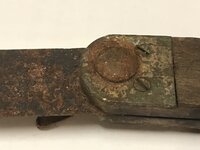
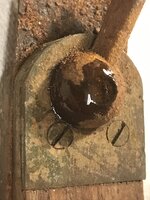
To get started, here is an angle gauge or whatever you want to call it that I found at the recycling center this afternoon. I’ll mail it to you (no charge) if you pledge to restore it and show pics and tell a good story on this thread.

It‘s probably rosewood with brass fittings. The steel slider and the lever is rusted up tight.
It might be a Stanley but I can’t see any markings. There is no finger recess like you see on many similar tools.

GOOD LUCK !


3EF6A782-A347-4E72-AC83-0346516C0173.jpegEA24A595-8007-4D59-BB8D-F83F31AA6ABC.jpeg44EBAF34-9708-4D4D-80B4-F74F4BD41FE7.jpeg
 
Last edited:

d42jeep

Well-known member
Joined
Oct 22, 2014
Messages
16,568
Location
Northern California
I have a Stanley marked one of those sitting on my workbench with a missing screw. I started cleaning it up but I haven’t figured out what to do with it. If you swing by and pick it up, you can complete the restoration on your rusty find yourself. No mail involved. 😉 I run across projects like that fairly often that I can add to this thread.
-Don
 
OP
S

Shiftless

Well-known member
Joined
Mar 9, 2014
Messages
14,553
Location
East Bay SFO
Thanks Don

I might be overestimating the number of people who are looking for low value restoration projects to arrive in the mail with additional pressure to perform. :)
 

Dumber than lumber

Well-known member
Joined
Dec 19, 2015
Messages
1,927
To get started, here is an angle gauge or whatever you want to call it that I found at the recycling center this afternoon. I’ll mail it to you (no charge) if you pledge to restore it and show pics and tell a good story on this thread.

It‘s probably rosewood with brass fittings. The steel slider and the lever is rusted up tight.
It might be a Stanley but I can’t see any markings. There is no finger recess like you see on many similar tools.

GOOD LUCK !


EA24A595-8007-4D59-BB8D-F83F31AA6ABC.jpeg44EBAF34-9708-4D4D-80B4-F74F4BD41FE7.jpeg
That is not an "angle gauge". It is a bevel. It is used to transfer angle; a gauge would be used to measure.
In my experience the blade would have maker name stamped on it. Rather doubt it is a Stanley.
 
OP
S

Shiftless

Well-known member
Joined
Mar 9, 2014
Messages
14,553
Location
East Bay SFO
DTL:
Thanks for your reply and further info on that tool.
If nobody steps up to claim it for restoration, I guess I’ll have to do it myself.
 

crguy

Well-known member
Joined
Jan 24, 2016
Messages
2,658
Location
SW Washington
DTL:
Thanks for your reply and further info on that tool.
If nobody steps up to claim it for restoration, I guess I’ll have to do it myself.
The truth is that most collectors wouldn't consider a very common tool like that, in that condition, to be worth "restoration".
 

SilverDeck

Well-known member
Joined
Jun 7, 2016
Messages
481
Ok, what the heck, I will give it a shot. I will see what I can do in 30 days. Does the clock start ticking when the tool arrives in the mailbox? I will PM you my address, Shiftless. Thank you for the challenge. I hope I can salvage something out of this... Stay tuned.
 
OP
S

Shiftless

Well-known member
Joined
Mar 9, 2014
Messages
14,553
Location
East Bay SFO
First up at the plate is Silverdeck !
Thanks for taking up the challenge.
Yes, the 30 day clock starts ticking when you receive the item.
Post on this thread when you receive it and details of what you plan for the work.
 
  • Like
Reactions: LSU

SilverDeck

Well-known member
Joined
Jun 7, 2016
Messages
481
I can post some "sight unseen intended plans" on how I would attack this, which may be subject to change upon personal examination fo the piece:

Task #1 will be getting it apart. Essentially it appears there are three materials we are dealing with on the tool: wood (species unknown: perhaps rosewood, maybe walnut), brass, and steel (ferrous metal). The blade, blade screw, and lever (nut) are all ferrous metal (steel) and have rusted and seized. Some penetrating oil soaking into on the blade screw and lever (nut) will hopefully allow the lever to be removed and the the blade screw can be driven out. Removing the blade screw will free the blade from the handle.

With all of the ferrous components removed, the de-rusting process can begin on those. I plan to soak those components in household vingear for an unknown amount time to covert the rust to an oxide that can be easily be wire-brushed away. After brushing the ferrous components will be sprayed with WD-40 to dispace any residual water. After drying the can be wire brushed and sanded. The blade is likely will have some rust pitting. The goal will be to get it back down to sound steel. Once all of the ferrous componets have been cleaned up, they will be heated with a hair dryer for an application of paste wax and then buffed with a cotton cloth.

Assuming that I can accomplish that, the two brass plates at the pivot end of the handle should be able to be remvoed by loosenng the four slotted screws that hold them to the handle. There are another pair of brass plates at the **** end fo the handle and how these are secured remains to be seen. There appear to be a ferrous metal fastener (pin?) that joins these from side to side. Not sure yet if the **** plates will be removable or if it will be best to try to leave them in place. The brass components can be gentle sanded with fine sandpaper to remove the surface corrosion and oxidation and then coated with paste wax after warming.

The wood handle will need to be lightly sanded and then oiled. Treatment of the wood will depend on what type of wood it turns out to be.

With all of the individual components dealt with, the comes reassembly. The brass plates go back onto the wood handle. Then the steel blade and blade screw are inserted and fastened with the lever (nut).

The above is all speculation based on what I can see in the images posted. Acutal treatment may vary depending out whether or not these plans at disassembly are successful.
 

PugetDude

ALLIANCE MEMBER
Joined
Mar 13, 2013
Messages
22,421
Location
Superstition Mountains, AZ
In 30 days we'll be seeing an eBay listing for a:

RARE OPPORTUNITY
For the connoisseur of fine objects, we present this stellar example of industrial design and old-world craftmanship.
One of the finest examples of a professionally restored antique Bevel Gauge you are likely to encounter, believed to be from the iconic Stanley Works of New Britain, Connecticut, USA.
Solid Old-growth Rosewood handle, lovingly hand-rubbed with 15 coats of Pink Ebony oil to a lustrous finish.
Hand-burnished and polished High carbon Sheffield Steel blade, with lively character markings from the hands of the master craftsman/caretaker who previously cherished it.
Blued and polished original locking lever, with a crisp close and positive engagement.
Gleaming solid brass bolsters, enhanced with 7 coats of painstakingly applied Definitive Wax Marble.
Presented in a exqisite carrying case crafted from free-range rich Corinthian leather.
Insured International shipping is available at additional charge

Investment: $2,495.00 shipped anywhere in the Continental Unted States, a nominal fee will be added to discerning buyers form Canada, Alaska, or Hawaii.
 
Last edited:
OP
S

Shiftless

Well-known member
Joined
Mar 9, 2014
Messages
14,553
Location
East Bay SFO
P.D. :
You made my day with your brilliant parody of what‘s happening in some corners of EBay. “LOL“ doesn’t start to cover my reaction.

4E0251B5-C584-4CD0-B6B7-2BFC0D3C12E0.jpeg
 
  • Like
Reactions: LSU

SilverDeck

Well-known member
Joined
Jun 7, 2016
Messages
481
The t-bevel that Shiftless sent arrived Friday morning (1/14/2021) so the 30 day clock began ticking. Shot a few pics right out of the box. This thing was locked up tight! The steel screw and steel lever nut were rust-fused together. Freeing them would be step #1 in order to get the bevel apart.
 

Attachments

  • B39FE179-2B56-4628-BF8B-3552E0B30A70.jpeg
    B39FE179-2B56-4628-BF8B-3552E0B30A70.jpeg
    138.6 KB · Views: 68
  • 60622718-E9F5-49E1-9C55-6B2782CC585B.jpeg
    60622718-E9F5-49E1-9C55-6B2782CC585B.jpeg
    138.5 KB · Views: 61
  • 627D8DC0-D77D-4E66-B1B0-EF5631AD79AE.jpeg
    627D8DC0-D77D-4E66-B1B0-EF5631AD79AE.jpeg
    237.2 KB · Views: 61
  • A2EA731E-FC76-4CFB-9542-DB75D59956EF.jpeg
    A2EA731E-FC76-4CFB-9542-DB75D59956EF.jpeg
    218.6 KB · Views: 60
  • DA3D61A2-90E7-4B96-A72C-98D9F15FAD49.jpeg
    DA3D61A2-90E7-4B96-A72C-98D9F15FAD49.jpeg
    161.2 KB · Views: 93
Last edited:

SilverDeck

Well-known member
Joined
Jun 7, 2016
Messages
481
After 2 1/2 days of penetrating oil drops and hammer taps, I am officially declaring victory over the rust-fused screw and nut. At first there was just an almost imperceptible amount of movement. More oil. More hammer taps. Tap, oil, let it sit. Then repeat. Again and again. Finally the hammer taps started to move the lever nut. Enough movement eventually that I could grab it with the pliers and spin it until it finally came off. The nut, screw and blade went immediately into an Evaporust soak where the will remain for many days. We will see what this blade ends up looking like. It is pretty corroded and will likely be heavily pitted. We will have to wait and see.
 

Attachments

  • EB7A323D-9552-4409-9DE9-B46D117166E5.jpeg
    EB7A323D-9552-4409-9DE9-B46D117166E5.jpeg
    282 KB · Views: 99
  • DD548072-ED98-4069-8812-09A78188EC42.jpeg
    DD548072-ED98-4069-8812-09A78188EC42.jpeg
    343.1 KB · Views: 152

SilverDeck

Well-known member
Joined
Jun 7, 2016
Messages
481
While the ferrous metal parts are doing their thing in the "Evaporust Spa", I started working on the rosewood (pretty sure it's Brazilian rosewood) and brass handle. Someone had taken a file or rasp to one side ‘of it at some point and removed some wood, leaving deep gouges. I don’t know yet if I will be able to completely sand these out or not. For now they have been smoothed and I will keep working to see if I can remove the gouges completely without losing too much more rosewood in the process. I treated the rosewood with some Danish oil to put moisture and color back into it. Looks and feels world’s better already. Little bit of metal polishing on the brass ends.
 

Attachments

  • 489E299A-D402-4609-8BB4-7EA21C56010D.jpeg
    489E299A-D402-4609-8BB4-7EA21C56010D.jpeg
    195.1 KB · Views: 152
  • 71B65F2D-FA76-48D8-A7CC-4EF67086DFF9.jpeg
    71B65F2D-FA76-48D8-A7CC-4EF67086DFF9.jpeg
    194 KB · Views: 148
Last edited:

SilverDeck

Well-known member
Joined
Jun 7, 2016
Messages
481
Here is my best guess at a similar example of what this t-bevel would have looked like. This one is from an old eBay sale. At least on this example, there was a name stamped into the wood on the thumb nut side of the handle. On the piece that I am working on, that happens to be the side where the filing/rasping occurred. So if there was any name stamped there, it was obliterated long ago. This example doesn't have any markings on the blade, so it is doubtful that there will be any on the one I am cleaning up either. Even in there had been, the heavy corrosion probably would have removed it.
 

Attachments

  • antique-henry-disston-rosewood-brass_1_c48fcb8f462656b2d58e787b674e28c6.jpg
    antique-henry-disston-rosewood-brass_1_c48fcb8f462656b2d58e787b674e28c6.jpg
    298.1 KB · Views: 138
  • antique-henry-disston-rosewood-brass_1_c48fcb8f462656b2d58e787b674e28c6 (3).jpg
    antique-henry-disston-rosewood-brass_1_c48fcb8f462656b2d58e787b674e28c6 (3).jpg
    285.8 KB · Views: 80
  • antique-henry-disston-rosewood-brass_1_c48fcb8f462656b2d58e787b674e28c6 (2).jpg
    antique-henry-disston-rosewood-brass_1_c48fcb8f462656b2d58e787b674e28c6 (2).jpg
    197.3 KB · Views: 80
  • antique-henry-disston-rosewood-brass_1_c48fcb8f462656b2d58e787b674e28c6 (1).jpg
    antique-henry-disston-rosewood-brass_1_c48fcb8f462656b2d58e787b674e28c6 (1).jpg
    271.7 KB · Views: 98
To avoid these ads, REGISTER NOW!

SilverDeck

Well-known member
Joined
Jun 7, 2016
Messages
481
Working on this handle of this tool has reminded me of the incredible beauty of Brazilian rosewood (Dalbergia nigra). In 1992 the CITES (Convention on the International Trade of Endangered Speices) treaty declared Brazilian rosewood an endangered species and prohibited its import or export. Prior to this date it had been a heavily-harvested species to supply to the furniture industry, the musical instrument industry (primarily stringed instruments like guitars) as well as the tool industry. Brazilian rosewood was heaviliy used by toolmakers such as Stanley to make levels, workworking plane handles and knobs, try square handles, and t-bevel handles.

In the case of the t-bevel that I'm now working on for the hand tool restoration challenge, more than likely whoever left the bevel at the recycling center didn't realize (or, more likely didn't care) that the handle was made from the wood of a now-endangered species.

Here are a few links if you would like to learn more about Brazilian Rosewood.

The Cadillac of Wood: Brazilian Rosewood

Tools for Woodworking blag: Before the CITES List: Endangered Materials Used in Tools

The Wood Database: Brazilian Rosewood

Brazilian Rosewood

 
Last edited:

Private Lugnutz

Well-known member
Joined
Mar 30, 2012
Messages
30,629
Location
The Authentic Jersey Shore
I might be overestimating the number of people who are looking for low value restoration projects to arrive in the mail with additional pressure to perform.
I think the premise of the thread is a terrific idea, Shifty, combining fellowship and workmanship - on the clock, to boot, and the promise of it being an interesting, insightful, educational follow is being amiably demonstrated by your first ̶v̶i̶c̶t̶i̶m̶ volunteer!

If anything has been overestimated, I would suggest that it might be the number of people who have restoration projects that they are willing to give up! :)
 
OP
S

Shiftless

Well-known member
Joined
Mar 9, 2014
Messages
14,553
Location
East Bay SFO
The screw and nut are out of the Evaporust with excellent results. The blade is still “cooking”.
Great work so far SilverDeck! 🍻
Your use of the term “cooking” makes me remember how slowly Evaporust works at temps maybe 60 and below. What’s the temp of your Evaporust bath? I sometimes use a 25 watt aquarium heater to give the juice some boost even though the wintertime temp of my unheated and uninsulated garage is around 62
 

y'sguy

Well-known member
Joined
May 1, 2010
Messages
1,331
Location
Tulsa, Oklahoma
Very cool idea on the challenge. I am eager to watch how things unfold (no pun intended) I'll have to hunt around and see if there is something I can scrounge up.
Great job so far on the bevel gauge.
 

SilverDeck

Well-known member
Joined
Jun 7, 2016
Messages
481
Here is the blade out of the Evaporust. Rust free, but badly pitted as I suspected.
 

Attachments

  • 93128B74-D538-49A7-9773-0C84CB466280.jpeg
    93128B74-D538-49A7-9773-0C84CB466280.jpeg
    243.4 KB · Views: 160
  • 52EB6549-2489-4691-A548-38F7007649AA.jpeg
    52EB6549-2489-4691-A548-38F7007649AA.jpeg
    229.7 KB · Views: 185

SilverDeck

Well-known member
Joined
Jun 7, 2016
Messages
481
The bevel is back together now. I did a light little light sanding on the blade to take off the peaks of the roughness and aloe the blade to slide smoothly. I could have kept going until all of the pitts were sanded out, but I would have lost a considerable amount of blade thickness in the process. Sometimes you just have to know when to stop.

This thing looks pretty good when it is closed. When opened, the pitted end of the blade is visible. The bevel operates perfectly. And locks up solid just like it should. So it is a perfectly functional tool again now, just bearing a few scars from the wars that it has been through.
 

Attachments

  • 9DBFAA19-8B77-4F08-8355-0A2B2A40BFC9.jpeg
    9DBFAA19-8B77-4F08-8355-0A2B2A40BFC9.jpeg
    361 KB · Views: 183
  • 53C506AA-4FE1-4428-B2D5-A1E6483CBB05.jpeg
    53C506AA-4FE1-4428-B2D5-A1E6483CBB05.jpeg
    381.3 KB · Views: 176
  • 8ECDE35B-2CDB-4537-85CC-0459644CF946.jpeg
    8ECDE35B-2CDB-4537-85CC-0459644CF946.jpeg
    348.2 KB · Views: 188
Last edited:

SilverDeck

Well-known member
Joined
Jun 7, 2016
Messages
481
I think we successfully brought this one back from the dead. What do you think?

Restoration time: 4 days (1/14/2022 to 1/17/2022)

Evaporust baths were done in a plastic container in the basement utility room. Evaporust temp was room temperature (approx 68 degrees F).
 

Attachments

  • 4982B07C-5EA7-4481-88C8-74EB27E292AA.jpeg
    4982B07C-5EA7-4481-88C8-74EB27E292AA.jpeg
    395.9 KB · Views: 211
  • 622C3325-02A7-48BA-BF6B-C466F5951BCD.jpeg
    622C3325-02A7-48BA-BF6B-C466F5951BCD.jpeg
    331 KB · Views: 184
Last edited:
OP
S

Shiftless

Well-known member
Joined
Mar 9, 2014
Messages
14,553
Location
East Bay SFO
The first winner of the hand tool restoration challenge is SilverDeck who hit it out of the park at his first time at bat on this thread. And finished in “record time” :). Congrats!

OK…is anybody going to dig up a hand tool that is worthy of restoration and send it free to another victim volunteer member for challenge #2 ???

(Thank you Lugz for the victim volunteer angle. I really like it.)
 
Last edited:

SilverDeck

Well-known member
Joined
Jun 7, 2016
Messages
481
Thank you!

I gotta admit, though, that there was a moment after a couple days of repeatedly oiling that thumb nut and screw without getting it to move that I began to have some serious doubts that I would be able to pull this off. I could picture the “inaugural tool restoration challenge” as going down in flames.

Fortunately time, patience, and Liquid Wrench won the day in the end
 

don long

Well-known member
Joined
Mar 31, 2012
Messages
8,852
Location
southern california
I am willing to play if one of you guys want to part with some Blackhawk tools for my display board
I'll look tomorrow for a few tools to offer up. I'm sure that there is something out in the shed that will qualify.
 
OP
S

Shiftless

Well-known member
Joined
Mar 9, 2014
Messages
14,553
Location
East Bay SFO
Thanks for dropping in Don.
Your tool and equipment restorations show the highest level of expertise and attention to detail that I have ever seen. 🍻
 
OP
S

Shiftless

Well-known member
Joined
Mar 9, 2014
Messages
14,553
Location
East Bay SFO
Agreed! I like that you didn't go farther with the brass bolsters, either.

A classic "Save", SilverDeck!

Definitely right there Lugz.
IMHO, a mirror finish on the brass bits would have been showy but inappropriate. I do the mirror finish on the brass bolsters of my 50 year old Buck 112 pocket knife (but that’s a different thread).
 

RivennHewn

Well-known member
Joined
Jun 4, 2011
Messages
10,376
Location
PNW
I’ll throw out a draw knife.

I picked this up while out in the hills of Palm Desert.

It was in a pile of junk, miles from the nearest road.

I have given you a head start on this one. It’s rust free, and I got started on the edge.
But it stalled out there. Ready for you to have your way with it.

free shipping in the USA

1642729240436.jpeg
1642729305578.jpeg
1642729351592.jpeg
 
To avoid these ads, REGISTER NOW!
Top Bottom