To avoid these ads, REGISTER NOW!

Harbor Freight 68" toolbox

alinc100

Well-known member
Joined
May 26, 2013
Messages
3,027
Location
Dearborn,MI
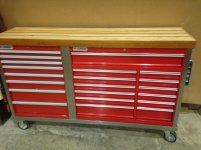
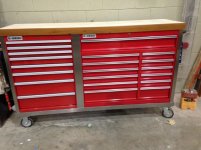
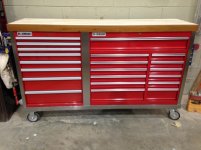
Harbor Freight (almost) 69" toolbox

Yep, not a typo as of today there is a HF (almost) 69",21 drawer toolbox.
001 (Medium).JPG

002 (Medium).JPG

003 (Medium).JPG

004 (Medium).jpg

005 (Medium).jpg

006 (Medium).jpg

007 (Medium).jpg

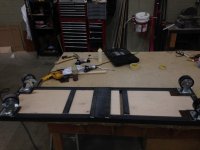
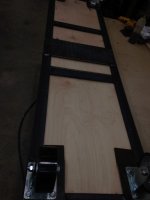
I drew up a plan for a frame this weekend after I had acquired both boxes.
This was accomplished by shopping at 2 HF stores. The metal shop suggested some steel angle and flat stock. I am not a welder so a case of beer goes a long way to get projects completed.(Thanks Ray!!)
I removed the casters from the 44" box and mounted them onto the steel and plywood frame. I think the casters are plenty strong in this application.
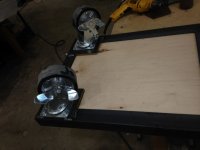
They are all drilled and tapped into the steel framing and bolted with tee nuts in the plywood through a welded steel gusset. I added two center gussets to install center casters if the need arises. A simple lift with the forklift and bolt on, I tapped the holes while I had easy access on the bench.
If I ever need to repair/replace a caster it can be done without removing the boxes from the frame. This will save on having to unload the box if the task is required.
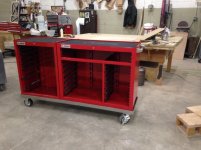
I built up the inside of the frame with plywood to allow for the different heights of the two boxes. The 26" cabinet is about an 1 1/2" taller than the 44" cabinet.
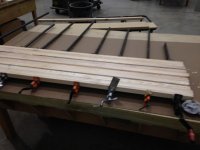
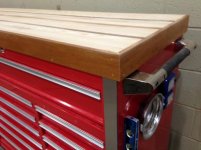
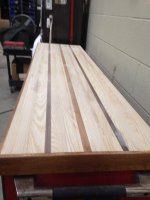
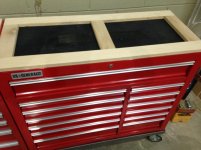
I laminated the sides and front edge of the steel cart with an aluminum product that mimics brushed stainless steel .In the future I plan to make a butcher block top from some 2" ash I have stored in my garage attic along with the possibility of more Alumasteel trim /corner protectors. I am happy to have gotten it to this point and with a couple extra hours after work tomorrow I may be able to get most of my tools moved over and begin the task of dividers/organizers/etc.

As of now it is definately a work -in-progress but for a change I am making progress.
Thanks for looking,
Andy
 
Last edited:
To avoid these ads, REGISTER NOW!
OP
A

alinc100

Well-known member
Joined
May 26, 2013
Messages
3,027
Location
Dearborn,MI
Unfortunately the pics aren't loading for me...

I am attaching them as thumbnails .Hopefully they work and can be seen.
 

Attachments

  • 007 (Medium).jpg
    007 (Medium).jpg
    90.4 KB · Views: 420
  • 006 (Medium).jpg
    006 (Medium).jpg
    82.2 KB · Views: 299
  • 005 (Medium).jpg
    005 (Medium).jpg
    76.6 KB · Views: 267
  • 004 (Medium).jpg
    004 (Medium).jpg
    89.6 KB · Views: 237
  • 003 (Medium).JPG
    003 (Medium).JPG
    132.6 KB · Views: 237
  • 002 (Medium).JPG
    002 (Medium).JPG
    110 KB · Views: 211
  • 001 (Medium).JPG
    001 (Medium).JPG
    98.1 KB · Views: 247

daparrothead

Well-known member
Joined
Dec 21, 2013
Messages
200
Turned out real nice, I think I would acquire another set of the swivel caster and go ahead and install them in the middle .
 

Hpozzuoli

Well-known member
Joined
Dec 11, 2013
Messages
3,428
Location
Rhode Island
Finish it off with some chrome strips on the corners and where the boxes join together. I think that would make it look factory original. That's a good idea that surprises me nobody else has come up with.
 

jim1987

Banned
Joined
Feb 16, 2014
Messages
3,582
Location
Ohio
Hey thanks for the thumbnails. That looks great. The butcher top will make that thing ****.
 

zkling

Well-known member
Joined
Jan 23, 2007
Messages
16,939
Wow, that came out really slick. A little more storage than a 44" with two side cabinets but for less $. I take it the height of the boxes is the same or did you shim one? The way the top rails on the boxes line up makes it really go together well. I bet it's the only one in the shop.....for now. :thumbup:


Finish it off with some chrome strips on the corners and where the boxes join together. I think that would make it look factory original. That's a good idea that surprises me nobody else has come up with.

:+1: Maybe some aluminum T, not only for looks, but to prevent anything from dropping between the boxes. If your luck is anything like mine, and I hope not for your sake, items will seem to gravitate towards that gap and be lost for ever. :willy_nil
 
Last edited:
OP
A

alinc100

Well-known member
Joined
May 26, 2013
Messages
3,027
Location
Dearborn,MI
Wow, that came out really slick. A little more storage than a 44" with two side cabinets but for less $. I take it the height of the boxes is the same or did you shim one? The way the top rails on the boxes line up makes it really go together well. I bet it's the only one in the shop.....for now. :thumbup:


:+1: Maybe some aluminum T, not only for looks, but to prevent anything from dropping between the boxes. If your luck is anything like mine, and I hope not for your sake, items will seem to gravitate towards that gap and be lost for ever. :willy_nil

Zach,
I shimmed the boxes to sit level.The 26" box has a piece of 1/2" ply underneath it to make it solid,helped out by a couple grooves where the steel is formed/bent.The 44" is built up underneath with an 1 11/16" of plywood to get the two boxes to plane out level. I am gonna start tomorrow on milling out a butcher block top from ash and a few other selected hardwoods. I plan to get a little artsy/creative with the top and have some fun with it.That will close/cover the gap on the top and some trim strips will wrap the front corners and seam . it's all in my head right now and hopefully it will turn out as good as I hope.I have a tendency to start fast and hard and fall off at the end and never quite finish or end up cutting corners.
 

JimNut

Active member
Joined
Apr 16, 2012
Messages
29
Location
North of Detroit
Very nice! I was going to build a frame for my setup as well but got lazy. I originally started out with the 26" top and bottom boxes but quickly ran out of room. I then purchased an end cabinet and put it on the 26" box after adding some braces underneath. Ran out of room again and bought the 44" box which is what I should have done from the beginning. Atleast I shouldn't run out of room for a while!

Here's a pic of my setup. Don't mind the mess. Currently re-doing some shelves so the garage is trashed.
jyveduhe.jpg
 

Givl Reggin

Banned
Joined
Oct 11, 2008
Messages
936
Location
Hawaii, USA
44 + 26 = 70. Not 68.

Not necessarily... I assume the 44" & 26" are overall dimensions and include the handles? So, it might just in fact be close to 70" overall without the handles on the one side.

Nice looking setup. Only thing I would have done differently would be to cut off the lip on the top of both boxes so that the boxes can be bolted together and the seam between them would be less noticeable.
 
To avoid these ads, REGISTER NOW!
OP
A

alinc100

Well-known member
Joined
May 26, 2013
Messages
3,027
Location
Dearborn,MI
44 + 26 = 70. Not 68.


Sent from my iPhone using Tapatalk

yeah just checked on my calculator, its 70 lol

Not necessarily... I assume the 44" & 26" are overall dimensions and include the handles? So, it might just in fact be close to 70" overall without the handles on the one side.

Nice looking setup. Only thing I would have done differently would be to cut off the lip on the top of both boxes so that the boxes can be bolted together and the seam between them would be less noticeable.

The boxes actually measure(not including handles) at 26 3/4" and 42 1/8" which for those who are keeping track adds up to 68 7/8" accounting for the bent steel lips.I made the cart slightly wider,69 1/4" I.D. to insure there were no fitment problems or hard to grind corner welds preventing it from slipping in or damaging the corners of the boxes.

The top seams will be covered by an end to end butcher block hardwood top I was hoping to start fabricating today but the temps are single digits and I am out of propane in the garage,so it may wait a week or two.
The front seam and corners are going to get trimmed out in aluminum to hide the front seam and protect the corners.

I do not think that drilling and bolting the cabinets together ,as they sit now is necessary. I will state that they would physically be a stronger,more solid unit if bolted ,but I don't see the need to drill holes in the sides just yet.
I may pull out a drawer or two and see if the threaded inserts for the handles/side box line up and something could be done that way.I honestly did not look or even think of that until I began writing this sentence.

I do wish that the boxes matched a bit better in color and in handles/drawer fronts but for the $700 I have into it I am very happy.
The two cabinets do have distinct differences I like the ease of the slides on the 26 7/8" cabinet better than the 42 1/8" cabinet. The detents are softer and in my opinion easier to open and close.
I cannot say that one or the other is more secure when rolling the box as I have not moved it anywhere yet.
 
OP
A

alinc100

Well-known member
Joined
May 26, 2013
Messages
3,027
Location
Dearborn,MI
Well the last couple nights I have stayed late at work to mill and glue up some hardwood for the top work surface.
I had roughly milled the stock to 2"x2" over the weekend but its just too cold to continue in my garage. The shop at work is much,much larger and alot warmer.

None of the boards I am using are spectacular, high end furniture boards but quite good for my current needs. I squared/flattened all the stock on the jointer,planer and tablesaw.

When finished the top will be about 70" long x 18 1/2" wide.
I got the top glued and into clamps this afternoon.Tomorrow when my shift ends I will scrape any excess glue off and probably have the top machined for finish thickness.
I used Ash and the darker contrast strips are Walnut and Cherry.
 

Attachments

  • 001.jpg
    001.jpg
    123.7 KB · Views: 168
  • 002.jpg
    002.jpg
    126.8 KB · Views: 165
  • 004.jpg
    004.jpg
    135.8 KB · Views: 182
OP
A

alinc100

Well-known member
Joined
May 26, 2013
Messages
3,027
Location
Dearborn,MI
Any update on the top? This is a great looking box BTW

Thanks for the compliment. I have not had a chance to do any more to the top.I am waiting for our CNC operator to drop it on the table between the paying jobs. I am going to hand rout where the lips of the boxes meet as soon as I get it sized and see which side becomes the best face after surfacing.
I do have some Waterlox wiping varish/tung oil ready to go so after a quick sanding/smoothing session I should start to see the beauty of the wood shining thru.Hopefully get some progress/photos soon.
 
OP
A

alinc100

Well-known member
Joined
May 26, 2013
Messages
3,027
Location
Dearborn,MI
I had a couple more hours to spare after work today so I began fitting the top and trim onto the box. I built a plywood web frame to eliminate the need to rout the hardwood top around the seam/joint/edges of the boxes.
After a finish is applied I will screw the plywood to the underside of the top.
I fitted some pre-finished poplar trim around 3 sides to capture the top onto the box.

The aluminum trim is just temporarily taped up to get an idea of what it looks like and for me to decide if I like the look or not.The problem with the voices in my head is they talk too much and I get a lot of ideas but grow weary of implementing them.

Tomorrow I hope to get to some finish sanding/smoothing along with a coat of Waterlox varnish. I figure somewhere around 6-8 light coats should suffice.
 

Attachments

  • 007 (Medium).jpg
    007 (Medium).jpg
    93.7 KB · Views: 253
  • 006 (Medium).jpg
    006 (Medium).jpg
    80.2 KB · Views: 241
  • 005 (Medium).JPG
    005 (Medium).JPG
    133 KB · Views: 237
  • 004 (Medium).jpg
    004 (Medium).jpg
    91.8 KB · Views: 232
  • 003 (Medium).jpg
    003 (Medium).jpg
    83.6 KB · Views: 207
  • 002 (Medium).jpg
    002 (Medium).jpg
    86.1 KB · Views: 184
  • 001 (Medium).jpg
    001 (Medium).jpg
    87 KB · Views: 192

stage20

Well-known member
Joined
Nov 5, 2013
Messages
3,722
Location
pcola FL
nice work and that is a nice drawer layout for what i would want to do with it. the different shape handles and the handle finish being off would drive me nuts.

says the guy with a black lower and a dark green upper box. :)
haha
 

Chadwilliam1

Well-known member
Joined
May 13, 2012
Messages
2,788
Location
Cincinnati
I did something similar with my Snap on boxes at work. I suggest you add two more casters at least. I have 6 casters on mine but I dont move it much but I really need to add four more. I have some very heavy tools in mine. I am industrial maint and I welded fork boots on mine.

Op looks good, trust me before you get it loaded down put more casters on it. you will not regret it.
 
OP
A

alinc100

Well-known member
Joined
May 26, 2013
Messages
3,027
Location
Dearborn,MI
OK I finally got it finished.I wiped on 5-6 coats of Waterlox over the last week or so and Monday I got the top placed on the box and was able to get some pics before I start piling **** on top.Currently I am in the mode to clear the top as the day is over but knowing me it won't be long before that fad is over.
I don't think the I-Phone takes the greatest pics. The wood has a nice light amber tone to it pictures are kinda deceiving.
 

Attachments

  • 007 (Medium).jpg
    007 (Medium).jpg
    85.5 KB · Views: 147
  • 004 (Medium).jpg
    004 (Medium).jpg
    79.6 KB · Views: 151
  • 003 (Medium).jpg
    003 (Medium).jpg
    70.7 KB · Views: 157
  • 002 (Medium).jpg
    002 (Medium).jpg
    90.5 KB · Views: 153
  • 001 (Medium).jpg
    001 (Medium).jpg
    84 KB · Views: 195

jmlcolorado

Well-known member
Joined
Sep 23, 2009
Messages
794
Location
Elbert County, CO
Damn you!!!!
I've been very close to building a Steevo style setup with 2 44's, but this looks fantastic!
I REALLY like the top! I think the only thing I would do different is to overhang the front and sides of the top 1" from the boxs. My current top is flush and it makes a bear to sweep stuff off into a dust pan when you can't place the pan below the edge.

Other than that, :rocker::rocker::rocker:
 

zkling

Well-known member
Joined
Jan 23, 2007
Messages
16,939
Wow, that turned out great. One sharp setup, especially for the investment.
 
OP
A

alinc100

Well-known member
Joined
May 26, 2013
Messages
3,027
Location
Dearborn,MI
Ok on Friday I had a little free time and when no-one was looking I was able to cut some Alumasteel laminate to trim out my box a little further.
On the 13 drawer side the laminate slid right into channels in the aluminum extrusion pulls.On the 8 drawer side I used a clear double sided tape similar to 3M's vhb tape. I had tried bending the Alumasteel laminate in an "L" shape brake but the edge wasn't clean and crisp so I went with the overlay.There is just enough detail on the pulls on the cabinet to give a place to register the trim to look right to my eye. I'd have been happier if they had been made of similar construction/made by the same process but I think my laminating gives the box a better continuity than it had before. Pics are via Iphone,not the worst I've seen.
 

Attachments

  • 001 (Medium).jpg
    001 (Medium).jpg
    96.9 KB · Views: 198
  • 002 (Medium).JPG
    002 (Medium).JPG
    138.6 KB · Views: 164
  • 003 (Medium).JPG
    003 (Medium).JPG
    143.9 KB · Views: 153
  • 004 (Medium).JPG
    004 (Medium).JPG
    143.1 KB · Views: 169
  • 005 (Medium).jpg
    005 (Medium).jpg
    95.7 KB · Views: 201

Toxicscrew

Well-known member
Joined
Nov 22, 2006
Messages
296
Location
Saint Louis, MO
Great job man!

I second the removal of the emblems. Not because they are HF, but because they mess up the clean look. I'd take them off if they were SO, Mac, whomever. But that's me, you keep it how you like.
 

Matt_C

Well-known member
Joined
Apr 24, 2014
Messages
218
Location
London, UK
Looks really good. I also endorse the emblem removal - at the very least, pull the one off the larger cab. And if it were me, I'd trim down the alu strip covering the join/gap between the boxes, as it looks too thick compared to the side/corner strips, and the base section.

Other than that, looks great!
 
To avoid these ads, REGISTER NOW!
Top Bottom