Innovate1
Well-known member
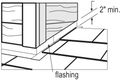
Have 1st gen Hardie siding on the house and garage. Installed in 2004. I think they changed their process and improved it somewhat since then. Seems like the product isn't very solid inside - kind of powdery and probably absorb moisture. So is there something I could put on the spots where the paint has flaked off that is thinner and will penetrate a bit to firm things up? Above the garage OHD I have other issues going on as well as some chipping . Have never been able to keep the jamb board (the one flat against the top of the opening) from pulling down. Suspect it may be from moisture getting behind the siding but this side faces away from the direction of most weather so maybe not. Have considered pulling the trim board off and putting a z flashing above it. Any ideas?
. Have never been able to keep the jamb board (the one flat against the top of the opening) from pulling down. Suspect it may be from moisture getting behind the siding but this side faces away from the direction of most weather so maybe not. Have considered pulling the trim board off and putting a z flashing above it. Any ideas?