To avoid these ads, REGISTER NOW!

Hardwood Flooring for workbench top

DC50

Member
Joined
Nov 30, 2018
Messages
6
Location
Atlanta, GA
Hey everyone, I'm new to this site, so if this thread belongs elsewhere, please point me in the right direction, preferably with only light-to-moderate berating :lol2:.

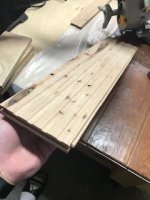
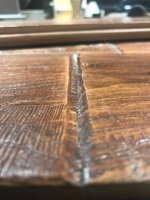
I recently came into possession of about 250 square feet of hickory hardwood flooring (tongue and groove). I'm planning on replacing the tops of my 3 workbenches with this wood, all of which currently are topped with 3/4" plywood screwed to a bed of 2x4's spanning the entire length and width of the bench. My work benches are 4'x8', 2'x7', and 2'x4'. Actually, I'm not actually "replacing" the tops, but adding the flooring on top of the plywood. I've already started doing so on my 4'x8' when I realized I should check to see if there is a better/best way of doing it. Currently, I've been gluing the individual pieces to each other, then when I have about a 4 sqft section, I would glue that to the plywood top (see pics). The glue I'm using is Titebond3. I also have Titebond 2, but using 3 because it's waterproof, vs. 2 being only water resistant.

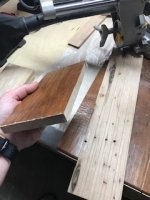
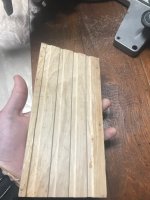
I checked several message boards and saw one person suggest ripping off the tongue and grooves of each piece, planing the bottom to remove those grooves, then gluing each piece to the table individually. This actually seems more appealing to me, as it would seem to make for a better fit. I've posted a pic below of a couple of boards where I've done this in case the way I described it wasn't clear.

The main concern I have is that I saw quite a few people mention the wood expanding/contracting, and the issues this can cause when the wood is glued or nailed to the plywood, as opposed to a floating top.

Any/all suggestions are welcomed and encouraged!
 

Attachments

  • bench1.jpeg
    bench1.jpeg
    37.4 KB · Views: 246
  • wood5.jpeg
    wood5.jpeg
    32 KB · Views: 235
  • wood4.jpeg
    wood4.jpeg
    29.4 KB · Views: 219
  • wood3.jpeg
    wood3.jpeg
    31.2 KB · Views: 225
  • wood2.jpeg
    wood2.jpeg
    31.1 KB · Views: 221
  • wood1.jpeg
    wood1.jpeg
    27.8 KB · Views: 202
  • bench2.jpeg
    bench2.jpeg
    35.3 KB · Views: 219
To avoid these ads, REGISTER NOW!

Voi

Well-known member
Joined
Oct 10, 2010
Messages
5,148
Location
Western South Dakota
Is this a pre-finished, "hand-scraped" hardwood? Is there a V-groove between two planks when the tongue and groove are set?

If so, I'd be inclined to keep the bottom grooves and plane the finish, the hand-scraped texture off until it's a flat surface. If the V-groove is still present maybe take off a bit more.

Do you condition the garage in winter or summer?

I assume snow melt in a garage in Atlanta is a rare occurrence?
 

lilredex

Well-known member
Joined
Apr 29, 2006
Messages
5,956
Location
Toronto
Looks good to me as in that last picture, as long as the cracks between the
boards don't bother you. Cut them (T&G) off if they do. Gluing is forever.

Would love to find some hickory like that......we never see that around here.
 
OP
D

DC50

Member
Joined
Nov 30, 2018
Messages
6
Location
Atlanta, GA
Is this a pre-finished, "hand-scraped" hardwood? Is there a V-groove between two planks when the tongue and groove are set?

If so, I'd be inclined to keep the bottom grooves and plane the finish, the hand-scraped texture off until it's a flat surface. If the V-groove is still present maybe take off a bit more.

Do you condition the garage in winter or summer?

I assume snow melt in a garage in Atlanta is a rare occurrence?

-It is pre-finished, yes.
-As far as hand-scraped, unfortunately I'm not exactly sure what that means, so I can't answer that question.
-Regarding the V-grooves, if you're talking about what I think you are, then yes, but only slightly. I've posted a close-up pic below - lemme know if that's what you're referring to. Also, when I cut/rip off the tongue/grooves, that completely eliminates the v-groove issue (again, if you're referring to what I think you are).

-I like the look of the finish as is, but I took your suggestion and planed a small board to try and get an image of how it would look if the entire surface was like that (see attached pic), and honestly now I'm torn, because the wood's grain shows up rather nicely, and will do so even more on the larger boards. The board below is the smallest size I have. The longest is somewhere around 5-6 feet (I've never measured these).

I don't do anything specific to condition the garage, but it is fairly well conditioned already - It was below freezing a couple of days last week and I was comfortable in shorts/t-shirt in the garage. It does get hotter than I like in the summer, but not unbearable.

And yes, snow melt is very, very rare.


Looks good to me as in that last picture, as long as the cracks between the
boards don't bother you. Cut them (T&G) off if they do. Gluing is forever.

Would love to find some hickory like that......we never see that around here.

The cracks between the boards don't bother me, but I do like the look better then the tongue/grooves are cut off, it's a much "cleaner" look. On the other hand, it feels more secure putting them together with the tongue/grooves - that's one of the main reasons I'm having trouble deciding which way to go.

I got very lucky with the wood. My parents were remodeling their house, and the supplier made a mistake and quoted them the price of a much cheaper type of flooring. They realized their mistake before any of the flooring was installed, but they honored their quote nonetheless (which amounted to a discount of well over 50%). I was the lucky recipient of the extra.

I would be inclined to nail it like you would on a floor .
it looks to be engineered?

I am considering nailing it - would that allow for more expansion?

And no, it is not engineered. Each panel is one solid piece of hickory.
 

Attachments

  • endgrain.jpeg
    endgrain.jpeg
    56.8 KB · Views: 123
  • v-groove?.jpeg
    v-groove?.jpeg
    77.3 KB · Views: 133
  • planed top.jpeg
    planed top.jpeg
    85 KB · Views: 119
  • unplaned bottom.jpeg
    unplaned bottom.jpeg
    89.7 KB · Views: 109
Last edited:

cgrutt

Well-known member
Joined
Mar 4, 2016
Messages
8,338
As mentioned above, I'd nail it as you would a floor. Not sure about Atlanta but gluing that down to plywood is just asking for checking with seasonal movements in NY. If you want to glue it, I'd glue the hickory together but not to the plywood. Screw it from underneath at center and let it float.
 

Shiftless

Well-known member
Joined
Mar 9, 2014
Messages
14,553
Location
East Bay SFO
If you decide to glue all the T and G edges together to make one big sheet and then attach it to the plywood bench top, I would expect it to be VERY difficult to get it straight across. It is my experience that the strips would make a bow and not be one straight planer surface. I suggest getting another piece of thick plywood and placing it on top of the glue up with some very heavy weights like maybe bags of concrete or piles of bricks on top until the glue dries.
 

cgrutt

Well-known member
Joined
Mar 4, 2016
Messages
8,338
How many screws would you use, and how much spacing between them?

One in center and a few on each side of that a few inches apart. You can also slot the plywood further out and add more screws if you'd like. Idea being fix it at center and allow grain to expand and contract with seasonal movements. You can also add breadboard ends that allow same thing. Solid wood will naturally expand and contract across its grain with changes in temperature and humidity. Don't have to worry so much about movement with grain, just side to side across it. I've had solid hardwood tops check before when I didn't allow for movement.
 

Bretny

Well-known member
Joined
Jul 31, 2017
Messages
3,918
Location
Dutchess county NY
I have a bunch of red oak flooring that i plan on making a work bench top out of. My plan is to plane the bottom groves off, rip it down the center and stand it on edge then use Trod and bolt/glue it together. I should have about a 1.5in thick oak top then.
 

Cobra5150

Well-known member
Joined
Feb 2, 2008
Messages
1,955
Location
GA
Plan on those v-grooves catching a lot of dust.
Welcome fellow Georgian.
 

CraigStu

Well-known member
Joined
May 22, 2014
Messages
4,038
Location
Blacksburg, Va
The problem w/ planing it to remove the grooves is you also remove the finish. IMHO the factory finish is tougher than anything you can put on yourself.
 

DOUGD

Well-known member
Joined
Mar 15, 2011
Messages
171
If expansion and contraction is a concern,leave the tounge and groove. Create a nice looking edge from 90 deg angle (maybe 1.5"x 1.5" aluminum) to hold the wood down at the perimeter of your benches and let it float .
 

jimreed2160

Well-known member
Joined
Aug 7, 2016
Messages
3,589
Location
Tallahassee FL
That is a nice stash of hickory and it should make some nice benchtops. I recently bought some cheap laminate flooring ($19 on sale) and covered a woodworkers bench as well as a workbench. The flooring replaced a sacrificial piece of Masonite on the woodworkers bench and fit into a recess. The pieces snapped together and made a floating top. I added a few countersunk sheetrock screws to hold it in place. Same deal for the other workbench. It is a Kobalt toolbox bottom with an oversized plywood top. A picture of that one is attached.

Your situation is a little different because you have actual wood with T&G joints. The T&G is a time tested joint that allows for wood expansion and contraction so gluing it down defeats the purpose of the joint. I would toenail it in place just like a floor. Since it is a workbench top, not many nails are needed. After it is in place, I would band the top edges with round over trim.

My European beech workbench is in my garage. During the seasons the 24" top moves over 1/2". It is very thick top with breadboard ends that are probably pinned in the center. So I think wood movement in your shop is a real issue. Let your flooring float like it should and it will be happy for a long time. Good luck with your project.
 

Attachments

  • DSCN8156.jpg
    DSCN8156.jpg
    148.5 KB · Views: 118
To avoid these ads, REGISTER NOW!

matt_i

Well-known member
Joined
Mar 14, 2008
Messages
10,730
Location
SE Michigan
I did a project like this in the late 1990s. Used 3/4" thick maple flooring, T+G, this was unfinished. I used a floor nailer and put the pieces in like that although some were glued. I used a solid door as the base so it was plenty thick.

I glued some pieces as I recall, the hardest was getting the "edge banding" correct because the flooring didn't have unlimited width. I ended up ripping all of the tongues of and doing some miter work.

It survived very well so far but also has had minimal use...I moved into metalworking soooo...The one thing I did was to mount my Record vise to the table ahead of the job. I used socket head screws and washers to bolt it thru, but I didn't want to have the screwheads locked, forevermore into the table, so I did some bore/counterbore on a couple of pieces to fit the fasteners into the table. The frame of the bench is metal so I used the same socket-head configuration.
 

Voi

Well-known member
Joined
Oct 10, 2010
Messages
5,148
Location
Western South Dakota
-As far as hand-scraped, unfortunately I'm not exactly sure what that means, so I can't answer that question.

Hand scraped is a texture that is milled into the surface. Gives is a more rustic look, I guess. Often faux sawmill marks are also milled into these products.

If I were in your situation I would not want the V-grooves or any sort of texture on the surface. But I would want to keep the tongue and groove. Yes, the typically UV cured factory finish is really tough but I'd gladly give that up for a flat work surface and a repairable finish.

But with that said, I agree with what jimreed said. I'd just nail the surface down but do so in a way you could pull it up and plane the surface in the future.
 

PoorOwner

Well-known member
Joined
Feb 10, 2007
Messages
5,032
Location
CA
I am lazy, but I would just screw the row on the back of the bench, and then brush some wood glue on the T&G and just lay them down. Wiping the glue from the seams.

At the end of the last row, I would drill and 1/2" hole and use a washer and screw installed lightly hold it down.
the deepest bench being 4' isn't enough wood to cause an issue. Only problem is when you have a room full of them butted wall to wall, when they expand it had no where to go.

I would also use a nailer to keep it down as needed.
 

NUTTSGT

Super Moderator
Staff member
Joined
Sep 14, 2009
Messages
51,035
Location
Northern Central Ohio
Personally, I'd probably nail them like on a floor and the last section on the outside get a trim piece like aluminum angle. I think I would want to be able to replace them if need be, however, they'll probably last a long time.

That V-groove would drive me nuts though.
 

WP9

Well-known member
Joined
Nov 26, 2014
Messages
81
Good find on the tongue and groove flooring!
I had 3/8" thick tongue and groove flooring left over from a flooring install and used some of it to make a counter top in my garage. I used a 16 ga brad nailer to nail like regular flooring ( onto 3/4" plywood) and trimmed the edges with some nice maple. I did not notice any adverse expansion/contraction despite being in Michigan where the variations in temp and humidity can cause problems.
If the grooves are not problematic for you in your workbench top, by all means install it like flooring and enjoy. Hickory is one of the harder, more durable woods.
 
OP
D

DC50

Member
Joined
Nov 30, 2018
Messages
6
Location
Atlanta, GA
I really appreciate everyone's input! Sorry for not responding sooner - I'm currently in law school and have been studying all weekend for my Contracts Final tomorrow night (technically tonight at this point).

The plurality opinion seems to be to install w/nails as I would if actually installing for their intended purpose, so that's what I'll probably end up doing (when I have time, once my exams are in the rearview).

I'm also intrigued by what Bretny is planning on doing (cutting off the T/G, planing grooves, ripping down the middle and standing on edge).

Also, what would be the downside to removing the T/G, planing off the grooves, and ripping the wood to strips in order to make a sort of butcher block style top?

I can tell simply by the methods suggested and terminology used that I am in the bottom 1% in this forum in terms of experience, so please forgive me if my questions seem elementary - in addition to my relative lack of experience, my brain is shot from studying.

Last question (for now): Is there anything at all I can do/any method I can use in order to prevent the expansion/contraction issue of the wood (short of creating a climate controlled environment)?

Thanks again to everyone for your input. I probably won't make it back here tomorrow - after work I'll be studying until my exam, which won't end until 9. I'll get home and immediately crash, but will certainly be back on Tuesday.
 

JimNC

Well-known member
Joined
Jul 9, 2017
Messages
580
Location
NC
You really can’t stop the wood from moving. Wood tends to expand across grain, so a flat sawn board will expand primarily in width while a quarter sawn board will expand primarily in thickness. So, cutting the joints off and turning your flat sawn boards will result in a surface that shows less movement. BTW, this is not butcher block, that would be cutting it with end grain up, you don’t want that.

One advantage of the factory finish is that glue can likely be peeled off, especially if you wax it. For this reason I’d use it face up on the bench you use for assembly. I would either nail it down as designed or screw into it from beneath (one line of screws down the center of each board).

One other use would be to install it on a wall and hang tools on it. Leave the ends random lengths, it’ll look good.

Oh, and good luck with contracts!
 

4Kings

Well-known member
Joined
Nov 2, 2010
Messages
263
Location
Southwest Missouri
I really appreciate everyone's input! Sorry for not responding sooner - I'm currently in law school and have been studying all weekend for my Contracts Final tomorrow night (technically tonight at this point).

Good luck. I have a daughter who is a 3L at Northwestern and she said 1L was the toughest.
 

Bretny

Well-known member
Joined
Jul 31, 2017
Messages
3,918
Location
Dutchess county NY
I dont plan on taking off the tounge or grove. Just plane the expension joints off the back and rip it down the middle of the 3in width. Then turn the ripped edges up. Screw, Trod and glue it together.
 

Voi

Well-known member
Joined
Oct 10, 2010
Messages
5,148
Location
Western South Dakota
I'm also intrigued by what Bretny is planning on doing (cutting off the T/G, planing grooves, ripping down the middle and standing on edge).

Also, what would be the downside to removing the T/G, planing off the grooves, and ripping the wood to strips in order to make a sort of butcher block style top?

Last question (for now): Is there anything at all I can do/any method I can use in order to prevent the expansion/contraction issue of the wood (short of creating a climate controlled environment)?

By doing what Bretny is doing or what you mentioned in the second sentence (assuming the boards on edge) you'll have most of your expansion and contraction along the thickness of the material rather than the width.

The downside is you'll be giving up some material by making both faces flat for a glue-up. Also more labor for a busy law student not to mention dealing with end grain in your shortest pieces are shorter than the bench.

Do you have a lot of short pieces that will have to be joined end to end?
 

Milton Shaw

Well-known member
Joined
Feb 11, 2011
Messages
4,841
On T & G flooring the edges do not meet and lay flat. They are designed to always have a tight top joint and the bottom open so they can be tight on top. This makes for a board that does not glue together flat. I tried it 40 years ago with white oak strip flooring. I eventually bought a tongue and grove bit set and recut the T & G so that the boards would glue up flat. That was the only way to make the furniture I was making at the time. I would attach it like flooring to the top and then when you need to replace it you still could and reuse the plywood. Any glue use would make the whole top have to be replaced down the road. Lots of luck...
 

JAYoung

Well-known member
Joined
Jun 19, 2018
Messages
85
Location
Butte, Montana USA
I resurfaced the old, battered workbench that came with my house with a box of laminate flooring from my local Habitat ReStore last summer.
I just planed the high spots off the original surface, laid down about a dozen layers of newsprint, floated the new flooring on that and retained the edges with some aluminum molding I had laying around.
I live in a dry climate, but there's been no buckling or separation at the joints and it remains perfectly flat.
I waxed the finished surface and it is resistant to spills and as flooring it resists a lot of physical abuse.
It was cheaper than masonite and much tougher. If it gets beat up in the next decade I'll just do it again.
 

HenryAZ

MEMBER EMERITUS
Joined
Sep 18, 2012
Messages
1,054
Location
South Congress AZ
At the millwork shop where I worked for 25 years, we made our bench tops by laying T&G softwood (T&G'd it ourselves, with no V). Rough sanded the T&G top to remove any high spots. Screw the T&G boards down around the perimeter with NO glue, to allow it to move. Also screwed to a center rail that ran crossways to separate two drawers. Then we topped the bench with 1/4" tempered hardboard, which was nailed down simply with 1" brads. When necessary, we just replaced the hardboard with a new piece. Those benches lasted a long time, seeing daily 40 hour work weeks' worth of punishment.

If you topped your flooring with something like that, it would be a nice smooth surface and you wouldn't have the concern of the v-groove collecting dust. But you would lose the nice appearance of the flooring. It would still be a good solid top, though.
 
Last edited:
OP
D

DC50

Member
Joined
Nov 30, 2018
Messages
6
Location
Atlanta, GA
At the millwork shop where I worked for 25 years, we made our bench tops by laying T&G softwood (T&G'd it ourselves, with no V). Rough sanded the T&G top to remove any high spots. Screw the T&G boards down around the perimeter with NO glue, to allow it to move. Also screwed to a center rail that ran crossways to separate two drawers. Then we topped the bench with 1/4" tempered hardboard, which was nailed down simply with 1" brads. When necessary, we just replaced the hardboard with a new piece. Those benches lasted a long time, seeing daily 40 hour work weeks' worth of punishment.

If you topped your flooring with something like that, it would be a nice smooth surface and you wouldn't have the concern of the v-groove collecting dust. But you would lose the nice appearance of the flooring. It would still be a good solid top, though.

Thank you, I’ve decided this is the way I’m going to go. I’ll scrap the 5-6 boards I’ve already glued together and start over with this method; that’s what most seem to recommend. Thanks again to everyone for your input. I’ll post pictures when I’m finished.

Good luck. I have a daughter who is a 3L at Northwestern and she said 1L was the toughest.

Literally every attorney I’ve spoken with has all said the same thing: First year is the hardest, by a long shot. That’s certainly good to know, because I couldn’t promise I’d finish if it got progressively more difficult.
 
To avoid these ads, REGISTER NOW!
Top Bottom