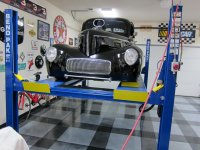
To avoid these ads, REGISTER NOW!

HD9 Installation Questions

DerStig

Well-known member
Joined
Jun 15, 2015
Messages
441
Long day:) I'll cut right to the chase:

- The lift is very wobbly and swings side to side if you push the columns. Also, most of the columns are not flush to the ground (I think the base plate isnt straight) as a result columns themselves are not straight with a level (some are crooked outwards some inwards). Any idea how to correct this?
- 2 of the safety lock air connectors are leaking air, would HD sell these, I'm hoping its the connectors themselves thats the problem.
- Do I need to put gear oil on the cables right away? Do you use a brush?
- WD-40 on the entire ladder?
- Diagonal distance is off by 1" is that ok?

It did take me and my friend about 10 hours to put this together though thanks to the poor manual:) At least it works (well sort of, it only goes up and not down:))
 
To avoid these ads, REGISTER NOW!

Z2V

Well-known member
Joined
Jul 19, 2016
Messages
418
Location
Cedar Park (Austin) Texas
Long day:) I'll cut right to the chase:

- The lift is very wobbly and swings side to side if you push the columns. Also, most of the columns are not flush to the ground (I think the base plate isnt straight) as a result columns themselves are not straight with a level (some are crooked outwards some inwards). Any idea how to correct this?
- 2 of the safety lock air connectors are leaking air, would HD sell these, I'm hoping its the connectors themselves thats the problem.
- Do I need to put gear oil on the cables right away? Do you use a brush?
- WD-40 on the entire ladder?
- Diagonal distance is off by 1" is that ok?

It did take me and my friend about 10 hours to put this together though thanks to the poor manual:) At least it works (well sort of, it only goes up and not down:))[/QUOTE

Question 4, diagonal distance needs to be right. Fix that.
Question 1, Drill your holes and bolt it down tight. Now you can plumb and level everything up. It should already be square ^^^
Question 2, where are they leaking? Threads, or hose connection? If threads retake them and try again. If hose connections, cut end off hose and try again. No, they don't sell these at HD. Fastenal has them. The hose is metric, not 1/4"
Question 3, No, you don't have to do it today and yes, you can use a brush or rag or squirt can, what ever it takes. Do so sparingly.
Question 4, I personally don't like WD-40 but lube the whole length where it rides through the guides.

What is keeping you from lowering it? Or do you know?
 

bobabuee

Well-known member
Joined
Nov 6, 2009
Messages
173
Location
HAZLETON, PA
first thing with it on 2 of 3 locks level it, if it not level shim get some metal bar stock 1x2x1/8 its not base plate it your floor, lower the lift ...then put the car on it take it up not on to locks.

let it hang 10min to preload cables then take it up with car still on the lift up and down 3 to 4 times .


its wobbly with car not on the lift no need to bolt it down. as soon as car is on it and it is on locks it will be solid i guarantee it.

did you get caster kit with it?

also check for level with car on it.


dont worry about lubing cables just add grease to pulley fittings.

air cyl leak because you didn't cut hose end straight if not cut straight it wont push all way in making cut ends over re-insert hose after get rid of the leaks remove the hoses from each cyl. spray wd-40 count 5 seconds in each hose re-connect to cyl. this brakes in the air cyl locks makes function great . no need to put a lubrication regulation on the lift every month do this. get a can pb blaster garage lube for cables use this only as wd-40 attracts dust and dirt .
 
Last edited:
OP
D

DerStig

Well-known member
Joined
Jun 15, 2015
Messages
441
I was not going to drill anything on the floor for this, are you saying I should? Even if I did, I want to use smaller anchors.

As for the leaks, one of the connectors doesnt have the white plastic piece that goes with it. Most of the connectors didnt have their brass cap on and I found them in the floor when I unbolted the unit from the metal package. I think they were very lose from the factory. Anyways, I found all the brass screws but one plastic was missing.

The other leak though has everything set properly I already redid it but will do it again.

I'm not sure how I can fix the diagonal distance. This thing is very heavy.
 
OP
D

DerStig

Well-known member
Joined
Jun 15, 2015
Messages
441
What I mean about leveling problems isnt the horizontal levelness of the runways. Thats easy to fix with the ladder bolt.

The problem I am referring to is the straightness of the columns. They are not perpendicular to the floor. And the reason for that is because baseplate is not fully straight. I noticed this when I unpackaged the unit. Its got nothing to do with my floor, my floor is actually suprisingly level. From one end to the other end of the driveway, I only have 3/4" of variation.

When I look at the unit from straight ahead (as if you would drive your car in through the ramps), so I m facing it, I see the left and right columns bending outwards if that makes sense. This is not an issue with the floor. I can see up to 1/8" of space on the edges of the baseplates.
 
OP
D

DerStig

Well-known member
Joined
Jun 15, 2015
Messages
441
Do the bottom of the safety ladders get attached to the column somehow? They are free floating. I see a hole on the column and wide space on the ladder
 
OP
D

DerStig

Well-known member
Joined
Jun 15, 2015
Messages
441
Got it working, found the plastic piece in homedepot and fixed all air leaks. Goes up and down now.

How tight are the cables supposed to be?
 

Z2V

Well-known member
Joined
Jul 19, 2016
Messages
418
Location
Cedar Park (Austin) Texas
Step 17, 11&12 on pg 28 explain the cable tension.
I'm not clear exactly what "white plastic piece" that you found at HD is but glad to hear that you have it going up and down.
Congratulations, I know you have put a lot of thought into this project
 
OP
D

DerStig

Well-known member
Joined
Jun 15, 2015
Messages
441
Step 17, 11&12 on pg 28 explain the cable tension.
I'm not clear exactly what "white plastic piece" that you found at HD is but glad to hear that you have it going up and down.
Congratulations, I know you have put a lot of thought into this project

That step explains the ladder leveling not how tight the tension cables need to be.
 
OP
D

DerStig

Well-known member
Joined
Jun 15, 2015
Messages
441
That will determine how tight the cables are.

Sorry I m not following you. The tightness of the cables change as the ladders go up and down. So its important to know how much the cables should be tightened because raising the ladders will make the cables loose.
 

Z2V

Well-known member
Joined
Jul 19, 2016
Messages
418
Location
Cedar Park (Austin) Texas
You use the ladders to level the runways while they are at rest. You adjust the cables so that the runways are level while the lift is moving up and down.
While the lift is going up, listen to the locks as they pass the holes in the ladder. Adjust the cables so the locks pass the holes in the ladder at the same time. You want to hear one "clang" sound as the locks pass, not three or four.
 
OP
D

DerStig

Well-known member
Joined
Jun 15, 2015
Messages
441
Oh I see. I have been doing this wrong then.

Another question, there are these yellow plastic things size of an iphone 6 (4 of them). What are these for? Also if I dont want the ramps to drop as I raise the lift, how can I do that?
 

kbuhagiar

Well-known member
Joined
Dec 27, 2005
Messages
1,736
Location
Escondido, CA
DerStig,

Glad to hear that all appears to be going well. :D

After intently following all of your trials and tribulations for the last few days (weeks?), we will now need some pictures of the finished product.

:needpics:

Thanks!
 
OP
D

DerStig

Well-known member
Joined
Jun 15, 2015
Messages
441
I need some help.

Put my friend's car in for the first time to test the lift and also change his oil. Car went up fine but coming down front columns started moving outwards and one of them got stuck resting on the I beam of the house. Very scary moments. I couldnt lower the lift and we literally had to use tie down straps at the top of the columns to pull the columns inward.

I dont know what i m doing wrong. I m also noticing that once the car got on the lift, the cables got very very tight like literally there is no play. Should I loosen the cables is that why the columns are flexing?
 

Z2V

Well-known member
Joined
Jul 19, 2016
Messages
418
Location
Cedar Park (Austin) Texas
Did you put your layout on the garage floor with chalk lines? Check diagonal measurement to make sure it's square? Shim and plumb the four corner post so the are plumb both directions? Lube the inside of the corner post and guides on cross beam? Are runways level both ways when lift is sitting on the locks? When raising lift were locks clanging together, are cables adjusted pretty close?
 
OP
D

DerStig

Well-known member
Joined
Jun 15, 2015
Messages
441
When I measure the width of the unit (baseplates), both front and rear are spot on at 110 1/4". The length measures 174 1/8" in one side other is 174 1/4". But the diagonal distances in the inner posts are off by 3/4 to 1". I dont know where I am going wrong.

The other thing I want to ask is my garage floor is on a slope. Should I be using shims under the columns to fix the levelness OR use the cables or ladders?

Right now I am not using shims and using the ladder and cables the runways are perfectly level in both directions - spot on. But, when I check the columns themselves obviously because of the slope of the floor, columns are not fully level themselves on their long sides.

When I look at my runways now there is about a 1.5" under the rear runway to the floor whereas the front is only 0.5". Which is expected because of the slope but when I put my level on the runway its perfectly level.
 
To avoid these ads, REGISTER NOW!

Z2V

Well-known member
Joined
Jul 19, 2016
Messages
418
Location
Cedar Park (Austin) Texas
The post need to be plumb for the lift to work smoothly. Be sure to lube the inside of the post also. If everything is plumb and square it should work just fine.
 
OP
D

DerStig

Well-known member
Joined
Jun 15, 2015
Messages
441
I will try this again today but I m really frustrated:)

- I will unload the carfrom the lift.
- I will check each baseplate and for the edge that dont touch the ground due to unevenness of the steel or the floor imperfections, install the steel shims that came with the lift so the baseplates are flush.
- I will lower the cable tension to 1" again on each corner and the ladders all the way down to 1/2" from the baseplate as per the manual. So basically at this point I am reseting everyhing.
- I will raise the lift about 2-3 feet and use cables to level the lift perfectly.
- Then I will slowly raise the lift to the next safety lock and as soon as the first lock engages I will stop the lift and raise the other safety locks until they engage. This should ensure all of them are synchronized.
- Then I will check the cable tension, if not enough tension, I will raise all 4 (to maintain levelness) until there is enough tension.

However, I still dont know as no one could tell me how much tension is enough. can it have some play or does it need to be as tense as a steel rod. How much play is enough. The instructions are terrible.
 

Z2V

Well-known member
Joined
Jul 19, 2016
Messages
418
Location
Cedar Park (Austin) Texas
Tension is not an issue here. You are not adjusting the cables for "tension". You only have one cable per corner, each cable is carrying its portion of the load. The "tension" on each cable will be dependent on the load on the lift. Don't worry about tension.
Plumb the post, make sure the post are to proper dimensions from each other. Raise lift and set on locks and level the ramps using ladders then synchronize the locks using the cables.
The instructions are good you just might need to go back and read step 17 again until it's clear to you what they want you to do. Don't overthink it.
 
OP
D

DerStig

Well-known member
Joined
Jun 15, 2015
Messages
441
This is not going well...

- I redid the entire adjustments. Now all locks engage simulatenously (literally you cannot tell them apart).
- The lift is level on its length.
- The columns are level vertically (as in with respect to the width of the 4 post lift). So when I stick the big 6 feet level on its side of each column, it shows level
- The width of the baseplates from corner to corner is 110 1/4" in one side and 110 3/8" in the other side. I have no idea why there is 1/8" variance and I dont seem to be able to do anything about it
- The length of the baseplates from corner to corner is dead on 174 1/4" on both sides
- Diagonal measurements are off by only 1/8" now.
- Each base plate is flush on the ground (otherwise they wouldnt be level).

So on the face of it, its great right? It's as perfect as its going to be.

The problem is, as the lift starts going up, when it reaches the first safety lock or so, the rear posts at the top (baseplates dont move) starts bending inwards. And the higher the lift goes the more they approach to each other and move as much as 1/4" on each side (but no more than that). Whether there is load on it or no load, its the same result.

I dont know what I am doing wrong, but this is extremely worrying to me, not only do I have I beam of the house so close to the columns or the garage tracks, but the fact that there is such play doesnt give me any confidence at all about the lift, I dont think I can get under it.

The only thing that I am suspicious of is, when I look inside of each column, the thick plastic piece that is holding the crossmember has a lot of room/play around it and in each column its in a different place. That thing is not tight at all and it might be the problem here. I can see as much as 1/4" of a gap on some corners, I dont know if thats normal.

Does anyone else have these issues? To be honest with you if I didnt have any structures around the columns (I beam or garage door tracks), I wouldnt be able to spot this. Because it is such a slow gradual motion and as I said, baseplates do not move at all. The only way you will know its moving is by getting a measuring tape and measure the columns from the top after lift is raised.

Dont know what else to do, I want to cry:( I am so tired, I have now spent combined 25 hours inside my cold garage across 3 days and I want this to be over:(
 

Z2V

Well-known member
Joined
Jul 19, 2016
Messages
418
Location
Cedar Park (Austin) Texas
I'm not a Engineer but if I'm reading you correct your post move a total of 1/4" at the top of the post between the lift being lowered or raised. I don't think I would concern myself too much over that. Personally though, I have mine bolted down. I know BendPak advertises it to be used without anchoring it but I like the security of the bolts in the floor. I don't know why they send a 3/4" wedge anchor with the lift. I think a screw anchor is more appropriate for this. I used the Hilti Kwik Hus reusable screw anchors. Anyway, something to consider.
Did you lubricate the inside of the corner posts? That thick plastic piece is the guide.
Oh, I wish it was cold in my garage now. 80 here today. LOL
 
OP
D

DerStig

Well-known member
Joined
Jun 15, 2015
Messages
441
I'm not a Engineer but if I'm reading you correct your post move a total of 1/4" at the top of the post between the lift being lowered or raised. I don't think I would concern myself too much over that. Personally though, I have mine bolted down. I know BendPak advertises it to be used without anchoring it but I like the security of the bolts in the floor. I don't know why they send a 3/4" wedge anchor with the lift. I think a screw anchor is more appropriate for this. I used the Hilti Kwik Hus reusable screw anchors. Anyway, something to consider.
Did you lubricate the inside of the corner posts? That thick plastic piece is the guide.
Oh, I wish it was cold in my garage now. 80 here today. LOL

I called Bendpak and the customer service guy spoke to an engineer for me, they said this is within specifications and as long as each column does not move more than 1", its fine. This eliminates the fear factor for me but does not address the concern of the posts touch the I beam or the garage door tracks. This is something I need to fix I just dont know how. I was thinking maybe keeping (permanently) a tie down ratchet at the top of the columns. For me bending inwards is fine to be honest, its the bending outwards thats the problem which causes issues with the I beam.

The concern I have with bolting it down is this kind of swinging will stress the concrete way too much and can cause cracks in the future. I have actually said this same thing to the guy on the phone today and he said that I was right to be concerned if the lift moves that much, the lateral forces may eventually stress the concrete to a point that it cracks. He also said these are not really meant to be bolted down but you can use smaller anchor screws (like the ones you said and those are also the ones I use at my home gym).

I think this is all because of the imperfections of my floor. Its not a matter of leveling but rather ensuring the surface is smooth. My garage floor is like the surface of the moon (due to the paint work previous owner did, its not smooth). I will go to HD now and try to look for small shim plates.

When you say lubricate, what I did was to WD-40 the entire ladder (on the sides where the guides move) and the guides themselves. In fact now there is a little WD-40 lake at the baseplate on each column:)
 

kbuhagiar

Well-known member
Joined
Dec 27, 2005
Messages
1,736
Location
Escondido, CA
This is not going well...

<<snip>>

Dont know what else to do, I want to cry:( I am so tired, I have now spent combined 25 hours inside my cold garage across 3 days and I want this to be over:(

Hang in there. Take a step back and clear your head before you try again.
This will all be worth it in the end.
 
Last edited:

Al G

Well-known member
Joined
Jan 5, 2015
Messages
340
Location
Arizona
Is the fit between the beam and door track so tight you can't accept 1/4" movement? Can you adjust the door track 1/4"? That's just a whack with a hammer.
 
OP
D

DerStig

Well-known member
Joined
Jun 15, 2015
Messages
441
I think I realize the problem now. I have been trying to level the posts on their side to ensure they are upright. Now the problem with that is because the floor isnt flat (this is not a general slope per se but small areas around the baseplates are uneven and have imperfections), what ends up happening is the uprights facing each other both end up requiring shims on their front. Yes they end up being level and the baseplate to baseplate measurement is 110 1/4" as per spec but there is an angle towards top causing the posts to have more distance at the top. As the lift moves up it obviously pulls the posts towards each other to correct for this.

So what I will try to do is to remove all the shims and use shims only to make the baseplate plum then not worry about side to side levelness and try and use cables to level the runways.
 

Al G

Well-known member
Joined
Jan 5, 2015
Messages
340
Location
Arizona
You want the posts to be plumb (perfectly vertical) not level. Once the posts are plumb don't worry about whether the baseplates are level. Just shim them to get the posts plumb. If some posts sit lower than others use cable and ladder adjustmemts to get the runways level.
 
Last edited:

LX-Markham

Well-known member
Joined
Apr 27, 2013
Messages
2,929
Location
Markham, Ont.
^^^this.

The posts need to be plumb. The baseplates do not need to be level (same elevation) with respect to each other.

As for 1/4" deflection, my posts move/adjust slightly as I raise the lift.
 

oldgto

New member
Joined
Jan 29, 2017
Messages
2
Location
Southern Colorado
I just have to make a comment here as my first post to this forum.

When you drive your car on the lift, the whole lift will must likely move forward a little bit each time. So if you do not bolt the lift to the floor it is going to move. I spent a lot of time getting my lift squared up only to see it move when I drove the car on it to test it with a car.
I ended up securing my left to the floor.

Just wanting to let you know this.
Mike
 
Last edited:

ronr80

Well-known member
Joined
Feb 13, 2013
Messages
504
Location
ontario
Mine also move when I lift a car , I drove a rear wheel drive car on it and the whole lift shifted about 6 inches , scared me so I put 8 anchors and just remove them if I need to move the hoist, my posts will move a little when I raise a vehicle . Some one mention to take a deep breath and once you have it figured out it will be worth it . Ron
 
OP
D

DerStig

Well-known member
Joined
Jun 15, 2015
Messages
441
^^^this.

The posts need to be plumb. The baseplates do not need to be level (same elevation) with respect to each other.

As for 1/4" deflection, my posts move/adjust slightly as I raise the lift.

The problem with not shimming the edges of the baseplates to make the entire thibgs plum is the lift literally bends inwards/outwards towards where the baseplates are not plum.

My lift does not move even a millimeter when I get on it. I got on it several times now. Not even a hair.

I bought a lot of these zinc plates from HD and leveled the baseplates as much as I can. Now its much more stable, still some movement but only 1/8" on each side.
 
OP
D

DerStig

Well-known member
Joined
Jun 15, 2015
Messages
441
To clarify, I am talking about making the entire baseplate plum with the ground NOT leveling the baseplate with shims so the baseplate is level using a level.

Basically the baseplate should have no play in each direction with a slight tap at the top of the column.
 

Al G

Well-known member
Joined
Jan 5, 2015
Messages
340
Location
Arizona
Yes, you need to shim the baseplates to make the posts plumb. I don't know what you mean by making the baseplates plumb to the ground, but it doesn't matter. Plumb (perfectly vertical) posts is the goal. Unless your floor is perfectly level and flat you'll need to shim the baseplates if you think they are bending.
 

396_425

Active member
Joined
Jul 8, 2013
Messages
31
Location
Clovis, NM
My floor slants to the middle of my shop due to the drain in the middle. I used a transit to mark all four posts and had to put a 1/4" steel plate under 1 post, 1/2" under another and 3/4" on another, one remains on the floor with no plate. I followed the directions and mine works perfectly and does not wobble and is not bolted to the floor.
 

Attachments

  • IMG_0529.jpg
    IMG_0529.jpg
    144 KB · Views: 57
  • IMG_0530.jpg
    IMG_0530.jpg
    137.7 KB · Views: 55
  • IMG_0532.jpg
    IMG_0532.jpg
    138.8 KB · Views: 55
To avoid these ads, REGISTER NOW!
Top Bottom