To avoid these ads, REGISTER NOW!

Heavy duty rolling welding/fab table build

rust buster

Well-known member
Joined
Feb 27, 2011
Messages
279
Location
VA
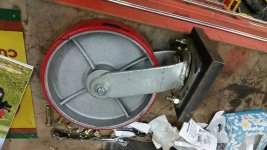
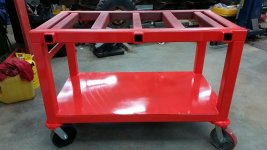
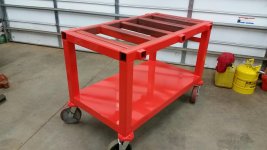
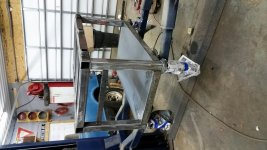
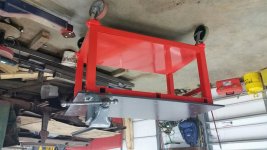
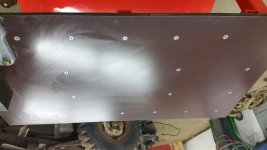
I'm finally getting around to posting some pics of the welding table I built over Christmas break. I've had the material sitting around for three years while I went back and forth on a design. Of course then I read Dukers build and it was decided that he hit nirvana, so much of my design is from his, so thank you Duker! Table is build out of 3"x3" 1/4" wall square tube with a 3/4" plate steel top. The top is 3'x5' and it is about 39" tall. The thing weighs a ton but is solid as a rock. The casters are 8" rated at 800 lbs a piece, solid steel with a polyurethane tread.

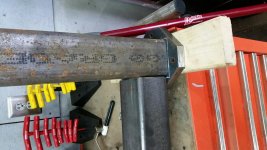
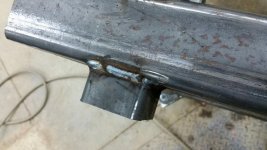
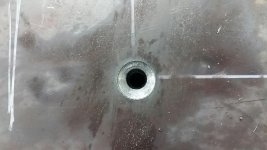
I built it to house 2" tube to mount tools/accessories like cut off saw, beverly shear, etc...Instead of welding the 2.5" tube to the 3" tube, I cut clear through the 3" tube and slid the 2.5" tube all the way through. This way I have mounts on both sides.

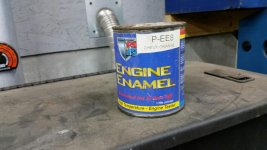
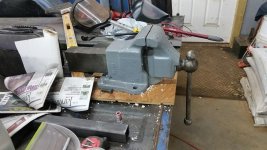
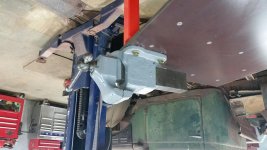
The vise is a Reed 106 that is an absolute tank. The bottom shelf is 1/8" steel. I built this thing to last a lifetime and then some, but it was very fun to build. The Paint is Por-15 Chevy Orange engine paint I had left over from an engine build.

Comments/suggestions on welds and overall build are welcome, you won't hurt my feelings and I am far from a professional welder...I learn something from you all everyday on here, so fire away and thanks for looking.
 

Attachments

  • 20151224_145805.jpg
    20151224_145805.jpg
    150.1 KB · Views: 156
  • 20151227_132631.jpg
    20151227_132631.jpg
    149.4 KB · Views: 156
  • 20151227_121124.jpg
    20151227_121124.jpg
    147 KB · Views: 154
  • 20151227_113138.jpg
    20151227_113138.jpg
    138.5 KB · Views: 145
  • 20151226_114743.jpg
    20151226_114743.jpg
    150.6 KB · Views: 144
  • 20151224_145754.jpg
    20151224_145754.jpg
    144.3 KB · Views: 161
  • 20151226_095459.jpg
    20151226_095459.jpg
    145.3 KB · Views: 142
To avoid these ads, REGISTER NOW!
OP
R

rust buster

Well-known member
Joined
Feb 27, 2011
Messages
279
Location
VA
Progress pics...
 

Attachments

  • 20151227_164621.jpg
    20151227_164621.jpg
    144.7 KB · Views: 162
  • 20151227_175827.jpg
    20151227_175827.jpg
    148.9 KB · Views: 149
  • 20151227_175839.jpg
    20151227_175839.jpg
    147.4 KB · Views: 143
  • 20151228_170337.jpg
    20151228_170337.jpg
    151.9 KB · Views: 154
  • 20151228_170332.jpg
    20151228_170332.jpg
    149.5 KB · Views: 169
  • 20151228_170419.jpg
    20151228_170419.jpg
    127.5 KB · Views: 146
  • 20151228_170407.jpg
    20151228_170407.jpg
    145.7 KB · Views: 146
OP
R

rust buster

Well-known member
Joined
Feb 27, 2011
Messages
279
Location
VA
And more...
 

Attachments

  • 20151231_101002.jpg
    20151231_101002.jpg
    137.9 KB · Views: 165
  • 20151230_174541.jpg
    20151230_174541.jpg
    135.9 KB · Views: 161
  • 20151230_174523.jpg
    20151230_174523.jpg
    136.8 KB · Views: 171
  • 20151230_142130.jpg
    20151230_142130.jpg
    145.7 KB · Views: 143
  • 20151230_142140.jpg
    20151230_142140.jpg
    140.7 KB · Views: 136
  • 20151230_115909.jpg
    20151230_115909.jpg
    147.9 KB · Views: 137
  • 20151228_170441.jpg
    20151228_170441.jpg
    147.2 KB · Views: 141
OP
R

rust buster

Well-known member
Joined
Feb 27, 2011
Messages
279
Location
VA
Last ones...I have no idea why the pics are showing upside down...they are correct when I open them in the folder...Any ideas?
 

Attachments

  • 20151231_101016.jpg
    20151231_101016.jpg
    148.6 KB · Views: 173
  • 20151231_123117.jpg
    20151231_123117.jpg
    143.2 KB · Views: 176
  • 20151231_161639.jpg
    20151231_161639.jpg
    142.1 KB · Views: 190
  • 20151231_161705.jpg
    20151231_161705.jpg
    138.6 KB · Views: 191
  • 20151231_161650.jpg
    20151231_161650.jpg
    145.2 KB · Views: 173
  • 20151231_161717.jpg
    20151231_161717.jpg
    136.7 KB · Views: 203

richeyc2000

Well-known member
Joined
Feb 22, 2015
Messages
984
Location
Europe
Just the last four pics are upside down.
About the bench. That is built to last several lifetimes. Savage build. Really impressed with the whole execution. Very well built and when it was painted up it really set it off. Well done. Looking forward to seeing more images of it and what will be built on it.
 

Strouty

Well-known member
Joined
Mar 21, 2010
Messages
38,215
Location
Southern Maine
How about some pictures of the truck!

Also the table looks great, I can never get mine to stay on the ceiling.
 
Last edited:
OP
R

rust buster

Well-known member
Joined
Feb 27, 2011
Messages
279
Location
VA
How about some pictures of the truck!

Also the table looks great, I can never get mine to stay on the ceiling.

Ha ha, thank you! The pictures being upside down is really frustrating...I've even tried making them upside down on my computer and then posting them, but they stay upside down.

The trick is a 1948 Dodge Power Wagon. What makes this one special is that it has a very rare dual PTO that feeds a rear belt pulley for running attachments like a sawmill, etc... It is all there and all original but needs total restoration. The one behind it (you can barely see it) is a 1967 Power Wagon. They changed very little over 20+ years.
 

AMCguy

Well-known member
Joined
Dec 23, 2009
Messages
2,022
Location
Sunshine Coast, BC Canada
That thing is brutal. Well done. Put it in your will.

As for your pictures. I finally figured out why mine were sometimes upside down after posting. With an iPhone, if the picture is taken with the phone upside down, it will always be upside down. It only appears right side up on your device or on a mac.

Now I always take the picture with the home button to the right.
 

BD1

Well-known member
Joined
Mar 18, 2007
Messages
4,602
Location
north side
As for your receiver tube , is there a way to secure the inserted tube ? I drilled hole in the larger and welded a nut over hole then use a bolt with '' T '' handle to secure.
 
OP
R

rust buster

Well-known member
Joined
Feb 27, 2011
Messages
279
Location
VA
As for your receiver tube , is there a way to secure the inserted tube ? I drilled hole in the larger and welded a nut over hole then use a bolt with '' T '' handle to secure.

good eyes! yes, I remembered about that after i painted it...doh! I may just resort to hitch pins to hold the 2x2s in place rather than tightly together. Open to ideas!
 
To avoid these ads, REGISTER NOW!
OP
R

rust buster

Well-known member
Joined
Feb 27, 2011
Messages
279
Location
VA
That thing is brutal. Well done. Put it in your will.

As for your pictures. I finally figured out why mine were sometimes upside down after posting. With an iPhone, if the picture is taken with the phone upside down, it will always be upside down. It only appears right side up on your device or on a mac.

Now I always take the picture with the home button to the right.

Ah! That could very well be. I have a Samsung Galaxy S5 and it might do the same thing as the iPhone. Thanks!
 

9GUY9

Well-known member
Joined
Oct 12, 2009
Messages
248
Location
Mankato, MN
Ah! That could very well be. I have a Samsung Galaxy S5 and it might do the same thing as the iPhone. Thanks!

It does. Transfer the files to your computer. Use microsoft photo viewer to view them. In that viewer you can rotate the photo. Rotate the photo to the way you want it then click the Left or right arrow to view different pics. This will save the image however you were viewing it.

Table looks awesome! I'm planning to build one almost identical.

How did you cut the holes in the 3" tubing?
 
OP
R

rust buster

Well-known member
Joined
Feb 27, 2011
Messages
279
Location
VA
It does. Transfer the files to your computer. Use microsoft photo viewer to view them. In that viewer you can rotate the photo. Rotate the photo to the way you want it then click the Left or right arrow to view different pics. This will save the image however you were viewing it.

Table looks awesome! I'm planning to build one almost identical.

How did you cut the holes in the 3" tubing?

Hmmm...I did that and it still came out upside down on the forum...
As for cutting the holes in the 3" tubing, I used an angle grinder with a cut off wheel to cut four sides and then finished the corners with the sawzall. I thought it was going to be a log painful job, but I had all 12 holes cut in about 45 minutes using good wheels and great saw blades. The biggest pain in the *** was when I went to put the 2.5" tubes through the 3" tubes. The welded seam inside the 3" tubes sits proud of the inner service and had to be ground down with a die grinder. That took a while...
 

LXCam

ALLIANCE MEMBER
Joined
Apr 23, 2013
Messages
19,137
Location
AZ
Excellent job, the table looks great even upside down. I wish I could have used or for that matter owed a magdrill. My table is 3 X 7 with a 1/2" thick stainless slab. I did the same thing with counter sunk 1/2" grade 8 socket head bolts into the frame which is 3/8" thick. I ended up setting my drill press up and moving that behemoth around the table, but what a PITA!.
 
OP
R

rust buster

Well-known member
Joined
Feb 27, 2011
Messages
279
Location
VA
Excellent job, the table looks great even upside down. I wish I could have used or for that matter owed a magdrill. My table is 3 X 7 with a 1/2" thick stainless slab. I did the same thing with counter sunk 1/2" grade 8 socket head bolts into the frame which is 3/8" thick. I ended up setting my drill press up and moving that behemoth around the table, but what a PITA!.

You're a better man than me! I thought it was bad enough with the mag drill...what a process I had to do. First drill a 7/16" hole through both the top and the tube underneath. Then switch out bits to a 3/8" for the tap hole in the tube underneath, then switch to the countersink bit. I did all this for each hole so as not to move the mag drill and risk alignment issues. So I did that and repeated it 22 times. And those mag drills are loud!!
 

Strouty

Well-known member
Joined
Mar 21, 2010
Messages
38,215
Location
Southern Maine
The trick is a 1948 Dodge Power Wagon. What makes this one special is that it has a very rare dual PTO that feeds a rear belt pulley for running attachments like a sawmill, etc... It is all there and all original but needs total restoration. The one behind it (you can barely see it) is a 1967 Power Wagon. They changed very little over 20+ years.

My Dad is working on a carryall right now, but he is going a bit modern. He took an F350 diesel chassis and is making it fit. I am amazed at what he has been able to do, but he is far from done and has already started two more project vehicles.
 

LXCam

ALLIANCE MEMBER
Joined
Apr 23, 2013
Messages
19,137
Location
AZ
You're a better man than me! I thought it was bad enough with the mag drill...what a process I had to do. First drill a 7/16" hole through both the top and the tube underneath. Then switch out bits to a 3/8" for the tap hole in the tube underneath, then switch to the countersink bit. I did all this for each hole so as not to move the mag drill and risk alignment issues. So I did that and repeated it 22 times. And those mag drills are loud!!

Well probably not. It was such a pain and luckily my plate was pretty damn flat so I drilled only three length wise and one center on the ends for a total of 8. And the same as you with a pilot hole and worked my way up. In stead of taping the rails, I drilled all the way thru, then drilled up with a 7/8" hole saw and used flanged rib nuts so I didn't even have to get a socket on them. One of these days I'd like to add some more bolts, but in all honestly it really doesn't need it. What I absolutely want to do is lay out a grid of tapped and fitted holes for jig alignment and clamping.
 

saceone

Well-known member
Joined
Dec 31, 2011
Messages
388
Location
Montreal Canada
awesome table !

isn't the best part of building a table is the frustration of not welding on a proper table? makes you appreciate the table so much more when you're done
 

Moose364

Well-known member
Joined
Oct 21, 2014
Messages
282
Location
East Texas
Awesome build, should last 2 life times,

I'm getting the stuff together to build me one, question ? why did you bolt the top and not weld it, I've seen a couple and the legs are welded to the top, now you have me wondering
 
Last edited:

34kw

Member
Joined
Jul 18, 2012
Messages
10
Nice job! That will last forever. I am always torn between wheels and wanting something immovable to bolt my vise to.
 
OP
R

rust buster

Well-known member
Joined
Feb 27, 2011
Messages
279
Location
VA
Awesome build, should last 2 life times,

I'm getting the stuff together to build me one, question ? why did you bolt the top and not weld it, I've seen a couple and the legs are welded to the top, now you have me wondering

I bolted it just to save me the hassle down the road if there is ever any reason to remove the top. There may be other good reasons too, but I won't take credit for knowing them.
 

racer-john

Well-known member
Joined
Apr 1, 2008
Messages
1,461
Location
Newmarket, ON Canada
Awesome build, should last 2 life times,

I'm getting the stuff together to build me one, question ? why did you bolt the top and not weld it, I've seen a couple and the legs are welded to the top, now you have me wondering

The reason is: if the top plate happens to not be perfectly level, then you can shim under the low spot(s) and bolt them down.
Also as the OP mentioned if he ever had occasion to have to remove the top.
 

aczr2k

Well-known member
Joined
Oct 24, 2007
Messages
523
Location
NW Minnesota
Looks good, nice and heavy. One option for whomever makes one in the future is to drill and blind tap the top plate and drill and counterbore the tube frame. No bolts in the top to catch slag and grinding dust. I'm a fan of the POR paint, that stuff is tough.
 
To avoid these ads, REGISTER NOW!
Top Bottom