To avoid these ads, REGISTER NOW!

Heavy Duty Welding/Layout Table Build, MK II

ez-duzit

Well-known member
Joined
Jun 24, 2013
Messages
5,101
Location
Marina del Rey
Diamond wheel.

baldor-500-1_zpsee2pas05.jpg
 
To avoid these ads, REGISTER NOW!
OP
D

dr_clyde

Well-known member
Joined
Jan 7, 2009
Messages
6,459
Location
Holland, MI
It's actually a wheel very similar to diamond, called a CBN wheel. It stands for cubic boron nitride. It's meant for grinding tungsten carbide tooling. Does a super job on tungsten.
 

dontlifttoshift

Well-known member
Joined
Mar 19, 2015
Messages
185
Location
Beach Park, IL

Your table is flat bitchin' but what can you tell me about the orange steel rack against the wall? Looks like you fabbed it, I would like to do something similar. Any info you can offer? Is that 3" square tubing? Is attached to anything substantial in the wall or is the floor still carrying the load? Anything you would do different.

Thanks!
Donny
 
OP
D

dr_clyde

Well-known member
Joined
Jan 7, 2009
Messages
6,459
Location
Holland, MI
I did fab that material rack, but I'm not sure I'd do it again. It was a fair amount of work.

The rungs and verticals are 3" square tube, 1/4" wall. The feet/bottom shelf are 6" or 8" x 3", I can't remember which. They are cross braced with some straps of flat bar in the back that are attached with bolts. I added little tabs on the ends of the shelves to keep tubes from rolling off. It's also anchored to the floor on the fronts of the feet. Rear too, IIRC. The floor is doing the work. That wall is sheetrock with steel studs so we could hardly hang a picture up, much less a material rack.

If I did it all over, I'd make it 5 feet longer, it's 20 feet now, but some material comes in longer lengths. I'd make the shelves out of 2" instead of 3", they are a bit overkill. I'd also space them a bit closer and add another shelf. There's too much air in between and its wasted space. Otherwise I'm pretty happy with it. It's holding several tons now with no noticeable effects.
 

dontlifttoshift

Well-known member
Joined
Mar 19, 2015
Messages
185
Location
Beach Park, IL
Thanks! I'm sure it was work to get it built but it looks great. I am replacing a 12" dual side cantilever rack. I have some special needs for mine, that's why I am considering building it.

Most of what I have is about 12' long but occasionally I am storing full length tubing. So as not to waste floor space, I am thinking I can keep the longer stuff up high and be able to package the cold saw and horizontal band saw under neath of it. All verticals would go to the floor, I can lag into the wall but that would just be for added stability.

If you have pics of the bases, that would be great, it is always easier to learn from someone else.
 

CRCRFT78

Member
Joined
Jun 27, 2013
Messages
10
Location
SF Bay Area
Just read through your thread. I wish I wasn't a truck driver and started welding when I was younger. Beautiful table, any updates?
 
To avoid these ads, REGISTER NOW!
OP
D

dr_clyde

Well-known member
Joined
Jan 7, 2009
Messages
6,459
Location
Holland, MI
Hey guys. Sorry I haven't updated this thread in a while.

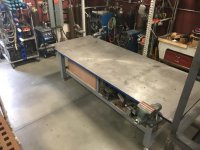
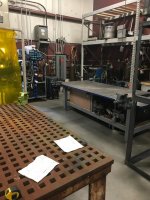
Here are some pictures of the welding corner of the shop and how the table sits right now.

attachment.php


attachment.php


The table itself hasn't changed much. I did finally finish the shelves for the bottom, and I have some drawers under there for some misc. stuff like consumables.

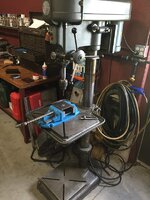
attachment.php


As far as attachments go, I normally keep some vises on here, and my B3 Beverly shear. I usually have 2 vises on opposite corners, and the shear wherever is out of the way.

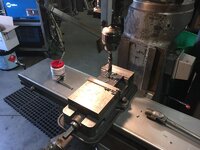
attachment.php


I also have made attachments for my ring roller, JD² Model 3 bender, and a bench grinder. I just don't have pictures of those.

My little rod bender, tube notcher, and some other smaller welding tools just clamp in a vise.

Thanks for looking.
 

Attachments

  • IMG_6500.jpg
    IMG_6500.jpg
    132.9 KB · Views: 1,109
  • IMG_6501.jpg
    IMG_6501.jpg
    110 KB · Views: 1,105
  • IMG_6502.jpg
    IMG_6502.jpg
    119.6 KB · Views: 1,118
  • IMG_6503.jpg
    IMG_6503.jpg
    93 KB · Views: 1,121

01birddog

Member
Joined
Mar 14, 2019
Messages
14
Location
Abingdon, Virginia
Quite obvious new guy here but your work is beautiful on this project. I to had used .750 thickness on a 4'X 8' table and could see ever so slight swag even with six legs.
 

christopher

Well-known member
Joined
Sep 13, 2022
Messages
64
My old "Ultimate Welding Table" has served me splendidly. It has been an essential fixture in my shop, and I consider it to be one of my most useful and effective fab tools.

However the time has come for its replacement to be fabricated. I sold it to my neighbor after he got some welding equipment and was asking me about a table. I gave him the condition that I be able to use it one last time to fabricate it's replacement. I figured this would be a good opportunity to upgrade some features.

I will update this thread as I go, hopefully it gets done soonish.

This time around, I plan to do a few things different. First, the top plate.

3/4" was too thin on the old one, and had a slight rolled edge where it was sheared at the steel supply. I also hated the mill scale on the surface. It was flaking off inconsistently, and made grounding on sensitive parts a pain. Over 10 feet, the weight of the plate made a very small sag in the middle of the table. Not enough to bug most people, but I was bothered by it.

I ordered this as a replacement. It is 1-1/4" thick A36, Blanchard ground to +/- .005" per foot and a 32 RMS finish.

17911822985_df489259ff_c.jpg

17885422096_b28d572dcf_c.jpg

The next thing I started work on was the bottom of the base. I decided to upgrade from 2-1/2" to 4". I really don't want 6 legs, so the only way to get a self supporting frame with minimal deflection in the center is to build out of material that is stiff enough to not sag over 10 feet. I had some leftover 4", so it was the perfect choice.

17757616948_e4b9f605ea_c.jpg

I also cut the legs out of this material.

Next up was to cut the bottoms for the legs and weld in some nuts for the leveling feet.

I used some 3/8" hot rolled I had laying around. I set a chunk of it in the W.F. Wells and let er rip.

Top tip, if you're sawing through a thick plate, you can set some round stock on the rear of the vise and tilt the plate a little. This allows the blade to cut a smaller cross section and speeds up the cut. It especially helps on a saw like mine, where the blade drops evenly on twin posts, instead of on a hinge.

17757987230_e526737719_c.jpg

Unfortunatley, the stock I had was too short to get 2 parts out of 1 strip so I had to cut 4 and stack them for the last cut. They're getting welded to the bottom of the feet, so I didn't get too fussy with the lengths.

17942493012_c78035b53e_c.jpg

I used a set of small toothed blocks from a mill strap clamp set to space the vise and keep even pressure on the plates.

17945577565_e9eeb0a1cb_c.jpg

Using the 20" Walker Turner and the Bridgeport I poked some 3/4" holes in the caps.

17757940680_d47c66bf85_c.jpg

17945511665_c2c3c16f1d_c.jpg

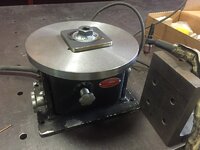
First a root pass, then up onto the rotary table for the cover bead.

17919092446_6e37fd3207_c.jpg

17945497465_36cdf0229b_c.jpg

17322918514_64fde04fa6_c.jpg

That's all for now, I must go back into the shop and make some more progress!
You are Legend. Wow.
 

christopher

Well-known member
Joined
Sep 13, 2022
Messages
64
Not a welder, but I am a maker. There's something about the sheer mass of a 10 foot x 4 foot(?) x 1.25 inch thick slab of steel that has got to have a feeling of stability and permanence. Heft, strength, and immovability are it's hallmarks. It's a very-low-frequency hum kind of property. Stiffness is different. Stiffness can be achieved with very light materials. While not for welding tables, Aluminum honeycombs can provide incredible stiffness and flatness with very low mass. Or even a hollow-core door. Its a high frequency kind of property. But that feels like it's not built to last. It feels cheap or fake. Not solid. Something that might provide the best of both worlds is really a massive steel honeycomb table top with thick steel top and bottom plates, and 1/2 as thick vertical separating honeycomb members that are tall, like 12" or something like that. It's in the height of the honeycomb members that the stiffness lives.

Your work is at a level completely out of the reach of almost everyone anywhere. Glad to see it.
 
To avoid these ads, REGISTER NOW!
Top Bottom