To avoid these ads, REGISTER NOW!

Hein Warner Floor Jack

Hiball

Well-known member
Joined
Apr 30, 2009
Messages
14,027
Location
Missery
Great thread. This helped me a lot disassembling my Hein Werner WS 1 1/2 ton I inherited from my grandfather. I really want this thing to work but as I test it out it leaks like crazy. I bought a new seal kit for it and got it torn down with the help of this post but I CANNOT get the outer hydraulic piston cover to come off! I've got it in my clamp and I've tried everything to get it to budge but nothing I do will break it free. Any ideas on what I can do to possibly get it off?

The hydraulic unit needs to be stationary, and you need some leverage to remove the tank nut, they are torqued down from the factory to prevent leakage between the base/reservoir/nut which utilizes a metal to metal seal from the factory.


FYI... No need to bump every HW thread with the same question, just give us some time to address the question.

Welcome to GJ.
 
To avoid these ads, REGISTER NOW!

lifejacket0

New member
Joined
May 2, 2014
Messages
2
The hydraulic unit needs to be stationary, and you need some leverage to remove the tank nut, they are torqued down from the factory to prevent leakage between the base/reservoir/nut which utilizes a metal to metal seal from the factory.


FYI... No need to bump every HW thread with the same question, just give us some time to address the question.

Welcome to GJ.
I read this note and it sounds like I might be working on the spot. I am trying to remove the 1-3/8" nut. On the Hein Werner parts list it is item #22 and called the Release Valve Box. I put my biggest adjustable wrench on the nut and gave it a few hits with a hammer but it doesn't move. I am going to pick up the right size socket tomorrow and use a breaker bar to get it off. I just thought it would be a good idea to ask if I am on the right track before I twist off a part I can not buy.
Everything else has come apart pretty easy until now
 

Hiball

Well-known member
Joined
Apr 30, 2009
Messages
14,027
Location
Missery
I read this note and it sounds like I might be working on the spot. I am trying to remove the 1-3/8" nut. On the Hein Werner parts list it is item #22 and called the Release Valve Box. I put my biggest adjustable wrench on the nut and gave it a few hits with a hammer but it doesn't move. I am going to pick up the right size socket tomorrow and use a breaker bar to get it off. I just thought it would be a good idea to ask if I am on the right track before I twist off a part I can not buy.
Everything else has come apart pretty easy until now

Generally it will come lose with a little persuasion.. Lefty loosey, righty tighty... Don't plan on buying a replacement outside of finding one in the used market.
 

lifejacket0

New member
Joined
May 2, 2014
Messages
2
Thanks for the moral support. I know that if I break anything that is not a seal I am up the creek without a paddle. That is why I put the question out there. I remember a washing machine I almost destroyed but I found out I was working with a left hand thread.
Thanks again, Mark
 

an8pilot

Well-known member
Joined
Oct 31, 2014
Messages
49
Location
CRG319&39DME Airport id 3J6 Davis Field Folkston G
hey fellas,

I just got back from being deployed. My first job at home is to reseal my fathers Hein Werner model - M

I already have a reseal kit.

But removing the main high pressure seal nut with everything I had including heat I could not get the brass part number 19455 packing nut for the 5/8 piston model to unscrew.

So I had to drill it out.

Disgusting isn't it.

So now I am looking everywhere to find a 19455 packing nut.
A 19410 piston would be nice too as it got a little bit dented / beat up but I burnishd it out and I think it should ok.

I have tried blackhawk and hcrcnow and other places.

I understand what a labor of love this is now after I last read this forum thread when I was overseas.

I want to rebuild this because it was my Fathers and it would help me with daily life issues with our vehicles when things go bad and the jack that was my Fathers will be there to help.

Darn I hate auto correct.

Respectfully

Mike [email protected]
 

Hiball

Well-known member
Joined
Apr 30, 2009
Messages
14,027
Location
Missery
hey fellas,

I just got back from being deployed. My first job at home is to reseal my fathers Hein Werner model - M

I already have a reseal kit.

But removing the main high pressure seal nut with everything I had including heat I could not get the brass part number 19455 packing nut for the 5/8 piston model to unscrew.

So I had to drill it out.

Disgusting isn't it.

So now I am looking everywhere to find a 19455 packing nut.
A 19410 piston would be nice too as it got a little bit dented / beat up but I burnishd it out and I think it should ok.

I have tried blackhawk and hcrcnow and other places.

I understand what a labor of love this is now after I last read this forum thread when I was overseas.

I want to rebuild this because it was my Fathers and it would help me with daily life issues with our vehicles when things go bad and the jack that was my Fathers will be there to help.

Darn I hate auto correct.

Respectfully

Mike [email protected]

Call the Shop in my Signature, Ask for Steve Flora. I don't believe I have any M series laying around, I have some 4 ton units but I believe the piston is a hair bigger, maybe 11/16" IRC. Worst case scenario, Any machine shop should be able to fab one up fairly reasonable.
 

an8pilot

Well-known member
Joined
Oct 31, 2014
Messages
49
Location
CRG319&39DME Airport id 3J6 Davis Field Folkston G
Thanks Hiball. I will call.

But it definitely is the piston packing nut pn 91455 for the 5/8 piston pn 19410.

Hope i can find one pf those 91455 packing nuts out there somewhere from a jack that is in pieces.

I could have the part machined but, that would be costly.

The outside diameter is 1 and 3/16 by 20 thread with the inside diameter 5/8 for the piston and the bottom end the end that is inserted has a inverted chevron indention to squeeze the packing. The packing nut is about 1 inch deep or so and has the two notches for a special socket to tighten it. Made of brass.

I enjoyed reading your replies to threads in here while I was overseas there Hiball. But I don't want to take up your time at work fr piddley things unless you really want to. But anyone can call me anytime below.

Mike Robinson 912 547 5477
 
Last edited:

acacia1602

Member
Joined
Apr 18, 2014
Messages
13
Location
Phoenix AZ
Hi all (and especially hiball)

After reading through the threads I decided to restore an HW WS:


It was in pretty sad shape but I have the hydraulics all cleaned up and ready for reassembly. I bought the kit front the place mentioned in hiball's sig.


Before I do so I have some questions:

1.) There seem to be some "extra" pieces in this kit. That always make me nervous. I've lettered these; I'd appreciate some feedback on which are actually needed for my jack.


A.) This isn't an extra but rather a gasket/oring which was on the plug. Is it necessary? The one I pulled off is shot, but I'm not even sure it's necessary
B.) The fill plug also had a gasket on it, and it's gone now. Is this milky/clear plastic washer supposed to go on the fill plug?
C. and D. and E.) Mystery gaskets. No idea where they go on my WS


F.) some kind of rubber plug, also no idea where it goes on my WS
G.) Is it really necessary to muck with these balls and springs? I'm holding off for now....
H.) Do the raised ridges align in any particular direction on the piston?

Speaking of pistons - the piston had some scoring where it looks like someone tried to use a pliers on it:

I took off the high spots with a few light passes on an extra fine diamond DMT stone. I think it's not necessary to get this perfect for the pump to function well, so long as it's not cutting the packing and causing dirt to enter the reservoir. Am I right? I could buff it a bit to get it smoother, or even chuck it up in my lathe and either turn it to consistent diameter or weld it and then turn it down. The question is: is it necessary? The inside of the cylinder looks great, so I'm hoping not:


Next, I notice the piston cup assembly and cup both look pretty different from what was there before. Are these ok? Notice the before and after for the cup:

Here is the difference in the piston cup (kerchow!):


Finally - any advice for reassembly? I understand it's best to soak the cup for a few hours before assembly - what about the packing , or anything else? Put together with hydraulic fluid (oil) on all the threads, or keep some portions dry?

Thanks in advance for your help!

Regards,


Andrew M. Lewis
 

Buckgnarly

Well-known member
Joined
Oct 8, 2010
Messages
7,651
Location
VT
Nice info Andrew, I am awaiting my rebuild kit and will be doing exactly this on Sat afternoon!
 

Hiball

Well-known member
Joined
Apr 30, 2009
Messages
14,027
Location
Missery
Hi all (and especially hiball)

After reading through the threads I decided to restore an HW WS:
It was in pretty sad shape but I have the hydraulics all cleaned up and ready for reassembly. I bought the kit front the place mentioned in hiball's sig.


Before I do so I have some questions:

1.) There seem to be some "extra" pieces in this kit. That always make me nervous. I've lettered these; I'd appreciate some feedback on which are actually needed for my jack.

A.) This isn't an extra but rather a gasket/oring which was on the plug. Is it necessary? The one I pulled off is shot, but I'm not even sure it's necessary B.) The fill plug also had a gasket on it, and it's gone now. Is this milky/clear plastic washer supposed to go on the fill plug?
C. and D. and E.) Mystery gaskets. No idea where they go on my WS
F.) some kind of rubber plug, also no idea where it goes on my WS
G.) Is it really necessary to muck with these balls and springs? I'm holding off for now....
H.) Do the raised ridges align in any particular direction on the piston?

Speaking of pistons - the piston had some scoring where it looks like someone tried to use a pliers on it:
I took off the high spots with a few light passes on an extra fine diamond DMT stone. I think it's not necessary to get this perfect for the pump to function well, so long as it's not cutting the packing and causing dirt to enter the reservoir. Am I right? I could buff it a bit to get it smoother, or even chuck it up in my lathe and either turn it to consistent diameter or weld it and then turn it down. The question is: is it necessary? The inside of the cylinder looks great, so I'm hoping not:
Next, I notice the piston cup assembly and cup both look pretty different from what was there before. Are these ok? Notice the before and after for the cup:
Here is the difference in the piston cup (kerchow!):

Finally - any advice for reassembly? I understand it's best to soak the cup for a few hours before assembly - what about the packing , or anything else? Put together with hydraulic fluid (oil) on all the threads, or keep some portions dry?

Thanks in advance for your help!

Regards,


Andrew M. Lewis

Stop!! I don't have time to Address everything as I have to get ready for work but you have the Pump Piston Seal on Backwards..

A: Never seen a seal under that Plug.
B: Yes that white washer is for the fill plug.
C: Packing for the Release Gear, You need to remove the star wheel and disassemble to install.
D: Cylinder seal at the Base.
E: Seals the top of the pump piston "After you flip the Pump seal around" sits between the nut/Face of the seal.
F:Valve Seal that goes under the plug.
G: Valve components, Yes I would replace if you are going to go to the trouble of completely tearing down the jack, this way you can flush the system of any floating problems.
H: Brass Washer that goes in first on the Tank nut "Under the Packing", The Indentations give the packing room to compress on the Rod to aid in sealing.

The Main Ram Leather Piston seal is OEM, it will need to be Soaked and then have the face/Flared Portion pulled in to install in the Bore to prevent damage.

Here is a link to Past member Elroy who has fully documented a OS and WS, They should help you immensely.

Here is a Breakdown that should Aid you in understanding your "Extra Parts".
 
Last edited:

acacia1602

Member
Joined
Apr 18, 2014
Messages
13
Location
Phoenix AZ
Hiball,

Thanks so much for taking to time to correct my mistakes! I appreciate the help very much.
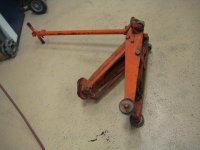
I did in fact read both of Elroy's threads, several times, but it seems that some nuances of assembly either were skipped or I did not comprehend them. To recap your post:
A.) Isn't OEM, so probably was introduced by PO. I noticed on Elroy's build he introduced a copper washer - would you recommend that or just torque down till it doesn't leak?
B.) Great, got one right. :)
C.) Good to know. That nut holding the Star wheel seems difficult to get off, perhaps because it rotates with the wrench. If you think I should use that packing, how would you recommend I do so? I'm thinking spanner and a socket, or gently in my wood faced vise to hold it steady without crushing.
D.) Per your own posting, I've left the cylinder alone. It seems fine. :) So If I don't remove it, do I do anything with that cylinder seal? I didn't see on on the jack when I took it apart.
E.) This, and the pump seal, look very different from the originals. I've taken more pictures, below, but basically the original had a significant countersink cut in it, but the new one is just plain flat:


The new seal has a raised lip profile to it, and four concentric circles raise on the end that has the raised lip, while the other side is flat.
The old one has a much less pronounced lip to it. It is fairly smooth. Internally, on one side, it has a countersink profile with a slightly larger concentric ring where it met the shaft. The washer fit inside that countersink and the nut tightened on it.


Given how different this hardware is, do I have the correct seal?
F. and G.) Ok, so these go together. If you say replace, I replace. :) Pull the old seal out with a dental pick or equivalent?
H.) I know where it goes, my question is whether the convex side of the dimples ride against the packing or if the packing goes against the concave side of the dimples.

Thanks again for your help!!!

Regards,


Andrew M. Lewis
 

Hiball

Well-known member
Joined
Apr 30, 2009
Messages
14,027
Location
Missery
Andrew..

A: I really don't think a crush washer is necessary if you torque it down sufficiently.

C: The star wheel can be a bear, I generally put the entire unit in a vice (Not the Gear) and then using a long drift punch or similar tool position it in between the gear teeth to hold it stationary and then remove the nut. I will say that you need to be Careful as 99 out of a 100 of these units have the nut staked to prevent it from backing off so sometimes you will run into one that doesn't want to cooperate. Its entirely possible to bend those teeth, NOS OEM are still available but spendy so use some common sense.

D: I very seldom replace the Cylinder base seal, And cant remember the last time I had a jack that wouldn't hold pressure on the stand. I wont rule it out completely, but Not a big Issue based off my experiences.

E: They are both piston seals, The Newer one is a Loaded Ucup variety, I haven't talked to anyone of late but my understanding is the Costs associated with making the OEM seal have skyrocketed, Thus some of suppliers are updating to the Newer style. The part that has the Ridges goes toward the pressure, the flat side matches up to the Leather washer. I do have a WS running the Newer seal and over the last 6+ Mos I haven't noticed any sealing/performance problems.

H: I always put the convex part towards the Seal, To be completely honest ive seen them both ways.. LOL.
 

abk241

Well-known member
Joined
Aug 22, 2014
Messages
310
Location
SF Bay Area, California
Just want to say that I had a HW 1 1/2 Ton portable floor jack that was a fantastic piece of equipment.
Bought in the mid '70s, I resealed it (an easy job) twice in the 20 + years I had it.
Wish I had never loaned it out.
 

acacia1602

Member
Joined
Apr 18, 2014
Messages
13
Location
Phoenix AZ
Update:

I assembled the hydraulic parts. Getting the cup in was a PITA, and although it now works (yea!) I think I did this poorly: "the face/Flared Portion pulled in to install in the Bore to prevent damage. "

I soaked it for 24 hours and was compressing it gently in a funnel, but I couldn't *quite* get it in, so I used a woodworking bar clamp to gently persuade it in. Like it said, it works, but it was very tight and the ram does not want to go back in easily. Probably under normal jacking weights it will, but even just my weight leaning on it doesn't move the ram back in. I used the same bar clamp to bring it back in.

Do I need to go back, pull out the cup, and compress it outside the cylinder? Or will it start to conform to the cylinder wall and get easier to use with repeated use?
 

Hiball

Well-known member
Joined
Apr 30, 2009
Messages
14,027
Location
Missery
Update:

I assembled the hydraulic parts. Getting the cup in was a PITA, and although it now works (yea!) I think I did this poorly: "the face/Flared Portion pulled in to install in the Bore to prevent damage. "

I soaked it for 24 hours and was compressing it gently in a funnel, but I couldn't *quite* get it in, so I used a woodworking bar clamp to gently persuade it in. Like it said, it works, but it was very tight and the ram does not want to go back in easily. Probably under normal jacking weights it will, but even just my weight leaning on it doesn't move the ram back in. I used the same bar clamp to bring it back in.

Do I need to go back, pull out the cup, and compress it outside the cylinder? Or will it start to conform to the cylinder wall and get easier to use with repeated use?

Hard to say.. I generally, crimp mine to the point where they slip in the bore with little to no resistance, then once installed I simply put the Jack under load and the pressure will conform the seal face to the wall. I'm guessing if it was that difficult to install it more than likely damaged the face by rolling up the sealing lips.
 

acacia1602

Member
Joined
Apr 18, 2014
Messages
13
Location
Phoenix AZ
Just to be sure, I pulled it apart (thank god for this wench, which makes that job easy) and had a look:


To my eye, the edges look clean and crisp - as crisp as oil soaked suede leather can be, that is. ;-)

And interestingly, it was not as hard to move up and down. So a little time in the 'tube has helped mold it to the cylinder.

Where the resistance then? In the packings! The packings on the top nut are binding the movement of the cylinder. So I'll take a shot at adjusting them - mind you they are just sitting against the washer, not compressed by the packing nut at all. Perhaps in all the excitement of putting the cylinder in the packings got compressed and need a little space. I figure it's worth a shot. Any advice about these?

Thanks again for the help hiball! If this weren't sort of interesting I think I'd send this to you next time. It certainly doesn't make monetary sense for me to be doing all this work, but it is a whole different world and an escape from the software I write. :)

Regards,


Andrew M. Lewis
 

acacia1602

Member
Joined
Apr 18, 2014
Messages
13
Location
Phoenix AZ
During the install I ran into a bear of a time installing the spring and guards on the piston. I'd like to share what I learned about how to make it a breeze.

The spring is pretty stiff, as you would imagine. So you really need to be able to put some force down on it to compress it. And then force the c clip on it. You need three hands, or more. Or a jig. Here's mine:

I grabbed a brace and a bit that is slightly smaller than the OD of the upper guard, but slightly larger than the expanded clip. I then cut a hole in a thin piece of plywood (any wood 3/8" or so would do) that was wide and long enough for me to put a clamp on it.


I then extended the piston, positioned the lower guard and spring on the piston, then gently pressed the upper guard on sighting through the hole. A little wiggling and I was able to get the piston through the hole in the upper guard, and through the wood.


Continue compressing and then slip a woodworking quick clamp on the wood.


That will hold it long enough for you to put the clip on with both hands.

HTH!

Andrew M. Lewis
 

Hiball

Well-known member
Joined
Apr 30, 2009
Messages
14,027
Location
Missery
Just to be sure, I pulled it apart (thank god for To my eye, the edges look clean and crisp - as crisp as oil soaked suede leather can be, that is. ;-)

And interestingly, it was not as hard to move up and down. So a little time in the 'tube has helped mold it to the cylinder.

Where the resistance then? In the packings! The packings on the top nut are binding the movement of the cylinder. So I'll take a shot at adjusting them - mind you they are just sitting against the washer, not compressed by the packing nut at all. Perhaps in all the excitement of putting the cylinder in the packings got compressed and need a little space. I figure it's worth a shot. Any advice about these?

Thanks again for the help hiball! If this weren't sort of interesting I think I'd send this to you next time. It certainly doesn't make monetary sense for me to be doing all this work, but it is a whole different world and an escape from the software I write. :)

Regards,


Andrew M. Lewis

Seal Looks Good, Make sure you lube it up generously with some hydraulic jack oil to prior to reinstalling it, I have a coffee can full of it and I normally just dunk the entire end in it prior to slipping it back in the cylinder. As far as the binding? There is some resistance between the packing and Piston rod even with the compression nut loose, Which is why I always recommend light adjustments as the Jack is used over the years. The One thing I have seen to cause extra resistance and actually poor sealing performance is that when installing you allowed a section of packing to roll/twist versus being completely flat in the bore. Its something you need to work at when installing to makes sure you are working the packing uniformly around the rod, Im sure you seen it wanting to twist when you installed it.
 

Hiball

Well-known member
Joined
Apr 30, 2009
Messages
14,027
Location
Missery
During the install I ran into a bear of a time installing the spring and guards on the piston. I'd like to share what I learned about how to make it a breeze.

The spring is pretty stiff, as you would imagine. So you really need to be able to put some force down on it to compress it. And then force the c clip on it. You need three hands, or more. Or a jig. Here's mine:

I grabbed a brace and a bit that is slightly smaller than the OD of the upper guard, but slightly larger than the expanded clip. I then cut a hole in a thin piece of plywood (any wood 3/8" or so would do) that was wide and long enough for me to put a clamp on it.


I then extended the piston, positioned the lower guard and spring on the piston, then gently pressed the upper guard on sighting through the hole. A little wiggling and I was able to get the piston through the hole in the upper guard, and through the wood.


Continue compressing and then slip a woodworking quick clamp on the wood.


That will hold it long enough for you to put the clip on with both hands.

HTH!

Andrew M. Lewis

Nice Problem solving, I have a small pair of vice grips with some brass covers, set to the Piston rod size. I then simply man handle the cage down far enough to clear the ring groove, Clamp, Install Ring and then remove the vice grips.
 
To avoid these ads, REGISTER NOW!

acacia1602

Member
Joined
Apr 18, 2014
Messages
13
Location
Phoenix AZ
My compliments on your ability to manhandle that spring down so far, hiball. Mine is a beast - you must be a strong guy. :)

I pulled and repacked the packing last night, and jacking up is definitely easier. It's noticeably easier to move down as well, though I still can't push it back down with just my body weight. I guess I'll see how it goes when it's back in the jack frame.

Next steps are to correct a frozen wheel and maybe do a little cosmetic painting. I'll update in a day or two.
 

GeorgeB22

New member
Joined
Nov 20, 2014
Messages
4
I have an OLD model K Hein Warner 2 ton that needs rebuilt. Bought it as an old floor jack 40+ years ago. The hydraulic unit uses a tank nut with radial holes for a spanner wrench. I have tried two undersized spanner wrenches and I have and broken both not budging the nut. I know these nuts are tough to remove having just taken one off a 1-1/4 Walker using the modified socket and impact tool approach.
Any ideas for removing the tank nut with the radial spanner holes?
I'll post pictures soon.
 

Attachments

  • IMG_0960.jpg
    IMG_0960.jpg
    144.2 KB · Views: 46
  • IMG_0961.jpg
    IMG_0961.jpg
    147.1 KB · Views: 56
  • IMG_0966.jpg
    IMG_0966.jpg
    144.8 KB · Views: 47
Last edited:

Jeeper

Well-known member
Joined
Dec 25, 2006
Messages
2,124
Location
Round Rock, TX
I have an OLD model K Hein Warner 2 ton that needs rebuilt. Bought it as an old floor jack 40+ years ago. The hydraulic unit uses a tank nut with radial holes for a spanner wrench. I have tried two undersized spanner wrenches and I have and broken both not budging the nut. I know these nuts are tough to remove having just taken one off a 1-1/4 Walker using the modified socket and impact tool approach.
Any ideas for removing the tank nut with the radial spanner holes?
I'll post pictures soon.

You need to go through H/W threads but here are a few links that may help you...

http://www.garagejournal.com/forum/showthread.php?t=36252&page=2 (post 23 & 27 by Hiball)


Look on this thread at post 217. Acacia posted a link the the wrench he used:
http://www.amazon.com/gp/product/B002FHNIXW/?tag=atomicindus08-20
 

Hiball

Well-known member
Joined
Apr 30, 2009
Messages
14,027
Location
Missery
i have an old model k hein warner 2 ton that needs rebuilt. Bought it as an old floor jack 40+ years ago. The hydraulic unit uses a tank nut with radial holes for a spanner wrench. I have tried two undersized spanner wrenches and i have and broken both not budging the nut. I know these nuts are tough to remove having just taken one off a 1-1/4 walker using the modified socket and impact tool approach.
Any ideas for removing the tank nut with the radial spanner holes?
I'll post pictures soon.

facom (Medium).jpg

I Use a Facom Face Spanner Wrench for those 180 Degree Offset HW tank nuts. Im not sure what model I have but its roughly 18" long and has Cheater marks. :lol_hitti

Obviously it can be done with a Pipe Wrench as there is plenty of meat on the bone to stay off the Seam, But its will leave marks and isn't the proper tool for the job. I would like to add.. The one I have is a bit overkill for the typical tank nut size, they make smaller ones that carry less throat and they probably aren't as sketchy when heaving on them.
 
Last edited:

GeorgeB22

New member
Joined
Nov 20, 2014
Messages
4
Thanks Jeeper. I had read the entire thread.
Hiball thanks, that is a really neat and correct tool for the job. I think it is the FA-116.200 and best price I can find is $295. A little out of my budget. I'll try to fabricate something that can utilize some 3/8 dowel pins.
 

acacia1602

Member
Joined
Apr 18, 2014
Messages
13
Location
Phoenix AZ
GeorgeB22,

The wrench I use is a Williams 474 Adjustable Hook Spanner Wrench. But of course it uses a hook, not pins, which natively won't work for your nut. I put my calipers to it and I see it's .51" width at the hook end. That might be wide enough for you to either grind the hook down to size, or grind off the hook, drill a 3/8 or smaller hole, and then put a pin (drill rod, maybe?) in it. I know it's a rig v.s. a tool but at about $50 total outlay maybe it would save you some green.

Here's what you'd be dealing with:


Hope this helps, and good luck!

Andrew M. Lewis
 
Last edited:

acacia1602

Member
Joined
Apr 18, 2014
Messages
13
Location
Phoenix AZ
I see what you are saying now that pics are up. Here is a cool idea: http://www.practicalmachinist.com/vb/antique-machinery-history/pin-spanner-monkey-wrench-218529/

Basically pins using a monkey wrench. Not sure if it would be large enough but cool idea.

Thats an awesome link, and yes, that's exactly what I'm proposing. The only difference being that monkey wrench he drilled out probably wouldn't make it far enough around to hold, but this Williams, with it's pivot, would be fine.

You'd just want to make sure your pin extends at the same angle as the hook currently does. That way the force of the wrench is at the correct tangent to the nut.

Again, best of luck!
 

GeorgeB22

New member
Joined
Nov 20, 2014
Messages
4
Thanks everyone for the ideas and advise. I had no "Ford wrench" types big enough to bore for pins an had tried clamps with dowel pins and chain wrenches.

I made a beating tool from a 1"x2"x5" piece of steel by boring a 3/8 hole for the dowel pin, leaving it protrude very slightly more than the depth of the spanner hole in the tank nut. Heated nut with an oxy-actelene torch to about 300 degrees F. Inserted the pin and beat on the steel block. Took three cycles and the nut rotated. After about a quarter turn with the tool it would rotate with my fingers. Minimal elongation of the spanner holes.

Everything looks clean and worth rebuilding. I'll tackle the pump end tomorrow.
 

acacia1602

Member
Joined
Apr 18, 2014
Messages
13
Location
Phoenix AZ
So I took the front wheels apart - it took a pipe wrench and a vise to get the axle off the frozen front left wheel - and have the wheels moving smoothly again. But the front wheel washer and front axle snap ring for that wheel were not present and I need to find a replacement.

Here are the dimensions on the ones I do have:
Front wheel washer:
OD: 1.25"
ID: 0.825"
Thickness: .085"

Split lock washer/front axle snap ring:
OD: 1.08"
ID: .825"
Thickness and height: .127"

Anyone know of a supplier for these parts?

Regards,


Andrew M. Lewis
 

acacia1602

Member
Joined
Apr 18, 2014
Messages
13
Location
Phoenix AZ
I can't recommend Lazzars. I spoke with Mark, who was quite dismissive and angry that I'd even call about such a thing. He was unwilling to even look for the parts.

I quote: "I can't put a guy on finding $2 worth of parts."

Never mind that I'd be quite willing to pay much more than $2 for the correct parts.

Lazzars can't be bothered and they will never see my business, small or large. :mad:

Still looking...

UPDATE: Mark called me back and apologized for his behavior. Apology accepted. He found the parts and has processed an order for me. If I actually get the correct parts I'll revise this post and water under the bridge.
 
Last edited:

GeorgeB22

New member
Joined
Nov 20, 2014
Messages
4
I have taken my old Model K apart and now am trying to install the leather ram cup. The parts are from Lazzers. Marc sent instructions to soak for a few days and then roll the sealing edge of the leather to reduce the cup outside diameter so that it can be installed. Leather on ram 45 degree angle to roll on hydraulic oil soaked rag.

Well I soaked for about a week and rolled it until I am worn out. The cup is still way over-sized at .810" and won't fit in the .75" bore.

Any ideas? I am soaking it in ISO32 hydraulic oil.
 

Hiball

Well-known member
Joined
Apr 30, 2009
Messages
14,027
Location
Missery
I have taken my old Model K apart and now am trying to install the leather ram cup. The parts are from Lazzers. Marc sent instructions to soak for a few days and then roll the sealing edge of the leather to reduce the cup outside diameter so that it can be installed. Leather on ram 45 degree angle to roll on hydraulic oil soaked rag.

Well I soaked for about a week and rolled it until I am worn out. The cup is still way over-sized at .810" and won't fit in the .75" bore.

Any ideas? I am soaking it in ISO32 hydraulic oil.

I was Actually Contacted by Mark and he wanted to pick my brain about preparing Leather Piston cups for installation. I did type of some instructions on how to prepare the seal for installation, The Correct Method for preparing the Seal is to Soak it for 24-48 Hours Min and then utilize a Crimping die. Unfortunately a Crimping die runs about $80 bucks to purchase, so its not cost effective to purchase one for a 1 time job. Essentially its a big chunk of Aluminum that has been machined out similar to the inside of a funnel, After soaking the cup you reinstall the seal onto the Ram, insert it into the die and lightly tap the end of the Ram which drives the seal into the die, thus pulling the flare in and allowing it to be inserted into the cylinder with NO damage. I have known some members who have been able to roll the lip and apply enough pressure to get them installed, Its definitely not the preferred method, But I understand why Mark used it. I might suggest what another member did, He took a piece a Appropriate sized PVC, Cut a section off and then cut a section out, length ways so he could squeeze the pvc around the flare. I wish I could be of more help, but without the proper tool you will have to work with what you have.

Ive attached a picture of the Crimping die, Sorry its not too good. Ill get a better picture next time im at the shop.


mdcar

Member
Joined
Jan 4, 2014
Messages
21
Location
Smithfield, KY
I have a Hein Werner that I think is a model WS. I am hoping to get it back up and going and want to see if anyone can verify that I have the model correct if I need to order parts. I also am looking for a reputable place to have to pump rebuilt. I live outside Louisville, KY, but don't mind sending it off. Thanks.

ImageUploadedByTapatalk1421528030.501982.jpgImageUploadedByTapatalk1421528054.707077.jpgImageUploadedByTapatalk1421528065.895619.jpgImageUploadedByTapatalk1421528076.400358.jpgImageUploadedByTapatalk1421528086.972889.jpg
 

469 runner

Well-known member
Joined
Jan 5, 2006
Messages
353
Location
North Carolina
Yes, I say that looks like a WS Hein Werner. It must be an early one as most I've seen have the weight capacity and model designation cast into the lift arm. Also, this ones handle seems to be missing the "T" crosshandle, or maybe early models didn't have this feature? The pump plunger should be retained by a dust cover and snap ring, not a hitch pin. Good luck.
 

mdcar

Member
Joined
Jan 4, 2014
Messages
21
Location
Smithfield, KY
I noticed the pump plunger was missing the dust cover and snap ring, and I think it also has the wrong spring. I found those parts still available. I thought that I read the WS was 6 3/4" between the frame so that is why I thought that's what it was. I'm having a difficult time getting it pulled apart, but that's probably due to not having the right tools. Thanks for the replies.
 

engineer031

Well-known member
Joined
Jun 26, 2015
Messages
131
Location
Ontario Canada
I have been coming to this web site for some time now and after reading all the good information I decided to join
I just picked up a Hein Warner model K I want to get working as it dont seem to pump up very good
 
To avoid these ads, REGISTER NOW!
Top Bottom