I decided that I would try to contribute something here in the hopes that it may help someone looking at doing this same project or considering Hellfire from Legacy Industrial. I chose Hellfire due to its chemical and heat resistance. I do a fair bit of welding and automotive work and wanted a coating that would hold up for a long time in that environment. While I think a lot of epoxy/Polyurea floors on here look great I actually kinda liked the industrial look of the Hellfire.
Please make no mistake that this is not a decorative coating - legacy is very clear about that. While I think I did pretty good (a pro could do better) it was not easy to achieve a finish without roller marks. It rolls on thin and I think I was a little conservative on coats 1 and 2. I ended up doing 4 coats - I had decent results after 3 but there was a little bit of miscommunication between my girlfriend and I during cutting in which left an area about 3’ by 1” wide with only 2 coats. We had the material and decided to do a fourth coat - the fourth coat netted a much better result but this could be due to the light first coat. I used 5.25 gallons total.
Legacy is on this board and was helpful with several questions I had. The material shipped next day and was well packaged. I did have one can that leaked during the rigors of transportation but this was resolved quickly and without headache. My advice here is to open the package and check for damage even if the box looks fine. I was ready to start the coating when I opened the box and that is when it was discovered. The cans are wrapped in plastic and the box is taped really well!
I would recommend an 18” roller which Legacy sells. I didn’t realize it when I bought the materials but buying from them would save time. Amazon has a sturdy plastic roller frame called Big Ben. It worked really well on an extension pole. A 6’ or 8’ extension pole is my recommendation to avoid roller marks.
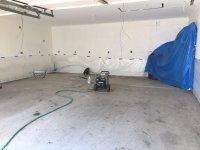
Pressure wash and grease removal:

I was far from satisfied with the result here. I originally planned to acid etch and had 7 gallons of acid ready to go. Instead I ended up renting a Diamabrush and floor polisher/grinder at Home Depot. This tool worked really well, was fast, and pretty easy to use. I’d recommend watching some of the Diamabrush videos from the manufacturer to see how to use it - they were helpful. You’ll also learn what the tool looks like in good condition. The diamond “brushes” are consumable and easily abused. I went to two Home Depot before finding one that was near new. My Home Depot didn’t have a dust shroud but I would have definitely used one along with a dust vac. If your Home Depot is like mine and you don’t have a cartridge style respirator just buy one now. You’ll want it when you apply the coating anyway. You can also use the Diamabrush wet. This ***** more than the dust and created a slurry that was tough to remove/vacuum. I guess if your surface is real hard the slurry can help the tool work. I did the edges with a 7” diamond cup wheel. I had this tool already - if I didn’t I would have bought the smaller Diamabrush.

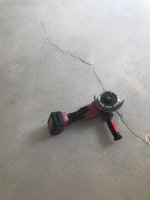
After the floor was clean I realized I needed to chase and fill the cracks. I used two products here depending on whether the crack was ”moving” both were from PC products a 2 part paste epoxy and a Polyurea 2 part epoxy for the cracks that were moving. My cracks were bigger than I thought and while the application method of the 2 part epoxy in the caulking gun is convenient it would have been more cost effective to buy the Polyurea from legacy. When I started I was like ‘no way I’ll use that much...’ I did. I chased the crack with 4.5” diamond crack chasing blade. This was really easy.

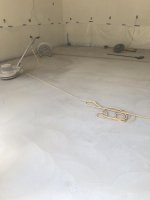
Here the floor after 1 coat:

After 4 coats:

Let me say that I’m far from an expert so if folks have suggestions I’ll take no offense!
Please make no mistake that this is not a decorative coating - legacy is very clear about that. While I think I did pretty good (a pro could do better) it was not easy to achieve a finish without roller marks. It rolls on thin and I think I was a little conservative on coats 1 and 2. I ended up doing 4 coats - I had decent results after 3 but there was a little bit of miscommunication between my girlfriend and I during cutting in which left an area about 3’ by 1” wide with only 2 coats. We had the material and decided to do a fourth coat - the fourth coat netted a much better result but this could be due to the light first coat. I used 5.25 gallons total.
Legacy is on this board and was helpful with several questions I had. The material shipped next day and was well packaged. I did have one can that leaked during the rigors of transportation but this was resolved quickly and without headache. My advice here is to open the package and check for damage even if the box looks fine. I was ready to start the coating when I opened the box and that is when it was discovered. The cans are wrapped in plastic and the box is taped really well!
I would recommend an 18” roller which Legacy sells. I didn’t realize it when I bought the materials but buying from them would save time. Amazon has a sturdy plastic roller frame called Big Ben. It worked really well on an extension pole. A 6’ or 8’ extension pole is my recommendation to avoid roller marks.
Pressure wash and grease removal:
I was far from satisfied with the result here. I originally planned to acid etch and had 7 gallons of acid ready to go. Instead I ended up renting a Diamabrush and floor polisher/grinder at Home Depot. This tool worked really well, was fast, and pretty easy to use. I’d recommend watching some of the Diamabrush videos from the manufacturer to see how to use it - they were helpful. You’ll also learn what the tool looks like in good condition. The diamond “brushes” are consumable and easily abused. I went to two Home Depot before finding one that was near new. My Home Depot didn’t have a dust shroud but I would have definitely used one along with a dust vac. If your Home Depot is like mine and you don’t have a cartridge style respirator just buy one now. You’ll want it when you apply the coating anyway. You can also use the Diamabrush wet. This ***** more than the dust and created a slurry that was tough to remove/vacuum. I guess if your surface is real hard the slurry can help the tool work. I did the edges with a 7” diamond cup wheel. I had this tool already - if I didn’t I would have bought the smaller Diamabrush.
After the floor was clean I realized I needed to chase and fill the cracks. I used two products here depending on whether the crack was ”moving” both were from PC products a 2 part paste epoxy and a Polyurea 2 part epoxy for the cracks that were moving. My cracks were bigger than I thought and while the application method of the 2 part epoxy in the caulking gun is convenient it would have been more cost effective to buy the Polyurea from legacy. When I started I was like ‘no way I’ll use that much...’ I did. I chased the crack with 4.5” diamond crack chasing blade. This was really easy.
Here the floor after 1 coat:
After 4 coats:
Let me say that I’m far from an expert so if folks have suggestions I’ll take no offense!
Attachments
-
 5E02D233-4260-479C-A963-EB46B77243DD.jpg110.9 KB · Views: 957
 -
 1EEE56B3-FC44-4498-AF23-FBFF19E81481.jpg39.1 KB · Views: 959
 -
 F804904A-83C0-4E54-B6A4-C802EE9D2E6D.jpg67.9 KB · Views: 959
 -
 9FF11E81-DB54-4EE8-97A3-8657545E4150.jpg84.2 KB · Views: 957
 -
 C789FAA9-74F9-4A41-83B5-3A4E10952A59.jpg44.9 KB · Views: 994