To avoid these ads, REGISTER NOW!

Hello from NJ

aben8057

Member
Joined
Jul 19, 2005
Messages
12
Location
New Jersey
I just wanted to stop by and say thank you. Thank you for motivating me in completing one of my summer projects. This forum is a great source of knowledge and information which made it easier in my decision. Well after about a month of on and off work, I managed to get my garage 90% complete. The remaining 10% will consist of wall decorations and a hardline for the compressor. I would like to introduce to you my project……

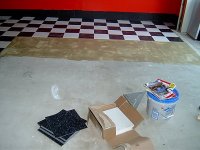
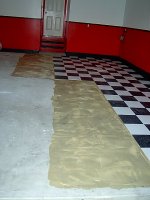
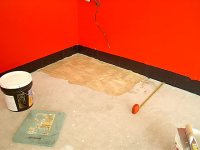
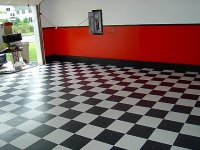
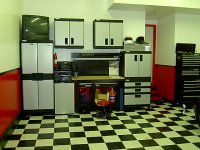
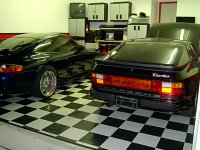
I used VCT for the floor and exterior wall paint for the lower portion of the walls with interior for the white. High voltage 8 ft lights that are more than enough for my humble 2 car garage.

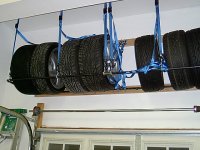
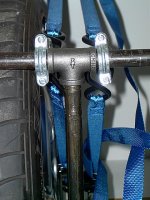
Before and after pics
 

Attachments

  • IM000068.JPG
    IM000068.JPG
    64 KB · Views: 50
  • IM000066.JPG
    IM000066.JPG
    61.5 KB · Views: 34
  • IM000069.JPG
    IM000069.JPG
    59.4 KB · Views: 31
  • IM000004.JPG
    IM000004.JPG
    55.2 KB · Views: 68
  • IM000007.JPG
    IM000007.JPG
    53.8 KB · Views: 46
  • IM000008.JPG
    IM000008.JPG
    62.9 KB · Views: 51
  • IM000003.JPG
    IM000003.JPG
    56.1 KB · Views: 85
To avoid these ads, REGISTER NOW!
OP
A

aben8057

Member
Joined
Jul 19, 2005
Messages
12
Location
New Jersey
Taking advantage of some ceiling space....
 

Attachments

  • IM000015.JPG
    IM000015.JPG
    58 KB · Views: 108
  • IM000011.JPG
    IM000011.JPG
    57.8 KB · Views: 100

icnsltmfg

Well-known member
Joined
May 14, 2007
Messages
282
Location
New Jersey
Great job...you are a few weeks ahead of me. Next week the topcoat is getting sprayed, plus the lower blocks painted. The VCT is next. Any tricks on the VCT? How long did you wait to drive on it after being put down? Did you do one side then the other?

We are starting to see some more NJ guy's on the board. What part of the state?
 

enginerd

Well-known member
Joined
Aug 26, 2006
Messages
354
We have block 4' up on the wall, we're debating what to do...maybe just paint it white with a strip at the top? The floor is stamped concrete in 1/2, and ironite epoxy for the other areas.

Strip on the wall at that height makes all the difference, very cool.

Not a huge fan of the Checker board pattern, it a bit too played out, but yours look svery "crisp."

Atleast you have some decent cars in there :)
 

Oddjob

New member
Joined
May 22, 2007
Messages
4
Location
MD
Taking advantage of some ceiling space....

What did you use to hang those tires up there? I'm trying to do something about my summer set and your solutions looks pretty attractive. Is that just steel pipe in the shape of a rectangle attached to a 2x4 on the wall? What is the upper 2x4 holding up?
 
To avoid these ads, REGISTER NOW!

mhoffm911

Well-known member
Joined
Sep 3, 2007
Messages
511
What did you use to finish off the front of the tiles by the garage opening? I have always wondered what you put at the front to tie it all together.

Can you please post some more pics of that section? Thanks!

Garage looks great, by the way.
 
OP
A

aben8057

Member
Joined
Jul 19, 2005
Messages
12
Location
New Jersey
Adam….The only trick I researched was to let the adhesive cure 30 minutes prior to laying down your tile, do small sections at a time and make sure the weather is above the 70’s. Upon completion of the tile I waited 7 days before I parked any cars inside. I have attached some pictures of the progress.

Enginerd…Thanx for the compliments.

Oddjob…I attached some pictures of the hardware used to create my tire rack. In a nutshell it is ½ black pipe in a 8 foot by 18 inches configuration. I originally had 2x8 however I noticed that my 16 inch wheels would have fell through so I decided to go with the 18 inch pipe at HD. I also used 2x3 wood anchored to my ceiling joist using in order to spread out the weight distribution. I chose to hang the tire rack via straps attached to O-hooks as seen on the pictures.

Mhofm911…I contacted my local commercial flooring supplier and ask for a 4-foot of 1/16 overlapping transitional strip. Using the same Armstong adhesive, I applied it with the same protocol as laying down the tile.
 

Attachments

  • IM000022.JPG
    IM000022.JPG
    52.6 KB · Views: 28
  • IM000020.JPG
    IM000020.JPG
    63 KB · Views: 43
  • IM000016.JPG
    IM000016.JPG
    61.2 KB · Views: 33
  • IM000121.JPG
    IM000121.JPG
    61.7 KB · Views: 31
  • IM000113.JPG
    IM000113.JPG
    56 KB · Views: 25
  • IM000119.JPG
    IM000119.JPG
    59.6 KB · Views: 35
  • IM000118.JPG
    IM000118.JPG
    50 KB · Views: 34
Last edited:
OP
A

aben8057

Member
Joined
Jul 19, 2005
Messages
12
Location
New Jersey
cont....and some overhead storage racks
 

Attachments

  • IM000027.JPG
    IM000027.JPG
    56.3 KB · Views: 27
  • IM000019.JPG
    IM000019.JPG
    55.5 KB · Views: 20
  • IM000018.JPG
    IM000018.JPG
    56.1 KB · Views: 20
  • IM000025.JPG
    IM000025.JPG
    57.7 KB · Views: 27
  • IM000024.JPG
    IM000024.JPG
    57.6 KB · Views: 24
  • IM000021.JPG
    IM000021.JPG
    56.1 KB · Views: 8
Last edited:
OP
A

aben8057

Member
Joined
Jul 19, 2005
Messages
12
Location
New Jersey
Last set of pics

Here are some more which you may be able to see the HD sponsored tire rack. It is supported by straps at a 45 degree angle as well as from the ceiling.
 

Attachments

  • 15.JPG
    15.JPG
    58.3 KB · Views: 14
  • 16.JPG
    16.JPG
    62.4 KB · Views: 14
  • 17.JPG
    17.JPG
    60.1 KB · Views: 15

Oddjob

New member
Joined
May 22, 2007
Messages
4
Location
MD
Re: Last set of pics

Here are some more which you may be able to see the HD sponsored tire rack. It is supported by straps at a 45 degree angle as well as from the ceiling.

Thanks so much for all the pictures. I really do like the way you did it. Unfortunately, the ceiling in my garage isn't as tall, but I may be able to adapt this to work for me.

Thanks! Your garage looks great.
 
To avoid these ads, REGISTER NOW!
Top Bottom