To avoid these ads, REGISTER NOW!

Hello from Toronto

JohnJL

Well-known member
Joined
Jul 28, 2010
Messages
150
Location
Toronto
Hello,
My wife and I just moved from Sydney, Australia to a small town north of Toronto, Ontario. We bought a home on a hill with a great view but with lots of scope to improve it. With a baby on the way, we needed to do some improvements to the nursury and master suite. The existing 3-car garage also wasnt going to cut it...we have 3 collector cars, 2 daily-drivers, a lawn tractor, bikes, will probably add a snowmobile, I'd like to build an off-road cart, and I do all the work on the race cars.

So, my loving wife agreed to my master plan of building out the existing garage to an 8-car space with a lift. On the second floor she gets a big bedroom, another bedroom, a big bathroom, upstairs laundry room, and a bunch of enhancements throughout the house.

First pics are part of the current collection and the original garage preparing for demolition.
 

Attachments

  • IMG_2782.jpg
    IMG_2782.jpg
    146.1 KB · Views: 36
  • IMG_2787.jpg
    IMG_2787.jpg
    144.8 KB · Views: 33
Last edited:
To avoid these ads, REGISTER NOW!
OP
J

JohnJL

Well-known member
Joined
Jul 28, 2010
Messages
150
Location
Toronto
...here are some more of the before, planning and demolition stages.

I hired the original builder of our home to do the design, contracting, demolition and construction of the bones of the house. I'd like to be able to pitch in with the construction but job demands dont allow it. With the baby due in 4 months there is no scope for time slippage so the wise choice was a fixed time contract. I'm doing the bathroome, flooring and trim throughout the rest of the house as well as the air, lighting, paint and floors in the new addition and garage...
 

Attachments

  • IMG_2794.jpg
    IMG_2794.jpg
    144.2 KB · Views: 18
  • IMG_2795.jpg
    IMG_2795.jpg
    133.8 KB · Views: 15
  • IMG_2798.jpg
    IMG_2798.jpg
    131.5 KB · Views: 15
  • IMG_2797.jpg
    IMG_2797.jpg
    137 KB · Views: 16
  • IMG_2796.jpg
    IMG_2796.jpg
    135.7 KB · Views: 16
  • IMG_2801.jpg
    IMG_2801.jpg
    140.1 KB · Views: 14
  • IMG_2803.jpg
    IMG_2803.jpg
    133.9 KB · Views: 12
Last edited:
OP
J

JohnJL

Well-known member
Joined
Jul 28, 2010
Messages
150
Location
Toronto
Demolition and footings dug...this was within 4 days of starting!
 

Attachments

  • IMG_2894.jpg
    IMG_2894.jpg
    148.7 KB · Views: 7
  • IMG_2893.jpg
    IMG_2893.jpg
    146.3 KB · Views: 7
  • IMG_2891.jpg
    IMG_2891.jpg
    154 KB · Views: 6
Last edited:
OP
J

JohnJL

Well-known member
Joined
Jul 28, 2010
Messages
150
Location
Toronto
Footings went in quickly. The weather mostly cooperated. We're using the existing slab and adding slabs around the perimeter to the new footprint.
 

Attachments

  • IMG_2895.jpg
    IMG_2895.jpg
    151 KB · Views: 7
  • IMG_2921.jpg
    IMG_2921.jpg
    148.2 KB · Views: 14
  • IMG_2925.jpg
    IMG_2925.jpg
    148.8 KB · Views: 9
  • IMG_2928.jpg
    IMG_2928.jpg
    151.5 KB · Views: 8
  • IMG_2932.jpg
    IMG_2932.jpg
    144.5 KB · Views: 10
Last edited:
OP
J

JohnJL

Well-known member
Joined
Jul 28, 2010
Messages
150
Location
Toronto
Getting there...I spec'd steel beams so that there are only 2 posts inside the entire 8-bay space. Those two columns are "sistered" up next to where the 2-post life columns will be installed to minimize their intrusion into the space.
 

Attachments

  • IMG_3002.jpg
    IMG_3002.jpg
    148.6 KB · Views: 9
  • IMG_2959.jpg
    IMG_2959.jpg
    150.5 KB · Views: 7
  • IMG_2954.jpg
    IMG_2954.jpg
    151.4 KB · Views: 8
Last edited:
OP
J

JohnJL

Well-known member
Joined
Jul 28, 2010
Messages
150
Location
Toronto
...this is 3.5 weeks into the build. The 2nd and 3rd pics show the placement and view from the north-side windows. That north-west corner is where it looks best to place situate the "man cave corner." I envision an LCD on the wall, driving console for GT2, couch, fridge, carpet, etc...

I'll post more as progress occurs...thanks for looking!
 

Attachments

  • IMG_3086.jpg
    IMG_3086.jpg
    143.6 KB · Views: 13
  • IMG_3084.jpg
    IMG_3084.jpg
    144.2 KB · Views: 13
  • IMG_3050.jpg
    IMG_3050.jpg
    137.2 KB · Views: 11
  • IMG_3041.jpg
    IMG_3041.jpg
    144 KB · Views: 11
  • IMG_3024.jpg
    IMG_3024.jpg
    141.9 KB · Views: 11
Last edited:
To avoid these ads, REGISTER NOW!
OP
J

JohnJL

Well-known member
Joined
Jul 28, 2010
Messages
150
Location
Toronto
Progress pic from yesterday...10 4x48" T8 tubes gives tons of light in the work area...4 more are installed in the storage half of the garage. The remaining 6 interspersed 2x48" lamps go in this weekend...

The work area is very bright. I havent done the calcs for the worklevel but there are 10 of the 4x48" 3000 lumen per tube over a ~700 sq foot work area.

Both heaters are in now too, in the workspace area there is a stack of the old kitchen cabinets that I'll R&R for garage storage use. The radiant Schenk heater over the stack is a 15 footer and puts out nice heat over the workspace. The 45k reznor unit keep the ambient air warm.

4xliftmaster 3800 door openers work with no problem. Very quiet.

Compressed air in plumbed with 3x outlets along the workspace wall. I havent ordered the lift yet but the electrical is all set up. The 220v for the welding station and powdercoat oven are all in and set too.

Also need to set up the A/V. Wiring for the TV and in-ceiling speakers is behind the wall and in the rafters.
 

Attachments

  • DSC00820.jpg
    DSC00820.jpg
    136.5 KB · Views: 24
  • DSC00822.jpg
    DSC00822.jpg
    136.3 KB · Views: 24
  • DSC00823.jpg
    DSC00823.jpg
    133.5 KB · Views: 25
Last edited:

R6 Racer

Well-known member
Joined
Feb 21, 2010
Messages
1,632
Location
Northern Ontario Canada
Fantastic looking build!
Welcome to GJ. :beer: You should find the company pleasant enough.:)
Good to see another Canadian member, I'm a couple hours south of yall!.
The wife & I will have to stop buy in the spring on one of our trips north!
Questions...
"bikes"... as in motor or pedal?
Lift... I think I see where your going to be putting it. Ceeling height doesn't appear all that tall, what type of lift are you planning on? Mid rise Scissor, maybe MaxJack?

Steve
 
Last edited:
OP
J

JohnJL

Well-known member
Joined
Jul 28, 2010
Messages
150
Location
Toronto
Fantastic looking build!
I'm a couple hours south of yall!.
The wife & I will have to stop buy in the spring on one of our trips north!
Questions...
"bikes"... as in motor or pedal?
Lift... I think I see where your going to be putting it. Ceeling height doesn't appear all that tall, what type of lift are you planning on? Mid rise Scissor, maybe MaxJack?

Steve

Hi Steve,
Thanks for the compliment and welcome. I'm not all that far north, 65km from Toronto, just past Vaughan.

I had to sell the motorcycles, all mountainbikes now...

The lift will be a 10k 2-poster. I'm finalizing my choice now. The ceiling in the main area is 10 ft but on the perimeter and in the workspace is 11 foot. The ceiling looks low inthe first pic because I am standing on a ladder. We designed in a 14' "pocket" to accomodate the lift pillars. That will allow plenty of height for most of the cars I work on (porsches and WRXs) but I might still have to stoop a tiny bit for the land rover and landcruiser.

Welcome to stop by, of course!
 
OP
J

JohnJL

Well-known member
Joined
Jul 28, 2010
Messages
150
Location
Toronto
Time for an update...

I've gotten a bunch of work done. I'm halfway through a 2-week holiday with the wife and new son, which means I'm staining stairs, installing dimmers, and when I'm able, sneaking off to the garage to make some progress.

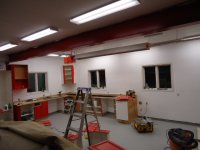
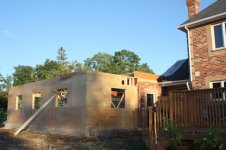
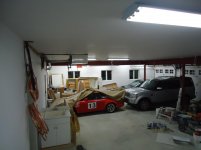
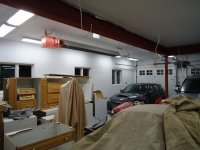
Firstly, the overhead beams and posts got coats of tremclad fire red. I think it looks pretty good and the posts sure are high-viz now. Dollies and hoists are picked out.

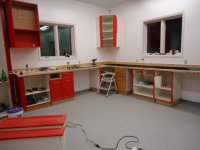
Next I needed to get some kind of coating on the floor area under the cabinets and in the corner. This area will get a lot of foottraffic, but will have rubber mats next to the benches. I drag engine stands around in this area. Towards the door will be the welding/grinding/messy area. I struggled with the floor choice here. What I decided to do was start with just some basic Behr 1-part epoxy. If it holds up, great. If not I can just throw down another coat. When I get to the rest of the garage and if I go with epoxy there then I will be grinding anyway so whats 300 sq feet more of grinding off the paint in this area. I thought about vct tile too, I really like the checkerboard look. But I am not sure it would hold up to engine stands, welding slag, grinder shards, etc. So I washed, degreased, etched, rinsed, rinsed, rinsed, dried, primered and rollered down half a can of the Behr 1-part "acrylic-epoxy" silver gray and let it sit for a few days. Once its cured for a bit I'm going to do some testing with brake fluid, gas, oil and scratching. We'll see if it passes those tests...

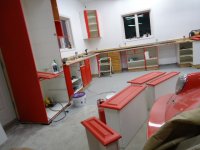
I then turned my attention to the cabinets. We remodeled our kitchen and had the 18 old cabinets removed and stored carefully. I laid them out in various combinations along the walls. I then picked out the ones I'll use, straightened up/gluednscrewed where needed and washed them down a few times.

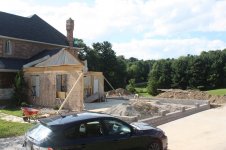
On went a coat of Zinsser 1-2-3 primer. That stuff covers really well and sticks great. Here's where I should have paid attention though...I should have had the primer tinted. I then rollered on some melamine cabinet paint. Then another coat. Then another coat. Then another coat. And I'm putting on another as soon as I get a coat of poly on the stairs. The color was supposed to match the Fire Red tremclad on the posts but so far it seems to be an exact match of Porsche Guards' Red (compare to the car in the pictures.)

If I can keep the progress up on the interior stairs then I hope to get the cabinets in place and start on the bench tops. I've left a few gaps between the cabinets for rolling toolchests, welding cart, rolling jacks and dollies and lifting table. I'm not set yet on the benchtop materials. I'll likely use 2 layers of 5/4 ply and cover with flashing, melamine or maybe even try out some vct tile. I've tried thinking about each work area separately. I have a computer/paperwork area, an engine assembly area, a grinding/bashing area, and a welding area. I may choose a different material for each, we'll see.

I also pulled the trigger on the lift and have a Bendpak XRP10ACX on the way. To decode that, its a 10Klb 2-post, clearfloor, x-tra wide asymmetrical lift. Ships today for installation next week/week after.
media.nl


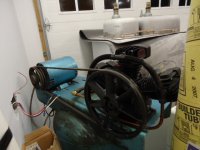
Also a couple of pics of the compressor. It is a stout unit, but the motor it came with is a 3-phase unit. I ebay'd and am told a new Baldor 1-phase 5hp motor is on the way. The pump is a new devilbiss. Still need to source and assemble the proper pressure switch and starter.http://www.baldor.com/products/detail.asp?1=1&page=1&catalogonly=1&catalog=L1430T&product=AC+Motors&family=Single+Phase%7Cvw%5FACMotors%5FSinglePhase&hp=5&rpm=1400%2D1800&winding=36WGT077&rating=40CMB%2DCONT

Hope you enjoy!
 

Attachments

  • DSC00960.JPG
    DSC00960.JPG
    114.7 KB · Views: 15
  • DSC01037.JPG
    DSC01037.JPG
    113.9 KB · Views: 14
  • DSC01036.JPG
    DSC01036.JPG
    120 KB · Views: 15
  • DSC01035.JPG
    DSC01035.JPG
    118.5 KB · Views: 14
Last edited:
OP
J

JohnJL

Well-known member
Joined
Jul 28, 2010
Messages
150
Location
Toronto
Thanks Foss and Steve. Made some more progress today after doing some duty on the interior stairs...

I got the base cabinets in place in the "clean" area. This corner is where the computer, stereo and Atari will reside, as well as engine and other clean assmbly. I shimmed the base cabinets, then attached them all in place with 3/4" (18.5mm) exterior grade sheathing plywood. I then cut 4" for "backsplash" and attached that to the bench and wall. Then the top layer of 3/4" ply went on top. Everything was glued and screwed. I wont be removing this when I move...

In the last pic you can see a few elements of the construction. First, everything sits on base kitchen cabinets. Then 2 layers of 3/4" plywood. In the background is the backsplash. The black pieces are some flashing, there is other angle iron also painted black. Once I've painted everything (tomorrow?) a layer of 1/4" melamine-coated hardboard will top off the plywood. It will directly on the ply and held in place at the edges with the angle iron and over the seams with more black flat iron bar. The flashing will dress up the corner on top of the backsplash.

You can also see I've started to hang the wall cabinets. I've made a bunch of changes to the layout as I've gone along to accomodate the rolling toolboxes and such. I'm still not happy with the cabinet paint either, I see more painting in my future...

Hope you like it...maybe more tomorrow...
 

Attachments

  • DSC01038.JPG
    DSC01038.JPG
    117.6 KB · Views: 8
  • DSC01039.JPG
    DSC01039.JPG
    119.4 KB · Views: 8
  • DSC01042.JPG
    DSC01042.JPG
    116.2 KB · Views: 7
  • DSC01043.JPG
    DSC01043.JPG
    117.3 KB · Views: 9
  • DSC01044.JPG
    DSC01044.JPG
    106.8 KB · Views: 8
To avoid these ads, REGISTER NOW!
Top Bottom