To avoid these ads, REGISTER NOW!

Help Identifying Early-Type Swivel / Smith-Style Vise

Tyler-James

New member
Joined
Mar 16, 2015
Messages
4
Location
Saint Albans, VT
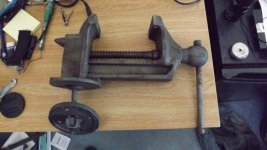
Hello Garage Journal. For a first post, I thought I'd show you something unique I picked up.

I bought this vise from a liquidator on Sunday. The man who originally sold it to the liquidators was still in the store, and when I questioned him on it, he said all the parts were present. I didn't want to argue with him, but I had my suspicions that there were some mounting pieces missing.

Regardless, it looked unique to me, so I bought it, and have been trying to identify it. I have been looking through the forums on here to try and identify the maker of this vise. The best I've done is to determine that it's probably early 1900s and is the "original" type of swivel vise. Beyond that, I don't know if it's Oswego, Sawyer, Athol, Parker, or even if it's some other brand.

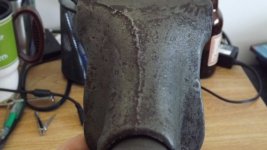
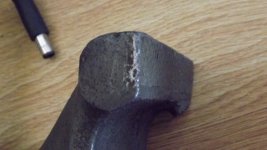
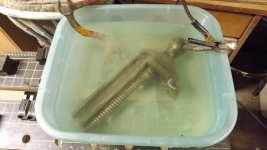
I have two problems. First, I can't find any identifying makers mark on it. I'm at college right now, so I can't do any work on it, but my goal is to run it through an electrolysis bath because it's pretty seized up at the moment. Second, compared to all the other vises I've seen on here with the early type of swivel / center bolt, this one has an I-beam style of slide and the small horn on the back.

Any thoughts? I'll try to update when I work on it in a few weeks.
 

Attachments

  • 01.jpg
    01.jpg
    65.7 KB · Views: 35
  • 02.jpg
    02.jpg
    63.8 KB · Views: 28
  • 03.jpg
    03.jpg
    65.6 KB · Views: 23
  • 04.jpg
    04.jpg
    65.8 KB · Views: 23
  • 05.jpg
    05.jpg
    69.6 KB · Views: 22
To avoid these ads, REGISTER NOW!

t4runner

Well-known member
Joined
Jun 9, 2012
Messages
719
Location
Lake Grove. NY
I may be wrong but it looks like almost all the parts are there except for the round backing plate that goes between the nut and the bottom of the bench top your mounting it to.
 

Attachments

  • IMG_5622.JPG
    IMG_5622.JPG
    131.6 KB · Views: 18
OP
T

Tyler-James

New member
Joined
Mar 16, 2015
Messages
4
Location
Saint Albans, VT
t4runner, thanks for the picture. I think you're right and the backing plate may be the only missing piece. Any idea on the maker / brand?

I was able to clean it a bit, but still, no visible markings. I can tell you that it has 3" jaws, opens 5" and the jaws are also welded on. Don't have a scale so I can't tell you the weight, but it's pretty solid.
 

Attachments

  • Vise 001.jpg
    Vise 001.jpg
    71 KB · Views: 13
  • Vise 002.jpg
    Vise 002.jpg
    70.8 KB · Views: 12
  • Vise 009.JPG
    Vise 009.JPG
    141 KB · Views: 11
  • Vise 007.jpg
    Vise 007.jpg
    55.9 KB · Views: 9
  • Vise 005.JPG
    Vise 005.JPG
    140.8 KB · Views: 12
  • Vise 010.jpg
    Vise 010.jpg
    71.1 KB · Views: 12
To avoid these ads, REGISTER NOW!

classicJackets

Well-known member
Joined
Sep 26, 2014
Messages
448
Location
SE Michigan
Cool piece! Worst part about trying to collect/pick up tools in college is there's nowhere to put the bigger ones, lol.. I'm in the same boat
 

BFBOB

Well-known member
Joined
Sep 20, 2011
Messages
5,073
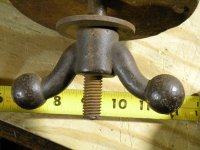
It's missing one other piece: the handle (or wrench) that turns that nut on the bottom of the bench. It's meant to function like a normal swivel vise, so you really don't want to go fumbling for a wrench every time you need to adjust the swivel. Some vises of this type use a giant wing nut; yours uses something like this:

The big wingnut is for a Yost No. 1; the wrench/square nut is for an Oswego.
 

Attachments

  • DSCN3842.jpg
    DSCN3842.jpg
    141 KB · Views: 5
  • DSCN4591.jpg
    DSCN4591.jpg
    132.6 KB · Views: 5
  • DSCN4592.jpg
    DSCN4592.jpg
    137.2 KB · Views: 7
Last edited:
OP
T

Tyler-James

New member
Joined
Mar 16, 2015
Messages
4
Location
Saint Albans, VT
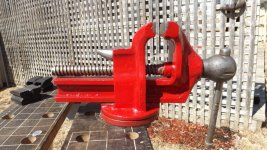
Well, here she is. I opted for two coats of Rust-Oleum Oil Enamel in a gloss red, brushed on by hand to keep with the rugged antique look it has. I thought about using a red oxide primer, but I didn't have any at the time, and due to the pitting on the surface, the paint had no trouble bonding with the metal.

Rather than using the square nut that came with this, I opted for a wingnut. Well, it took me a while to find one, as 7/16-14 is not a common size anymore; luckily, Fastenal stocks practically everything. I used a scrap piece of brass to act as a counter-weight / bumper underneath the work table, and filled in the space with some spare washers. With this vise, I was actually surprised with its stability - I don't need to screw the plate down to the work surface because hand-tightening the wingnut stops it from swiveling or rocking. This piece is solid.

I still have no clue as to the age or maker, but I'm happy with it, and I'm sure it will get enough heavy use in the coming months that I might be painting it again by the end of summer.

Also, I didn't mention it earlier, but the weight on this is 15 lbs.
 

Attachments

  • Spring Break Work 039.jpg
    Spring Break Work 039.jpg
    75.1 KB · Views: 3
  • Spring Break Work 038.jpg
    Spring Break Work 038.jpg
    133.5 KB · Views: 6
  • Spring Break Work 037.jpg
    Spring Break Work 037.jpg
    126 KB · Views: 8
  • Spring Break Work 015.JPG
    Spring Break Work 015.JPG
    137.1 KB · Views: 4
  • Spring Break Work 011.JPG
    Spring Break Work 011.JPG
    137.5 KB · Views: 4
  • Spring Break Work 003.JPG
    Spring Break Work 003.JPG
    143.6 KB · Views: 5
  • Spring Break Work 040.jpg
    Spring Break Work 040.jpg
    129.2 KB · Views: 4
To avoid these ads, REGISTER NOW!
Top Bottom