To avoid these ads, REGISTER NOW!

Help me rebuild this R15

sdriv

Active member
Joined
Dec 28, 2013
Messages
27
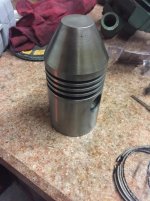
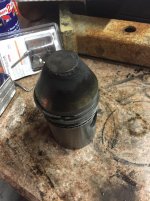
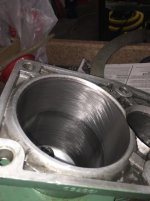
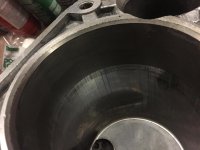
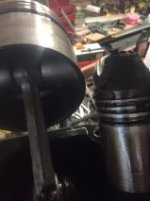
So I thought I would take apart the auto drain and clean it up since I am waiting for the new motor to come. Well one thing led to another and I ended up pulling the whole head off after seeing this:eyecrazy:That is the high pressure exhaust valve. As you can see somewhere in its previous life someone used this as a vacuum instead of a compressor:willy_nil. So it looks like a whole new set of valves are in order. As for the high pressure piston what is the best way to clean that up? Also is there a trick to getting the head back on? I have don it before on a lawnmower engine with a ring compressor but that was a single cylinder. Is it best to have a second set of hands to slide the head down as I compress the rings on each piston? Also is there any definitive way to tell if this is an R-15 or R-15B pump? I read somewhere that the R-15 has the same size high pressure valves and the B has different sizes.
 

Attachments

  • comp valve 2.jpg
    comp valve 2.jpg
    12.6 KB · Views: 126
  • compr valve.jpg
    compr valve.jpg
    8.4 KB · Views: 114
  • comp piston.jpg
    comp piston.jpg
    26.2 KB · Views: 107
To avoid these ads, REGISTER NOW!

Trey T

Well-known member
Joined
Aug 3, 2011
Messages
3,749
Location
Houston, TX
R15 is R15B. For the 5HP models, Champion makes the R15B (splash lube) and PL-15A (pressure lube).

As for the valves, I'm not certain. Quincy and Saylor Beall use same size valves but different spring strength; strong spring for the high pressure.

R15B is my favorite pump and I believe it's the best one for home owner. I hope to see more photos of the rebuild.
 

MacMcMacmac

Well-known member
Joined
Oct 21, 2014
Messages
1,583
Location
canada
You need rings. You should also grab the HP rod and see how much you can wobble the HP piston side to side. As long as it's apart, I'd pull the rod caps and have a look at the crank journals. I wouldn't worry about the roller bearings unless there is signs of metal in the crankcase.
 
OP
S

sdriv

Active member
Joined
Dec 28, 2013
Messages
27
Ok so I will order the overhaul kit that comes with all new valves new rings for both Pistons and a gasket set. I will check the rod wobble when I get in this evening:thumbup:
 
OP
S

sdriv

Active member
Joined
Dec 28, 2013
Messages
27
Ok so no metal in the crankcase. I fiddled with both piston assemblies and there doesn't seem to be any excessive wobble. Is all that excessive build up in the valves and on the HP piston from dirt being sucked in?
 
Last edited:
OP
S

sdriv

Active member
Joined
Dec 28, 2013
Messages
27
Ordered up the rebuild kit today so I should have some good quality shop time this weekend.
 
To avoid these ads, REGISTER NOW!
OP
S

sdriv

Active member
Joined
Dec 28, 2013
Messages
27
Ok that should work thanks for the hint. Maybe you could help me out with setting the pistons. Most of the videos I have watched show putting the pistons into the head and then dropping the head onto the block and attaching the rods through an access opening in the block. This block doesn't have any access port to do that. So do I install the springs on the pistons while they are attached to the rods and then put the head over the pistons and compress both piston spring sets at the same time?
 

MacMcMacmac

Well-known member
Joined
Oct 21, 2014
Messages
1,583
Location
canada
Ok so no metal in the crankcase. I fiddled with both piston assemblies and there doesn't seem to be any excessive wobble. Is all that excessive build up in the valves and on the HP piston from dirt being sucked in?

Looks like burnt, carbonized oil. Worn rings + motor oil the likely culprits.
 
OP
S

sdriv

Active member
Joined
Dec 28, 2013
Messages
27
Do I need to hone the cylinders also? if so Is it something I could do myself?
 

redmondjp

Well-known member
Joined
Nov 25, 2014
Messages
2,318
Location
Redmond, WA
Do I need to hone the cylinders also? if so Is it something I could do myself?
It can't hurt to lightly hone them - most good tool rental places will have ball hones at different diameters. I'd just do 2-3 passes and call it a day - you want to plunge up and down fairly quickly so as to attain a 45 degree angle on the hatching (or close to it). It will only take less than a minute per cylinder.
 
OP
S

sdriv

Active member
Joined
Dec 28, 2013
Messages
27
My box o parts was sitting by the garage door last night when I got home so I was able to spend a little time on it after work today:thumbup:. I pulled the HP piston out and cleaned off the carbon and put the new rings on
Unfortunately I wasn't able to complete the LP piston rings because in the pack they sent two of the top rings but no second ring :mad:so I'll have wait for the new one to arrive
 

Attachments

  • hp piston2.jpg
    hp piston2.jpg
    144.1 KB · Views: 24
  • hp piston1.jpg
    hp piston1.jpg
    145.4 KB · Views: 25
Last edited:
OP
S

sdriv

Active member
Joined
Dec 28, 2013
Messages
27
Also was able to clean up the cylinder and ran the hone through both of them. The pic all the way to the right is before the other two are after. The only thing I'm a bit concerned about is the tapered part of the HP cylinder has some pitting in it that I can't smooth out but I got it as clean as I could
 

Attachments

  • honed 2.jpg
    honed 2.jpg
    131.7 KB · Views: 27
  • IMG_5817.jpg
    IMG_5817.jpg
    137.4 KB · Views: 32
  • before hone.jpg
    before hone.jpg
    143.6 KB · Views: 29
Last edited:
To avoid these ads, REGISTER NOW!
Top Bottom