Okay. Finally got a rebuild kit for my Lincoln J-134 95657. I know the kit covers many models and therefore all of the seals won't necessarily be used, and most of my seals ARE indeed here. However, the diagram that came with the kit and the utube videos that show the rebuild process all show the rebuild of what I believe is a newer unit. Specifically, the high pressure piston seal installation.
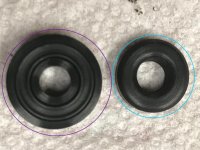
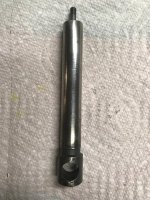
On the newer piston, the end has a sort of "button" (part of the piston), to which a hard plastic washer (white) goes on and then a rubber 2-piece seal attaches on top. That rubber piece is shown in purple in the pic below. On my earlier model however, I have a high pressure piston with the earlier threaded end. When I took it apart, there were 3 leather cup washers stacked, followed by a rubber washer, followed by a steel washer which is then secured with a threaded loc-nut. However, none of the diagrams nor videos on-line show the assembly of my particular threaded piston.
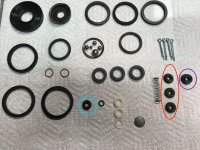
When I took it apart, I carefully grouped all of the parts, but I did not notate which direction the leather cup washers (circled in red in the pic) go on the piston. ie cup (concave) side towards the pressure side (the loc-nut side) or away from it. Also, although there are 2 washers that 'might' fit between the leather cup seals and the steel washer, one is too small and hard plastic (circled in blue in pic), and the other is the correct diameter and soft rubber, but appears too thick (circled in purple in pic). Perhaps the hard washer is smaller because it just serves to hold the leather cup seals in place and the seal is actually just the leather cups? The soft washer appears to act as the seal itself which would make the leather cup seals redundant.
Can anyone shed any light on this and help me get it all reassembled? If it matters, this hydraulic unit was last rebuilt by Lincoln - has the rebuild tag still on it. Hiball, you there?
On the newer piston, the end has a sort of "button" (part of the piston), to which a hard plastic washer (white) goes on and then a rubber 2-piece seal attaches on top. That rubber piece is shown in purple in the pic below. On my earlier model however, I have a high pressure piston with the earlier threaded end. When I took it apart, there were 3 leather cup washers stacked, followed by a rubber washer, followed by a steel washer which is then secured with a threaded loc-nut. However, none of the diagrams nor videos on-line show the assembly of my particular threaded piston.
When I took it apart, I carefully grouped all of the parts, but I did not notate which direction the leather cup washers (circled in red in the pic) go on the piston. ie cup (concave) side towards the pressure side (the loc-nut side) or away from it. Also, although there are 2 washers that 'might' fit between the leather cup seals and the steel washer, one is too small and hard plastic (circled in blue in pic), and the other is the correct diameter and soft rubber, but appears too thick (circled in purple in pic). Perhaps the hard washer is smaller because it just serves to hold the leather cup seals in place and the seal is actually just the leather cups? The soft washer appears to act as the seal itself which would make the leather cup seals redundant.
Can anyone shed any light on this and help me get it all reassembled? If it matters, this hydraulic unit was last rebuilt by Lincoln - has the rebuild tag still on it. Hiball, you there?