To avoid these ads, REGISTER NOW!

help picking a compressor

redmondjp

Well-known member
Joined
Nov 25, 2014
Messages
2,318
Location
Redmond, WA
Also is it worth buying one with a auto tank drain or can I add that easily later?

The auto tank drain is you, just like I'm the auto ice maker at my house!

If the tank has the typical petcock, simply replace it with a small street elbow, a short section of pipe (steel, brass, stainless, whatever you have), and a small ball valve.

To the OP above - you can also buy or find an old dryer cord, and put a box on the end of it with a 240V receptacle, and then run your compressor on that. I've been doing this at my house (have a gas dryer) for the past 18 years!
 
To avoid these ads, REGISTER NOW!
OP
N

nolan7120

Well-known member
Joined
Apr 28, 2017
Messages
70
Location
Chicago Burbs
Buy a 12 AWG 50' (max) extension cord, shorter the better. done
Put an outlet box on the back of the meter pan..look for the knockouts. Hook it to the open 15A breaker use 14 or 12 AWG solid wire. easy yet safe.
Consider unplugging the washer machine they usually have a dedicated branch ckt.
Both the washing machine and dryer are running on 110V.

I do have a double 30A breaker open and a few 15A's on the breaker box.

I like the idea of running the extension cord from the basement by the breaker, however I'm not following what a "meter pan" is? Thanks
 

Infinia

Banned
Joined
Oct 2, 2016
Messages
845
Location
SoCal
I'm not following what a "meter pan" is? Thanks

Sorry probably not proper electricians lingo. Anyway I meant add a junction box outlet mounted to the back or side of the circuit breakers enclosure. Usually both the Power Co WattHr counter (usage meter) and ckt breakers are housed in the same metal enclosure, with the covers off it looks like a big (cake ) pan I suppose.
I have my 15A compressor sharing the washers/gas dryer 120V outlets. I add a fat 50' extension cord when I want to move the compressor closer to work around the property.
 
Last edited:
OP
N

nolan7120

Well-known member
Joined
Apr 28, 2017
Messages
70
Location
Chicago Burbs
Sorry probably not proper electricians lingo. Anyway I meant add a junction box outlet mounted to the back or side of the circuit breakers enclosure. Usually both the Power Co WattHr counter (usage meter) and ckt breakers are housed in the same metal enclosure, with the covers off it looks like a big (cake ) pan I suppose.
I have my 15A compressor sharing the washers/gas dryer 120V outlets. I add a fat 50' extension cord when I want to move the compressor closer to work around the property.
Kind of like this?:

0xK1ILk.jpg


I took some pics of the breaker box today. That bottom right outlet powers the sump pump in the crawlspace. I'd hijack the other half of the outlet but 1) It's not grounded and 2) the circuit is only for 15A 3) the compressor wouldn't be alone on the circuit.

The dryer electrical box has an extra outlet on it that I could use but is only on a 15A breaker. That receptacle is grounded to the front of the box. The wiring is so messed up in this house. Here's a pic:

bF2QOMb.jpg


I could use this outlet with a 50' 12 AWG extension cord. Torn between that and installing a new 20A circuit. I started a thread over in "Electrical" to address the proper grounding of an outlet I'm replacing in the garage and also a new circuit and receptacle in case I want to go that route. Preferably I'd like to have it on it's own breaker, in which I'd be able to get away with a 25' extension due to a closer proximity.

ETA: Here's the link for the other thread: https://www.garagejournal.com/forum/showthread.php?t=366322
 

redmondjp

Well-known member
Joined
Nov 25, 2014
Messages
2,318
Location
Redmond, WA
You've got enough unused breakers in that box to install either a dedicated 120V or 240V circuit. I'd go with a 240V as the motor will start quicker and draw half as much current.
 

Infinia

Banned
Joined
Oct 2, 2016
Messages
845
Location
SoCal
Kind of like this?:

I took some pics of the breaker box today. That bottom right outlet powers the sump pump in the crawlspace. I'd hijack the other half of the outlet but 1) It's not grounded and 2) the circuit is only for 15A 3) the compressor wouldn't be alone on the circuit.

yes that is exactly similar to what I was describing. hehe
How did you determine its not grounded?

GROUNDING
I like that method because of grounding E.g. its metal to metal using the conduit. Its not the latest "code but it works really well E.g. A single point connection at the neutral white bus bar to the metal box pan. Full stop. At the outlets the metal conduit is substituted for the green or bare wire on modern romex.
I started a thread over in "Electrical" to address the proper grounding of an outlet I'm replacing in the garage and also a new circuit and receptacle in case I want to go that route
haha good luck on that
PS Id recommend getting a second opinion before you start any work! A local electrician will likely set you straight and perhaps save you money even if you need to pay him for the house call. trust me.

Notes for your other thread and what they don't tell you.
Remember you don't have to bring up your moms system to present day code! it's called 'grandfathered' provision. infact any work you do trying to achieve code will cost money AND likely bring any inspectors* swarming when otherwise they'd just say "hey look it's the old way". I wouldn't say no to a single earth ground if you don't have one and those ubiquitous 3 wire adapter thingies screwed to the outlet central cover screw.

*(real estate folks looking for angles )
 

Attachments

  • ground.JPG
    ground.JPG
    75.6 KB · Views: 14
Last edited:
To avoid these ads, REGISTER NOW!
OP
N

nolan7120

Well-known member
Joined
Apr 28, 2017
Messages
70
Location
Chicago Burbs
yes that is exactly similar to what I was describing. hehe
How did you determine its not grounded?

GROUNDING
I like that method because of grounding E.g. its metal to metal using the conduit. Its not the latest "code but it works really well E.g. A single point connection at the neutral white bus bar to the metal box pan. Full stop. At the outlets the metal conduit is substituted for the green or bare wire on modern romex.
haha good luck on that
PS Id recommend getting a second opinion before you start any work! A local electrician will likely set you straight and perhaps save you money even if you need to pay him for the house call. trust me.

Notes for your other thread and what they don't tell you.
Remember you don't have to bring up your moms system to present day code! it's called 'grandfathered' provision. infact any work you do trying to achieve code will cost money AND likely bring any inspectors* swarming when otherwise they'd just say "hey look it's the old way". I wouldn't say no to a single earth ground if you don't have one and those ubiquitous 3 wire adapter thingies screwed to the outlet central cover screw.

*(real estate folks looking for angles )

Wrong choice of words for me to use about not being grounded. It's grounded through the box, just no ground wire. An easy fix.

I talked to a buddy in the trades yesterday who happened to be with his electrician friend, so I was able to talk to him and ran by the setup and what I was going to do with the garage outlet and a new one installed by the breaker box and he said that was fine.

Yes, that new thread has been a little bit of a trainwreck lol. I'm not bringing anything up to code. The house is a tear-down and will be after my mom sells it. I just need something to suit my needs that won't start on fire or shock anyone.

I'm going to set up a 110V outlet attached to the breaker box on a 20A circuit, set up a ground wire on the inside of the new outlet box even though it's already grounded through the tubing, buy the shortest possible extension cord I can get away, and call it a day.

You've been friggin awesome this whole way, and I really appreciate it.
 

Infinia

Banned
Joined
Oct 2, 2016
Messages
845
Location
SoCal
Great! looks like all systems are GO.:thumbup:
My pleasure I don't mind helpin' folks spend money.. err learning from my some of my mistakes. I'm sure I can say appreciation is reciprocated here at GJ, esp upon returning to the thread by posting images of your new toys and any impressions you have.
 
OP
N

nolan7120

Well-known member
Joined
Apr 28, 2017
Messages
70
Location
Chicago Burbs
So it was either bump this thread, my accessory thread, or the thread on circuit breakers over in the electrical section. This one would probably be best.

I ended up going with the 29 gallon HF model. It made it to the garage unscathed from shipping damage. Today I got the chance to break it in.

Five of six of the bolts at the top of the pump were torqued correctly. One of them was slightly under. It took all of 6 mins and 57 seconds for the tank to go from 0 to 150 psi.

Before running the compressor, I checked the oil fill glass and didn't see any oil in there. I was under the impression that they came filled with oil. So I started adding oil. After dumping almost the whole 32 oz container in there, I peered in through the top and saw the oil level pretty close to the top and thought wtf! I was staring at the sight glass the entire time and saw no change.

Well, a messy oil change later and I refilled it to dead center of the oil fill glass. Either the compressor came overfilled from the factory, or I missed it somehow, which I doubt because I was adding a little and checking the fill line constantly. After getting the correct amount of oil in there, the oil line was easily seen through the fill glass. The oil line was not in the sight glass before adding oil, that I know for sure because I stared at it for so long wondering where the hell it was lol. Anyway...

After breaking it in, I let it fill to the 150 psi shutoff. 5-10 mins later, right before I left (was in a hurry to head to work), the gauge had settled to 145 psi. Six hours later I was able to go and check it again and it was down to 140. So there is a slow leak somewhere. Tomorrow I plan on using the soapy water technique and see if I can pinpoint exactly where it is coming from.

ETA: The compressor is on the quieter side and definitely tolerable.
 

Infinia

Banned
Joined
Oct 2, 2016
Messages
845
Location
SoCal
Hi
Thanks for the review. :D BTW sorry about your air leak trouble let us know what you did to resolve it. :sad:
This is the same 29gal HF compressor I would choose as a replacement upgrade to what I have now. :rocker: BUT I would of left the stock fitting on until I saw a problem that needed fixing! IMO High flow fitting are the refuge of last resort! I doubt you needed to add a ball valve and Milton part on the compressor outlet to air hose. Using a short rubber air hose < 25' 3/8" like the one you chose will prevent airline losses issues on higher CFM tools. Modifications like shorter air hoses and one less quick connect being easy fixes with greatest return of performance. In stock form run the max psi at the tank regulator when using the 1/2" impact gun and even consider adjusting the cutoff switch to overcome any flow problems @ compressors cut-in point! Much less headaches adjusting the compressor switch using a small screwdriver than large wrenches swapping out air fitting:)
 
OP
N

nolan7120

Well-known member
Joined
Apr 28, 2017
Messages
70
Location
Chicago Burbs
Update. Sorry for the novel:

The compressor didn't initially have a leak as I thought. The pressure held steady at 140psi for several days so I think it had something to do with the air inside the tank cooling and contracting, which led to less pressure.

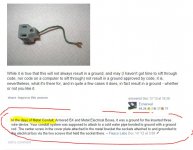
I did create a leak in one of the fittings by torquing on the ball valve a little too hard. This is a proprietary fitting that only HF uses for their 29 gallon compressors; it's the one that comes directly off the tank. It is basically two connections in one; a 3/8" turning nut with a 1/4" ****** that pokes out the top. The 3/8" nut connects to the tank, and the 1/4" ****** goes into the pressure switch. There is a hex key on the inside of the 1/4" connection which enables you to disconnect the fitting without taking a whole bunch of other stuff off. On the inside of the nut, they use a copper washer to help seal the connection.

I called HF and asked for a replacement on the 3/8" fitting because it was still under warranty. In the parts list, they list the 1/4" ****** and 3/8" turning nut separately which I thought was weird because the piece from the factory was basically one piece (although it was two separate components). The ****** was lodged in the turning nut fairly well and wouldn't come out without buggering up the threads on the turning nut. I didn't try, but with the diameter of the bottom lip of the ****** being larger than the threads on the inside of the turning nut, it only made sense that it should come as one piece. I wonder how they got the ****** in there without damaging the threads.

Anyway, I ordered the turning nut thinking I'd get both pieces even though they were listed separately. My mistake. HF told me 10-12 weeks which sucked, but I could always use the old fitting with the leak in the meantime to get me through some projects. I could've created a different connection by buying parts from the local Home Depot or Menards, but that would've involved taking all the wires off, possibly the gauges, etc., to get the part attached. I wanted to use that route as a last resort.

Two weeks after ordering the part, it arrives which I thought was weird, but welcoming nonetheless. Two weeks beats twelve weeks lol. I opened up the package and inside was only the 1/4" connection. I know the part I ordered was for the turning nut, and was hoping the ****** would come with it based on the factory part and how they were attached. I looked at the invoice and saw it was from a place called "FINI USA Corp" out of SC. I also double checked the parts guide and realized that HF got the two parts mixed up in their list. The part # listed for the 3/8" turning nut will get you the 1/4" ******, and vice versa. This printing error someone made when drawing up the manual.

I called HF again and explained the situation and how I ordered the 3/8" nut (hoping to get both parts) and received the 1/4" ****** instead. I told them about this printing error and needed the 3/8" nut since the part # for the nut yielded the ******, the part # for the ****** must yield the nut. The guy didn't want to help me and just said to take back the compressor to my local HF. I didn't want to do that so I decided to call FINI USA corp directly.

It turns out they supply HF with a lot of backup parts for compressors. I'm not sure which models, but I know the 29 gallon is one of them. Anyway, after explaining the situation, they were able to look up my order # (that HF placed from them for my warranty issue) and see the part shipped out. I explained how the part #'s were switched in the HF manual (even though my dumb *** should've asked for both parts initially) and that I needed the nut which had the ******'s part #. The lady I spoke with was awesome. She shipped me the turning nut for free and I had it in two days.

At this point I was happy to have both parts but still concerned that the ****** wouldn't fit into the turning nut due to the diameter issue on the factory part. Well low and behold, it fits perfectly.

Although I caused the issue myself with the torquing, I don't think the leak should've popped up like it did because I didn't apply that much torque to the ball valve. I should've supported the tank to pressure switch connection though while doing so. I do think that part is a weak link in the design, but it is what it is. If there is still a leak when I reconnect the new parts, I'll just create a newer and more sturdy fitting, although it'll be more difficult to attach. Again, sorry for the novel.

TL, DR: If you need compressor parts for your HF compressor, call FINI USA corp directly and see if they can help you. Be mindful of the fragility of the tank to pressure switch fitting on the 29 gallon HF. Also know that HF was dyslexic when printing the manual and have parts # 9050375 and 9050376 switched around. 9050375 gets you the turning nut, and 9050376 gets you the 1/4" connection ******.
 
To avoid these ads, REGISTER NOW!
Top Bottom