
To avoid these ads, REGISTER NOW!

HELP! Questions on compressor drain thread bung oversizing!

j3y_w4lk3r

Member
Joined
Mar 13, 2023
Messages
11
So I bought this 60 gallon upright compressor back in 2019, it’s been good so far, but I haven’t been great at draining the water regularly, I also don’t use it constantly, plus I live in AZ where it’s dry most the year. The tank is apparently from 1984, kinda old one would think. I bought a new regulator since the old one was leaking. After removing the old fittings I noticed the inside of the tank had a little rust, I’m talking surface rust, I put my endoscope inside to the bottom and couldn’t see much, but it just looks like surface rust, nothing too concerning. I figured I would reseal the whole tank with it apart so I tried removing the drain fitting I installed back when I first bought it, and the 1/4 NPT pipe broke in the bung, and since I’m stubborn & stupid and would rather spend 3 hours doing a job the wrong way rather than go buy the right tool to extract the remaining threads, I’m fairly certain I destroyed the original threads. I should also mention the drain pipe and fitting were full of what I believe are chunks of rust. So my plan is to drill and tap it to 3/8 NPT. My question is, with the inside of the tank being slightly rusty (assuming since I got rust chunks filling the drain & I haven’t been great at draining regularly) will drilling the drain bung to 3/8 NPT (I bought a 9/16” bit) compromise the integrity of the tank enough to cause a potential explosion down the road, even though I’m installing an automatic drain this time around? I saw some youtube videos of some compressors exploding like a friggin bomb, so I’m pretty terrified now. It’s probably irrational fear but still. Figured I would get your guys two cents. Pictures below. First is of the drain bung size with some brass threads still in it, second is of the rust chunks in the petcock fitting. My compressor is also on the exact opposite side of the wall from the houses breaker box, it made for easy installation of the 240v plug, but if the compressor blew I don’t even wanna think about what it could do to the houses electrical. Let me know how stupid you think I am below lol.
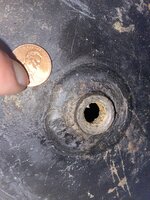
E905A042-FD2B-4334-A605-AE3980A56B7D.jpeg
E961184D-FF72-4C58-AF5F-B451F3213E20.jpeg
 
To avoid these ads, REGISTER NOW!

Big Bad Dad

Well-known member
Joined
Jan 31, 2010
Messages
2,664
Location
Southwest/ Central Va.
That's a lot of rust chunks for just a little "surface rust". I posted about what I found inside my compressor a year or so ago. It had rusted spots in the tank bottom where the metal was about half of the original thickness.
Here's a link, if you haven't already seen it.

 
OP
J

j3y_w4lk3r

Member
Joined
Mar 13, 2023
Messages
11
That's a lot of rust chunks for just a little "surface rust". I posted about what I found inside my compressor a year or so ago. It had rusted spots in the tank bottom where the metal was about half of the original thickness.
Here's a link, if you haven't already seen it.

That’s the exact video I’m talking about, it’s gotten me real worried that I’m next lol. I always hear the older compressor tanks are made of thicker metal, and seeing that my 60 gallon tank is incredibly heavy (I laid it down to work on the drain bung, and even though I regularly deadlift 200+ lbs, I couldn’t even begin to lift it back up), I’m inclined to believe that even with the thickness thinned a bit, it should be okay. I mean I was using it regularly until I took it apart, if I keep it dry from here on out, it shouldn’t get any worse, is that logic bad?
 

Walkers

Well-known member
Joined
May 17, 2021
Messages
3,912
Location
Cave Creek Az
Does your tank have a metal tag welded on it, or a sticker?

As far as thread repair, I would run a 1/4” NPT tap into it to clean up the threads. Then I would get a new high pipe ******. Mix up some JB weld and lightly wet the female threads, and put it more liberally on the male threads, then install the ****** and wait 24 hours before airing it back up.
 
OP
J

j3y_w4lk3r

Member
Joined
Mar 13, 2023
Messages
11
Does your tank have a metal tag welded on it, or a sticker?

As far as thread repair, I would run a 1/4” NPT tap into it to clean up the threads. Then I would get a new high pipe ******. Mix up some JB weld and lightly wet the female threads, and put it more liberally on the male threads, then install the ****** and wait 24 hours before airing it back up.
It does indeed have a tag like that, I’ll post a pic when I get home! I figured I would attempt to repair the 1/4 threads before going over size, I got a 13/32” drill bit as well and figure i’ll use that to remove as much brass as possible, then use the pipe thread taps I also bought to clean em & see if they’re reusable. The jb weld is a good idea, do you think some black rtv would also suffice? I only say that because I wonder if down the road should there would be a reason to remove the drain fittings again, it would be easier to remove the em with rtv rather than jb? Thanks for all the advice !
 

Wolley

Well-known member
Joined
Jun 24, 2022
Messages
420
Location
Maine
Yes try to drill and recut the 1/4 not first. Being a taper and interference situation you might gain by Going deeper with the tap. Going up on size will probably be fine if you maintain the number of threads in the bung and don't thin down the boss area sidewall of the welded in bung.
 

Walkers

Well-known member
Joined
May 17, 2021
Messages
3,912
Location
Cave Creek Az
Stop with the drill. There is a saying, when you find yourself in a hole, stop digging. It looks like there is enough gone to start the 1/4” tap, start working it in, it will take out the brass. So long as there is enough clean thread, just pipe dope will work fine. I was under the impression that you had already removed everything and that nasty hole was your result, which was why the JB suggestion.
 
OP
J

j3y_w4lk3r

Member
Joined
Mar 13, 2023
Messages
11
Yes try to drill and recut the 1/4 not first. Being a taper and interference situation you might gain by Going deeper with the tap. Going up on size will probably be fine if you maintain the number of threads in the bung and don't thin down the boss area sidewall of the welded in bung.
Exactly what I was thinking, if I go up in size the sidewall of the boss might end up real thin, I’ll try just using the tap.
 
OP
J

j3y_w4lk3r

Member
Joined
Mar 13, 2023
Messages
11
Here’s that tag
Does your tank have a metal tag welded on it, or a sticker?

As far as thread repair, I would run a 1/4” NPT tap into it to clean up the threads. Then I would get a new high pipe ******. Mix up some JB weld and lightly wet the female threads, and put it more liberally on the male threads, then install the ****** and wait 24 hours before airing it back up.
7510D0F8-DCD5-45D7-8C7D-92551211EDF4.jpeg
Here’s that tag
 
To avoid these ads, REGISTER NOW!

no704

Well-known member
Joined
Apr 27, 2016
Messages
5,224
Good advice above! If try to not oversize it. Is there such a thing as a 5/16 npt??
 
OP
J

j3y_w4lk3r

Member
Joined
Mar 13, 2023
Messages
11
Alright I think you guys saved me, here’s what not drilling it out, and just using a 1/4 NPT tap resulted in, first is left side, second is right, and third pic is bottom (in relation to me when I stupidly tried using a flathead & hammer to try & chisel the brass pipe in half). It looks like the threads are still mostly okay other than the “bottom” section, which is where I really went ham on it, but even still it looks to be useable. What do you guys think? Any tips on how to remove the remaining debris from the bottom of the tank? I thought maybe sticking a hose in it & adding water while keeping the drain fitting removed while straining the water that comes out, to see what sort and amount of other **** comes out would be a good idea? Thanks !
C9372E1E-D027-48FA-9C25-225836891998.jpeg
89D3420D-4388-4A91-8C68-D4AD6009E01C.jpeg
6AFF5E3B-3891-4134-8C30-C6C9FB9EEAC3.jpeg
 

dnschmidt

Well-known member
Joined
Oct 3, 2014
Messages
7,285
Location
Phoenix, AZ
Once you stand it up the area of the drain valve is the lowest point just beat on the tank with a "trusty cook" hammer and see if anything continues to fall out. A flexible magnet could help as well. If nothing more falls out put in a new L pipe fitting a six inch long piece of pipe with a ball valve at the end of it and go with it. If you have a leak J. B. Weld is your friend as you should never need to remove what you're installing ever again. If you do a propane torch will melt the J. B. Weld, your garage might stink for a month - side effect, but you'll be able to remove what you epoxied in.
 

Under_Pressure

Well-known member
Joined
May 13, 2014
Messages
115
Location
NE Wisconsin
No. 1/4 to 3/8

You can get fittings for 5/16-24, but not sure on what selection is available.

Sounds like it's academic now but 1/4 & 3/8 NPT are based on pipe size, so a male thread has .540" or .675" major diameter respectively. A 5/16-24 is a regular straight thread and has .3125" major diameter. So to get a size between them using non-pipe threads you'd be looking at something in the 9/16-5/8 range. To clean up threads from a 1/4 NPT you'd probably need to go to a 5/8-18 which uses a 37/64 tap drill, but you would still have to figure out how to seal it being a straight thread. Straight thread pressure connections use special fittings so an o-ring can seal them (o-ring face seal or o-ring boss most often).
 

mike93lx

ALLIANCE MEMBER
Joined
Dec 9, 2013
Messages
37,751
Location
Richmond, VA
Sounds like it's academic now but 1/4 & 3/8 NPT are based on pipe size, so a male thread has .540" or .675" major diameter respectively. A 5/16-24 is a regular straight thread and has .3125" major diameter. So to get a size between them using non-pipe threads you'd be looking at something in the 9/16-5/8 range. To clean up threads from a 1/4 NPT you'd probably need to go to a 5/8-18 which uses a 37/64 tap drill, but you would still have to figure out how to seal it being a straight thread. Straight thread pressure connections use special fittings so an o-ring can seal them (o-ring face seal or o-ring boss most often).
Yeah, I thought of that and was waiting for someone to post that. Point to your house :)
 

RTM

Well-known member
Joined
May 13, 2019
Messages
13,221
Location
SF Bay Area
One idea posted on a Dietz lantern site said to throw a piece of sash chain in the tank, swirl it around, and shake out what is loosened. Might work with the tank, if you can swirl it. ;)

I know I couldn't.
 

Jswain

Well-known member
Joined
Apr 26, 2013
Messages
2,463
Location
Calgary, AB
Threads worse then that have sealed higher pressures then it will ever see. 3 wraps of Teflon tape and nice and tight with a street elbow/long enough ****** to get the valve where it's easy to open & close.

A good way to get the rest of the crud out of the tank would be to blow it down everytime you use it. Doesn't have to be right to 0 but blow it down 3-4 times once you're done for the day for a few seconds each time all the way open. If you haven't used it in awhile and walk by it, crack it open etc.
 
To avoid these ads, REGISTER NOW!
Top Bottom