To avoid these ads, REGISTER NOW!

Help Removing HP and LP valves on Curtis pump

shouse

Active member
Joined
Feb 10, 2014
Messages
40
Hey guys, I've made a couple posts about this lately as i move further along on the restoration stage. I'm currently trying to get the high pressure and low pressure valves off the pump for inspection and most likely rust cleaning (hasn't been ran much in years other than recently). I'm a little in the dark on this to say the least and the only manuals i have are pretty much useless. Anyone an expert on this that can help me where to start.
Picture for reference. Thanks everyone.


To avoid these ads, REGISTER NOW!

pcmeiners

Well-known member
Joined
Aug 13, 2009
Messages
7,906
Location
In the only town in Pennsylvania, Bloomsburg.
A large Hex wrench or monkey wrench will loosen the valve covers. Suggest leaving the pump attached to tank for leverage; I did it to a d96 pump removed from tank, was *****. Best to soak the covers with thread penetration solution.
Why the covers are not installed with a Never Seize compound bets me.
 
OP
S

shouse

Active member
Joined
Feb 10, 2014
Messages
40
Ok, so all 4 of those should just remove with a standard open-ended wrench, counter clockwise? Just wanted to make sure before I started cranking down on it and possibly breaking something.

C96 is very similar to the d96. Any other tips or advice you can give me. Particularly on valve remove and cleaning. Seems to be pumping air fine. I pumped up an 80gal tank from 0-150psi in 5mins 50 secs. Pulled an equation from online that stated it should take 6 mins, assuming I inputted all the parameters correctly.
 

pcmeiners

Well-known member
Joined
Aug 13, 2009
Messages
7,906
Location
In the only town in Pennsylvania, Bloomsburg.
When I did it, had a large hex wrench, I used a heavy plastic mallet to smack the wrench handle to break the caps free (with 4ft pipe on the wrench), counter clockwise, re-assembled with never-seize. Most likely you will need to sand/polish the valve surfaces, I used wet/dry paper . It is pumping up, which means the valves are in relatively good condition, but I would not forego disassembly, 5 minutes 50 sound about right. There are a couple copper ring gaskets, reusable.
 
Last edited:
OP
S

shouse

Active member
Joined
Feb 10, 2014
Messages
40
Ok, i got one off. Found a lot of rust and a little confused how to proceed. Seems like a dead end.


I assume I need to remove all four? 2 for HP and LP b/c of being 2 stage? In regards to the one w/ the hex bolt on it (Referencing the picture, behind the valve i took off), do i need to remove that first before I remove main valve cap? Sorry for the rook questions, This is all new to me.
 

pcmeiners

Well-known member
Joined
Aug 13, 2009
Messages
7,906
Location
In the only town in Pennsylvania, Bloomsburg.
Bit late...
If memory servers, the larger outer nut, locks the inner, as pictured, the lower right assembly uncrews , remove it, if lucky the surfaces will just need some wet/dry, maybe wire wheel to clean them up. When I did it, it was soaked by Sandy, so I took off the head. The issue with that is you might need a new head gasket.
 
OP
S

shouse

Active member
Joined
Feb 10, 2014
Messages
40
No problem, Just thankful you're here to help.

Referencing the picture again, the upper left with two nuts. You're saying I need to loosen the lower bigger nut first before I remove the upper smaller nut? A little backwards from what I expected.

The upper right, this the same situation as the upper left?

I got the lower left off today. I don't have the tank mounted down, Ended up wedging a 2x6 between the legs and my 20" bandsaw to keep it from moving. Had to crank on it using a 4ft pipe to get it off. Everything came out fine after that. One question though. Should there be some kind of gasket or ring in the slot here?? It was completely full of gunk and i'm still working on getting it cleaned.


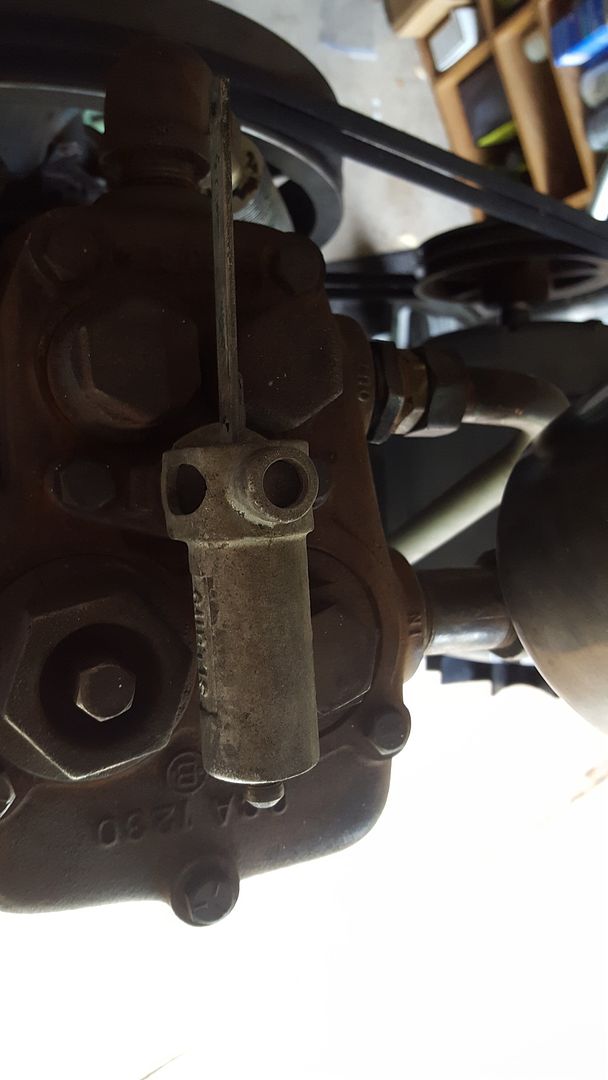
Now to the unfortunate news. the Lower right, I'm having issues getting it off and the wrench must have moved on me before i noticed an i ended up taking a nice chunk of steel off. :mad:

Am I correct that this shouldn't affect functionality. Obviously not a good thing, but if i can get it off and clean it up, i should be ok? I currently have it sitting in a pool of PB blaster right now. Are you thinking that is one entire piece or do you think the 'bolt' and 'washer' are separate? Seems solid to me, like the whole thing might screw into the head, but why the threads would exist on the 'bolt' i have no idea. Doesn't add up.

At this point, I'm half tempted just to remove the head. I can put the head on a vice and might have an easier time getting the remaining off. Getting a gasket seems like the least of my problems right now. Think that might be a wise move?

Thanks again.
 
Last edited:
To avoid these ads, REGISTER NOW!
OP
S

shouse

Active member
Joined
Feb 10, 2014
Messages
40
Ok, answered two of my own questions. Both cap nut set screws (located on the valves in the back) were able to be removed first.
 
OP
S

shouse

Active member
Joined
Feb 10, 2014
Messages
40
Ok, got the back two off and am in the process of cleaning up. Still lost on the front right. Going to try and do more research. I looked at the parts breakdown yesterday, but couldn't find that specific valve.
 

pcmeiners

Well-known member
Joined
Aug 13, 2009
Messages
7,906
Location
In the only town in Pennsylvania, Bloomsburg.
There are thin copper washers on a couple caps, not sure which, look at the parts diagram, check parts diagrams of similar pumps.

"Now to the unfortunate news." The loss of small bit of metal will not affect the stems function. I would smack the top of it a couple of times to hopefully break the rust bond. The stem is for adjustment.
 
Last edited:
OP
S

shouse

Active member
Joined
Feb 10, 2014
Messages
40
UPDATE

FINALLY got that last HP valve off. Actually took it to the local shop in hopes they could get it off w/o ruining it. They couldn't. Ended up only charging me for the valve itself which was nice.

Put it back together this evening and not what I hoped. Took 5mins, 50 secs to fill to 150psi before disassembly. Took 7mins, 20secs this time. The only lead that I have is that I appear not to be holding head pressure. In the current setup, I have to manually actuate the bleeder valve to bleed the pump pressure. I would estimate the pump has fully lost all head pressure in about 5-7secs after I shut power. So it appears to me that I have a pump leak somewhere.

I had to take the head off, so I got a new gasket. I noticed that it's paper thin and i'm pretty sure the old gasket was much thicker. I only tightened the head bolts down to 25 ft/lb as specified by curtis docs I have. I didn't really mess w/ anything else, so I'm wondering if I'm leaking right at head gasket. I unfortunately could not determine if it was leaking air or not at any specific location. Not sure what to do about this one. Might call the compressor shop on Monday if I don't get any good leads.
 

pcmeiners

Well-known member
Joined
Aug 13, 2009
Messages
7,906
Location
In the only town in Pennsylvania, Bloomsburg.
The head gasket I purchase was not paper thin. If your leaking at that gasket, you should be able to hear it if you turn the flywheel by hand.
Call the shop first, if you do not get an answer, call Curtis support directly.

" I would estimate the pump has fully lost all head pressure in about 5-7secs after I shut power." Could be the unloader, a normal function
 
OP
S

shouse

Active member
Joined
Feb 10, 2014
Messages
40
Unloader was already disabled.

Found it though! Did the soapy water trick. Man, there were quite a few locations. I wasn't using pipe sealant or anything since it was only in test mode. Biggest oof on my part were the valve bolt covers. 2 out of the 4 were leaking. 1 was max tight and I had to put pipe tape on it. Wasn't sure if RTV or something else was the preferred method. Head wasn't leaking, so I left it. If it works, don't mess w/ it I guess.

Took 5mins 50 secs to get to 150psi before the valve cleaning. Got it back down to 5mins 20secs. Calling this done and going to start doing the final prep before painting. Really can't wait for this project to be done.
 
To avoid these ads, REGISTER NOW!
Top Bottom