To avoid these ads, REGISTER NOW!

Help Wiring Grinder

Patrick123

Well-known member
Joined
May 31, 2012
Messages
229
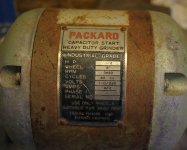
Well I finanly found a sturger old grinder cheap. Its an industrial grade Packard. But I need to rewire it. The switch is missing and the cord is spliced into a tiny lamp cord. So I have a coupld of questions. The colors do not match on the cord for starters. The grinder is black red and green. And all the cords I have to use are black wite and green. So what colors match up? You can see from the photos kinda how its wired now.
 

Attachments

  • grinder00.jpg
    grinder00.jpg
    99.2 KB · Views: 64
  • grinder00b.jpg
    grinder00b.jpg
    82.8 KB · Views: 60
  • grinder01.jpg
    grinder01.jpg
    89.9 KB · Views: 71
  • grinder02.jpg
    grinder02.jpg
    86.1 KB · Views: 71
  • grinder03.jpg
    grinder03.jpg
    101.5 KB · Views: 64
  • grinder04.jpg
    grinder04.jpg
    100.8 KB · Views: 64
To avoid these ads, REGISTER NOW!

2oolhound

Well-known member
Joined
Dec 18, 2010
Messages
5,918
Location
BC Canada
Being it is 110/220 volts capable I'm keeping out of this. I just wanted to say, are you able to sand blast the base and rusty parts? Now would be a good time to clean it up and paint it.
 

TheDukeofDeere

Well-known member
Joined
Mar 30, 2010
Messages
236
Location
IL
Does the grinder work or have you tried it yet? If it works it will simply be a matter of just replacing the old wire with new as much as possible.

Are you going to rewire this as a 110 or 220 motor?

Can you make out any model number or wiring diagram anywhere on the grinder? These will be helpful to possibly find a diagram online.

You'll also need to buy a toggle switch rated for 110v/220v. From there you'll have to make a switch plate that will hold the switch to the frame of grinder.
 

Packard V8

Well-known member
Joined
Mar 16, 2009
Messages
7,380
Location
Spokane, WA
Put it down and back slowly away from the grinder. Only a certified Packard technician should attempt to work on it.

For disposal, put it in a sturdy box and I'll arrange for a FedEx Will Call pickup.

jack vines
 

Outlawmws

Well-known member
Joined
Aug 9, 2011
Messages
39,328
Location
The Badlands
Not enough visibility in your pic (tape is in the way...)

Get all that tape off, and expose where the current cord is going. give us better pics. You mentioned brown zip cord? I'm assuming that was spliced into the black insulated cord that goes inside?

Basically for the switch you bring in a new 3 wire cord, Green on the cord is ground. use a dedicated screw for this.

This leaves White (neutral) and Black (hot or "line 1")

Trace where the old cord goes, take whit to where the white insulated wire goes.

Take the black new cord wire and run that to one side of the switch you will use. From the opposite side of the switch take that with some black wire to where the old cord's black wire goes.

I would also make sire ther is a good cord stop/insulator where the cord exits the housing to the wall.

I don't like wire nuts in power equipment that vibrates. They can come loose. Either a solid crimp connection, or solder and insulate. I'd recommend both shrink tubing and tape for this...

Lastly if you put your own three prong plug on the end of raw cord, green goes to the ground prong, and note that the screws for the two leads are silver and brass/gold. Black goes to brass/gold, white to silver.
 
To avoid these ads, REGISTER NOW!
OP
P

Patrick123

Well-known member
Joined
May 31, 2012
Messages
229
Sorry about the delay in replies. I was out with the family all day. I will try and answer them in one post.

TheDukeofDeere Yes the grinder works I had them test it before I handed over the money. Seems to work really well. I agree I think it will be pretty strait forward to rewire. Just want to make sure I do it correctly.

It is going to be 110v just like it is wired now.

I did not see any wiring diagram but I will look again. Also I cant find much info on grinders from this company.

Packard V8 does seem to be a good grinder for some one with a Packard nic haha.


lzenglish thanks I will check out the site looks like it has a lot of good info.


Outlawmws thanks I will try and get some better pictures after I get a chance to mess with it some more.
 
OP
P

Patrick123

Well-known member
Joined
May 31, 2012
Messages
229
OK had a chance to look at it and here is the exact wiring.....


Green from cord goes to ground on chassis.

Black from cord goes to black and yellow on motor.

Red from cord goes to grey? and red on motor.

The capacitor is hooked to a seperate red and black wire coming out of the motor are both connected to to black wires on the capacitor.
 

JASTECH

Well-known member
Joined
Oct 21, 2009
Messages
2,671
Location
Gering, NE
Do like Outlaw stated, he's correct.
Do make sure a good grommet is used and I like to tie a knot in the cord before it exits the grommet. Also decide on length of cord needed and guage required. I would use 12-2 w/grd.
 

DekeT

Well-known member
Joined
Aug 12, 2011
Messages
2,234
Location
USA
Rewired my vintage Black and Decker. Wired it the way I found it. Like this.
BDwiringdiagram.jpg
 

Outlawmws

Well-known member
Joined
Aug 9, 2011
Messages
39,328
Location
The Badlands
OK had a chance to look at it and here is the exact wiring.....


Green from cord goes to ground on chassis.

Black from cord goes to black and yellow on motor.

Red from cord goes to grey? and red on motor.

The capacitor is hooked to a seperate red and black wire coming out of the motor are both connected to to black wires on the capacitor.

Treat the white on the new cord as the red, put the switch in series on the black as I mentioned above, and you should be good to go.
 
OP
P

Patrick123

Well-known member
Joined
May 31, 2012
Messages
229
OK great just have to find a switch and make a new plate and then I am all set I think. Thanks for all the help Outlaw and every one.
 
OP
P

Patrick123

Well-known member
Joined
May 31, 2012
Messages
229
Just wanted to give a quick update. I finished rewiring the grinder and repainting it and and its working fine. Also took it apart and cleaned it and turns out it runs on ball bearings. One is a little noisy and will need replaced at some point but it was nice to see it was using that type of bearing.
 
To avoid these ads, REGISTER NOW!
Top Bottom