To avoid these ads, REGISTER NOW!

Help with 1940's Snap-On 71-15

suss427

Well-known member
Joined
Jul 27, 2011
Messages
151
Location
Iowa
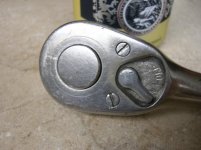
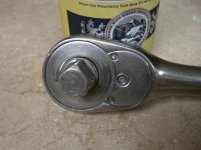
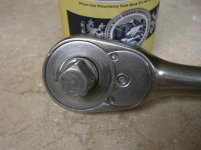
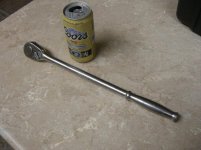
I just bought this off ebay!

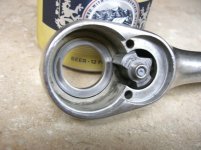
My intention is to use this thing. With that in mind I took it as far apart that I could (as in the picture) and cleaned some nasty gunk out of it with kerosene.

I could not figure out how to take the selector and pawl out, but I think it is clean enough.

So I am wondering when was it made? The only thing that looked like a date code was like a 7 or ? not sure if that is it.

Also, has anyone switched tooth counts before? in post #12 here:
http://www.garagejournal.com/forum/showthread.php?t=98218
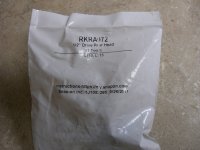
it is suggested that you can use the 32tooth rebuild kit RKRA972.

Thanks for the help!
 

Attachments

  • CIMG1310.jpg
    CIMG1310.jpg
    54.4 KB · Views: 109
  • CIMG1312.jpg
    CIMG1312.jpg
    57.9 KB · Views: 91
  • CIMG1311.jpg
    CIMG1311.jpg
    58.1 KB · Views: 93
  • CIMG1309.jpg
    CIMG1309.jpg
    51.2 KB · Views: 113
  • CIMG1308.jpg
    CIMG1308.jpg
    50.9 KB · Views: 85
  • CIMG1306.jpg
    CIMG1306.jpg
    47.9 KB · Views: 124
To avoid these ads, REGISTER NOW!
OP
S

suss427

Well-known member
Joined
Jul 27, 2011
Messages
151
Location
Iowa
yeah,i posted it. prolly within the first 10 pages. or it's

collectingsnapon.com

Thanks, one inconsistency though is that this is 20 teeth, not 25 as listed on collectingsnapon.com. Also this 7 looks like the 1947 and not the 1937 code and this model was not made in 1947... I am stumped. :headscrat
 

pfbz

Well-known member
Joined
Dec 17, 2008
Messages
984
1947 looks right to me...

1163108041_vEKGc-O.jpg


1163107992_ifT8f-M.jpg
 
OP
S

suss427

Well-known member
Joined
Jul 27, 2011
Messages
151
Location
Iowa
OK, I am going with this being 1947... I called SO last night and they are sending me a RKRA972 rebuild kit (32teeth instead of 20).
 

snapmom

Well-known member
Joined
Sep 4, 2008
Messages
3,541
Location
Florida
The 972 should work, its for a L715. You may have to change out the paw, to do that take a punch and remove the selector switch. To get the ball back in you could use a small flat tip screwdriver, or order this tool from snap on, its cheap.
HPIM1785.jpg
 

RKSpeed

Well-known member
Joined
May 3, 2011
Messages
343
Location
Augusta, ME
Yeh the end of the selector switch is peened over, which youll have to do again once the new kit is in.

Ive got the same ratchet, love the feel of it.
 

byoungblood

Well-known member
Joined
Apr 6, 2011
Messages
2,590
Location
Berryville, VA
OK, I am going with this being 1947... I called SO last night and they are sending me a RKRA972 rebuild kit (32teeth instead of 20).

I put a 30 tooth rebuild kit in my old 20 tooth 9/32" drive ratchet (before anyone gets worked up, someone had ground down the square drive in the past to use 1/4" sockets with it) and it works like a charm. Mine was from about the same vintage as yours.
 
To avoid these ads, REGISTER NOW!
OP
S

suss427

Well-known member
Joined
Jul 27, 2011
Messages
151
Location
Iowa
Thanks guys, I put some gear oil in it and now it is super sweet. I am going to wait to rebuild it though since the guts are chromed and I am bidding on a few more... What size punch do I use and how do I peen over the switch?

I might just have my SO guy do it, but I don't want him to have to rebuild all of these ratchets I didn't buy from him...
 

JSBriggs

Well-known member
Joined
May 10, 2009
Messages
1,041
Location
Auburn CA
Thanks guys, I put some gear oil in it and now it is super sweet. I am going to wait to rebuild it though since the guts are chromed and I am bidding on a few more... What size punch do I use and how do I peen over the switch?

I might just have my SO guy do it, but I don't want him to have to rebuild all of these ratchets I didn't buy from him...

If you get a rebuild kit it will come with a new selector pawl and switch. If you aren't putting in a rebuild kit, I would leave it alone and get it as clean as you can while leaving it in place. The switch is alloy, so peening is one time deal. Once peened, you need to drill it or pry it off.

-Jeff
 
OP
S

suss427

Well-known member
Joined
Jul 27, 2011
Messages
151
Location
Iowa
nice ratchet, I love the old all chrome look myself as well, although I would put the newer dust cover in to give it a little color.

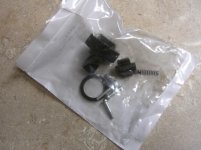
No go, this is what they sent me. They wanted me to send it in and just replace it because they don't have the exact rebuild anymore, but I said no way :pimpflash

This rebuild kit was packaged 4 days ago! 9/26 (I think I ordered on the 27th... talk about a fresh rebuild :thumbup:)
 

Attachments

  • CIMG1313.jpg
    CIMG1313.jpg
    51 KB · Views: 66
  • CIMG1308.jpg
    CIMG1308.jpg
    50.9 KB · Views: 50
  • CIMG1314.JPG
    CIMG1314.JPG
    143.7 KB · Views: 53
OP
S

suss427

Well-known member
Joined
Jul 27, 2011
Messages
151
Location
Iowa
I missed my Snap on guy today... I kind of want to do this myself. The only lingering question is how do I peen the reverse lever onto the pawl as per the instructions:

http://buy1.snapon.com/catalog/objects/7800/ZRK-S2.PDF

It seems straight forward enough, but also seems really easy to **** up. What size / type of peen do I need and where can I get it? Do I clamp the lever/ratchet in a vice, or do I rest it against an anvil. Help me out here.

Also, any suggestions for cleaning off some of the surface rust and cleaning up the finish?
 
Last edited:

snapmom

Well-known member
Joined
Sep 4, 2008
Messages
3,541
Location
Florida
Use a punch with a point on it. med will do, the length of the shaft on the switch may have to be cut down, so when you get it in an its to long, take it out and cut it down.
Place the rat on a hard surface, place your punch on the center of the shaft, and lightly hit it with a hammer to start, when you have your alignment about right, just hit it harder to you have a small amount of the shaft mushroomed out
As far as cleaning, some good pent. oil and fine steel wool will clean most of your problems. PS: you can use your old switch too, even if the shaft is bent, just stick it back in, an lightly hammer in back in.
 
OP
S

suss427

Well-known member
Joined
Jul 27, 2011
Messages
151
Location
Iowa
Use a punch with a point on it. med will do, the length of the shaft on the switch may have to be cut down, so when you get it in an its to long, take it out and cut it down.
Place the rat on a hard surface, place your punch on the center of the shaft, and lightly hit it with a hammer to start, when you have your alignment about right, just hit it harder to you have a small amount of the shaft mushroomed out
As far as cleaning, some good pent. oil and fine steel wool will clean most of your problems. PS: you can use your old switch too, even if the shaft is bent, just stick it back in, an lightly hammer in back in.

Thanks for the detailed instructions, they really helped :beer: I rebuilt today and will try to post some pictures in the near future.
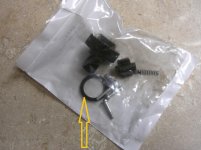
Just an FYI to all: there was no ball bearing in the kit, it was supplanted by a piece fixed in the new spring. It almost looked like a crimped bullet for reference and made it really easy.
 
OP
S

suss427

Well-known member
Joined
Jul 27, 2011
Messages
151
Location
Iowa
Snapmom and others, what do I do with this piece? The ratchet is a bit tight, this is the bushing right? How do I replace that?
 

Attachments

  • CIMG1313 - Copy.jpg
    CIMG1313 - Copy.jpg
    51.8 KB · Views: 32

snapmom

Well-known member
Joined
Sep 4, 2008
Messages
3,541
Location
Florida
I would not replace the bushing, the old one is chrome. Try backing off the screws a little. Does the new wheel have the same offset, on the length going into the head) as the old one. Take a look at the old and new, side by side, (side view) and make sure both are the same.
 
To avoid these ads, REGISTER NOW!
Top Bottom