To avoid these ads, REGISTER NOW!

Help with siding gable end

ive

Well-known member
Joined
Mar 8, 2011
Messages
1,533
Location
Canada
Hi everybody.

my mother in law had new gutters installed. The guys who did it never came back to finish the gable end, as the material was in order they said.

so now this has fallen into my lap. I’m wondering if I could finish this myself? I’ve never done this before, so as much information as you guys could share is much appreciated.

thank you.
 

Attachments

  • 1A3D146B-3294-44AB-9197-45EDC7E734DA.jpeg
    1A3D146B-3294-44AB-9197-45EDC7E734DA.jpeg
    260.5 KB · Views: 246
To avoid these ads, REGISTER NOW!

nadogail

Well-known member
Joined
Jan 23, 2009
Messages
32,062
Location
Coronado, CA
Will you be able to obtain the materials? Do you have the ladders and tools you will need. Do you have the strength to put the parts in place and fasten them? When you need an extra pair of hands, whose arm will they be on?

If the answerto all of the above questions are a resounding YES, then you can probably do the work.
 
  • Like
Reactions: ive

CraigStu

Well-known member
Joined
May 22, 2014
Messages
4,062
Location
Blacksburg, Va
A good thing is that it is very common for the gable end to be finished in a different color and or a different style. So you won't have to worry about an exact match to the rest of the siding. Personally, I actually prefer a difference.
 
  • Like
Reactions: ive
OP
I

ive

Well-known member
Joined
Mar 8, 2011
Messages
1,533
Location
Canada
Will you be able to obtain the materials? Do you have the ladders and tools you will need. Do you have the strength to put the parts in place and fasten them? When you need an extra pair of hands, whose arm will they be on?

If the answerto all of the above questions are a resounding YES, then you can probably do the work.
Very good points.
 
OP
I

ive

Well-known member
Joined
Mar 8, 2011
Messages
1,533
Location
Canada
A good thing is that it is very common for the gable end to be finished in a different color and or a different style. So you won't have to worry about an exact match to the rest of the siding. Personally, I actually prefer a difference.
Thank you. I will see what I can get. I called a contractor and he said 14 week wait for white siding. Sounds crazy.
 

RStewart

Well-known member
Joined
Jul 10, 2013
Messages
1,772
Location
a little north of boston
Me and my son did Hardie cement on our gables 25’up. Rented pump jack system and banged it out. Biggest issue was getting correct angle on the ends. Just used old siding to get it right. Also at that height, caulking and paint hides a multitude of sins. We had never done anything like that before. Was a good excuse to buy a pneumatic nail gun😊. I’m sure you can do it.
 
  • Like
Reactions: ive
OP
I

ive

Well-known member
Joined
Mar 8, 2011
Messages
1,533
Location
Canada
Me and my son did Hardie cement on our gables 25’up. Rented pump jack system and banged it out. Biggest issue was getting correct angle on the ends. Just used old siding to get it right. Also at that height, caulking and paint hides a multitude of sins. We had never done anything like that before. Was a good excuse to buy a pneumatic nail gun😊. I’m sure you can do it.
Heh. Yes a good excuse for more tools.
 
OP
I

ive

Well-known member
Joined
Mar 8, 2011
Messages
1,533
Location
Canada
Gentlemen, I have some ceder tongue and groove left over from the patio roof. I’d like to use that up.

This will hold up well? What fastener should I get for it? Staple gun?

Input greatly appreciated as always.
 
OP
I

ive

Well-known member
Joined
Mar 8, 2011
Messages
1,533
Location
Canada
A concern I have is how to finish between the soffit and the ceder planks at the ends to keep water out.

Any ideas?

thank you very much.
 

Attachments

  • 717FEB7A-3BCA-4B61-AA5C-74F9924A3EFA.jpeg
    717FEB7A-3BCA-4B61-AA5C-74F9924A3EFA.jpeg
    297.9 KB · Views: 162

danfromsyr

Well-known member
Joined
Jan 1, 2009
Messages
11,755
Location
Cicero, NY
it'll get another trim piece on top of the face of the cedar tight against the soffit.
like a 1x2 or such.
could probably rip it out of the cedar if you have a table saw and such.
 
  • Like
Reactions: ive
OP
I

ive

Well-known member
Joined
Mar 8, 2011
Messages
1,533
Location
Canada
it'll get another trim piece on top of the face of the cedar tight against the soffit.
like a 1x2 or such.
could probably rip it out of the cedar if you have a table saw and such.
Thank you. Would you add silicone to finish it after that?

Can I get away with putting the cedars over the flashing at the bottom and that’s it for the the bottom? I’d like to run the boards vertical.
 

The Cobbler

Super Moderator
Staff member
Joined
Oct 24, 2013
Messages
26,001
Location
Niagara Region, Ontario, Canada
Gable ends are more difficult than doing a wall, not the greatest place to learn LOL
siding should not rely on caulking for weatherproofing, yes, it helps but you rely more on flashings etc for weatherproofing
I would probably use stainless steel staples if I were going to use cedar as you mentioned. no rust stains to worry about running down the boards . you'll have very little water hitting the tops of the boards
 
  • Like
Reactions: ive
To avoid these ads, REGISTER NOW!

Hank11

Well-known member
Joined
Aug 19, 2019
Messages
1,159
Location
Tennessee
Finish the cedar on all sides and edges before you put it up. Use primer made for cedar. For the transition from your new cedar to the soffit above, Make some trim boards from the siding you are using, about 1x2 nailed flat over the gap. Finish those all around as well.
 
  • Like
Reactions: ive
OP
I

ive

Well-known member
Joined
Mar 8, 2011
Messages
1,533
Location
Canada
Gable ends are more difficult than doing a wall, not the greatest place to learn LOL
siding should not rely on caulking for weatherproofing, yes, it helps but you rely more on flashings etc for weatherproofing
I would probably use stainless steel staples if I were going to use cedar as you mentioned. no rust stains to worry about running down the boards . you'll have very little water hitting the tops of the boards
Yes. Not a great place to learn. Lol.

Can I get away with galvanized staples?
 
OP
I

ive

Well-known member
Joined
Mar 8, 2011
Messages
1,533
Location
Canada
Finish the cedar on all sides and edges before you put it up. Use primer made for cedar. For the transition from your new cedar to the soffit above, Make some trim boards from the siding you are using, about 1x2 nailed flat over the gap. Finish those all around as well.
Thank you. I will finish the cedar.
 
OP
I

ive

Well-known member
Joined
Mar 8, 2011
Messages
1,533
Location
Canada
It is very easy! The making it actualy be waterproof is the tricky part. But by the looks of it this has a big over hang and is a tiny area. I say have at it.
Thank you for the confidence. Much appreciated.

The waterproofing is giving me quite a bit of anxiety.
 

The Cobbler

Super Moderator
Staff member
Joined
Oct 24, 2013
Messages
26,001
Location
Niagara Region, Ontario, Canada
Yes. Not a great place to learn. Lol.

Can I get away with galvanized staples?
I think so, but I would be afraid of them rusting & staining over time... maybe I'm out to lunch! LOL
I have some stainless 1/4 crown staples, I could probably send you off some strips strips . I can't recall the length, they might be 1-1/4
 
  • Like
Reactions: ive

CraigStu

Well-known member
Joined
May 22, 2014
Messages
4,062
Location
Blacksburg, Va
I'd go for the stainless. Just not worth it to try galvanized because they will be fine until they aren't. Then you get to do the job again.
 
  • Like
Reactions: ive
OP
I

ive

Well-known member
Joined
Mar 8, 2011
Messages
1,533
Location
Canada
I think so, but I would be afraid of them rusting & staining over time... maybe I'm out to lunch! LOL
I have some stainless 1/4 crown staples, I could probably send you off some strips strips . I can't recall the length, they might be 1-1/4
Thank you for the recommendation. However, I’ll buy my own, thank you for offering. Very kind of you.
 
OP
I

ive

Well-known member
Joined
Mar 8, 2011
Messages
1,533
Location
Canada
I’ve run it o another problem here before I have even started. I noticed that the right corner of the roof under the gable has a different slope to it. It’s higher than the other side.

I’m concerned that it will be more prevalent when I put the cedars up.

The area in question is under the line.

Any suggestions on how to make this less noticeable?

Much appreciated
 

Attachments

  • F13B80FF-7085-480C-8AAC-E9E9DD55D830.jpeg
    F13B80FF-7085-480C-8AAC-E9E9DD55D830.jpeg
    360.7 KB · Views: 63

Hank11

Well-known member
Joined
Aug 19, 2019
Messages
1,159
Location
Tennessee
You could fur out the low side to bring it into plane. To do this you might have to cut some long tapered pieces. A table saw with a taper jig might be a good tool for this.
 
  • Like
Reactions: ive

Skiff Builder

Well-known member
Joined
Jun 7, 2016
Messages
1,783
Location
Southern NJ Coast
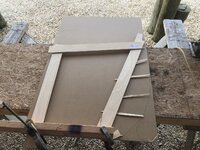
Your area to side is not huge, so here is the way this boatbuilder would side it -using vertical T&G: save a lot of up and down.
1.Make a pattern of the whole area to be sided:
Get a cheap sheet of thin plywood, rip a number of 3"wide by 8' long strips. Get a T-50 stapler, hot glue gun and a fine handsaw.
Go up and layout the strips to outline the whole gable. just overlap and hot glue them-use stapler to temporarily hold it on the wall. Glue on some W strips to hold the outlined shape.
2.Mark your vertical centerline on the pattern.
Can also mark stud locations if able
3. Cut 3/8 plywood to shape of your template.
Carefully take the pattern down to the ground
Trace and cutout shape.
Apply Tyvek to the plywood.
Mark centerline.
4. Nail/Staple your cedar onto the plywood- Keep it inline with your Vertical ref line!
If the fasteners poke through the back-ok -just bend them over-it's called "clinch nailing"-very secure.
5. Apply finish to siding.
6. Haul assembly up and fasten to existing sheathing
7. Trim


Patterning like this is easy and useful for so many building tasks.
Just remember not to bring the siding right down atop the roof shingles. Leave a gap as you have flashing there.
Going vertical will minimize the uneven roofline you mentioned.

Example pics of patterning from my boat project.
 

Attachments

  • IMG_1257.JPG
    IMG_1257.JPG
    331.5 KB · Views: 25
  • IMG_1258.JPG
    IMG_1258.JPG
    506.4 KB · Views: 15
  • IMG_1259.JPG
    IMG_1259.JPG
    205.5 KB · Views: 13
  • IMG_1247.JPG
    IMG_1247.JPG
    361.7 KB · Views: 11
  • IMG_1250.JPG
    IMG_1250.JPG
    326.1 KB · Views: 11
  • IMG_1254.JPG
    IMG_1254.JPG
    374.3 KB · Views: 40
  • Like
Reactions: ive
OP
I

ive

Well-known member
Joined
Mar 8, 2011
Messages
1,533
Location
Canada
You could fur out the low side to bring it into plane. To do this you might have to cut some long tapered pieces. A table saw with a taper jig might be a good tool for this.
Hi Hank. Thanks for the input. With doing this wouldn’t the taper be visible?
 
OP
I

ive

Well-known member
Joined
Mar 8, 2011
Messages
1,533
Location
Canada
Your area to side is not huge, so here is the way this boatbuilder would side it -using vertical T&G: save a lot of up and down.
1.Make a pattern of the whole area to be sided:
Get a cheap sheet of thin plywood, rip a number of 3"wide by 8' long strips. Get a T-50 stapler, hot glue gun and a fine handsaw.
Go up and layout the strips to outline the whole gable. just overlap and hot glue them-use stapler to temporarily hold it on the wall. Glue on some W strips to hold the outlined shape.
2.Mark your vertical centerline on the pattern.
Can also mark stud locations if able
3. Cut 3/8 plywood to shape of your template.
Carefully take the pattern down to the ground
Trace and cutout shape.
Apply Tyvek to the plywood.
Mark centerline.
4. Nail/Staple your cedar onto the plywood- Keep it inline with your Vertical ref line!
If the fasteners poke through the back-ok -just bend them over-it's called "clinch nailing"-very secure.
5. Apply finish to siding.
6. Haul assembly up and fasten to existing sheathing
7. Trim


Patterning like this is easy and useful for so many building tasks.
Just remember not to bring the siding right down atop the roof shingles. Leave a gap as you have flashing there.
Going vertical will minimize the uneven roofline you mentioned.

Example pics of patterning from my boat project.
Hi Skiff.

thanks so much for the steps. Much appreciated. Boat looks great. Happy sailing.
 

Hank11

Well-known member
Joined
Aug 19, 2019
Messages
1,159
Location
Tennessee
Hi Hank. Thanks for the input. With doing this wouldn’t the taper be visible?
Not if you make it flat and even with the surrounding area. Maybe I misunderstood the problem. Its hard to tell from your picture.

As far as installing the siding, make a pattern of the angle, then the short angle or heel of the next board is the same length as the long angle or toe of the preceding one. Make sure each board goes up with the bottom edge giving the same reveal at the bottom where it will overhang the flashing. The top won't matter so much because you are covering it up with trim.
 
OP
I

ive

Well-known member
Joined
Mar 8, 2011
Messages
1,533
Location
Canada
Not if you make it flat and even with the surrounding area. Maybe I misunderstood the problem. Its hard to tell from your picture.

As far as installing the siding, make a pattern of the angle, then the short angle or heel of the next board is the same length as the long angle or toe of the preceding one. Make sure each board goes up with the bottom edge giving the same reveal at the bottom where it will overhang the flashing. The top won't matter so much because you are covering it up with trim.
Hank, I’ll post better pics of the problem on the weekend. I’m ******* with work until then.

I like the idea of a pattern.
 
To avoid these ads, REGISTER NOW!
Top Bottom