To avoid these ads, REGISTER NOW!

Help with Snapon dust cap

76vette

Member
Joined
Apr 13, 2008
Messages
15
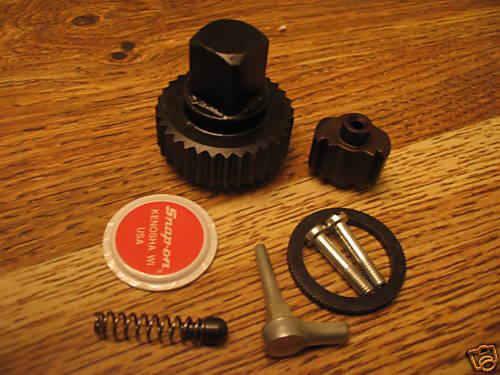
I got a rebuild kit for an older snapon ratchet - f117a if it makes a difference. I followed a youtube video and got the thing disassembled no problem, but when I was trying to put it back together i came across a bit of a snag. It looks like my version of the ratchet had the dustcover inset in the head. The videos I watched just had the dustcap pressed in from the inside of the ratchet. Mine has a recessed grove on the outside and I can't figure out how to press the cover in there. I'm guessing there's a special die or tool that will bend the edges of the cap enough to get it in the groove, but I haven't figured it out quite yet. Any help before I screw it up and have to order another one?

TsDdrRz.jpg
 
To avoid these ads, REGISTER NOW!

Wamsutta

Well-known member
Joined
Jan 8, 2014
Messages
10,871
Location
Amarillo, Texas
You need to pull the bushing out first, then the dust cover goes in from the inside. Bushing goes in after the dust cover from the inside.
 

Snaparxon

Well-known member
Joined
Aug 24, 2009
Messages
1,680
Location
Eastor
I believe that is a wear ring in the hole that needs to be knocked out, the kit should have a new one. Install the dust cap with the arrow facing the 12 o'clock position, then drive the new wear ring in with an extension inserted from the 6 or 12 point side of a 3/8" drive socket that the drive end is slightly larger than the wear ring.
 

Wamsutta

Well-known member
Joined
Jan 8, 2014
Messages
10,871
Location
Amarillo, Texas
The bushing is at the top left in this picture.

snap-tools-2-ratchet-repair-parts-gs_1_a3367aed9be3f70219f150ec48e03bc7.jpg


In this other picture, the two screws are sitting inside the bushing.

001.jpg
 
Last edited:
OP
7

76vette

Member
Joined
Apr 13, 2008
Messages
15
That seems to be exactly what it was gentlemen. Midnight here, but I just had to run out to the garage, and a few small taps with the dead blow on top of a socket and the ring popped right out. Thank you!
 
To avoid these ads, REGISTER NOW!

Jason280

Well-known member
Joined
Mar 4, 2012
Messages
3,160
They can be aggravating, I pushed mine out with a couple sockets and a large vise....and then getting the dust cover properly lined up can be a PITA. I'm not sure about that particular model, but you may also have to hammer/rivet the end of the selector back in place. They certainly aren't the most user friendly to rebuild, certainly far more complicated than more current ratchets.
 

Wamsutta

Well-known member
Joined
Jan 8, 2014
Messages
10,871
Location
Amarillo, Texas
They can be aggravating, I pushed mine out with a couple sockets and a large vise....and then getting the dust cover properly lined up can be a PITA. I'm not sure about that particular model, but you may also have to hammer/rivet the end of the selector back in place. They certainly aren't the most user friendly to rebuild, certainly far more complicated than more current ratchets.

The factory used a center punch of some kind; that's why you'll see a little dimple in the middle of the selector stem on ratchets that have never been rebuilt. All you need is a punch that hits hard enough to expand the selector stem. A heavy hitting automatic center punch like the Starrett 18C would probably do it.
 

David0858

Well-known member
Joined
Oct 30, 2016
Messages
201
Location
Tx
The factory used a center punch of some kind; that's why you'll see a little dimple in the middle of the selector stem on ratchets that have never been rebuilt. All you need is a punch that hits hard enough to expand the selector stem. A heavy hitting automatic center punch like the Starrett 18C would probably do it.

Well.... I wished I'd have thought about something like that when I rebuilt mine. Mine's riveted real good. :bounce:
 
To avoid these ads, REGISTER NOW!
Top Bottom