To avoid these ads, REGISTER NOW!

Help with tileing

nate379

Banned
Joined
Feb 2, 2009
Messages
7,279
Location
Palmer, AK
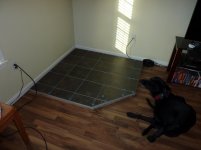
Base for a woodstove. Was going to make it aprox 2" tall. 54x54 with 1 corner dog eared.

I bought 2 sheets of 3/4" AC plywood (well 23/32", no such thing as 3/4" I guess?)

Now on top of that do I use "Durock" or "backerboard"? They had both at Lowe's. The Durock didn't seem to be all that flat.

What type of screws do I use (drywall screws?) and also they say to tape/thinset the seams, just normal drywall tape?

I have never done tile before. I refuse to pay $500 for a pre made stove pad when I will have around $150 into this one.
 
Last edited:
To avoid these ads, REGISTER NOW!

dipper

Well-known member
Joined
Jun 27, 2007
Messages
759
Location
Rochester, NY
i would use 1/4" hardibacker board, it is flat. they sell screws and mesh tape that are designed specifically for the backerboard. It should be available at Lowe's in the tiling section. I would thinset the backerboard to the plywood and screw it down in an 8" grid pattern, then tape all your joints and smooth out the joints with a putty knife. Let that dry for a day and then start out with your tile. I also would suggest mixing the thinset yourself and not using the pre-mixed "adhesive" that you can buy.
 

54FordPanel

Well-known member
Joined
Aug 7, 2009
Messages
5,711
Location
Fort 54, Littleton, Co
I would also build a really sturdy 2x4 base under that, and consider doubling up the 3/4" plywood. You can't make it too sturdy, especially under something heavy like a wood stove. The goal is ZERO flex.
Either DuroRock or Hardibacker works. They made special screws for the DuroRock, with a little bit bigger head than drywall screws.
 

lilredex

Well-known member
Joined
Apr 29, 2006
Messages
5,949
Location
Toronto
If it were my project, I'd be using a "mud" base and setting the tile at the same time. That way you'll have a solid, fireproof base that will out last you. You can also cheat and "thinset" the tiles after the base sets up. Tileing is easy.........the most difficult part is setting things up (patternwise) to look right. Get your Italian neighbour over to help. What?? No Italians where you are? Try here then.................http://www.johnbridge.com/how-to/deck-mud/
 
OP
N

nate379

Banned
Joined
Feb 2, 2009
Messages
7,279
Location
Palmer, AK
Yes the 3/4" ply is 2 layers to give me a height of ~1.5"

I would also build a really sturdy 2x4 base under that, and consider doubling up the 3/4" plywood. You can't make it too sturdy, especially under something heavy like a wood stove. The goal is ZERO flex.
Either DuroRock or Hardibacker works. They made special screws for the DuroRock, with a little bit bigger head than drywall screws.
 

tcianci

Well-known member
Joined
Feb 7, 2009
Messages
4,242
Location
Walpole, Ma
A single layer of the 3/4 should be enough since it is doubtful that you still won't be relying on the rigidity of the floor that you're installing the tiled unit on top of. Loosely translated... even if you make your base of 2 layers of 3/4 and you tile it and install it on top of a floor where there is not intimate contact between the floor and your tiled base, it will still flex and you may experience failure. A quick question. Why can't you tile directly on the floor where you will be placing the stove?

Moving on, if the plywood base you intend to use is nice and flat, you do not need to use thinset mortar under the Durock, in fact you don't even need the durock, but if you feel more comfortable with it, you can just put it down with roofing nails. Wonder board and Durock were around for quite a while before the specialized fasteners for them were. Nails worked just fine then, they still do. You can tape the joints on the tile backer with regular fiberglass drywall tape and lay it in as you install the tile, no need to mix up your mortar twice.

A lot of people believe that the construction of a base for a wood stove has some magical thermal characteristics involved. The most important feature of the base under a wood stove is that the surface is non combustible. It doesn't shield the floor from heat as such. In fact the coolest area around a working stove is the space under it.

Whether you use a backer board or not, be sure to use a good polymer modified thinset mortar. It has adhesive qualities far superior to basic thinset and it yields a more flexible bond.
 
OP
N

nate379

Banned
Joined
Feb 2, 2009
Messages
7,279
Location
Palmer, AK
Don't think I'm going to bother to glue the backerboard.

I have 2 layers of 3/4" plywood, PL Premium and screws on a 6" grid and then 7/16" Concrete board, 6" grid screws as well. The concrete board screws run through both layers of plywood as well.

I had to call the neighbor over to help me move it, it's about 150lbs and I haven't put the tile on it yet.
 

tcianci

Well-known member
Joined
Feb 7, 2009
Messages
4,242
Location
Walpole, Ma
Nate, I know guys are gonna laugh at me but that stack up you're going to use isn't as rigid as you might think. One good way to ensure that you don't have a problem later on down the road is to put that slab in place and leave it there a few days and then tile it in place. Remember that the ultimate function of this assembly will be it's ability to transfer the weight of itself and the installed wood stove to the frame of the building. If it can't do that you will have problems.
 
To avoid these ads, REGISTER NOW!

Treorp55

Well-known member
Joined
Feb 24, 2008
Messages
506
If it were me....i would not use hardibacker. I had to tear some tile out in my bathroom to move the toilet drain, and it scared me how easy it came up because the hardibacker's top layer just came up with it. In this situation, you want something that is going to last. I would thinset and screw the durock down. You will want to tape the seems and mud them, but you can tile right after that, you do not have to let the seam dry.
 

Treorp55

Well-known member
Joined
Feb 24, 2008
Messages
506
My best friend does tile for a living and will not use hardibacker. He told me not to in my bathroom, and not i understand why
 
OP
N

nate379

Banned
Joined
Feb 2, 2009
Messages
7,279
Location
Palmer, AK
Got it done last night.

It's not the best job in the world, but better than some "pro" jobs, so I guess I'd say fine for my first time.

I screwed up right off the get go and followed the instructions on the mortar mix. I thought that it was a bit dry, but figured they knew better than I did.

I put down 2 rows then it dawned on me that I should get a level and check it. Of course WAY off... and since the mortar was a bit dry it had already setup. Broke one of the tiles prying it up even.

The next batch I mixed it with 1/4 cup more water and it was perfect.

I'm not sure how much mortar normally gets used but I used almost a whole 25lb bag on about 20 sq/ft. Put it down on the concrete board and back buttered each tile.
I didn't know but I guess on the tiles just need to use the smooth side of the trowel, I used the notched side.

Going to let it sit until tomorrow and then grout it.

I have about $200 into it all said and done. To buy one it would have been right around $600, so I can live with it being not perfect!

Oh yeah, around the edge it will be trimmed out with some Alaska Red Birch which will match the trim my kitchen cupboards (kitchen and living room in one big area with vaulted ceiling)
 

Attachments

  • P1000318.jpg
    P1000318.jpg
    133.7 KB · Views: 22
  • P1000319.jpg
    P1000319.jpg
    134 KB · Views: 17
  • P1000320.jpg
    P1000320.jpg
    146.6 KB · Views: 17
Last edited:
OP
N

nate379

Banned
Joined
Feb 2, 2009
Messages
7,279
Location
Palmer, AK
Is this showing up for anyone else or just me? You guys damn near get chubs in your pants when Jack posts projects... but I do and it's crickets.... :confused::lol_hitti
 

Dustoff

Active member
Joined
Aug 23, 2010
Messages
26
Location
Kentucky
Nate,

I got some chubby crickets:bounce:...will those work?

I think it turned out great...I would not be able to throw down $600 for a stand either.

Shaun
 
OP
N

nate379

Banned
Joined
Feb 2, 2009
Messages
7,279
Location
Palmer, AK
Got it all done last night. Grouting was cake compared to setting the tile. Only thing is the grout turned out lighter than it was supposed to. It was supposed to be a dark grey and it's more the color of concrete.
I am going to get some sealer and I think that will darken it up.

Sorry no pics, doesn't seem like anyone really cares so I'm not going to waste my time loading them (take a long time, I have DSL that is about dial up speed)
 

tcianci

Well-known member
Joined
Feb 7, 2009
Messages
4,242
Location
Walpole, Ma
If you had continued to read the back of the mortar bag, you would have found reccomendations for the notch size of the trowel to use based on the tile size and the profile of the back of your tiles. You would have also seen the chart with the aproximate square footage of coverage you can expect for your type of installation.
 
To avoid these ads, REGISTER NOW!
Top Bottom