To avoid these ads, REGISTER NOW!

Heron Sculpture update:

Tyler2

Member
Joined
Jan 16, 2016
Messages
18
Location
Wilmington, NC
I am so sorry for my taking so long to post new images. It's just that what I do and my tecnique of fabrication, takes me some time to do... But I have posted some new pictures of the wings from the beginning start to the 95% completed wing one of two. This is just a very involved piece - But I hope you like the photos - Thanx, Paul b.
 

Attachments

  • chalk sketch wing.jpg
    chalk sketch wing.jpg
    63.8 KB · Views: 174
  • begin 2 wings.jpg
    begin 2 wings.jpg
    65.2 KB · Views: 167
  • wing 1.jpg
    wing 1.jpg
    47.6 KB · Views: 149
  • wing 2.jpg
    wing 2.jpg
    50.4 KB · Views: 144
  • wing 4.jpg
    wing 4.jpg
    56.5 KB · Views: 143
  • started wings on Heron.jpg
    started wings on Heron.jpg
    53.4 KB · Views: 225
  • new wing on Heron.jpg
    new wing on Heron.jpg
    49.6 KB · Views: 256
To avoid these ads, REGISTER NOW!

BD1

Well-known member
Joined
Mar 18, 2007
Messages
4,602
Location
north side
That is awesome ! You must have great patience and a real eye to get that in perspective . I do silverware art and am thinking of maybe a eagle , hawk, or owl. I gotta get lots of silverware.
What weld process do you use ? Looks like mig.
 

drivesitfar

Well-known member
Joined
Oct 23, 2013
Messages
35,991
Location
Pacific Northwest
Paul, first off don't apologize and we are all grateful for any pictures of your awesome talent you want to share. if you want to post up more of the type of welding rod, materials and techniques then some of the welders might have more interest or ideas to share. or if you have any questions just ask. there is a lot of talent on this forum and you sir have just added a lot more.

NICELY DONE
 
OP
T

Tyler2

Member
Joined
Jan 16, 2016
Messages
18
Location
Wilmington, NC
Yes, it is MIG welding. I use a Miller 212. I began with the Miller 175, but found I needed a little more juice and the 212 has been a dream to work! I also have a Hypertherm 65 I use for all my cutting. This project is being made from Corten (weathering steel), which I love to work. It will form its own protective rust-colored surface and need no other surface treatment and will remain in that state for decades without damage. Corten also has its own mig wire that I use. I'm welding with 75/25 argon mix for the Corten.

All of the steel I cut is hand-bent and formed. I have a 6"x 6"x 2-foot long chunk of wood that I have chiseled out various forms that I use to pound the steel to my desired shape. Use of heat w/oxy-acetylene is used a great deal to the bending and shaping of steel. I have one shelf in the studio that has nothing but pieces/parts of found objects that I use to help me shape and form the bends I need. This has been one of the best ways I have found to make strange bends and shapes I need.

I most always have to use my oxy/acetylene torch to form the acute bends in the feathers as they are attached, as this gives the wing a more authentic idea/form to the overall feel I try to represent.

Please feel free to ask questions about anything - I am not quite sure what you would like to know and do want to be able to describe accurately to you what I am doing and how certain processes are done. Thanx again to All
 
To avoid these ads, REGISTER NOW!

Tunajoe

Well-known member
Joined
Jun 10, 2013
Messages
359
Location
Ventura County
Are you free handing the plasma cutting?
Love this sort of thing.
I wish i had the skill and knowledge to do this sort of art.
Are you self taught?
 

drivesitfar

Well-known member
Joined
Oct 23, 2013
Messages
35,991
Location
Pacific Northwest
Paul: since i don't weld (yet) it's hard for me to say what i'd want to know, but the stuff you described was amazing. anything you want to share I'm sure all of us would be grateful.

i was thinking of buying a Miller 211 and you say you own a 212. do you know the difference or is the 211 just a newer model of the 212.


again thanks for sharing your amazing talent with us and feel free to share more pictures of your cool ideas, tools and projects when you are able.
 

Jeff95TA

Well-known member
Joined
Aug 11, 2008
Messages
886
Location
Pittsburgh, PA
I would say I'm creative, but certainly not artistic. When I see things like this and what's on your website, I can't fathom how you even start something like these. Very nice.
 
OP
T

Tyler2

Member
Joined
Jan 16, 2016
Messages
18
Location
Wilmington, NC
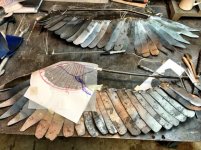
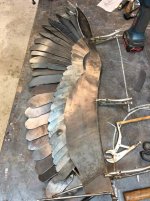
Hey Guys - Just read some of your questions this morning... I'll answer those in this message: Concerning the plasma cutter, everything I cut is free-hand. For my shapes, I will sketch out on paper what I want to cut out; take that paper sketch and spray glue the paper to a heavy card stock paper; cut that card stock, transferred image and trace that shape onto my steel; from that marker image, I will cut out the traced piece and hand form that cut-out piece to fit. I have to do this with each shape I use in my work which is why these pieces take so long, as well as, I am pretty picky about how good of a job I did cutting, so I may have to do it again until I like what I cut. 99% of the time I am close enough to use the piece, as I can grind to shape what portion I do not like... But this is the basic process I use in sculpting.

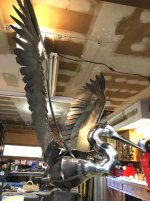
I have been an artist all my life. Mostly doing design work, magazine and editorial illustration. Have also painted in acrylics on stretched canvas - these canvas works were large pieces, usually around 5 or 6 feet stretched. Some work got into some museum shows. But about 15 years ago I started sculpting with thin, hand-cut steel and used rivets to hold the work together. I enjoyed that for a while, but after a few years, my hands and forearms became quite tired cutting and drilling and riveting. So that's when I began to use a welder. So I guess you could say that I am self-taught with my welding and plasma cutting. Just sorta jumped in and went for it!

The welder I use is the Miller 212. What's really cool about the 212 is that it has an auto-set feature where you set one dial to the wire size you are using - .030 or .035, and you set the then you set the other dial to the gauge steel you are using and the welder accommodates to that setting very good. You also have the choice to go full manual, but the auto portion works pretty efficiently. I can also weld aluminum with the 212, but I do not have a spool gun. The 212 is a 220 volt unit with a higher duty cycle than the 211
Both units will weld 3/8" easily. The 212 has dual feed rollers as opposed to one on the 211. Also has "gun-on-demand", but I only have the mig gun, so I do not use that feature. I have been very happy with the purchase, altho it is very heavy.

Hope my explanations are answering your questions? Thanx for asking as I enjoy sharing what I do and do hope it helps you guys. Please feel free to ask whatever else you have on your mind and I will do my best to explain. Will also post up more images as they become available to shoot. Thanx to All...paulb
 

drivesitfar

Well-known member
Joined
Oct 23, 2013
Messages
35,991
Location
Pacific Northwest
Paul: great post again and thanks for the 411 on the Miller 212 vs. the Miller 211. i thought the 211 does have a 220 option, but maybe since the 212 was built with only 220 that it might be a little more stout as you mention.

feel free to post more pictures as you have time because there are a ton of welding threads, but not any of them have the things you are making that i know of.

also since you might not be aware of all the safety issues with grinders and some of the tools this graphic video i saw and started a thread on might help you from getting hurt. i was almost 60 before joining this forum and i used my bench grinder usually without safety glasses and had no clue you shouldn't grind aluminum on the stone wheels. or that a stone could explode and put a hole through you.

you might know all the safety tips, but in case you might not here's the link for you and others reading your thread.

http://www.garagejournal.com/forum/showthread.php?t=263083&highlight=grinder+safety+101

again thanks for sharing your talent with us.
 

Steevo

Well-known member
Joined
Aug 18, 2009
Messages
8,738
Location
43.49600, -112.04300
Paul,
Wonderful work you do. I thoroughly enjoyed poring over the pictures of your sculptures in the link Tunajoe posted. You are an extremely talented and creative individual, and I am awestruck by many of your works.

Thank you for sharing with us here.
 

TimeWarpF100

Well-known member
Joined
Aug 21, 2010
Messages
6,784
Location
not here
I am so sorry for my taking so long to post new images. It's just that what I do and my tecnique of fabrication, takes me some time to do... But I have posted some new pictures of the wings from the beginning start to the 95% completed wing one of two. This is just a very involved piece - But I hope you like the photos - Thanx, Paul b.

Very nice work! Thanks for sharing what you do.
 

TimeWarpF100

Well-known member
Joined
Aug 21, 2010
Messages
6,784
Location
not here
I just looked at all the pics on webpage. I was completely blown away by the work!

Simply in Awe . . NICE!
 

drivesitfar

Well-known member
Joined
Oct 23, 2013
Messages
35,991
Location
Pacific Northwest
Tyler: guessing you got busy and forgot about us. hope you are ok and any chance you can continue to post up more of your cool STUFF/ART/GEMS/MASTERPIECES??

thanks in advance and hope you are doing well and didn't stop cause of health reasons.

cheers
 
To avoid these ads, REGISTER NOW!
Top Bottom