evintho
Well-known member
I finally got around to modding my HF 90lb pressure sandblaster. I got tired of blasting for 2 minutes then spending 30 minutes unclogging everything! I wound up replacing the feed assembly and modding the nozzle too. A few $$ in hardware store parts and a Saturday afternoon later and this thing is right up there with some of the $400 blasters!
Here's the beast in question. I don't think HF even sells the 90lb unit anymore. Couldn't find it on their website.

First I removed the original feed assembly underneath the tank then hit the local Home Depot plumbing department for everything I needed and put it all together. Below is the list of parts.
A - 1/2" MIP x 3/8" MIP
B - 1/2" ball valve
C - 1/2" x close ******
D - 1/2" MIP x 1/2" barbed fitting
E - 1/2" galvanized Tee
F - 1/2" galvanized 45*
G - 1/2" MIP x 3/8" MIP
H - 3/8" brass coupling
The red and black hoses are original equipment.

So, I basically upgraded from 3/8" to 1/2" but there's really more to it than that. Here's a pic of the old feed assembly next to the new one. In the 2nd pic, note the size of the hole the media flows through! That's the choke point where all the clogging tended to be! With the 1/2" plumbing fittings, the hole is 3 times that size! No more clogging!!


Be aware the 'made in china' POS has metric threads at the bottom of the tank but the MIP brass fittings are soft so wrap them with teflon tape and they'll screw nice and tightly into the steel metric boss.
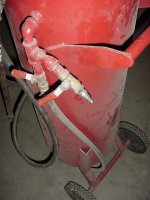
Because the new feed assembly sits lower than the original, I had to extend the legs to raise the unit up about 3". I still need to throw some paint on 'em.


Holding the deadman handle down while blasting is a real PITA! Simple fix. Drive the rollpin out and remove the deadman handle. Back down to HD for a 3/8" x close ****** and a 3/8" ball valve. It makes it soooo much easier to handle now!

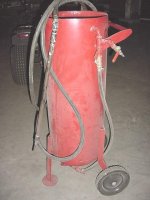
Here it is in all it's splendored glory!

One thing I've learned...........forget about using sand! Not only will it kill ya but it just doesn't do a very good job. I used to buy the $4 - 50lb bags at HD. Now I drive up the road and pick up 50 lb bags of Black Diamond blasting media at Tractor Supply Co. They cost twice as much but do 3 times a better job than sand! 1 bag of Black Diamond will do the same job as 3 bags of sand! So really, you're saving money and it works much faster! Win, win!
I've found it best to crack the media feed ball valve handle about 1/4 of the way open. Open the air handles all the way. I use an I/R 5hp compressor with a water trap 5' downstream. I also fabbed this setup to help keep the air dry. I screw this to the side of my toolshed when I'm blasting outside. Combine that with the water trap that comes with the blaster and I have clean dry air!

Today I blasted 4 wheels, a complete rearend housing and various suspension components. Took me about an hour and the blaster didn't clog once!! Mission accomplished!
Here's the beast in question. I don't think HF even sells the 90lb unit anymore. Couldn't find it on their website.
First I removed the original feed assembly underneath the tank then hit the local Home Depot plumbing department for everything I needed and put it all together. Below is the list of parts.
A - 1/2" MIP x 3/8" MIP
B - 1/2" ball valve
C - 1/2" x close ******
D - 1/2" MIP x 1/2" barbed fitting
E - 1/2" galvanized Tee
F - 1/2" galvanized 45*
G - 1/2" MIP x 3/8" MIP
H - 3/8" brass coupling
The red and black hoses are original equipment.
So, I basically upgraded from 3/8" to 1/2" but there's really more to it than that. Here's a pic of the old feed assembly next to the new one. In the 2nd pic, note the size of the hole the media flows through! That's the choke point where all the clogging tended to be! With the 1/2" plumbing fittings, the hole is 3 times that size! No more clogging!!
Be aware the 'made in china' POS has metric threads at the bottom of the tank but the MIP brass fittings are soft so wrap them with teflon tape and they'll screw nice and tightly into the steel metric boss.
Because the new feed assembly sits lower than the original, I had to extend the legs to raise the unit up about 3". I still need to throw some paint on 'em.
Holding the deadman handle down while blasting is a real PITA! Simple fix. Drive the rollpin out and remove the deadman handle. Back down to HD for a 3/8" x close ****** and a 3/8" ball valve. It makes it soooo much easier to handle now!
Here it is in all it's splendored glory!
One thing I've learned...........forget about using sand! Not only will it kill ya but it just doesn't do a very good job. I used to buy the $4 - 50lb bags at HD. Now I drive up the road and pick up 50 lb bags of Black Diamond blasting media at Tractor Supply Co. They cost twice as much but do 3 times a better job than sand! 1 bag of Black Diamond will do the same job as 3 bags of sand! So really, you're saving money and it works much faster! Win, win!
I've found it best to crack the media feed ball valve handle about 1/4 of the way open. Open the air handles all the way. I use an I/R 5hp compressor with a water trap 5' downstream. I also fabbed this setup to help keep the air dry. I screw this to the side of my toolshed when I'm blasting outside. Combine that with the water trap that comes with the blaster and I have clean dry air!
Today I blasted 4 wheels, a complete rearend housing and various suspension components. Took me about an hour and the blaster didn't clog once!! Mission accomplished!
Last edited:
")