someguy123
Member
- Joined
- Feb 4, 2013
- Messages
- 14
Great idea!! You pick up the pucks off E-Bay pretty cheap too...
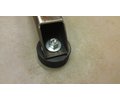
What kind of bolt heads are those ? I don't think I've ever seen them before.


Great idea!! You pick up the pucks off E-Bay pretty cheap too...


I'm trying to figure out exactly how you did those too!
Here's the last set I made for my compressor:
...snip....

I milled out a recess in the bottom of the puck just larger than the head of the bolt, then drilled a through hole the same diameter as the shank. For this project I didn't make them adjustable so I just bolted them right to the frame. To make them adjustable you'd just need to put a fender washer on top of the puck and thread a nut down onto it.
I got the pucks at Dicks Sporting Goods, $15 for 12 pucks.
Awesome thread OP! And I was wondering the same as above, if there is an industrial lazy susan cabinet.
Below is a pic of one in white, and the purple one is what my dad calls "An Efficient Jane". I found no mention of "Efficient Jane" online, so maybe it is his age/wisdom speaking, but I think both could be built fairly easy if you have fab skills. I will do something like this when I blatantly copy the OPs idea one day.
The swivels are made here in Manitoba. Definitely high end pricing, and funny enough, no one sells them locally. Strange.


I can't seem top see any of Steevo's pictures!!!! The work bench sounds awesome but I can't see them..UGH!!!!
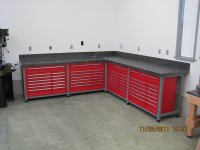
Here's a picture of Steevo's final product. Can you see the picture?I can't seem top see any of Steevo's pictures!!!! The work bench sounds awesome but I can't see them..UGH!!!!
You know you have inspired a pile of people with this workbench when the thread continues to go on this long!


what an awesome bench.... So i got myself a welder just to build this bench and think i got the basics down... If i can't weld too pretty i'll for sure get really good at grinding... So i plan on making a smaller version two cabinets with a hole in between to push in a chair... I am a little scared to take off the wheels and make it one long bench cause i don't know how long i will be in this house so i probably should keep it on wheels to make it easier to move then when i get my own house then i can take the wheels off and do more of a permimate setup and also add the fun air lines and 1000pound strong hold cabinets etc. So the question is do i try to cut up my current bench to fit the hf bench under it? Or start from scratch.

I don't think your benchtop is long-enough.
72" - 44" - (2" * 3 legs' width) - (2 * 2" overhang) = 18" left for your stool. Is that going to be enough to put your legs under?Yeah it's only 6 feet long so I was thinking of taking the middle support out and move it over to the 44in mark and putting one of the 44 HF under it then maybe box a second one with a metal top for welding etc...
72" - 44" - (2" * 3 legs' width) - (2 * 2" overhang) = 18" left for your stool. Is that going to be enough to put your legs under?
I might have missed it in an early thread....but how do you attach the core top to the metal rails? I'm guessing maybe the metal top gets welded to the rails so the wood is just a good filler? Sorry I am new to all this fabrication stuff and the more details the easier it is to recreate this master piece.
Thanks!
The wood door slabs are screwed to the front and rear angle iron rails from underneath.
The steel top is held down by the bolts for the vise that go through both the top and the doors and angle iron underneath, clamping down the steel top.


How about using spacers made from plate steel.Looking for some quick feedback from the smart kids.... (Quick background about me I am new to a lot of this fun stuff but have found this website and its been insipiring to take on as much DIY'ering as I can... And to do that I need a sweet garage)
So here's my question I borrowed Stevo's HF bench plans and did some terrible calculations... And it looks like the bench top is off by almost a half of an inch to make it flush with the frame... I think I can hammer the lip part sticking out down and over or even grind it flush or when i weld the front angle lip on i could have it raised a little... or I could start from scratch... Any other ideas welcomed...

Dennis93 I have to ask... are you by any chance my neighbor from across the street under a fake name??? Cause he came over and said the same thing (several times)... And he also suggested adding a kick plate in front of the casters if I wanted to hide them... I guess I just really like the idea of building a bench that is really solid and that i could stand on and set a motor on... But the more I learn to weld the more i am learning the need to clamp "the work" (recently learned that lingo) at crazy angles makes me rethink adding a metal top to this bench cause I'll prob end up making a dedicated welding table, since all the sparks keep cratering my pretty wood butcher block.I have the weirdest question in the world. Why go through all the expense and trouble of making those chests into a cabinet on stands. Why not simply leave them on their casters and put a top on it? That way if you ever need to move it you can lift the top off with a bunch of friends and roll the cabs away. Or even better roll the whole thing away. I just don't see the point of taking it off casters.
Im sure I'm missing something. But nice work not bashing it at all!
Hahaha... It's funny cause I was playing around adding some washers and some nuts and some thick bolts to fabricate some spacers... I guess I could just cut some 1/2 inch square tubing on each corner and weld them... But I kind of like the idea of the bench top supported evenly across the frame instead of little 1/2 spacers... Keep in mind I have no clue what I am talking about regarding metal working or structural engineering... But seriously thanks for the feedback!How about using spacers made from plate steel.
I have the weirdest question in the world. Why go through all the expense and trouble of making those chests into a cabinet on stands. Why not simply leave them on their casters and put a top on it? That way if you ever need to move it you can lift the top off with a bunch of friends and roll the cabs away. Or even better roll the whole thing away. I just don't see the point of taking it off casters.
Im sure I'm missing something. But nice work not bashing it at all!
Dennis93 I have to ask... are you by any chance my neighbor from across the street under a fake name???

Looking for some quick feedback from the smart kids.... (Quick background about me I am new to a lot of this fun stuff but have found this website and its been insipiring to take on as much DIY'ering as I can... And to do that I need a sweet garage)
So here's my question I borrowed Stevo's HF bench plans and did some terrible calculations... And it looks like the bench top is off by almost a half of an inch to make it flush with the frame... I think I can hammer the lip part sticking out down and over or even grind it flush or when i weld the front angle lip on i could have it raised a little... or I could start from scratch... Any other ideas welcomed...